How to Export and Import WooCommerce Orders
Are you looking to export and import WooCommerce orders from one site to another?
Migrating a WooCommerce store can be a challenging task, especially when you have a large volume of order history that you don’t want to lose.
In this article, we will guide you on how to seamlessly export and import woocommerce orders using the WP All Export and WP All Import plugins.
Table of Contents
How to Export and Import WooCommerce Orders Using WP All Import and WP All Export
Despite its extensive functionality, WooCommerce does not include built-in features for exporting or importing orders. This leaves you to use a third-party plugin for this task.
There are many third-party plugins available, but they are often limited to just exporting orders or are incapable of handling the export/import of complex orders with custom field data.
This is where WP All Export and WP All Import plugins come in. Both plugins work seamlessly together to provide a comprehensive solution that allows you to manage every aspect of exporting and importing orders, no matter how complex.
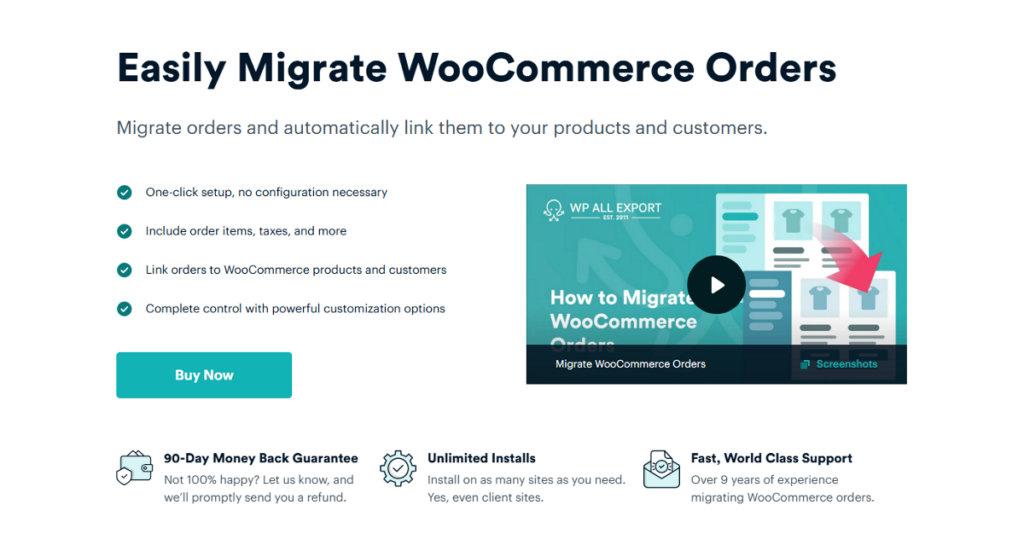
Both plugins feature an intuitive, user-friendly wizard that breaks down the export and import process into a few simple steps. They are also powerful and include features such as:
- Full support for all order data, including order items, taxes, custom fields, and more.
- Migrate large amounts of order data without slowing down your website.
- Powerful filter rules to select exactly which WooCommerce orders to include in your migration.
Step-by-Step: How to Export WooCommerce Orders for Migration
The first step in the migration process is to export your WooCommerce orders. For this, we will use the WP All Export plugin.
1. Install WP All Export and Its WooCommerce Export Add-On
To get started, download the core WP All Export plugin and the WooCommerce Export Order add-on from the WP All Import website. Then, log in to the WordPress dashboard on your source website and install both the plugin and the add-on.
If you don’t have access to the premium version of these plugins but want to test how the whole process works, you can create a free online sandbox from the WP All Import website. Just choose the WooCommerce Store option and click Create Sandbox.
2. Start a New WooCommerce Order Export and Filter the Order Data
Navigate to All Export > New Export in the WordPress main menu and select WooCommerce Orders as the export type.
WP All Export will scan your database and display the total number of orders available for export.
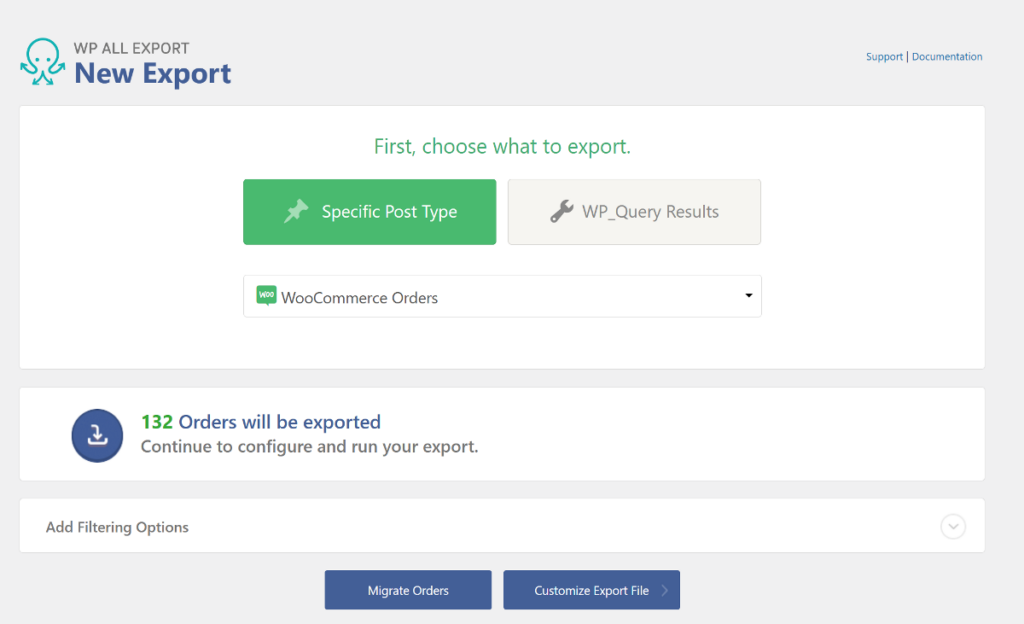
If you want to migrate all orders from the source website as they are, click the Migrate Orders button at the bottom to skip to the final step.
If you prefer to customize the order data before exporting, follow the steps below.
WP All Export offers a powerful filtering option that lets you apply multiple rules to select exactly which orders to include in the export. This is extremely useful if you only want to migrate specific orders to the new website.
On the same page, expand the Add Filtering Options panel near the bottom.
For each rule, you need to define three components: Element, Rule, and Value. For Element and Rule, click the box to select your choice from the dropdown menu. In the final field, enter the value you want to filter your orders by.

After you’ve added all three components, your filter should look like this.
Then, click the blue Customize Export File button at the bottom to proceed to the next step.
3. Select Your WooCommerce Order Export Fields and Change File Type
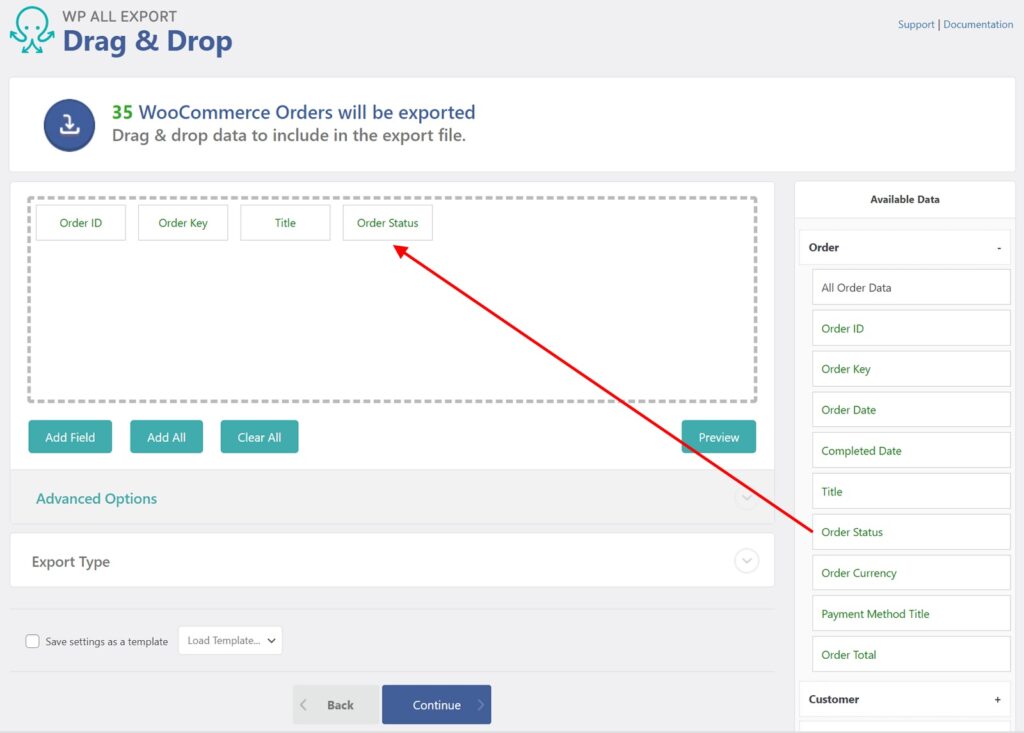
When exporting WooCommerce orders, most users do not need all the order data fields. WP All Export provides a simple Drag & Drop interface to let you select a subset of these fields. The available order tables and fields are displayed in the Available Data section on the right.
To export a field, drag it into the column selection area. For example, here, we have expanded the Order panel on the right and dragged the Order Status field into the column selection area.
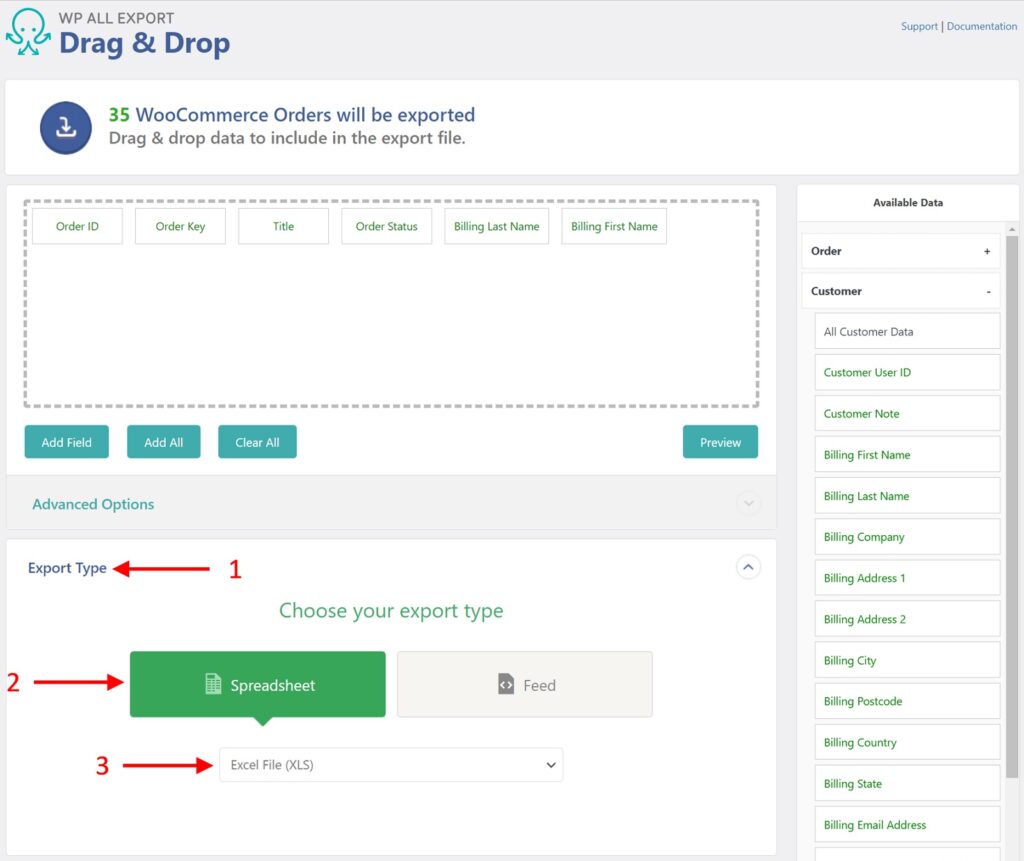
Similarly, we have expanded the Customer panel on the right and dragged the Billing Last Name and Billing First Name fields into the column selection area.

If you accidentally add a field, simply drag it from the column selection area and drop it elsewhere.
WP All Export allows you to select fields from various order-related categories, including:
- WooCommerce Order Data
- WooCommerce Customer Data
- WooCommerce Order Items
- Order Taxes & Shipping
- Order Fees & Discounts
- Order Notes
- Order Refunds
- WooCommerce Order Custom Fields
- All other WooCommerce order fields
By default, WP All Export provides the order data in a CSV file, but you can easily change this to Excel or XML format.
On the same Drag & Drop screen, expand the Export Type panel and choose between spreadsheet and feed format.
The spreadsheet option lets you choose between CSV, Excel XLS, and Excel XLSX formats, while the feed option allows you to export in Simple and Custom XML formats.
If you choose a custom feed, you can make this feed as sophisticated as you require.
Once you’ve added all the necessary fields and selected your preferred file format, click the Continue button at the bottom to move to the next step.
4. Download the WooCommerce Order Export File
After setting up your order export, click Continue, then verify the export settings. To run the export, click Confirm & Run Export. You can then click either the CSV or Bundle button in the “Click to Download” section.
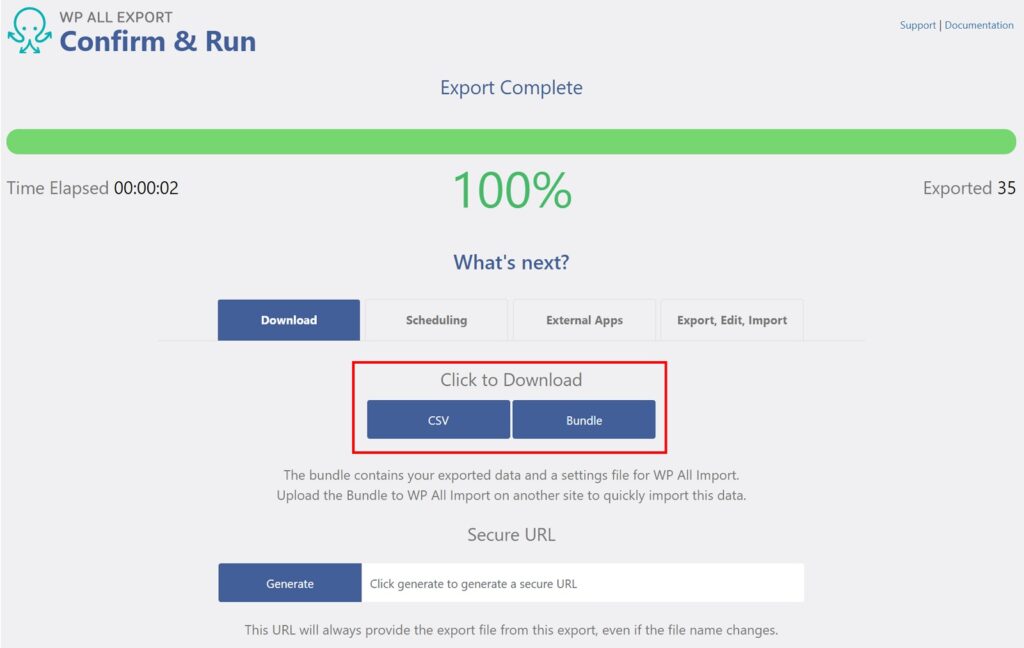
The bundle file contains both a CSV file and a template that helps WP All Import automatically import the CSV file. This makes migrating orders from one site to another quick and easy.
And that’s it! A basic WooCommerce order export couldn’t be any easier!
WP All Export Advanced WooCommerce Order Export Features
WP All Export includes several powerful advanced order export options that allow you to customize order fields or modify the data on the fly. Let’s explore these features now.
These features require the Pro version of the plugins. In case you do not have these versions, you can try our online sandbox or see the screenshots below to get an idea of how they work.
Combine Order Export Columns or Create Custom Columns Using PHP
In the Drag & Drop interface, click the Add Field button.
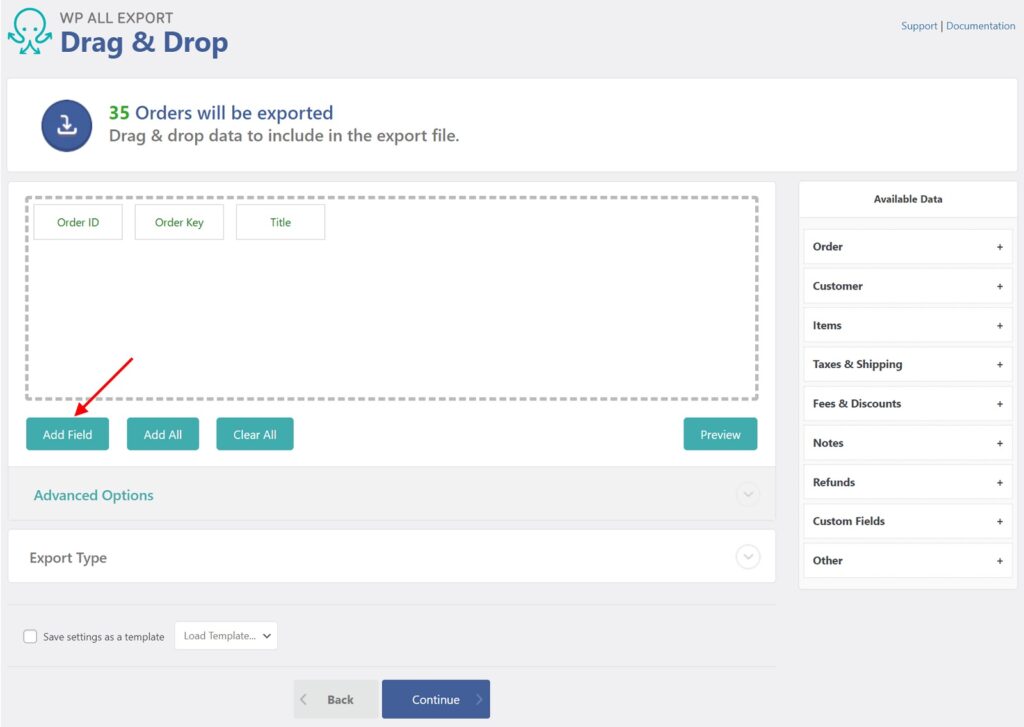
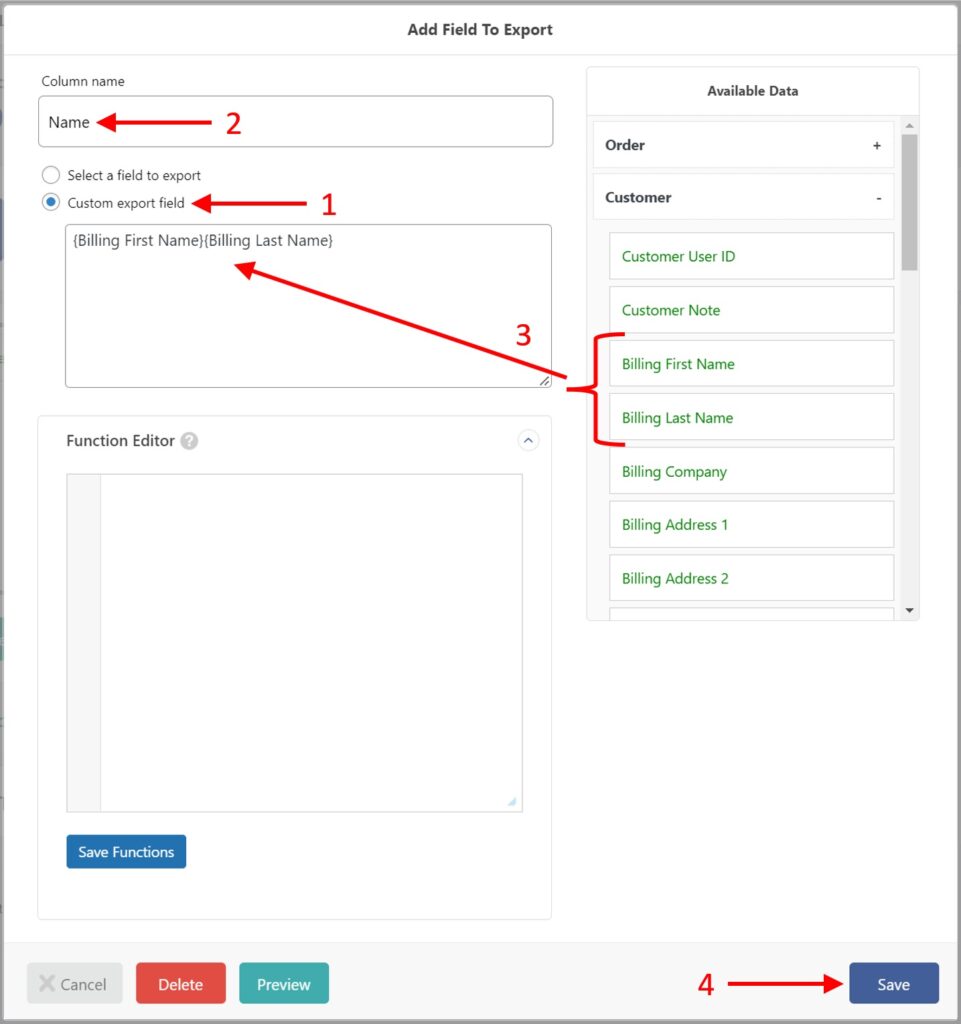
This allows you to create custom order export columns. You can either combine order fields or use the PHP editor to modify the data.
For example, we have used the drag & drop selector to combine the Billing First Name and Billing Last Name fields into a custom column called “Name.”
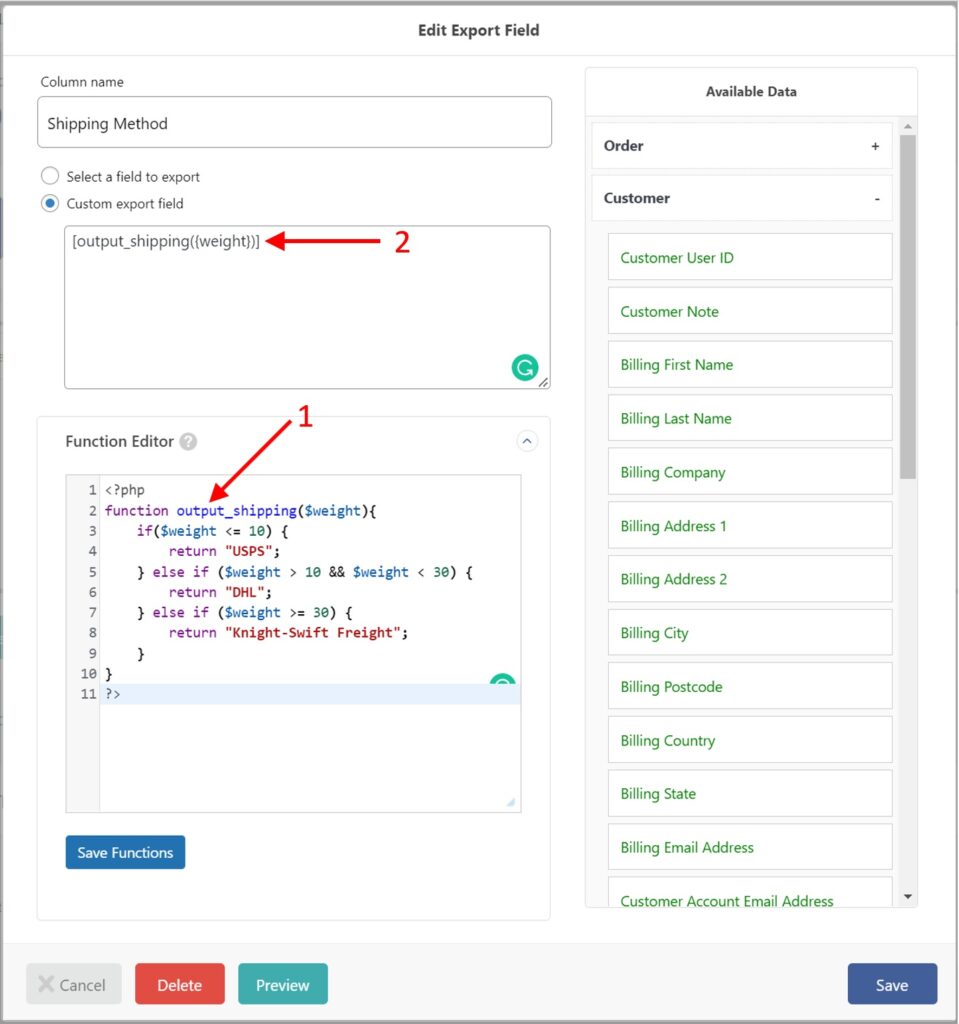
That’s a simple custom field. To create a more complex field, you can use the Function Editor to define your field using PHP. Here’s an example function:
function output_shipping($weight){

   if($weight <= 10) {
     return "USPS";
   } else if ($weight > 10 && $weight < 30) {
     return "DHL";
   } else if ($weight >= 30) {
     return "Knight-Swift Freight";
   }

}
Then just refer to the function in the Custom export field box, like this:
It is a testament to WP All Export that we have barely scratched the surface of its WooCommerce order export capabilities. It includes other advanced features such as:
- Use WP_Query to create queries that can’t be created any other way, at least not efficiently
- Using WPML to export your orders in different languages.
- Automatically schedule your WooComerce order exports
- Splitting large order exports into different batches and files.
- Integrating with Zapier to send WooCommerce order exports to thousands of external apps.
That’s it! You’ve successfully exported your WooCommerce orders, which can now be imported to another website. Let’s now look at the import side of the process.
Step-by-Step: How to Import WooCommerce Orders for Migration
Just like exporting orders, WooCommerce does not have a built-in feature to import orders. Your only choice is to use a third-party plugin.
WP All Import is a powerful plugin that lets you import all kinds of WordPress and WooCommerce data without any limitations. When paired with WP All Export, it allows you to migrate data from one WooCommerce website to another in just a few clicks.
Another advantage of this plugin is that every import step follows the same basic model and procedure as the WP All Export process. This means that you only have to pay for one plugin and learn one basic process for both exporting and importing data.
Now that we know a bit about the WP All Import plugin, let’s look at how to import the orders that we just exported using WP All Export.
1. Install WP All Import and Its WooCommerce Import Add-On
To get started with the order import process, you’ll need the core WP All Import plugin and the WooCommerce Import Add-On Pro plugin. Download both the plugin and the add-on, and install them on your website.
If you don’t have access to these plugins, you can use this free online sandbox. Just choose the WooCommerce Store option and click Create Sandbox.
2. Start a New WooCommerce Order Import
Navigate to All Import > New Import in the WordPress main menu. WP All Import provides three ways to import the order data file: you can either upload the file, download it from a URL, or use an existing file on your server.

After you upload the file, select New Items and choose WooCommerce Orders as the target data type.
Once you’ve configured everything, click Continue to Step 2.
3. Review the Uploaded WooCommerce Order Import File
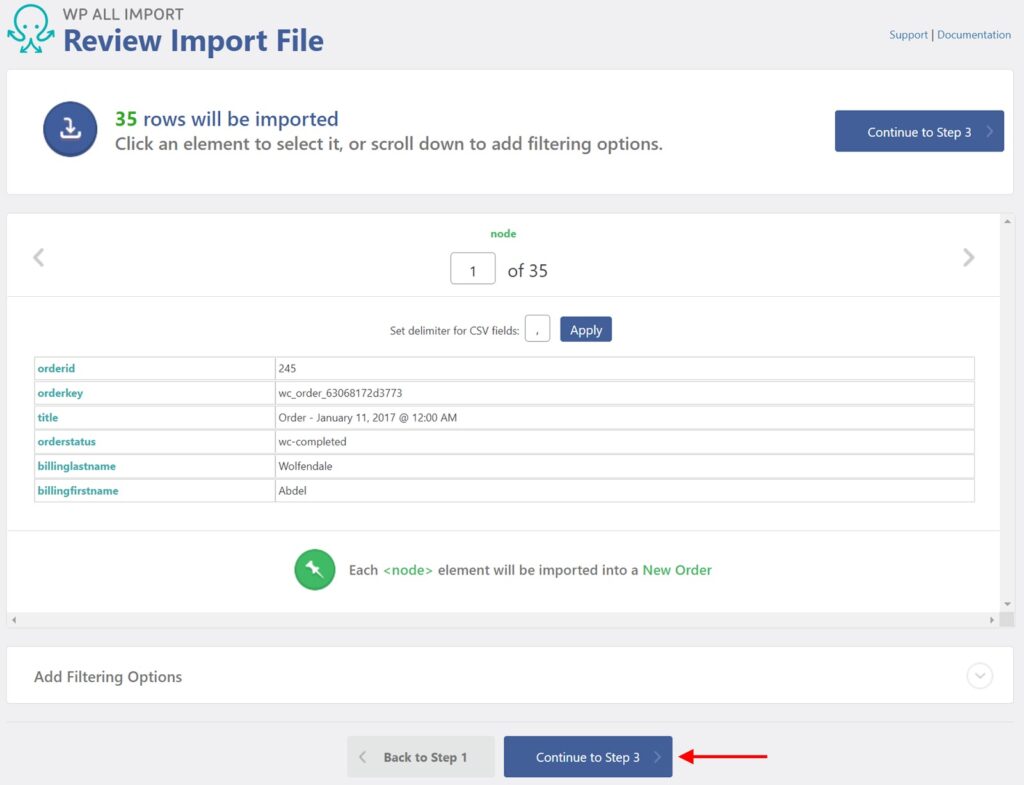
This screen allows you to check whether the order import file has been correctly parsed. If not, go back to Step 1, fix any issues with your file, and then try again.
If everything looks okay, click Continue to Step 3.
Note, you can also add order import filters here by expanding the Add Filtering Options panel, but we cover this topic in the later part of this tutorial
4. Map the Incoming Data to WooCommerce Order Fields
The Drag & Drop interface will now appear. This is where you map the incoming data elements to the WooCommerce order fields. To do this, simply drag the data elements from the panel on the right to the target fields on the left. For example, in this case, we’re trying to populate the Order Status field in the Order Details section.
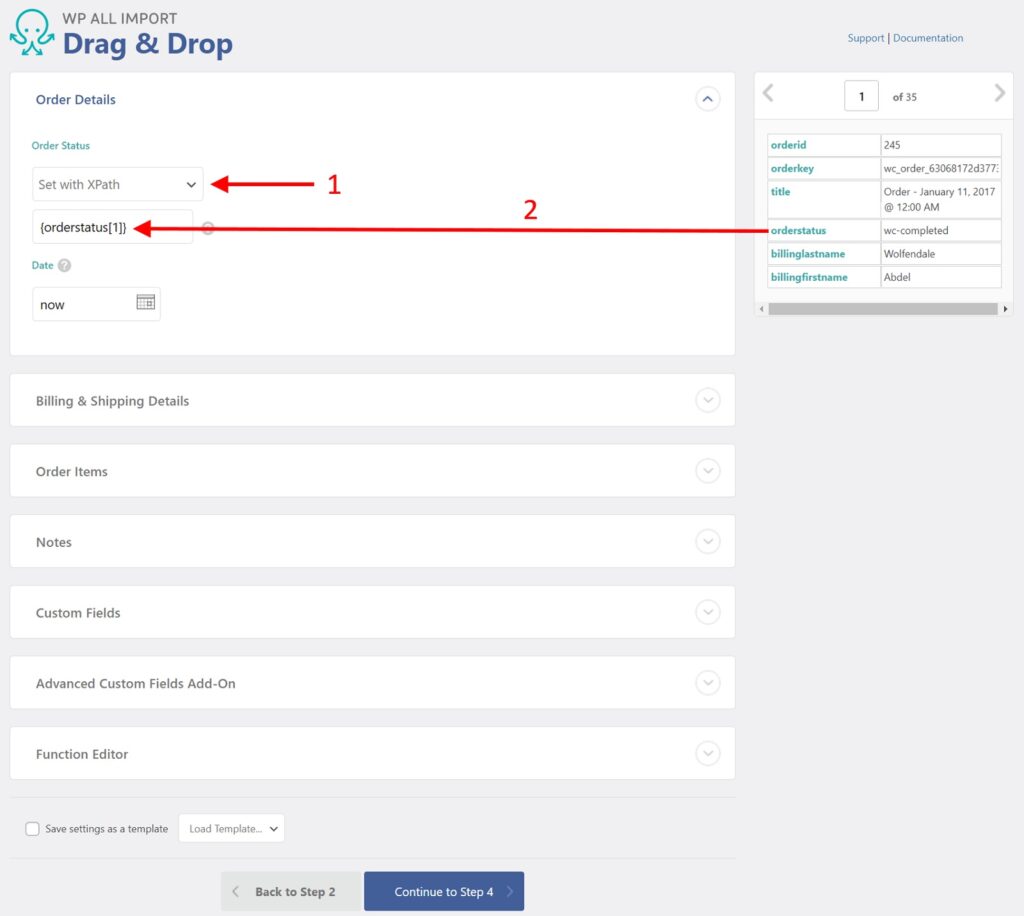
Choose Set With XPath and drag and drop the incoming orderstatus data element to the field edit box.
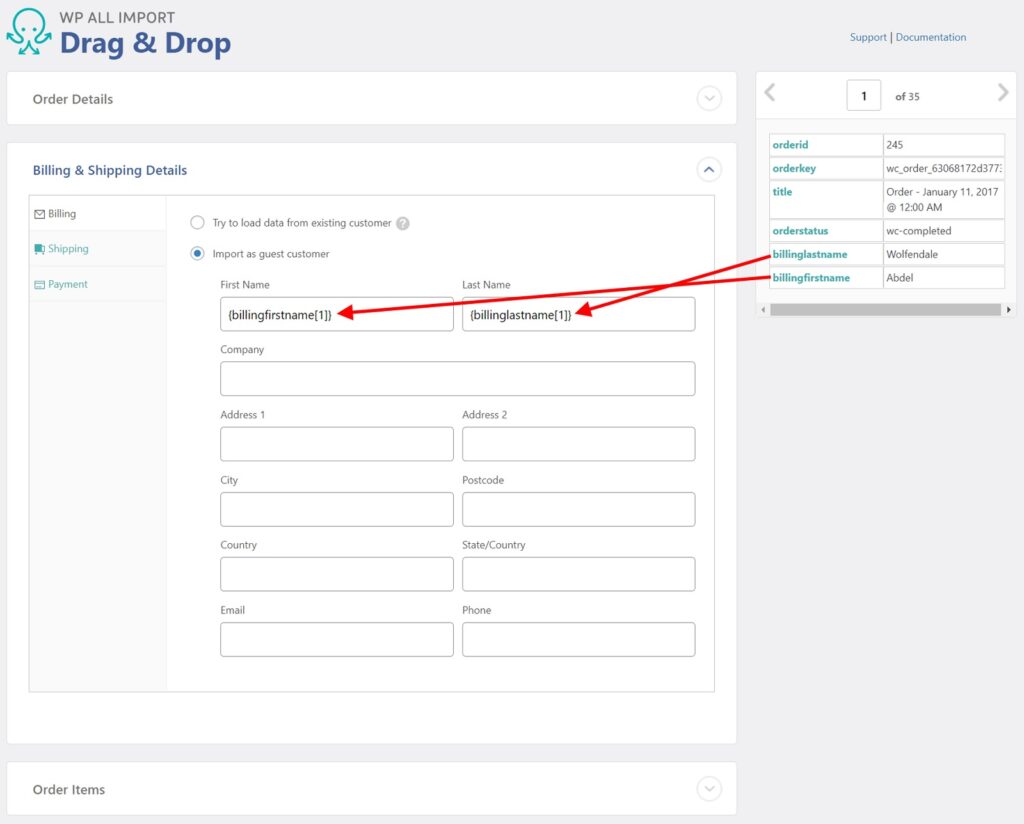
Next, expand the Billing & Shipping Details section and drag and drop the incoming billinglastname and billingfirstname data elements to their respective target fields.
As you can see in the screenshot, there are many sections and fields that can and should be populated in an order import. The main sections are:
- Order Details
- Billing & Shipping Details
- Order Items
- Notes
Other sections may appear depending on the plugins or WooCommerce extensions installed on your site.
We’re not going to describe all sections and their fields here as it would make the article too lengthy. Instead, you can read about them all in WP All Import’s documentation article. For now, just click the blue Continue to Step 4 button at the bottom of the screen.
5. Configure Additional WooCommerce Order Import Settings
The Import Settings screen will now appear. Here, your most important task is to select the unique identifier for the incoming orders. This helps WP All Import differentiate between orders.
The easiest way to select this value is by clicking the green Auto-detect button.
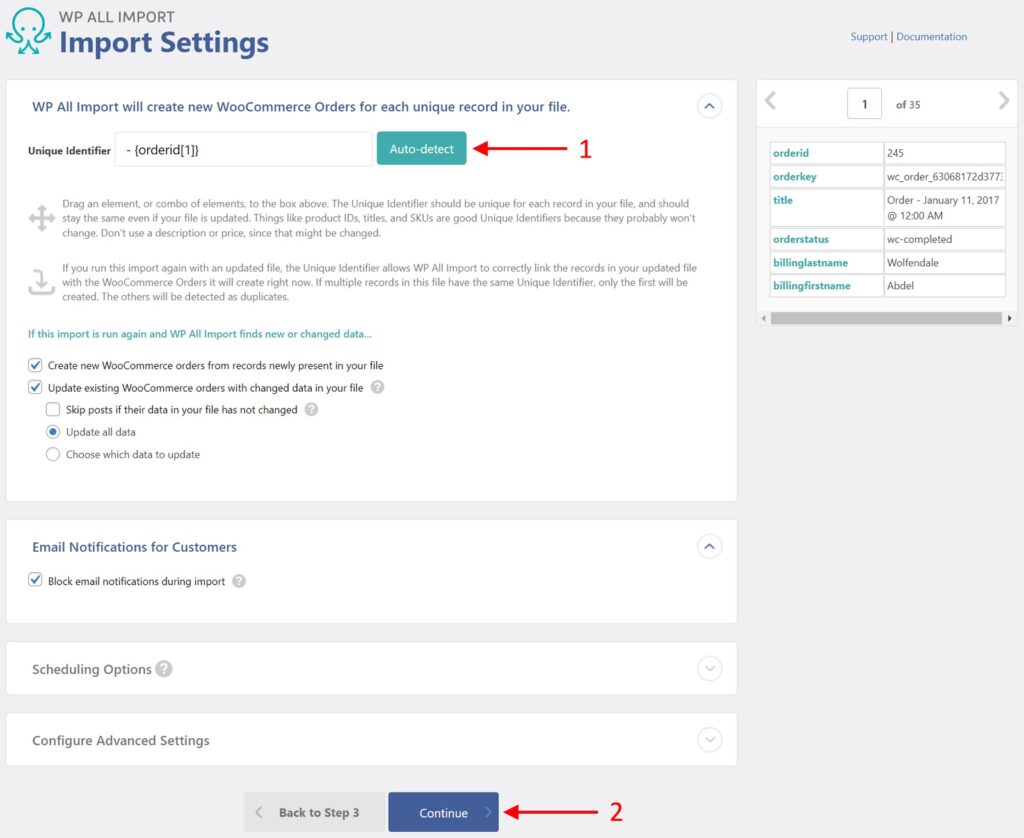
You can enter this value manually if you wish, but the auto-detect feature usually does a great job of selecting the best identifier.
As you can see from the screenshot, there are many other settings on this screen, including separate sections for scheduling and advanced settings. We’ll explain some of these options later in this article. For now, just click the blue Continue button at the bottom.
6. Run the WooCommerce Order Import
The next screen in the process is the Confirm & Run screen.
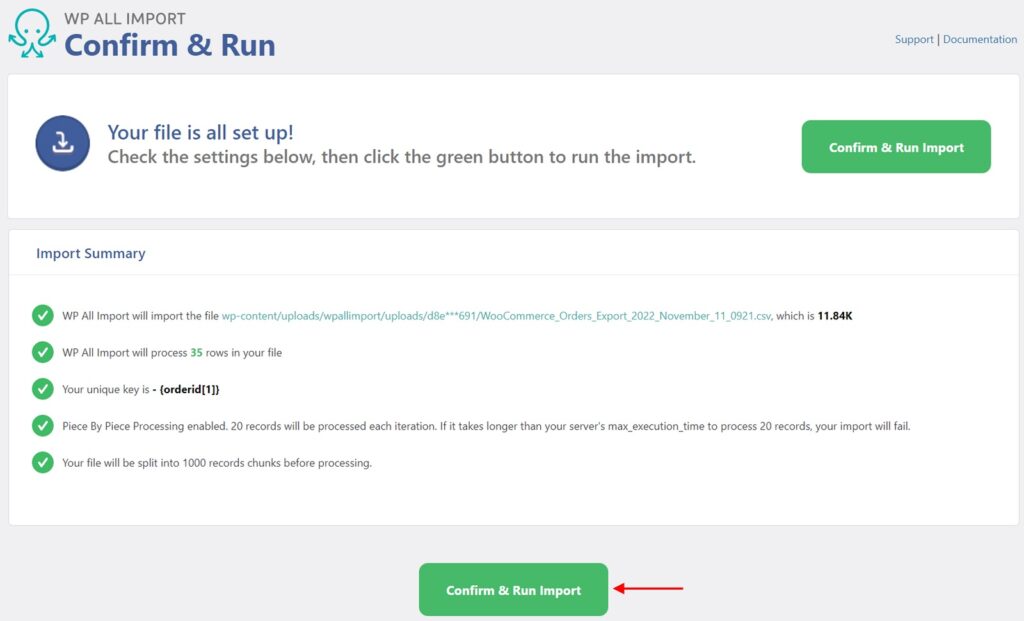
This screen provides a convenient Import Summary section that allows you to review what will happen during the order import before proceeding. If you spot a mistake, you can go back to the previous steps and correct any issues.
If everything looks okay, click the Confirm & Run Import button.
When the import finishes, this screen will appear.
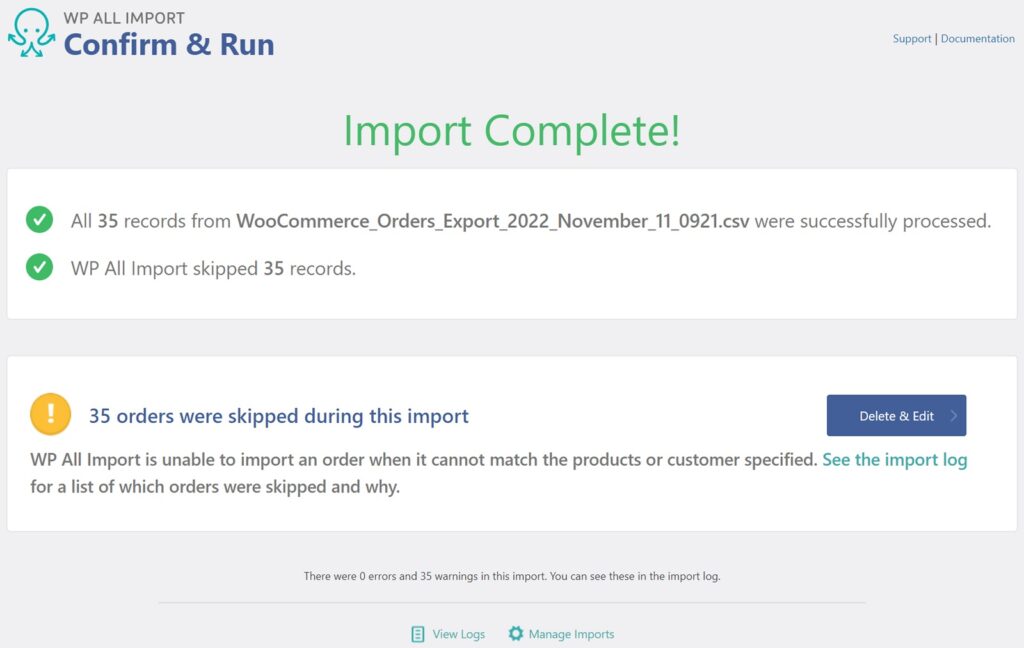
If you look closely at this screen, you will see that the orders you attempted to import have all been skipped. This is because the import file lacked information on the customers and products associated with the orders. Again, we did not include this data because it would have taken too long.
Let’s look at how to solve this issue.
How to Handle Missing Product and Customer Information in WP All Import
In the preceding section, all the imported orders lacked product information. By default, WP All Import tries to match the incoming product SKUs to the SKUs of existing products in the WooCommerce store.
In our tutorial, there were no incoming product SKUs, so every order import failed. A much more common scenario is that some of the imported orders will have SKUs that do not match your existing products.
One obvious solution to this problem is to edit the import file to correct the erroneous SKUs.
However, there is an alternative. If the product information is present in the import file but lacks the correct SKUs, you can manually import the product data in the Order Items section of the Drag & Drop screen, as shown here.
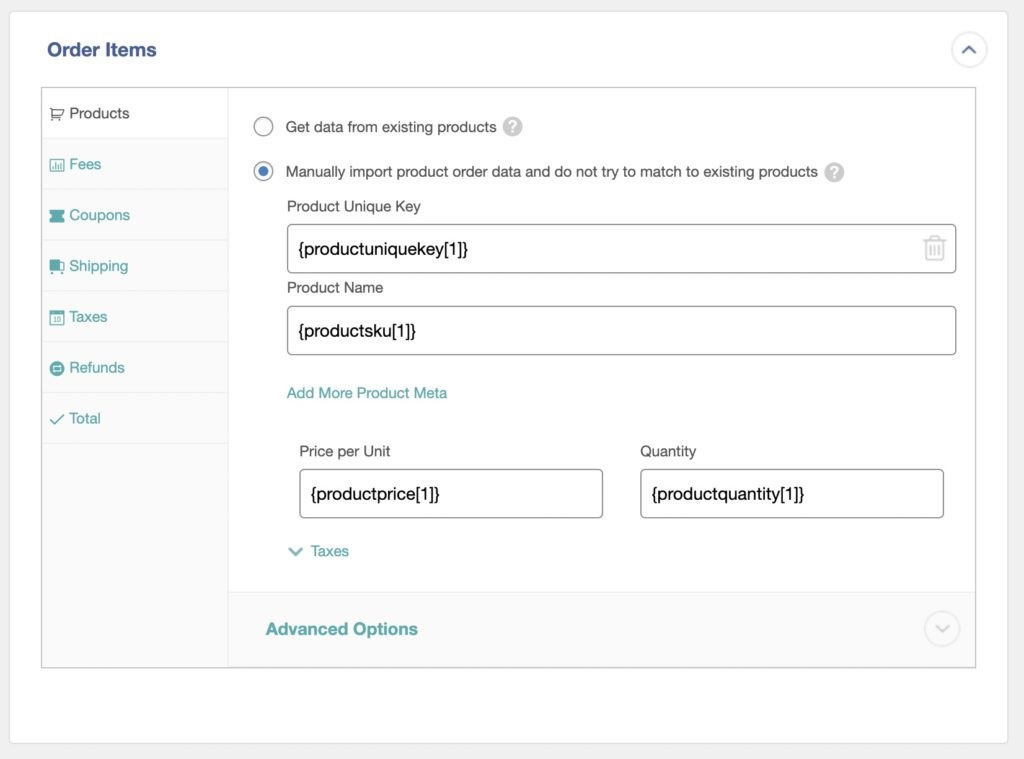
In this scenario, you simply drag and drop the relevant fields from the import file into the fields shown above.
A similar situation exists for missing customer data, which can be handled in the Billing & Shipping Details section of the Drag & Drop screen.

As the text on the screen suggests, the plugin normally attempts to match incoming customers to existing customers using an email address or some other unique value. But if such a match isn’t possible, you can instruct the plugin to create the required customer information on the fly.
WP All Import is full of these types of options to handle almost any import or export scenario. That’s why it is the industry leader.
WP All Import Advanced Features
WP All Import includes several powerful advanced options that let you filter incoming data, use different file formats for import, or schedule your imports. Let’s look at these features in detail.
Importing WooCommerce Orders From a Different File Type
As with exporting WooCommerce orders, you can import orders from many different file types, including CSV, Excel, and XML. To do this, just upload the file as shown earlier in this tutorial, then the plugin will a) automatically recognize the file type and b) adjust its interfaces accordingly.
For example, if you upload an XML file instead of a CSV file, the information in the Review Import File screen will display the XML elements.

Filtering Incoming WooCommerce Orders
The basics of creating filters for WooCommerce order imports are similar to those you create in WP All Export. The main differences are:
- The import filter tool is accessed in the Review Import File screen instead of the New Import screen.
- The import data is outside the WordPress database, so filters have to be applied using the XPath language.
To support this, filter rules are placed in a temporary area as you create them, as shown here.

When you are ready to apply these rules, click the Apply Filters to XPath button. This will populate the XPath field in the upper section with the equivalent XPath code and apply the filters to the data.
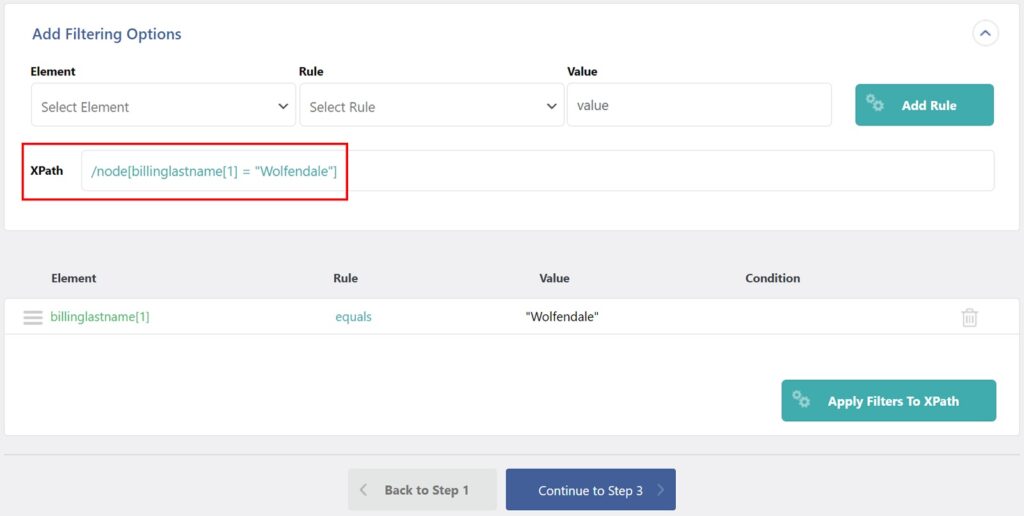
For most people, this is merely a slight procedural difference compared to export filters. But for advanced users, it is an opportunity to exert unparalleled control. The XPath field is editable, and XPath is a very powerful language, so there are virtually no limits when it comes to building order import filters.
Scheduling WooCommerce Order Imports
In some cases, order imports occur on a regular cycle. For example, when feeding orders into your main WooCommerce system from a peripheral sales platform. In these scenarios, it is typical to configure your order import to run automatically on a schedule.
To do this, you must first set up your import to download its data from a URL or an existing file on your server. Here is how you configure an import from a URL.

- Choose the Download a File option.
- Select the From URL option.
- Paste the URL of your order data.
- Click the Download button.
The reason for this requirement is that scheduled imports must be able to automatically access the import data without user assistance. Uploading a file manually during the import process would violate this principle.
To create an import schedule, you have two options:
- Manually schedule your import using cron jobs on the server.
- Use WP All Import’s Automatic Scheduling service, which allows you to schedule the import via the plugin’s interface.
The following image shows the plugin’s scheduling interface, which is found in the Scheduling Options section of the Import Settings screen.

To set up the automatic import of orders using the Automatic Scheduling option, follow these steps:
- Expand the Scheduling Options panel.
- Choose the Automatic Scheduling option.
- Choose the weather to import every week or every month.
- Select the day of the week that you want the import to run, in this case, Wednesday.
- Schedule the time when you want the import to run and select the timezone.
Make sure you subscribe to the Automatic Scheduling service, which is required for this scheduling option.
That’s it! Your order import will now run on a schedule.
One other caveat when setting up a scheduled import: you must ensure that the new order import file is in place each week before your import starts.
And there you have it! Isn’t it easy to export and import WooCommerce orders from one website to another using the combination of WP All Import and WP All Export?
Export and Import WooCommerce Orders — FAQs
Can I Export WooCommerce Order Fields Added by a Plugin? What About WooCommerce Extensions?
Yes. WP All Export automatically detects all custom fields created by any theme, plugin, or WooCommerce extension. You can export these fields just as easily as regular fields.
Are There Any XML Order Export Requirements That Are Too Complicated for These Plugins to Handle?
No. WP All Export lets you control every aspect and detail of XML output.
How to Export All WooCommerce Orders?
If you just run a standard order export without applying any filters, you will export all WooCommerce orders by default. If you have a large number of orders, you can avoid overwhelming your server’s resource limits by splitting your export into multiple files in the u003cstrongu003eExport Settingsu003c/strongu003e screen.
How to Migrate WooCommerce Orders to Another Website?
Export the orders that you wish to migrate. When you do this, download the u0022Bundleu0022 option instead of a CSV file. The bundle file contains import settings data in addition to the order export data. Upload the bundle file on the other site. WP All Import will automatically know how to process the bundle file based on its settings.
Is There a Specific Sequence I Should Use to Import WooCommerce Data?
Yes, you should import WooCommerce data in the following order:u003cbru003e- WooCommerce Productsu003cbru003e- WooCommerce Customersu003cbru003e- WooCommerce Ordersu003cbru003e- WooCommerce Reviewsu003cbru003eu003cbru003eThis will help reduce the instances in which customers and products in the order import data are missing from the WooCommerce store.
Can I Import Order Data Into Third-Party Plugins or Extensions?
Absolutely. As long as the plugin or extension in question is installed and activated, you can import data into its fields just as easily as you import data into core WooCommerce or WordPress fields.
Related Information
Want more information on how to import and export WooCommerce orders? See these key articles:
The 5 Best WooCommerce Order Export Plugins
The 5 Best Plugins for WooCommerce Order Export to CSV
The 5 Best Plugins for WooCommerce Order Export to XML
The 4 Best Plugins for WooCommerce Order Export to Excel