How to Export WooCommerce Orders to CSV, Excel, or XML File Format
Are you a WooCommerce store owner looking for a simple and easy way to export your order data?
Exporting your WooCommerce order information can be incredibly useful for many reasons. It allows you to share the data with third parties, integrate it with other tools, or keep a backup for future reference.
In this comprehensive article, we’ll share three easy methods to export your WooCommerce order data in various file formats:
- Method 1: Using the WooCommerce built-in reports feature to export the order data in CSV format.
- Method 2: Using the WordPress export tool to download the order data in XML format.
- Method 3: Using the WP All Export plugin to download complete data in a file format of your choice.
Let’s dive right in!
Why Export WooCommerce Orders in CSV, Excel, or XML Format?
CSV, Excel, and XML are common and widely supported file formats that make it easy to store, share, and edit data in bulk. When it comes to your WooCommerce store, being able to export your order data in these formats can be incredibly useful for many reasons. These include:
- Sharing WooCommerce order details with third parties: If you work with third-party service providers such as delivery partners, accountants, or warehouse staff, being able to easily share the order data will ensure that everyone has access to the data they need.
- Migrating data to another WooCommerce website: If you’re moving your store to a new website, exporting your order history will ensure that you have the import files needed to seamlessly transfer your customer order information.
- Integrating with other business tools: Sharing your WooCommerce order details with CRM, accounting, or marketing tools will help you make data-driven decisions. You can also share the data with advanced data analysis tools to get valuable insights on optimizing your store.
- Inventory management: Exporting your order data in a structured format will help you better understand your best-selling products and adjust inventory accordingly.
- Maintain order history backups: It also gives you a reliable way to store the information outside of your website. This can come in handy if you ever need to reference past orders or restore lost data.
Now that we know the benefits of exporting order information, let’s look at the different methods available to export the data.
1. Export Orders as a CSV File via WooCommerce Reports
If you need to export basic WooCommerce order data in a CSV format, the built-in WooCommerce export functionality makes it easy to do.
Here’s how you can export your orders to CSV:
- Log into your WordPress admin dashboard and go to WooCommerce > Reports.
- Click on the “Orders” tab, which will show you different report options such as:
- Sales by date
- Sales by product
- Sales by category
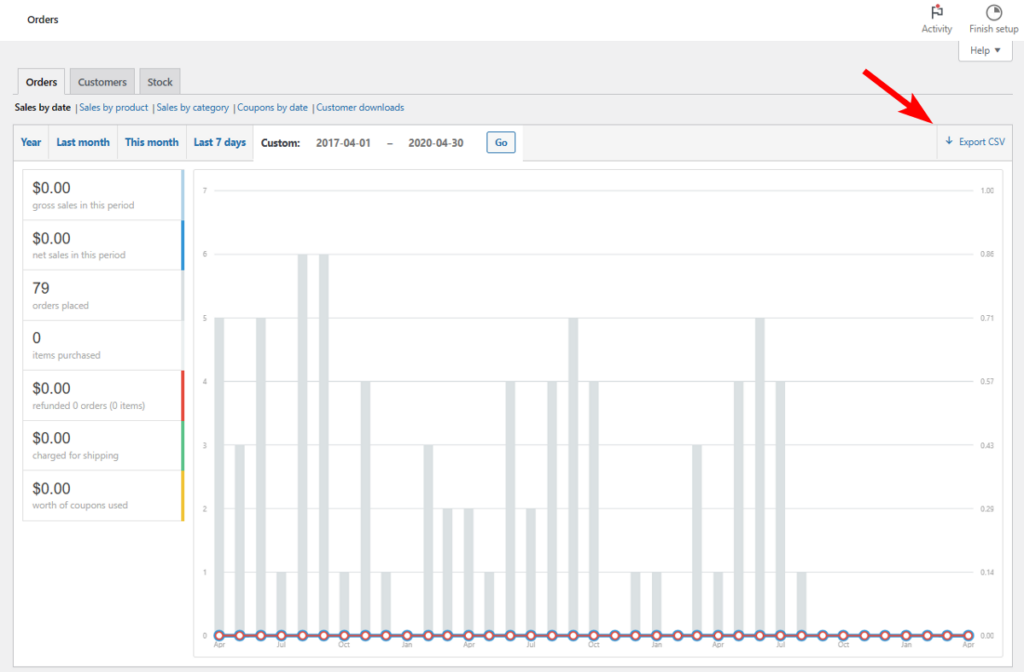
- For each report type, you can also select the specific date range you want to export orders for.
- Once you’ve filtered the data you want to include, simply click the “Export CSV” button in the top right corner. This will generate and download a CSV file containing your selected WooCommerce order details.
The exported CSV file will include basic order information such as:
- Number of items sold
- Number of orders placed
- Total sales amount
- Coupon discounts applied
- Tax and shipping costs
- And more
2. Export WooCommerce Orders as an XML File via WordPress Built-in Tool
In addition to the CSV export option, you can also download your order data in XML file format using the built-in WordPress export tool.
This method can be particularly useful if you’re looking to integrate your WooCommerce order information with other business tools or systems that accept XML data inputs.
To export your WooCommerce orders to an XML file, follow the below steps:
- From your WordPress dashboard, navigate to Tools > Export.
- On the Export page, select “Orders” from the list of content types.
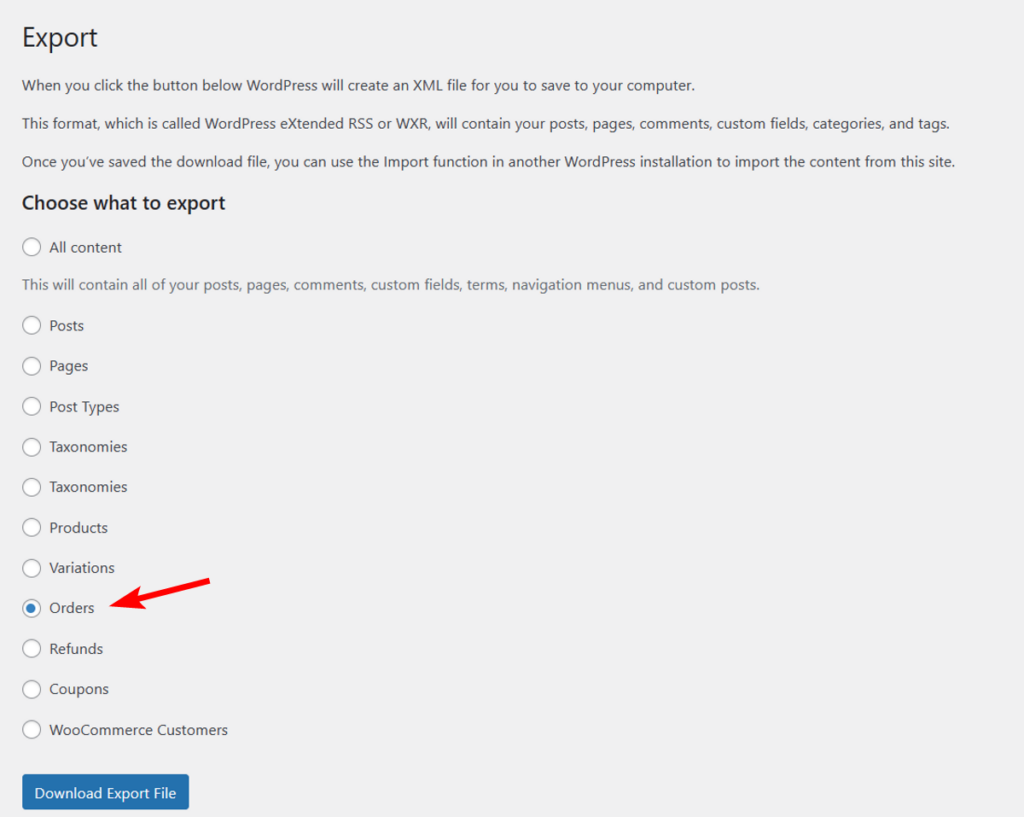
- Scroll down and click the “Download Export File” button to generate and download the XML file.
Why Use a Plugin to Export WooCommerce Orders Data?
The above two methods are straightforward and do not require a plugin to export the data. These methods work great if you just need basic order information.
However, if you require more advanced or customized export options for your WooCommerce order data, using a dedicated plugin can give you that freedom.
Here are some key reasons why you should consider using a third-party export plugin:
- Flexibility in data selection
Third-party plugins often offer more granular control over which order details you want to include in the export file. This allows you to extract the exact information you need. - Custom file format options
In addition to the CSV and XML, a plugin gives you the option to download the WooCommerce order data in other formats like Excel (.xls or .xlsx). - Advanced filtering
A plugin also gives you advanced filtering options to filter down to specific orders based on various criteria like region, product, date range, order status, and more. - Scheduled or automated export
WooCommerce export plugins also allow you to set up recurring exports, so you can receive updated order data on a regular basis. - Integrations with other tools
A few plugins may also include a built-in option to seamlessly send order data to tools like Zapier. This opens up possibilities to connect the data to accounting software, CRM, cloud storage, and other business applications.
From the above points, it is clear that for store owners who need more flexibility, using an export orders plugin gives that power.
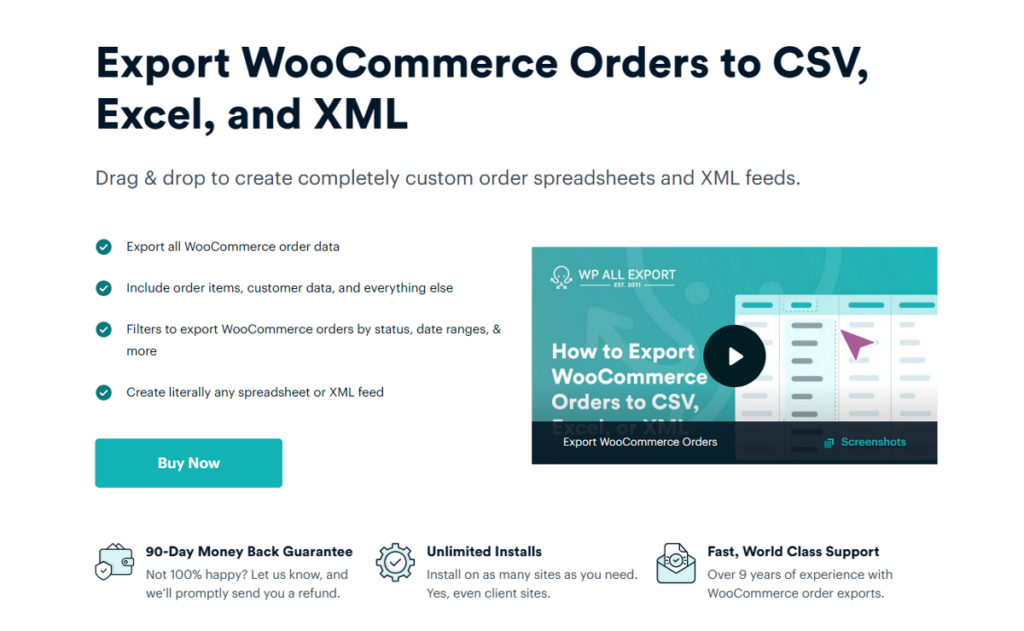
There are a number of dedicated plugins available. However, WP All Export stands out as the best for its user-friendly interface and powerful customization features.
Let’s now look at the step-by-step process of using WP All Export to export your order data in CSV, Excel, or XML formats.
3. Export WooCommerce Orders in CSV, Excel, or XML File Using the WP All Export Plugin
WP All Export is an excellent plugin for exporting WooCommerce orders. It comes with advanced order export features and allows you to export your order data in many formats, including CSV, Excel (.xls and .xlsx), and XML.
One of the standout features of WP All Export is its intuitive, drag-and-drop interface that makes exporting order data easy, even for beginners. The plugin comes packed with features, such as:
- Flexible data filters to include only the specific fields and columns you require.
- Automated scheduling to generate and receive updated order data on a regular cadence.
- Full order details, including any custom fields you’ve added to your WooCommerce store.
- Combine multiple fields into a single column or use the PHP function to customize the data on the fly.
To get started with WP All Export, you’ll first need to purchase the premium version of the plugin. Once you have the plugin files, simply install and activate the WP All Export followed by the WooCommerce add-on on your WordPress website.
After setting up the plugin, let’s look at the below steps to export your WooCommerce orders.
Step 1: Create a New WooCommerce Order Export
Start by navigating to All Export › New Export in the WordPress admin menu and choose WooCommerce Orders as the export post type.
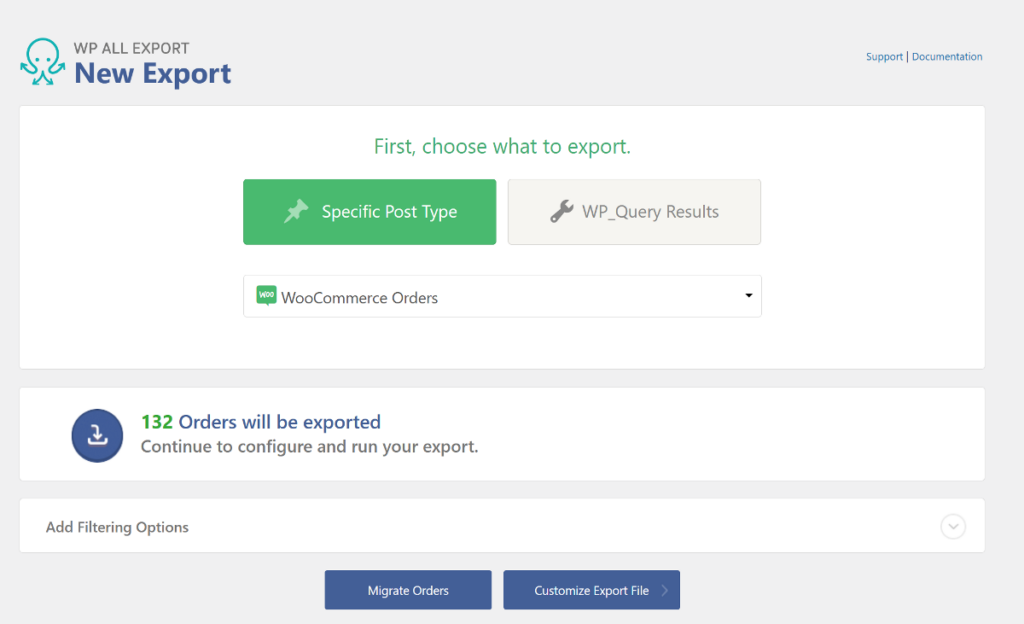
WP All Export will scan your database for all the order details and show you the number of orders that can be exported.
Step 2: Filter the WooCommerce Order Export Data
Not every recipient of your WooCommerce order data is interested in all of your orders. Some may only want new or recent orders. Others may only want orders for certain products or those destined for specific geographic regions.
One of the powerful features of the WP All Export plugin is its ability to filter your WooCommerce order data before exporting.
To set up your filters, simply expand the “Add Filtering Options” panel and start adding your custom filter rules.
Each filter rule consists of three values: an element, a rule, and a value.
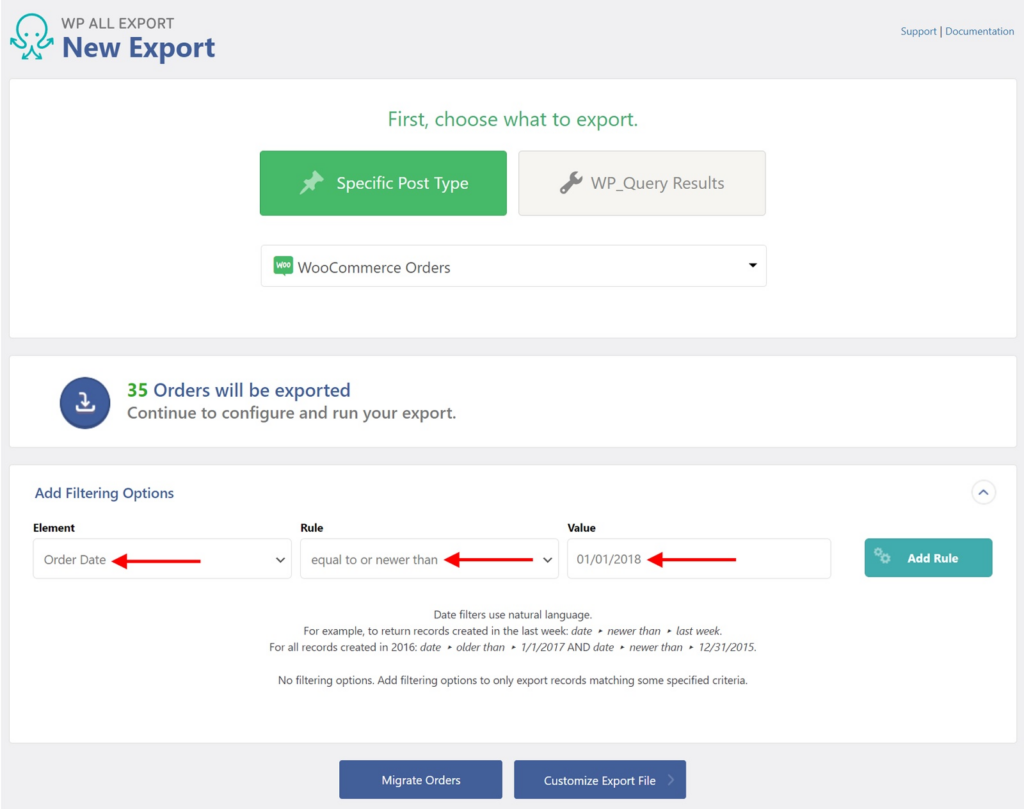
In this example, we’re requesting all orders that have an Order Date => 01/01/2018.
You can also add multiple filter rules and combine them using “AND” or “OR” logic. This gives you granular control in specifying exactly which orders to include in your export.

Once you have filtered your orders, click Customize Export File at the bottom of the screen to move to the next step.
Step 3: Select Your WooCommerce Order Export Columns
WooCommerce includes a lot of data fields for each order. In most cases, you may only want to export a selected few of those fields. If you have two different use cases, you’ll likely need to export orders with different fields. For some use cases, you may even want to export order custom fields.
WP All Export solves this issue with a drag-and-drop intuitive interface, which lets you add order fields into its column selection area. You can expand the various tabs listed in the Available Data section to see the fields (columns) available for export.
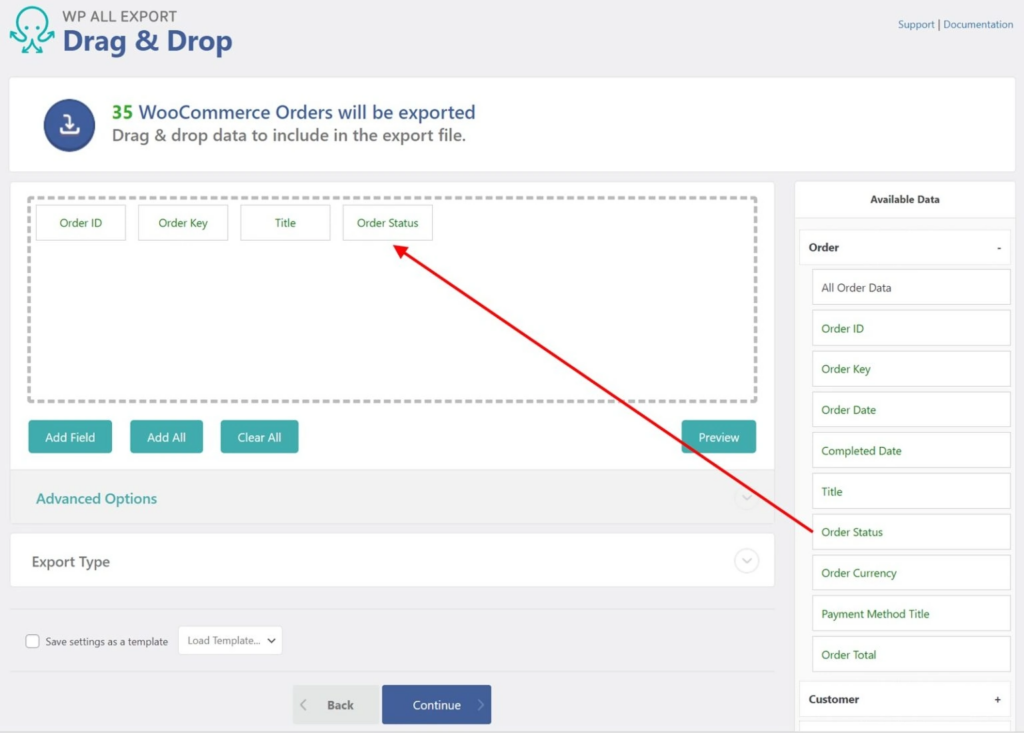
The same interface also lets you rearrange the columns in any order you see fit using the same drag-and-drop feature. If you add any field by mistake, you can also easily remove it by dragging it out of the selection area.
Don’t like the name of a column? You can easily change it by clicking the field in the selection area and typing the new name. For example, you can easily rename the Order Total column to “Amount.”

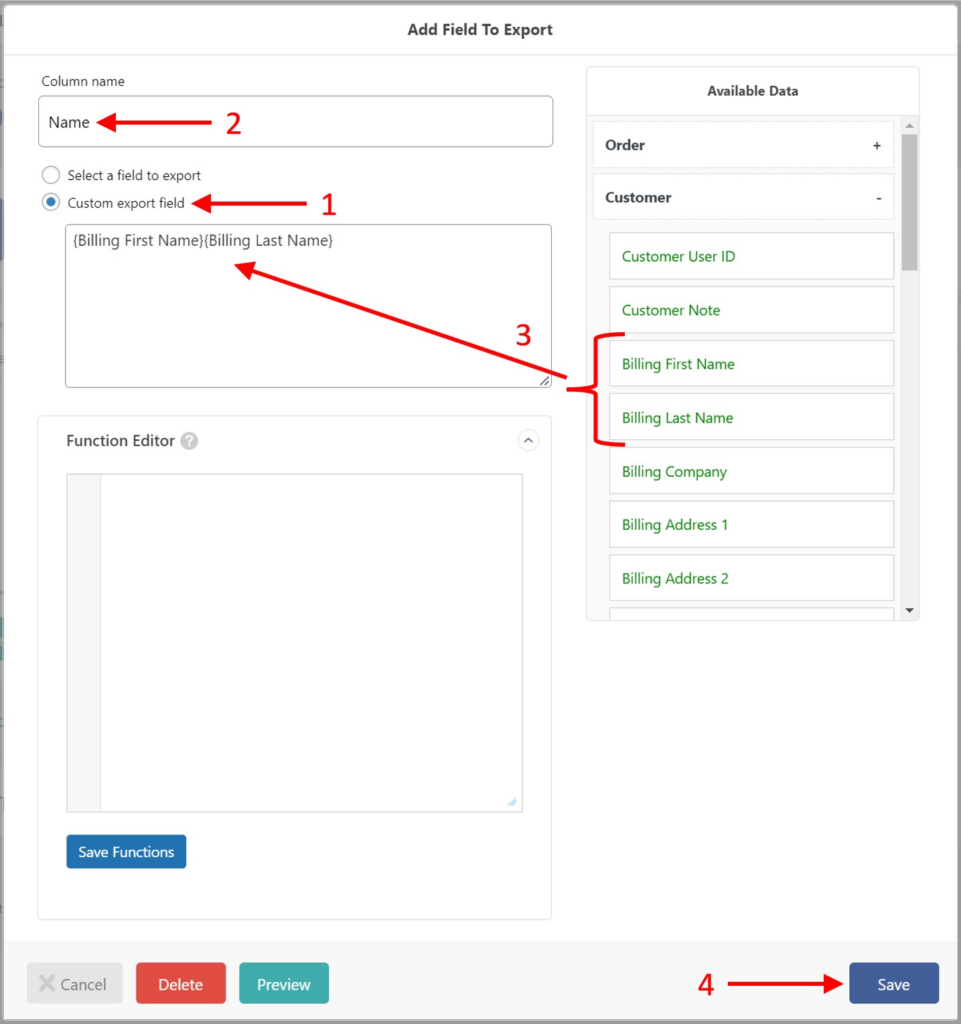
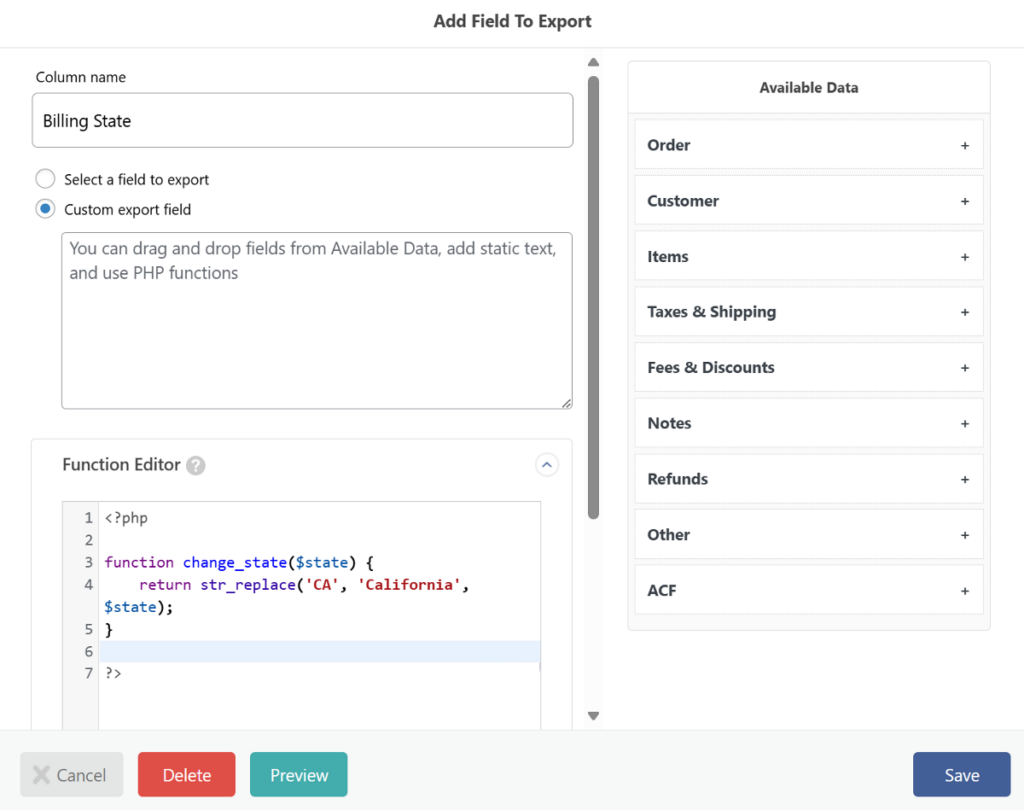
Need to combine data fields into one column? You can do that too by clicking the Add Field button and selecting the Custom export field option. Then, drag and drop multiple data fields to the box. For example, you can easily merge the first name and last name fields into a single “Name” column.
Need to modify the data contained in a field? WP All Export also lets you add a PHP function in the Custom export field box to modify field values on the fly. For example, you can add a PHP function to change full state names to abbreviations. You can also create your own custom function. This gives you almost unlimited power to modify data.
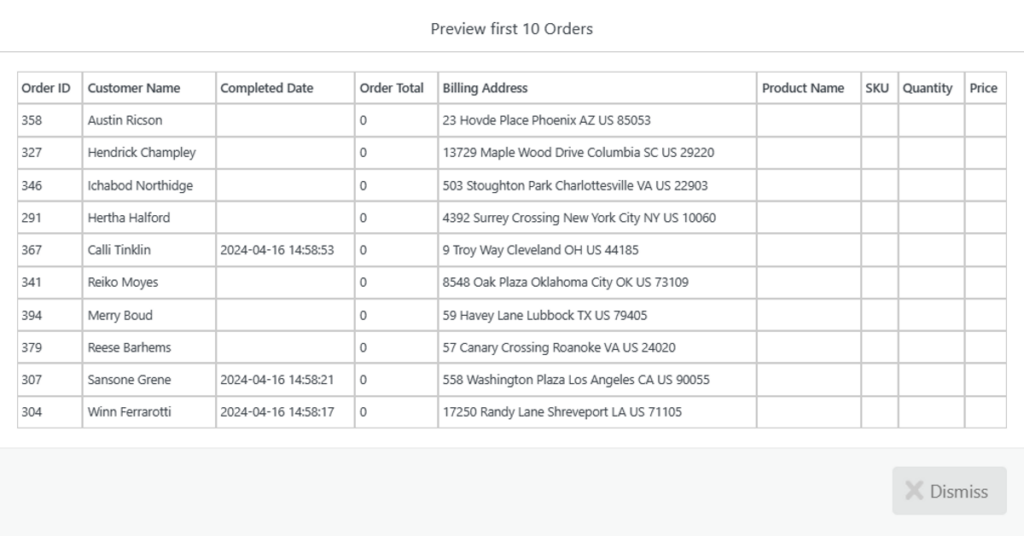
After you’ve added all the fields, you can preview the export file to see how it actually looks. Click the Preview button and WP All Export will show you a preview of the first 10 orders.
Step 4. Choose the WooCommerce Order Export File Format
WP All Export lets you export WooCommerce orders in a file format of your choice. You get options to choose between CSV, Excel (.xls and .xlsx), and XML file format.
On the same page, expand the Export Type panel near the bottom of the screen and choose between spreadsheet and feed type. Based on your selection, WP All Export will let you choose either CSV, Excel xls, and Excel xlsx, or Simple XML Feed and Custom XML Feed.
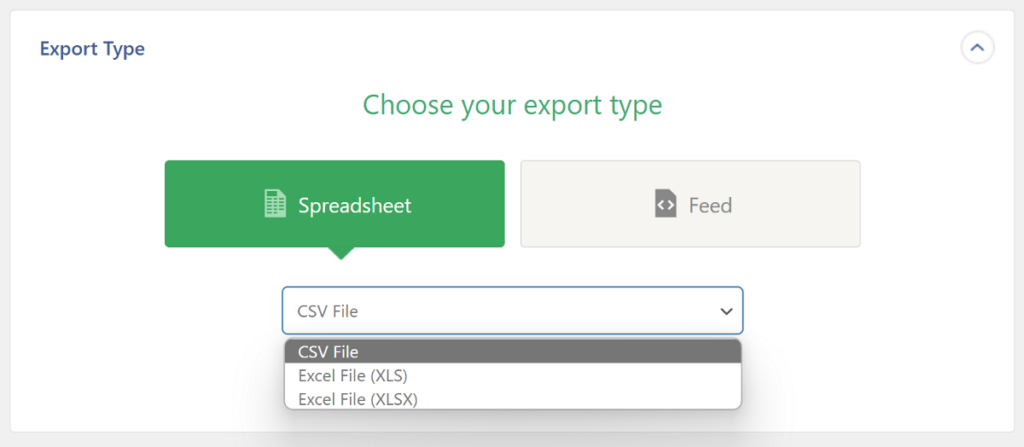
After you select the file format, click the Continue button at the bottom to move to the next step.
Step 5: Schedule Your Order Export
In addition to on-demand exporting, the WP All Export plugin also offers scheduling options to automate your WooCommerce order exports. This is incredibly useful if you need to regularly sync your order data with external tools or services.
The plugin uses cron jobs to automate the export. You can either manually configure cron jobs on your server or use the optional paid service provided by WP All Export to set up automatic scheduling.
Automatic Scheduling costs $9/month for unlimited exports on unlimited sites. After your purchase, simply expand the Scheduling Options section and select Automatic Scheduling.
Here, you can choose whether you want the exports to run weekly or monthly, and select the specific days and times that work best for your needs.
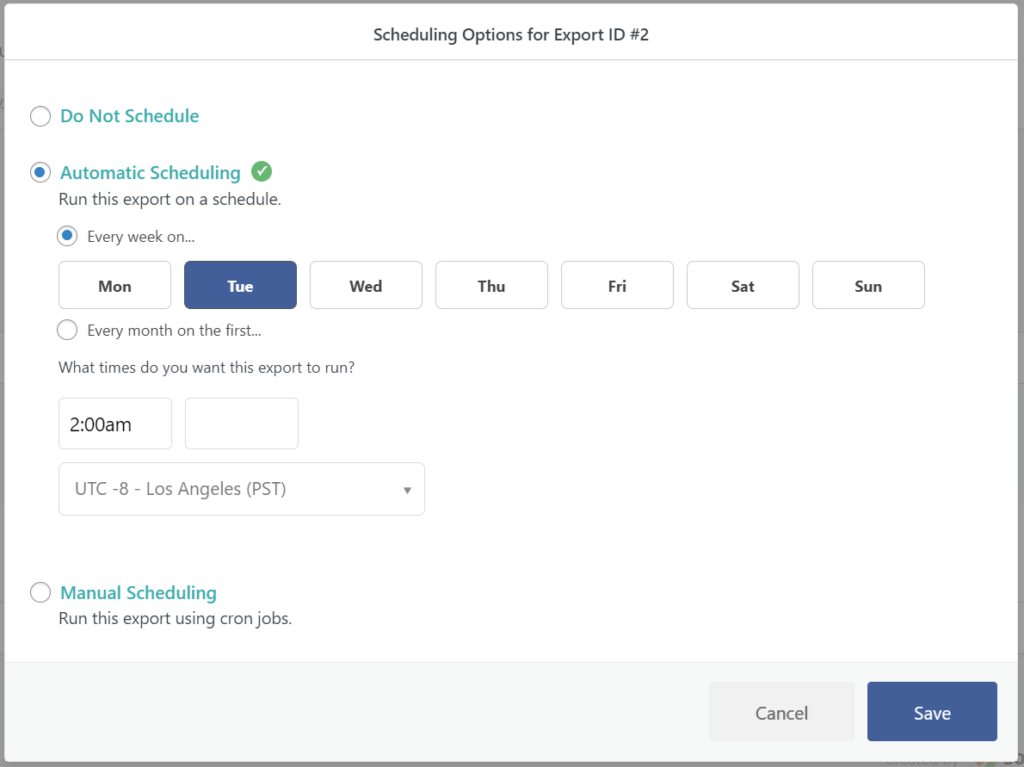
For example, in this screenshot, we’re scheduling an order export to run at 2:00 a.m. every Tuesday.
You can also set up the cron jobs manually on your server.
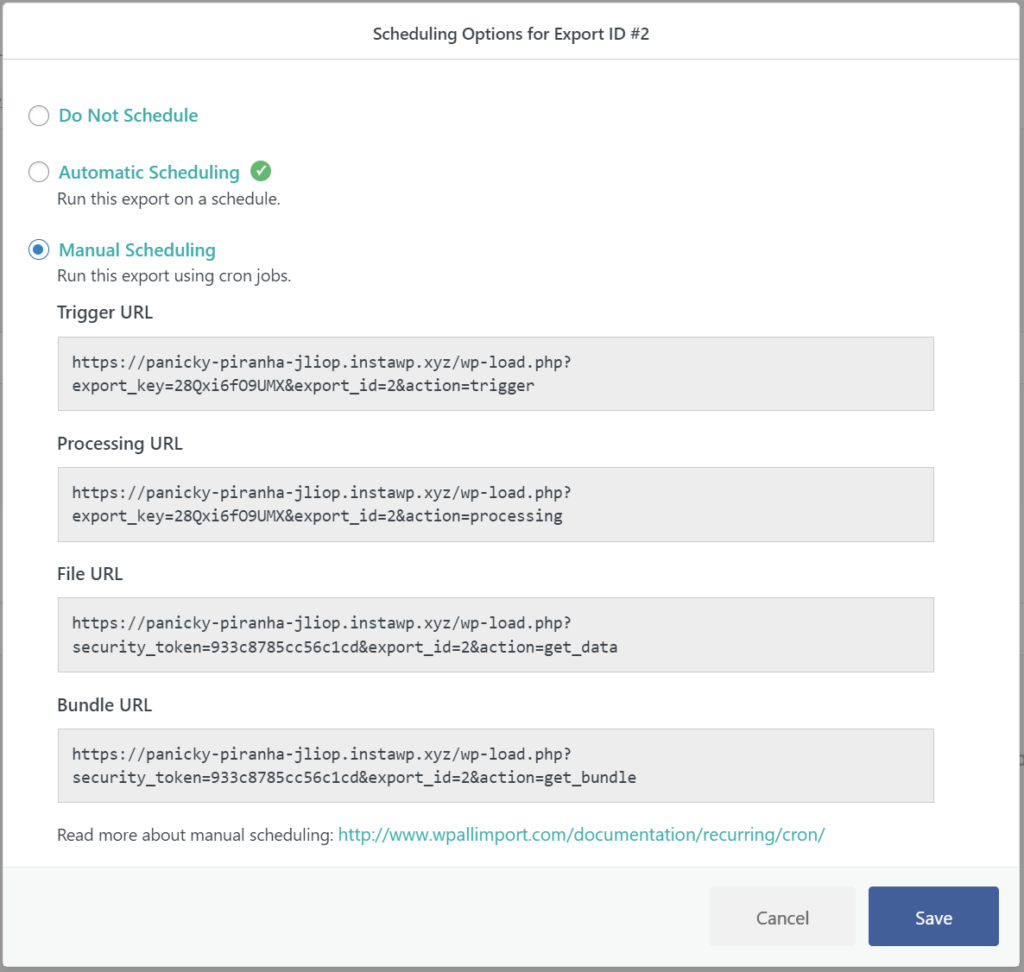
This may look complicated, but WP All Export offers complete documentation.
Step 6: Export WooCommerce Orders in Real Time
On the same page, WP All Export also lets you configure various advanced export settings options. All these options are self-explanatory and can be enabled by clicking the simple checkbox.
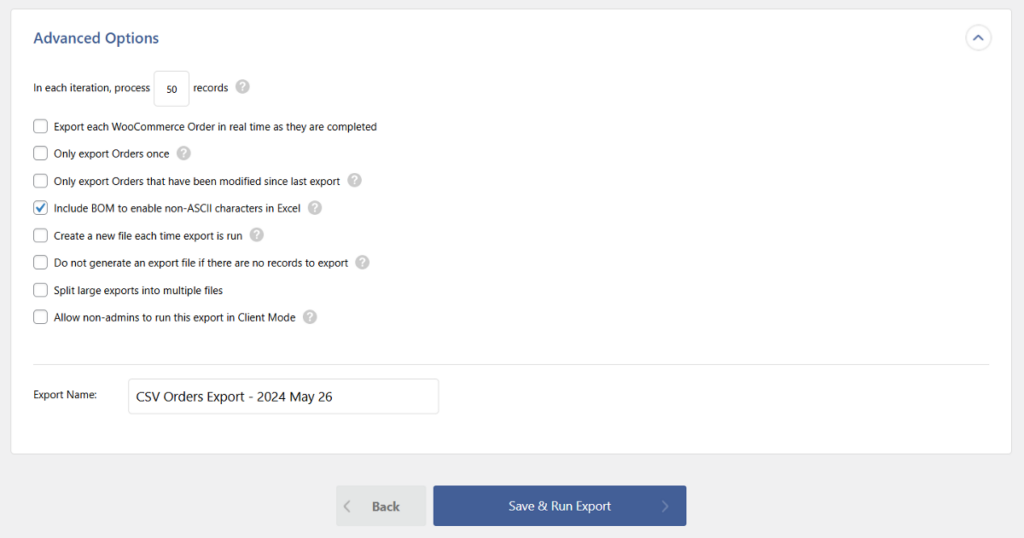
One of the unique features in the list includes enabling real-time export of orders. This opens up many possibilities as you can pair this with Zapier to connect with more than 5000+ apps. This includes connecting email marketing tools, CRM, or other business tools.

The process is relatively simple but involves many steps, so instead of walking you through the entire process, here are some videos made specifically on this topic.
To learn more about other settings in the list, refer to our dedicated article on export settings.
When you’ve configured everything, add a custom file name and click the Save & Run Export button to move to the next step.
Step 7: Download Your WooCommerce Order Export File
Apart from real-time export, WP All Exports also lets you do on-demand export of your orders. Based on the number of orders, it’ll take a few minutes to run the export. It will notify you when the file is ready to be downloaded.
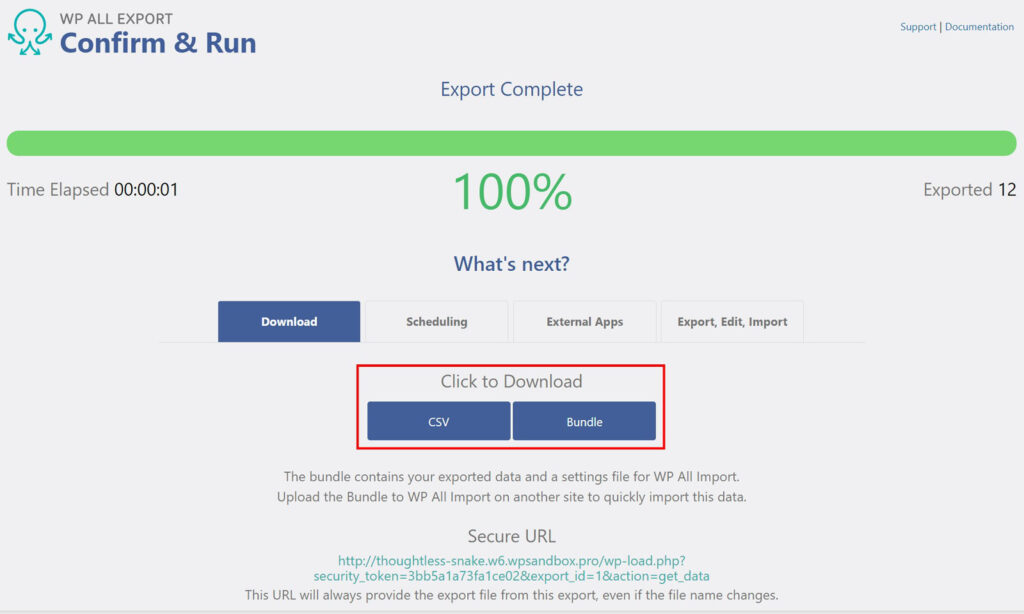
Based on the file type you selected in Step 4, WP All Exports will give you various options to download the file. You can either:
- Click the file format name to download the file right away.
- Click the Bundle option to download a zip file containing the export file and an import template.
The second option will come in handy if you plan to migrate the order information to another site.
It also lets you generate a secure URL for your export which gives you direct access to the export file in your browser. This works even if you change the file name or re-run the export.
That’s it! With just a few clicks, you’ve exported your WooCommerce order data using the powerful WP All Export plugin. Isn’t this a more flexible and customizable solution compared to the basic built-in export options?
Easily Export WooCommerce Orders — Wrap-Up
Exporting your WooCommerce order data helps you share the information with third parties or integrate it with essential business tools.
Both WooCommerce and WordPress come with a built-in option to export order data in CSV and XML format.
While both these options are quick and easy, they’re quite limited to give you the data exactly how you want.
This is where WP All Export and its WooCommerce add-on can help.
It includes features such as:
- 4-step quick export wizard to give you all the order information in a file format of your choice.
- Customization options to change data columns on the fly and save valuable time.
- Powerful export filters to target the exact order data you need.
- Scheduled and automated exports to share the data in sync with external tools.
Ready to effortlessly export your WooCommerce order data? Get the WP All Export Plugin today!
Exporting WooCommerce Orders – FAQs
1. How to download WooCommerce orders in Excel?
Follow these steps in the WP All Export plugin to easily download all your orders in Excel format.
- Create a new export in All Export > New Export.
- Choose WooCommerce Orders from the dropdown list.
- Customize the export by setting up the export columns.
- Change the Export Type to Spreadsheet > Excel File.
- Run the export and download the WooCommerce orders in Excel.
2. How to migrate WooCommerce orders?
You can migrate WooCommerce orders using the combination of WP All Export and WP All Import plugins.
- Use WP All Export to export orders that you wish to migrate.
- When downloading your export file, select the “Bundle” option instead of a CSV file. The bundle file contains settings data in addition to the export data.
- Upload the bundle file on the other site using WP All Import.
- WP All Import will automatically know how to import the orders based on the bundle file settings.
- Review your imported orders. This will complete your WooCommerce order migration.
See our WooCommerce order migration guide for additional information.
3. How do I export all data from WooCommerce?
WP Al Export is the best WooCommerce export plugin that supports exporting all data types. This includes WooCommerce orders, products, variable products, customers, reviews, and coupons.
Exporting WooCommerce Orders with WP All Export — Related Info
The 5 Best WooCommerce Order Export Plugins
The 5 Best Plugins for WooCommerce Order Export to CSV
The 5 Best Plugins for WooCommerce Order Export to XML
The 4 Best Plugins for WooCommerce Order Export to Excel
Exporting WooCommerce Orders with WP All Export — Related Videos