Advanced Order Export for WooCommerce: A Complete Guide
Exporting orders from WooCommerce can be quick and simple, but it can also involve several issues that require more advanced techniques. In this article, we’ll give you a quick walkthrough of a simple order export and then delve into these more advanced issues.
Table of Contents
- Your Options to Export WooCommerce Orders
- How to Handle a Basic WooCommerce Order Export
- Advanced Order Export Tasks
- Related Docs
- Related Videos
Your Options to Export WooCommerce Orders
There are several options available to export WooCommerce orders. Here is a brief description of the most popular ones:
- Built-in WordPress Export Tool. This free built-in tool just exports a quick XML dump of all your WooCommerce orders. It has no options and is really only useful if you intend to import the XML file into another WooCommerce site as is, i.e., with no changes.
- Advanced Order Export for WooCommerce by AlgolPlus. This is the top free plugin for exporting WooCommerce orders. It doesn’t do everything that WP All Export does (see next option), but it’s a capable plugin. Its main drawback is that it’s limited to exporting orders only, so if you ever need to export anything else, you’ll have to find another solution.
- WP All Export. This is the top premium plugin for exporting WooCommerce orders. It lets you do anything imaginable with your order exports, no matter how advanced. Better still, you can use the same tool to export all types of WooCommerce and WordPress data using the exact same interface and process.
- WooCommerce Customer / Order / Coupon Export by SkyVerge. A premium plugin of decent caliber. The problem is that it falls far short of WP All Export yet doesn’t offer much more than the Advanced Order Export for WooCommerce plugin, so it’s difficult to recommend this option.
- Order Export & Order Import for WooCommerce by Webtoffee. Another premium plugin. It doesn’t have all of the advanced features of WP All Export, but it does cover most of the basics. It’s also part of a family of plugins that allows you to export all WooCommerce data types. Unfortunately, it does not handle most WordPress data types.
- Order Export for WooCommerce by JEM Plugins. A much simpler paid plugin that is easier to learn and use but lacks advanced features. Still, with a slightly lower price, this plugin might make sense if your requirements aren’t too demanding.
For more information on most of these options, see The 5 Best WooCommerce Order Export Plugins.
For this article, because we want to demonstrate all of the advanced techniques needed for order exports, we’re going to use WP All Export in our examples. If you want to follow along, use this online sandbox. Choose the WooCommerce Store option and click Create Sandbox.
How to Handle a Basic WooCommerce Order Export
To help you get your bearings, let’s do a quick walkthrough of a basic order export using WP All Export.
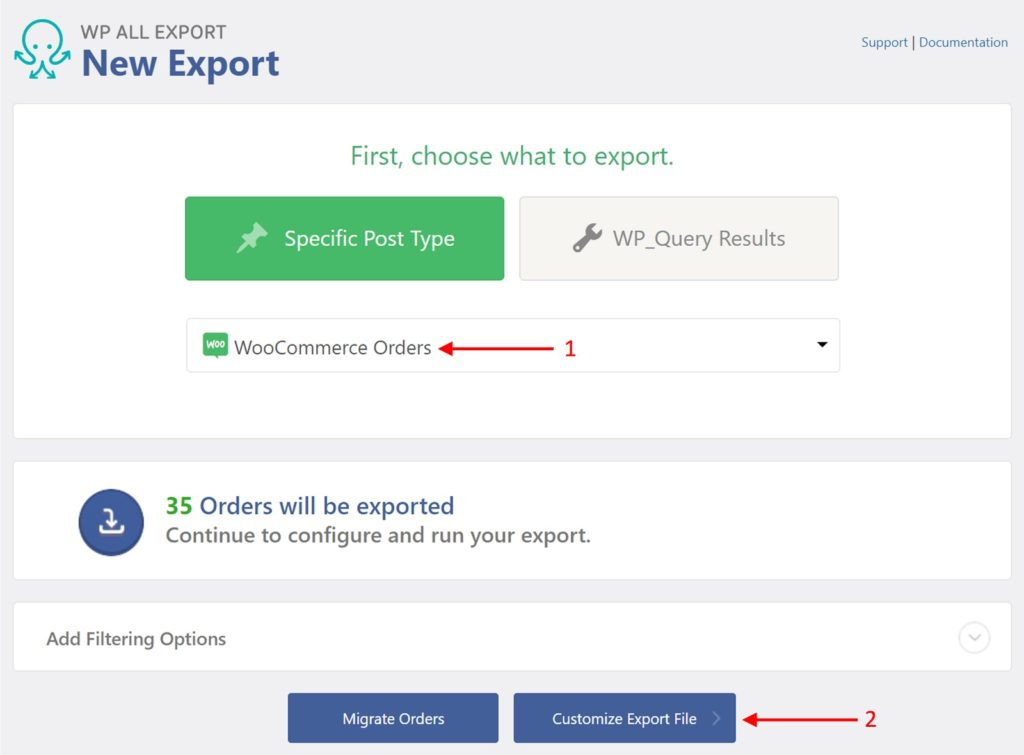
Step 1: Create a New Export for WooCommerce Orders
Navigate to All Export › New Export in the WordPress main menu and choose WooCommerce Orders as the export type. Click Customize Export File to continue.
Step 2: Choose Your Order Export Columns
The Drag & Drop screen appears next. Here, all the order-related fields are presented in the Available Data panel on the right. To include a field in the export, just drag and drop it into the column selection area on the left.
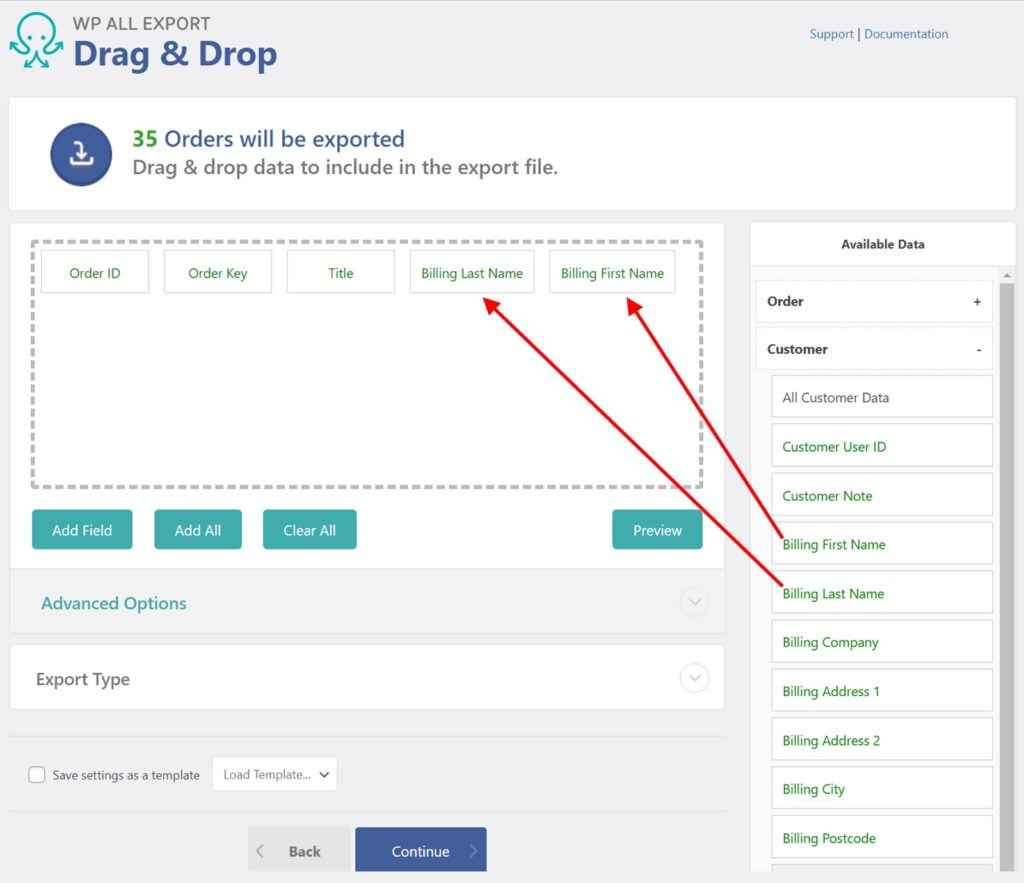
Note that the Available Data panel has many subsections, including Order, Customer, Items, Taxes & Shipping, Fees & Discounts, Notes, Refunds, Custom Fields, and Other.
For a detailed description of these subsections, see How to Export WooCommerce Orders to CSV, Excel, or XML.
Step 3: Configure the Export Settings
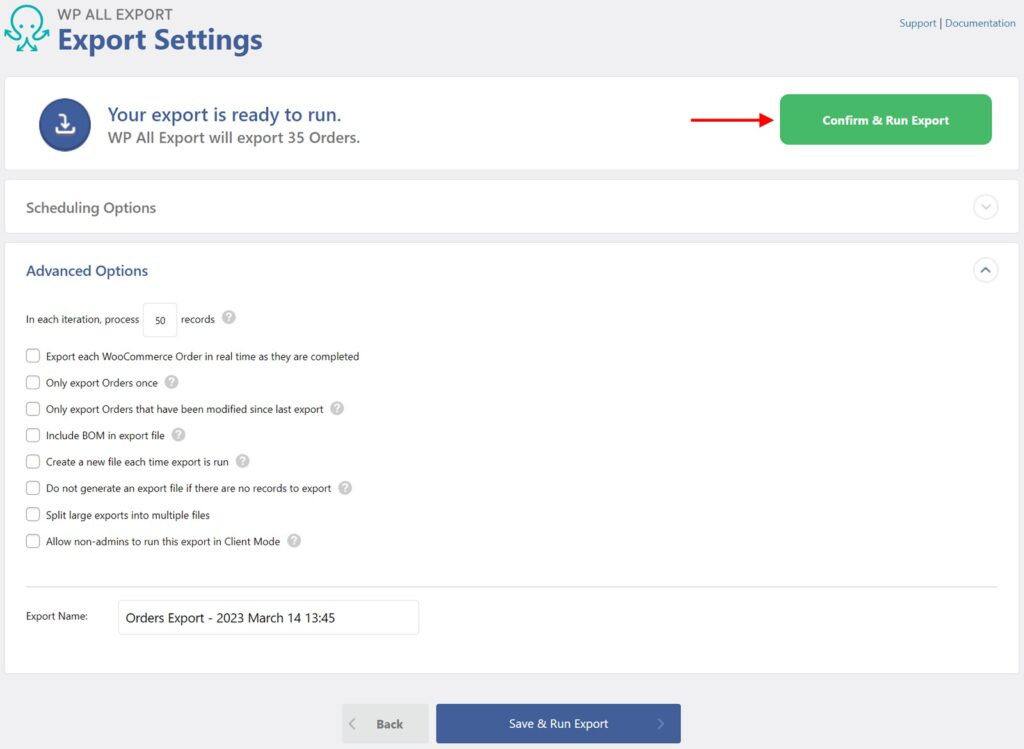
In this screen, you can set advanced options to dictate how your export should behave if it is run again in the future. We’ll cover some of these in the Advanced Order Export Tasks section.
You can also expand the Scheduling Options section to schedule your order export to run every day, week, or month. For more information on this, see How to Schedule WordPress Exports.
For now, leave these settings alone and click Confirm & Run Export.
Step 4: Complete Your Order Export and Download Your Export File
After the export has run, you should see a screen like this:
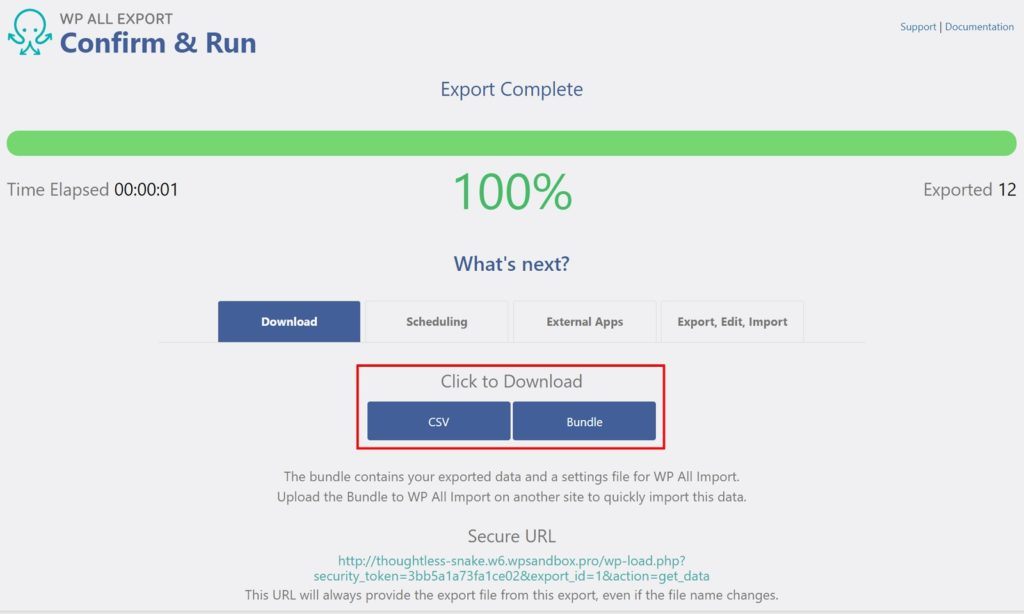
To download your exported orders, click the CSV button in the Click to Download section of the screen.
And that’s it — that’s all you have to do to create a simple WooCommerce order export!
Now, let’s see what kind of advanced order export tasks you might have to perform.
Advanced Order Export Tasks
Filtering Your WooCommerce Order Exports
Other than migrating a WooCommerce store to another site, it is rare to export all of your WooCommerce orders, especially after a store has been in business for a while. It is far more common to export a subset of your orders.
WP All Export offers several methods of controlling which WooCommerce orders are exported.
Filtering Order Exports with Advanced Options
Although the three options at the top of the Advanced Options section of the Export Settings screen are not technically filters, they have the same effect:
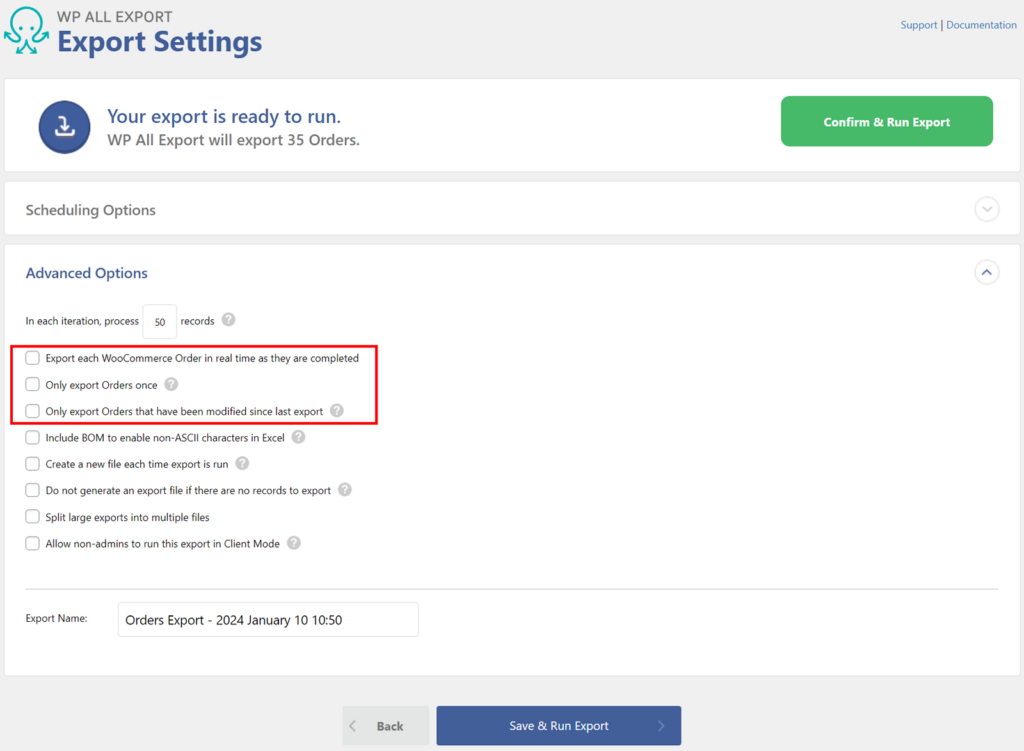
Here is a description of these options.
- Export each WooCommerce Order in real time as they are completed. As the description implies, this option outputs your orders one by one as they are completed. This is ideal if you are using a 3rd-party fulfillment service and you want to initiate shipment the moment an order is completed.
- Only export Orders once. This option makes sure that only orders that were not previously exported make it into the current export. This is a great way to avoid sending duplicate orders to your recipient.
- Only export Orders that have been modified since the last export. Self-explanatory. If you check this option and the preceding option, you can export only new or modified orders, which is a common requirement for updating accounting systems.
Basic Order Export Filters
You can create explicit order filters in the Add Filtering Options section at the bottom of the New Export screen:
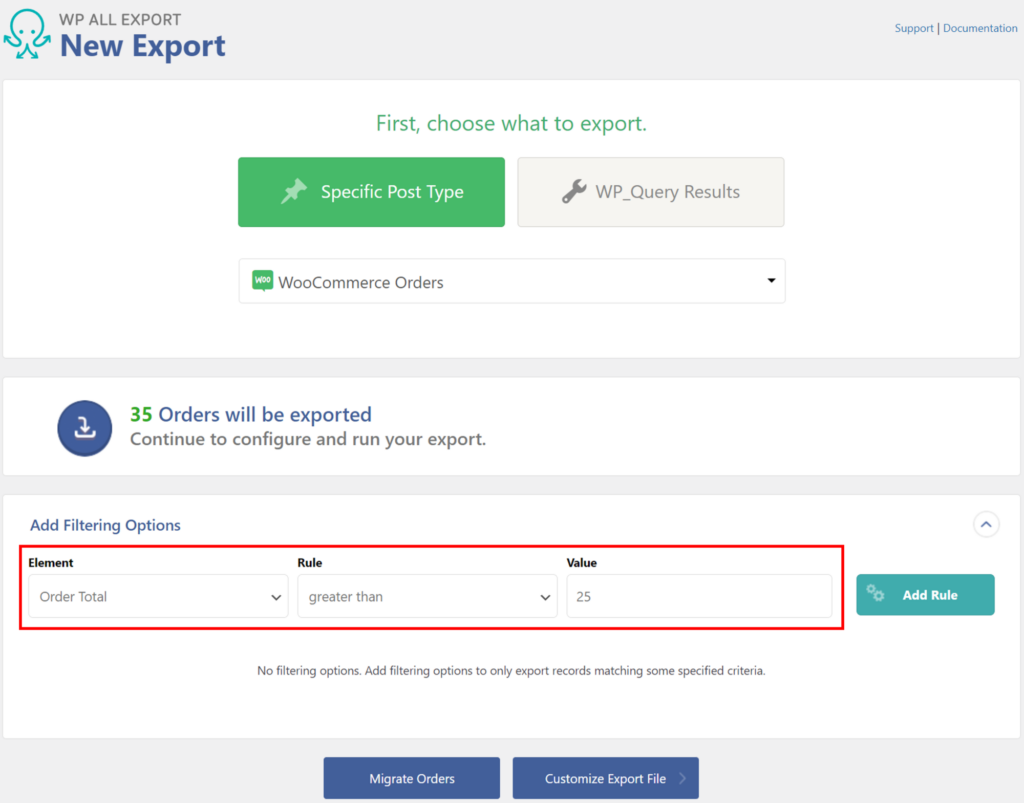
Filters consist of one or more conditions joined with either an AND or OR operator. Each condition consists of an Element, Rule, and Value. In the example shown above, we’ve created a filter to restrict our WooCommerce orders to those with an Order Total greater than $25.
Combining Filter Conditions
In this next example, we’ve used multiple conditions to restrict our export to orders with an Order Total between $25 and $50 and an Order Status of “wc-pending”:
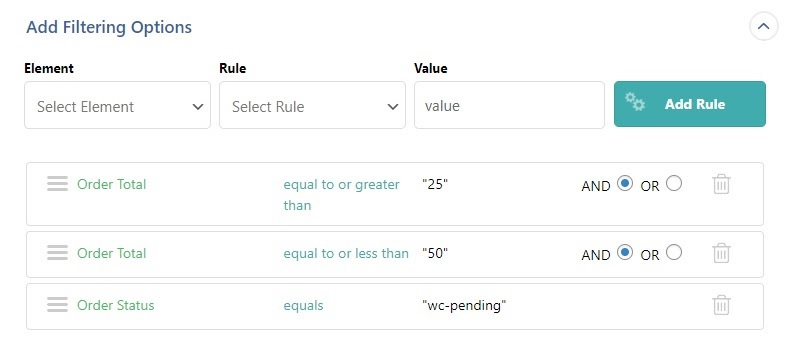
Note that each of these conditions is joined with an AND operator, meaning that the orders must meet all of the conditions.
Grouping Filter Conditions
What if we want a more sophisticated filter, one that selects orders with an Order Total between $25 and $50 OR an Order Status of “wc-pending” and an Order Total > 50?
To write this by hand, we would have to use parentheses like this:
Order Total >= 25 AND Order Total <= 50 OR (Order Status = “wc-pending AND Order Total > 50)
How do we represent parentheses in the interface? We simply drag the last Order Total filter condition inside the Order Status condition:

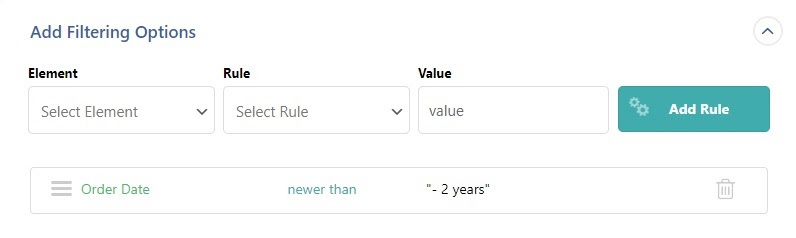
Relative Date Filters
For many order exports, especially if they’re recurring exports, we don’t want to use literal date filters because they’ll quickly become invalid.
Instead, we want to use relative dates. For example, this filter condition selects only those orders with an Order Date less than two years old:
This filter condition selects orders with an order date that equals last month:
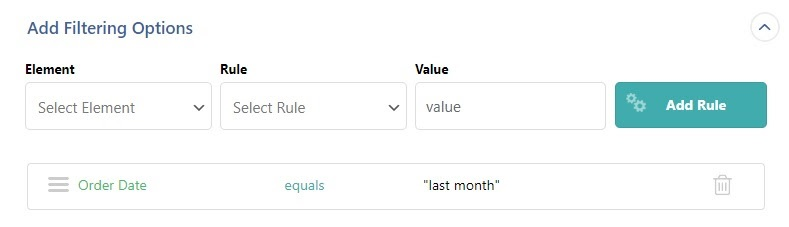
Note that these conditions won’t return any records for the sandbox data because it’s too old, but terms like “last month” or “this month” are very common for order exports.
Filtering Order Exports With PHP
If you need even more advanced order filter capabilities, WP All Export allows you to create any filter imaginable using its API, which is a large set of WordPress hooks that you can read about at Hooks Provided By WP All Import and WP All Export.
Modifying Order Export Values “On the Fly”
WooCommerce orders are often exported to external systems. These could be accounting, marketing, or shipping systems.
In these scenarios, it is quite common for the data requirements of the target system to differ from the way the data is stored in WooCommerce.
For example, you may be asked to combine multiple fields into one. This is quite simple with WP All Export. In the Drag & Drop screen, start by clicking the Add Field button:
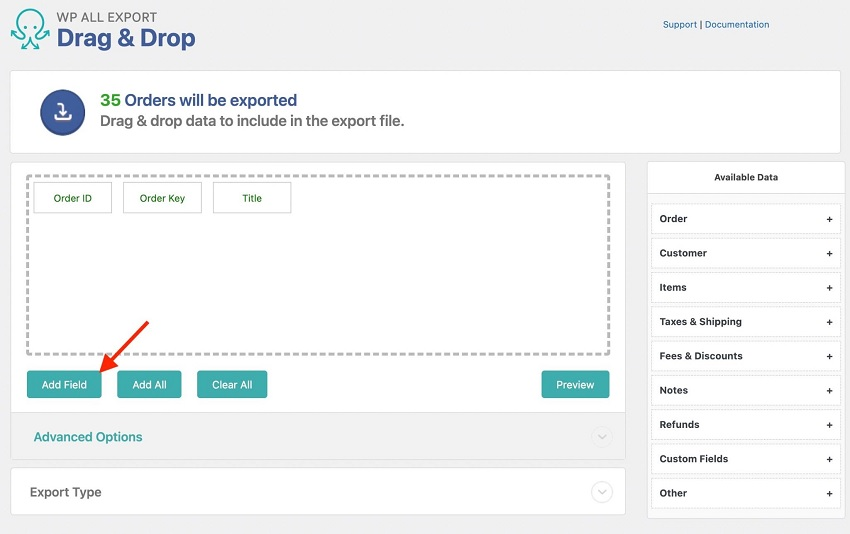
This opens a form that lets you create a new order export field using the following steps:
- Choose the Custom export field option.
- Drag and drop the Billing First Name and Billing Last Name fields from Available Data › Customer into the edit box below the Custom export field option. Insert a space between them.
- In the Column name edit box at the top, type “Name”.
Your form should look like this:

If you click the green Preview button on the bottom, you will see that the Name field does indeed combine the first and last names.
You can do this with any combination of fields. You can even combine literal values with the fields. For example, you can use this technique to create customer address information with proper labels.
However, sometimes, you may need more advanced capabilities. For example, say you need to replace certain text values with others. You can do this by using an inline PHP function like this:
[str_replace(“Shirt”,”T-Shirt”,{Title})]
This uses the standard PHP function str_replace() to replace all instances of “Shirt” with “T-Shirt” in the Title field.
There are scores of standard PHP functions at your disposal, including this list of the 100 most popular.
What if none of the standard PHP functions meets your requirements? In that case, you can build your own. For example, say you want to add a shipping method to your orders based on their weight:
- < 10 lbs = USPS;
- Between 10 lbs and 30 lbs = DHL;
- > 30 lbs = Knight-Swift Freight;
To achieve this, enter the following in the Function Editor:
function output_shipping($weight){ if($weight <= 10) { return “USPS”; } else if ($weight > 10 && $weight < 30) { return “DHL”; } else if ($weight >= 30) { return “Knight-Swift Freight”; }}
Next, click the Save Functions button near the bottom of the form. This creates the custom PHP function.
To call that function, enter the following in the edit box below the Custom export field option:
[output_shipping({Weight})]
Finally, enter “Shipping Method” as your Column name. Your form should now look like this:

Click the Save button to save the field and close the form.
Back in the Drag & Drop screen, drag the Items › Advanced › Weight field from the Available Data panel into the column selection area, then click the Preview button.
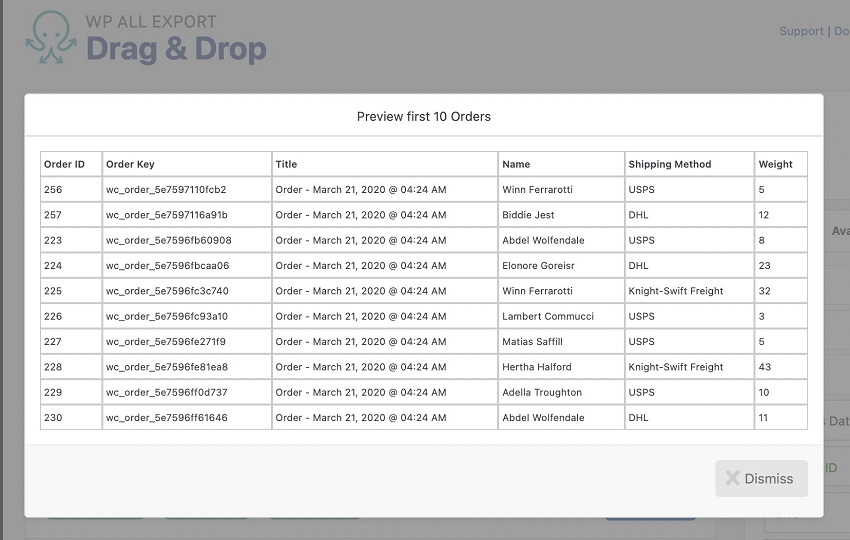
As you can see, there is now a Shipping Method column, and its values have clearly been generated by your custom PHP function.
For more information on these topics, see Combine and Process Multiple Data Elements into a Custom Export Field and How to Pass Exported WordPress Data Through PHP Functions.
Creating XML Feeds for WooCommerce Order Exports
Often, the data input requirements of external systems include specific file formats, such as XML.
Simple Order Export XML Feeds
Creating a simple XML export is similar to that of a CSV or Excel export. In the Export Type panel of the Drag & Drop screen, just choose Feed instead of Spreadsheet, then select Simple XML Feed, as shown here:
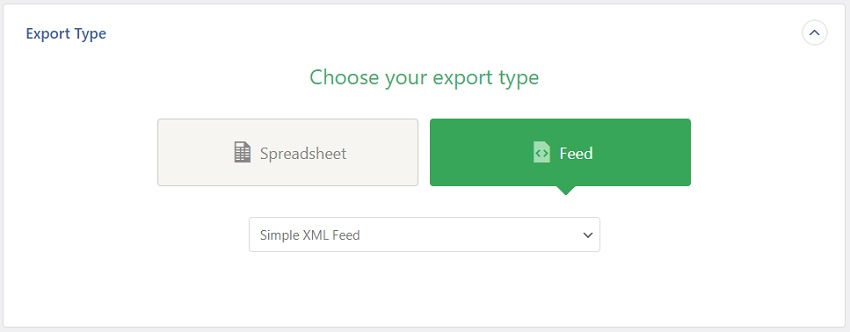
This will produce the default XML structure.
If a field you are exporting contains multiple data values, those values will be separated by a pipe delimiter (I). For example, here is what an image field with multiple images might look like:

You have limited options to change the structure of a simple XML feed. Basically, all you can do is add, delete, rename, and/or reorder the columns in the column selection editor, just as you would for a CSV or Excel export.
Custom XML Feeds
To gain more control over your XML order exports, choose Custom XML Feed as the Feed type:
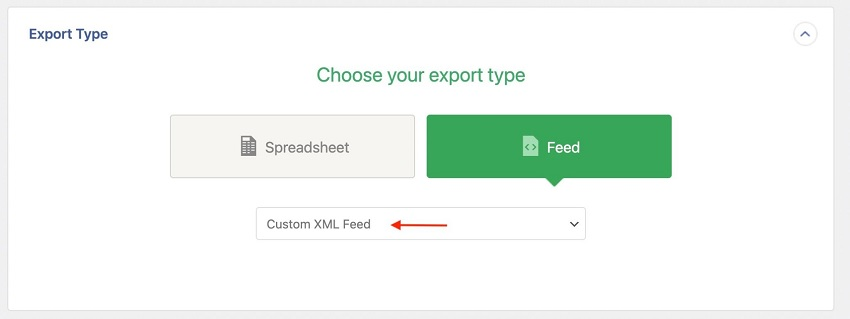
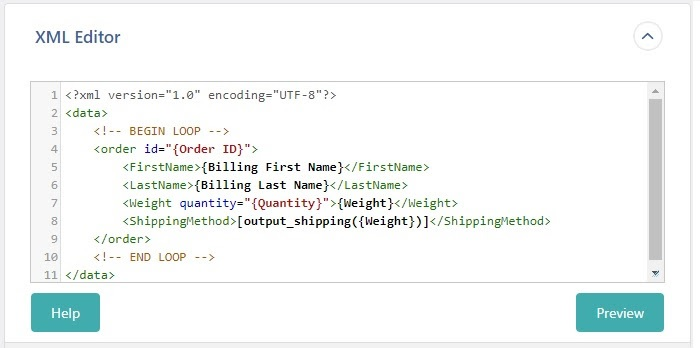
In response, WP All Export will open its XML Editor:

This editor lets you manually create your XML structure. To start this process, you typically drag fields from the Available Data panel and drop them between the <!– BEGIN LOOP –> and <!– END LOOP –> comments. These two comments mark the beginning and end of the loop that will eventually process the orders that match your filters.
You have complete control over how you build your custom XML feed from there. You can rename elements, nest them, add them outside the basic loop, create custom loops, and more. In this next example, we’ve even embedded the custom output_shipping() PHP function that we created earlier:
For more information on creating custom XML feeds, see Custom XML Feeds for WordPress.
Handling Large WooCommerce Order Exports
Large order exports can trigger two problems:
- Servers impose limits on the duration that a process can run. This is needed because long-running processes can exhaust a server’s resources and grind it to a halt. To avoid this problem, large order exports are broken into batches, but if a batch size is too large, it can still exceed the server’s limit.
- Servers can also impose size limits on the creation of files. Otherwise, a file might consume all the disk space. If a WooCommerce order export is large enough, the export file might exceed this size limit.
WP All Export lets you manage these issues in the Advanced Options section of the Export Settings screen:
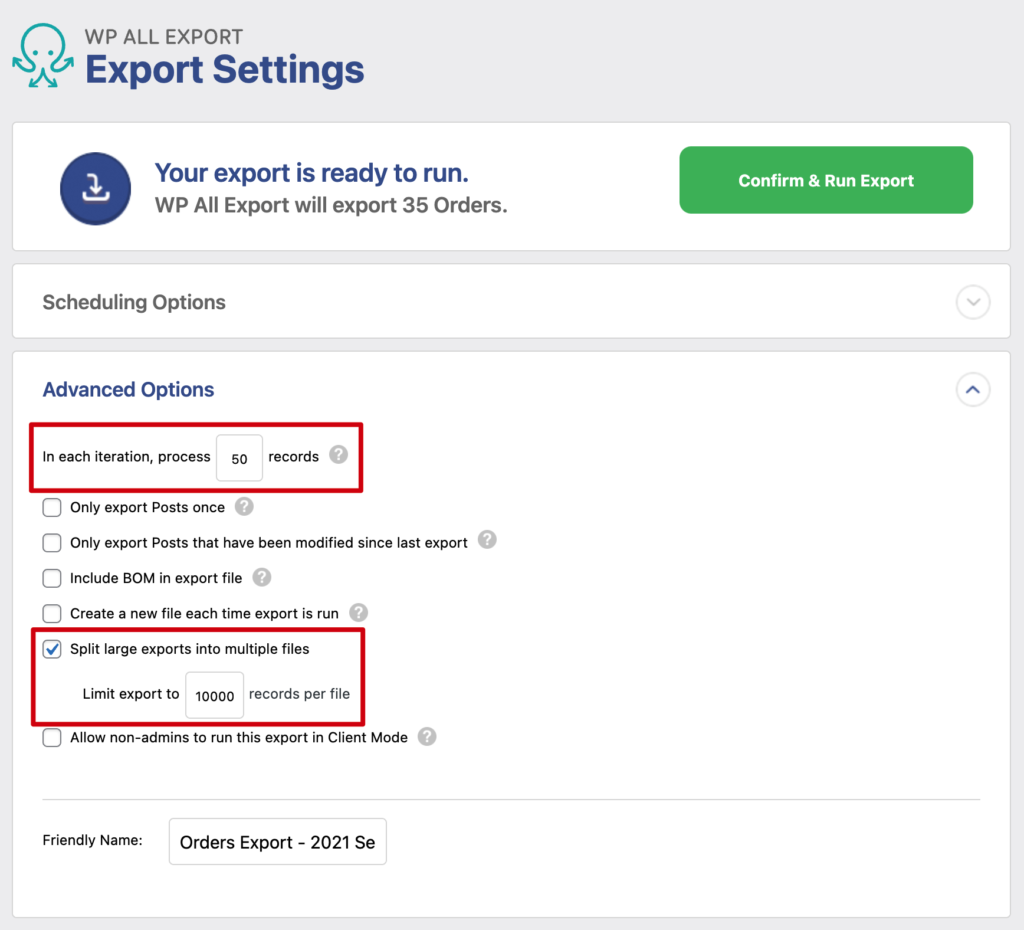
The first option manages the batch processing size for the order export. If your export process times out, lower this number and try again. However, if you set it too small, you may greatly increase the overall time for your export, so you have to balance these issues.
The second option lets you split your export file into multiple files consisting of a maximum record count. This lets you overcome the file size limitations. However, if you set this number too low, you’ll end up with too many files. So, again, you have to strike a balance.
Advanced Order Export for WooCommerce — Related Docs
Export WooCommerce Orders to CSV, Excel, and XML
How to Import and Export WooCommerce Orders
Exporting WooCommerce Orders with WP All Export: Full Review
The 5 Best WooCommerce Order Export Plugins
Advanced Order Export for WooCommerce — Related Videos