Exporting WooCommerce products can vary from outputting a simple product list to meeting the complex requirements of the Google Merchant Center. In this article, we show you how to handle all of these tasks using the same powerful tool.
There are three main options available for exporting products from WooCommerce. Let's walk you through each of them, from the most basic to the most feature-rich and advanced.

The Default WooCommerce Export Tool is a simple built-in feature of WooCommerce that allows you to export products in a CSV file format. You can access the tool by navigating to Products › All Products in the main WooCommerce menu and clicking the Export button. This option serves as a quick data dump but does not allow control of the export column layout, which may be a limitation for users who require a specific column arrangement.
Other drawbacks of the default export tool include:
For users who require more advanced capabilities, the Product CSV Import Suite or WP All Export may be more suitable.

The Product CSV Import Suite is a premium WooCommerce extension that provides a few additional features over the default export tool. It lets you bulk edit and bulk delete products, as well as import product images, categories, tags, and other product data.
However, this suite has some of the same limitations as the default tool. It still offers limited filter capability, output format control, and scheduling options. Users who require more advanced features and capabilities may find WP All Export to be a more suitable option.

WP All Export is a premium solution for exporting WooCommerce products and all WooCommerce and WordPress data using the same convenient interface. It provides users with the ability to:
This makes WP All Export a powerful and versatile plugin that can handle even the most complex product export requirements. And not just products. It can also export WooCommerce orders and customers, WordPress users, pages, and posts, and pretty much anything else.
In addition to these advanced features, this plugin also offers complete control over product variation data and custom XML product feeds. This makes it ideal for users who need to export variable products or create product feeds for the Google Merchant Center.
Now that we’ve introduced WP All Export, let’s examine the basics of using this plugin to export WooCommerce products, which involves four main steps:
Go to All Export › New Export, select an export post type of WooCommerce Products, and click the Customize Export File button.

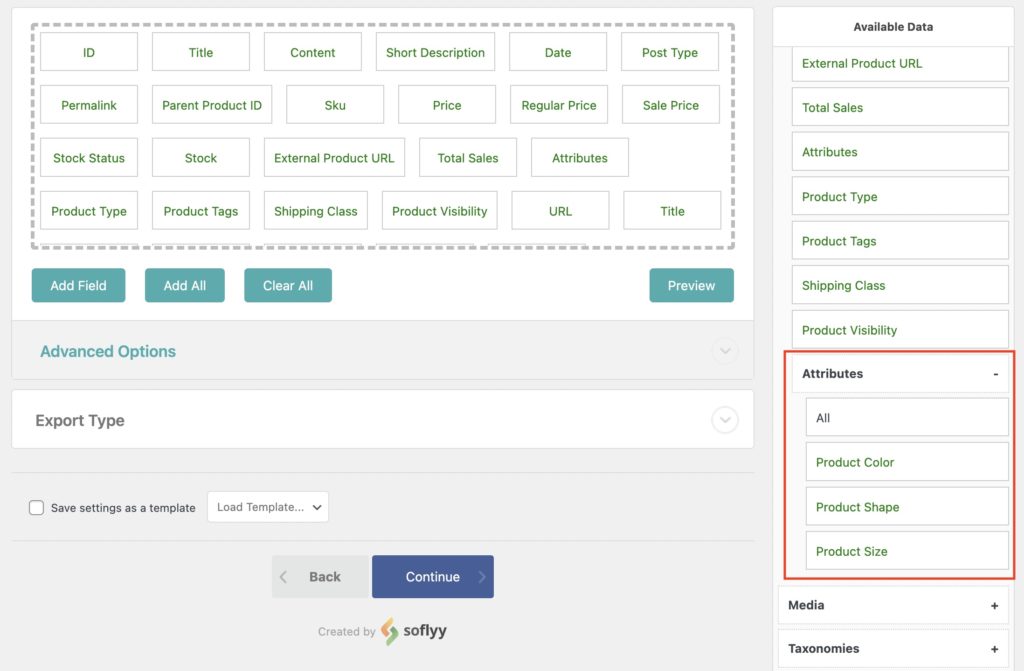
Most product exports require only a subset of all the product fields.
To add a field to your product export, drag it from the Available Data section to the column selection area:

To remove a column from the export, drag it from the column selection area and drop it outside that area.
When your export columns are the way you want them, click Continue.
When you're ready to run your export, click Confirm & Run Export. This will bring you to the Export Settings page:

There are many important settings on this screen, including the ability to schedule your export, control the batch processing size, and split large exports into multiple output files.
For now, accept the defaults and click the Confirm & Run Export button to start the export.
Once the export is complete, you can download a CSV version of your file by clicking the CSV button in the Click to Download section.

Here's a quick look at the output:

While WP All Export is designed for simple WooCommerce product exports that can be completed in seconds, it also offers a range of advanced capabilities for more complex export requirements. Some of these advanced features include:
One common requirement for exporting WooCommerce products is to include product images in the export file. WP All Export simplifies this process by allowing you to drag and drop your WooCommerce product image fields from the Available Data section into your export.

For more information, see How to Export WooCommerce Products with Images.
Variable products are products that come in different versions, such as different sizes, colors, or materials. Exporting these products can be a bit more complex than exporting simple products, but WP All Export makes it easy to manage variable product data.
To export variable products, you must follow these steps:
This will ensure that the exported file contains all the necessary data for your variable products, making it easy to import the variations into another WooCommerce store or bulk edit them.
To learn more, see How to Export WooCommerce Variable Products.
Another advanced capability of WP All Export is the ability to filter product exports based on specific criteria. This can be useful if you only want to export a subset of products, such as products in a certain category or products with a specific status.
WP All Export allows you to create custom filters for your product exports so that only the desired products are included in the exported file. For instance, you can choose to export products that are currently on sale, products that have reached a specific sales threshold, or products that were added to your store before or after a certain date, and so on.
Whether you're preparing for a seasonal sale and need to export all discounted items, or you're analyzing your best-selling items and want to export products that have reached a certain sales threshold, this plugin has you covered.
To apply filters to your product exports, follow these steps:
In this example, we are filtering to select only variable products:

For more information, see How to Filter Exported WordPress Data.
Scheduling product exports is another advanced feature offered by WP All Export. This allows you to set up recurring exports that run automatically at specified intervals, such as weekly or monthly. There are two options for scheduling WooCommerce product exports. You can use cron jobs to manually schedule an export, or you can point and click to schedule the export using WP All Export's Automatic Scheduling service.
Use Cron Jobs To Manually Schedule the Export
If you're a fan of having more control over your export scheduling, WP All Export gives you the power to configure cron jobs on your server. This is a perfect fit for those who like to customize their export schedule and have a tighter grip on the export process. Cron jobs are an excellent method to automate the export process and ensure your data is always fresh off the press. However, setting them up does require a bit of time, and they might not be the most user-friendly.
Use WP All Export's Automatic Scheduling Service
If the idea of manually scheduling exports doesn't appeal to you, WP All Export's Automatic Scheduling service is the answer to your prayers. With a simple point and click, you can set up your export schedule, and this service will initiate the export on your site and ensure it runs smoothly until completion.
With the Automatic Scheduling Service, you can quickly set up your export schedules and not worry about manually managing a bunch of cron jobs.

To learn more, see Run WordPress Export on a Schedule.
Creating a product feed for the Google Merchant Center is another advanced capability offered by WP All Export. This feature allows you to generate a custom product feed that meets the requirements of the Google Merchant Center, enabling you to upload your WooCommerce products to the platform with ease.
Google Merchant Center has pretty strict requirements on how your data needs to be structured. Even worse, your actual data has to meet their standards. The product categories are perhaps the most stringent. They have an enormous list of product categories, and each one of your products must be individually matched to their list. Usually, you'd need to change all of the categories in your store to match their format. Not with WP All Export, where you simply point and click to match your existing product categories to theirs.

To create a Google Merchant Center product feed, simply follow these steps:
This will configure your export file to meet the feed format requirements of the Google Merchant Center, making it easy to upload your WooCommerce products to the platform and drive sales.
For more information, see How to Export WooCommerce to the Google Merchant Center.
WP All Export also allows you to export WooCommerce products to different file types, such as Excel or XML. This can be useful if you need to work with product data in a specific format or if you’re importing products into another platform that requires a particular file type.
To export WooCommerce products to a different file type, follow these steps:
When it comes to exporting your WooCommerce products to XML, you have two ways to generate an XML feed. For basic feeds, you can select Simple XML Feed and use a straightforward drag-and-drop interface to set up your export. This interface is user-friendly and intuitive, ideal for those who are new to exporting products or who prefer a more visual approach and don't have specific requirements. You simply select the data you want to include in your export, then drag it to the desired location in your export file. This approach is not only easy to use, but it also allows for quick adjustments and modifications so you can fine-tune your export to your exact requirements.

However, for more complicated WooCommerce product XML exports, you can select Custom XML Feed and take complete control over your export. Here, you're given the freedom to write a specific XML spec using an easy-to-understand custom XML syntax. You can specify the XML namespace and element attributes, and even define nested and looping XML elements. This option is perfect for those who have more complex export needs and require a higher degree of control over their export format. Whether you need to include specific product attributes, create nested elements to represent product variations, or include additional metadata in your export, the custom XML export option provides the flexibility and control you need to create the perfect export for your needs.
To learn more, see Export WordPress to CSV, Excel, and XML.