
The Best Way to Import WooCommerce Product Tags

You have a spreadsheet of 500 products and a column of tags sitting next to the titles. WooCommerce stores tags on the products themselves, and it gives you no bulk way to put them there. Products › Tags creates the terms one at a time, then leaves you opening every product to attach them.
There are two ways to get those tags onto the products. One is to keep the tags in the product spreadsheet, so they arrive with the titles and prices. The other is to build the tag list first and apply it to the products in a second import.
In this guide, I will cover both methods of adding WooCommerce product tags, with the file layout each one needs and the checks worth running before you import.
What Product Tags Do That Categories Can’t
Categories work like a filing cabinet. Every product sits in one branch, and that branch tells a shopper where they’ve landed. Tags aren’t built for that job.
A product tag is flat. There are no parent tags, no subtags, and no hierarchy to lean on, which is exactly why tags suit traits that cut across the whole catalog. A furniture store with categories for dining, living, and storage can tag two hundred products Solid Oak without moving a single one out of place.

That freedom gives every tag its own archive at /product-tag/solid-oak/, a page shoppers can land on and search engines can index. Tags also feed WooCommerce’s built-in product search and most faceted filtering plugins, so a tag that describes something real earns its keep twice.
The trade-off comes from the same freedom. With no structure above a tag, the name is the only structure it has. Solid Oak and solid-oak are two terms, two archive pages, and two halves of the same idea.
Why Tag Imports Break More Often Than Product Imports
Products come with guardrails. A SKU has to be unique, a price has a format, and a bad row gets rejected. Tags have none of that.
Case and spacing create new terms. Summer, summer, and summer are three tags, three archive pages, and three URLs competing for the same intent. The import doesn’t merge them, because nothing in the file says they’re the same word.
Supplier language isn’t shopper language. A feed that ships AW24-DROP or WH-B creates an archive nobody will ever search for, sitting in your sitemap next to your real pages.
The native importer expects CSV. Products › All Products › Import reads CSV and TXT, with tags in a comma-separated column. A supplier workbook gets converted before anything else can happen.
One-product tags. A tag attached to a single item becomes a page with one product on it, which is the thinnest page a store can publish.
Two Ways to Import WooCommerce Product Tags
Both routes run through WP All Import. The plugin reads CSV, Excel, XML, and Google Sheets files without a conversion step, and adds the product fields, including the Tags field, so tag names come in as one more column. Automatic Setup builds the mapping from the header row, and every import checks each incoming name against the terms already in the database before creating anything new.

That check is why the plugin suits tags. WordPress treats solid-oak and Solid Oak as separate terms, and the import only reuses a tag when the name matches exactly. So the two routes below differ less in what they do than in where the tag names live.
With products. Tags come in with the product import, in one column beside the titles and prices. Choose this when the tags belong to specific products and those products are being created or updated in the same run.
Standalone taxonomy. Tags import as their own file, one term per row, through Taxonomies. Choose this when the tag list is the whole job: a migration, a seasonal set, a bulk rename. This route creates the terms, and it doesn’t attach them to products.
Both routes match incoming names against terms already in the database, so an existing solid-oak gets reused instead of duplicated.
| Route | Choose it when | Import type | What the file needs |
|---|---|---|---|
| With products | Tags arrive with product data | WooCommerce › Products | A Tags column, comma-separated per row |
| Standalone taxonomy | You only need the terms created | Taxonomies › Product tags | One term per row with Name and Slug |
How to Import WooCommerce Tags Alongside Your Products
This is the method most stores need, since tags usually arrive inside the same spreadsheet as the products.
Step 1: Put the Product Tags in Their Own Column
Each product keeps its tags in a single cell, separated by commas, like Solid Oak, Handmade, Dining. Remove the spaces after those commas and settle the spelling before you upload. If one row says Eco-Friendly and the next says eco friendly, you end up with tags that look like two entries when you open Products › Tags, and cleaning that up later takes longer than typing it right once.
Step 2: Upload the file and Choose Products
Go to All Import › New Import and click Set up automatically. Add your source file, then set Choose What to Import to WooCommerce and Products. If the tag column needs explaining, put a line in Add Setup Instructions before you click Start Automatic Setup.
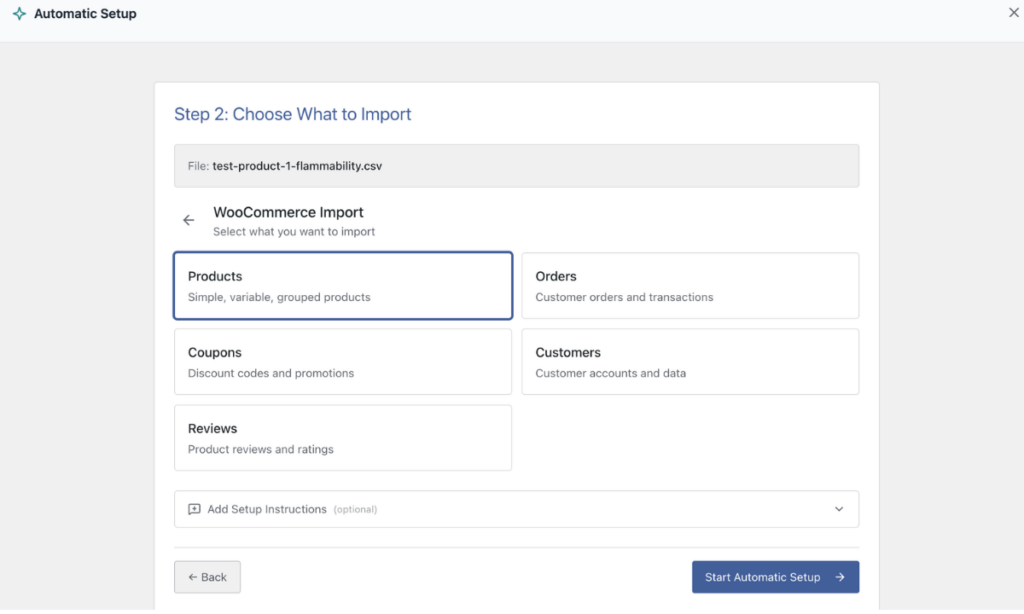
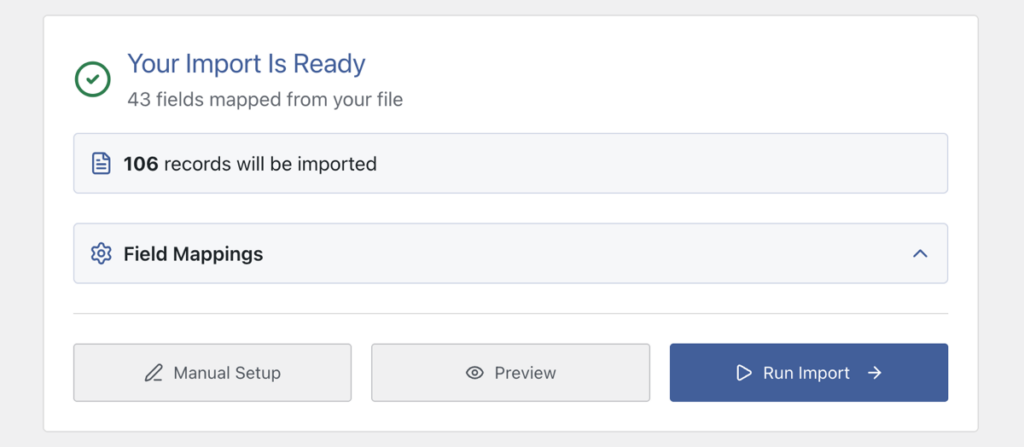
The mapping happens on its own from here. There’s no drag-and-drop screen: the plugin reads the header row, works out which column holds the tags, and pairs it with the Tags field. Wait for the Your Import Is Ready screen to finish.
Step 3: Check the Mapping and the Terms
That screen reports how many fields were mapped. Expand Field Mappings and confirm your tag column sits against Tags.
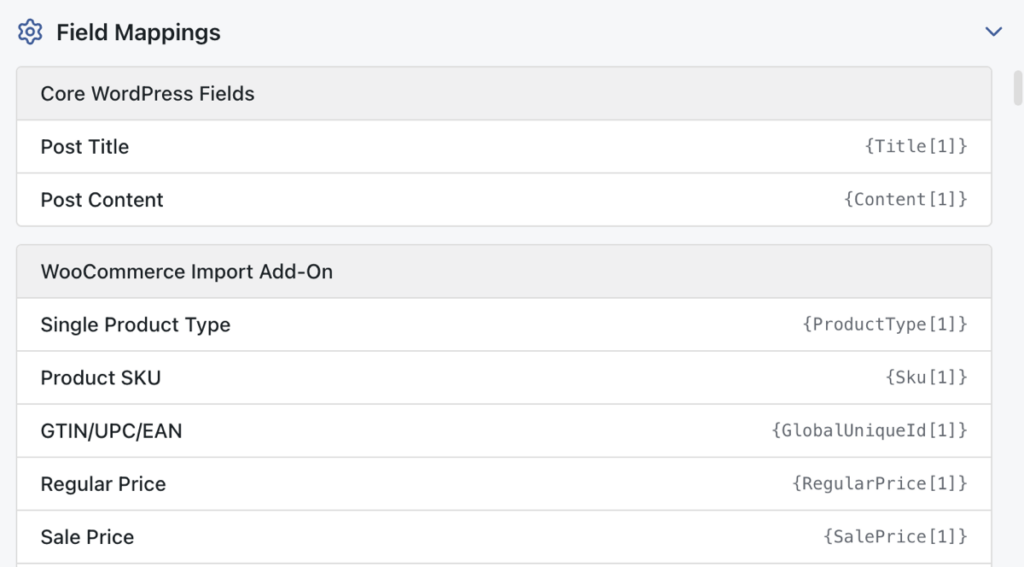
It’s also where a separator problem shows up. If the values landed as one long tag name, click Manual Setup. The drag-and-drop editor opens with everything Automatic Setup produced still in place, so you change the separator on the Tags field and leave the rest alone.
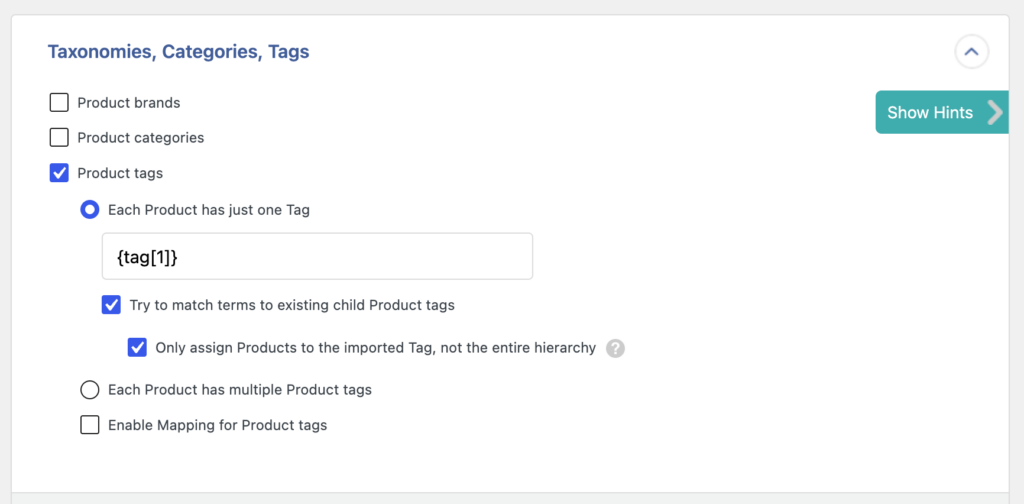
Before you run it, open Products › Tags in a second tab and note the term count. Then compare after the import: six unique tags across 400 products should add six terms, not 400.
Set your Unique Identifier on the Import Settings screen, click Run Import, and read the log for any row that failed.
Importing WooCommerce Product Tags as a Standalone Taxonomy
Use this when the terms themselves are part of the import: a platform migration, a seasonal list, or a batch of tags you want to exist before any product uses them.
Step 1: Build the WooCommerce Tag File
You only need two columns to begin with: Name and Slug. Add a description column if you want text on the archive pages, and keep one term per row. Keep the slugs lowercase with hyphens, since that’s what ends up in the URL.
The source can be Excel, CSV, XML, or a shared Google Sheets link. Nothing needs converting first, which is the main reason this route is quick when the list already exists somewhere.
Step 2: Choose Taxonomies, Then Product Tags
Start the import through Set up automatically and add your file. Where it asks what you’re importing, choose Taxonomies rather than WooCommerce, then pick Product tags as the taxonomy.

That choice is worth slowing down for. Both options sit in the same list, and picking Products gives you product records instead of terms.
Step 3: Confirm the Tag Fields and Run
Automatic Setup maps Name and Slug on its own. Open Field Mappings and check that both landed, because a file where only the name column was recognized leaves every slug to be generated from the name. That works until two tags share a name.
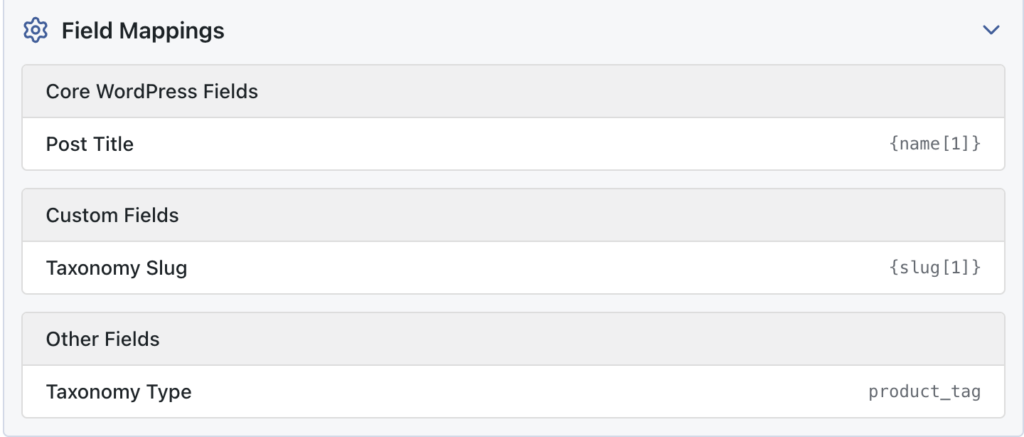
Set the identifier to the tag name, run the import, and open Products › Tags. The terms exist now, and none of them are attached to a product yet. Applying them means the product route above, or editing each product by hand.

Keeping Tags From Multiplying on the Next Import
Incoming names are matched against existing terms, so solid-oak in next month’s workbook reuses the tag already in the database. A different spelling creates a third term, which is why the spreadsheet, not the store, is where you fix it.
Sort Products › Tags by the Count column before each import. Anything with one product is a candidate for merging into a stronger term, and deleting a tag only removes the archive, never the products.
For renaming at scale, export the taxonomy using WP All Export, edit the names in a spreadsheet, and import the file back using WP All Import. Editing 200 tags by hand in wp-admin is the version of this job that takes an afternoon.
Which Method Is Best for Importing Product Tags?
For most stores, the answer is the product route, because tags rarely arrive on their own. They come attached to rows that also carry a title, a price, and a stock count, and one import handles all of it.
The taxonomy route earns its place in three situations: migrating a tag list from another platform, building a set of terms that marketing wants to exist before launch, or renaming a large batch after an export.
WP All Import covers both through Automatic Setup, matches existing terms instead of duplicating them, and reads CSV, Excel, XML, and Google Sheets. The file you have is the file you import, whichever route you pick.
More Questions on Importing WooCommerce Product Tags
Can I Import Product Tags Without Reimporting the Products?
Yes, through the taxonomy route: Taxonomies › Product tags create the terms on their own. The catch is that a standalone import doesn’t attach those terms to products, so you’d still need a product import or manual edits to apply them.
Why Did My Import Create Duplicate Tags?
Spelling differences. Summer, summer, and summer are separate terms in WordPress, and so are eco-friendly and eco friendly. Clean the column before uploading, and WP All Import will reuse the existing term rather than creating a second one.
Do Imported Tags Need Their Own Oxygen Template?
Yes, if you want tag archives to look like the rest of the shop. Assign a template to Archive › Taxonomies › All Product Tags in Oxygen › Templates and add a Products List element inside it. One assignment covers every tag you import later.
Can I Import Tags From a Google Sheet?
Yes. WP All Import reads a shared Google Sheets URL directly, so a tag list maintained in a sheet can be imported or refreshed without exporting a file. The same applies to CSV, Excel, and XML sources.
How Do I Rename Tags in Bulk?
Export the product tags taxonomy, edit the names in a spreadsheet, and import the file back with the slug as the identifier. WP All Import updates the existing terms instead of creating new ones, and the tag archives keep their URLs.
Further Reading
- Importing WooCommerce Products with WP All Import: Full Review
- Best WooCommerce CSV Product Import Plugins
- Best WooCommerce Bulk Edit Plugins
- Tutorial: How to Create a WooCommerce Shop Page Using Oxygen
- The Top 3 WooCommerce Product Search Plugins
Get Oxygen
Build it your way with Oxygen.
Not per year, not per site, not per seat. 60 day money back guarantee.