
How to Import Product Categories to WooCommerce

You have several options to import product categories to WooCommerce. If you want to import product categories as part of a product import, and that import is simple, you can use the built-in WooCommerce import tool at All Products › Import.
However, if your product import has even the slightest complexity, or you want to import product categories on their own, you’ll need an import plugin.
In this guide, I’ll show you how to import product categories in WooCommerce both directly as standalone taxonomies and automatically as part of a full product catalog import.
Table of Contents
- Importing WooCommerce Product Categories Directly
- Importing WooCommerce Product Categories as Part of a Product Import
- The Best Way to Import Product Categories into WooCommerce
Importing WooCommerce Product Categories Directly
Imagine that you’ve been sent a file containing product categories. To make this import task more interesting, let’s say that the product categories are organized in a hierarchical structure like this:

How would you import these categories into WooCommerce? Here are the steps:
Step 1: Create a New Product Category Import
Navigate to All Import › New Import in the WordPress main menu. At the top of the screen, click the Set up automatically banner to open the import wizard.
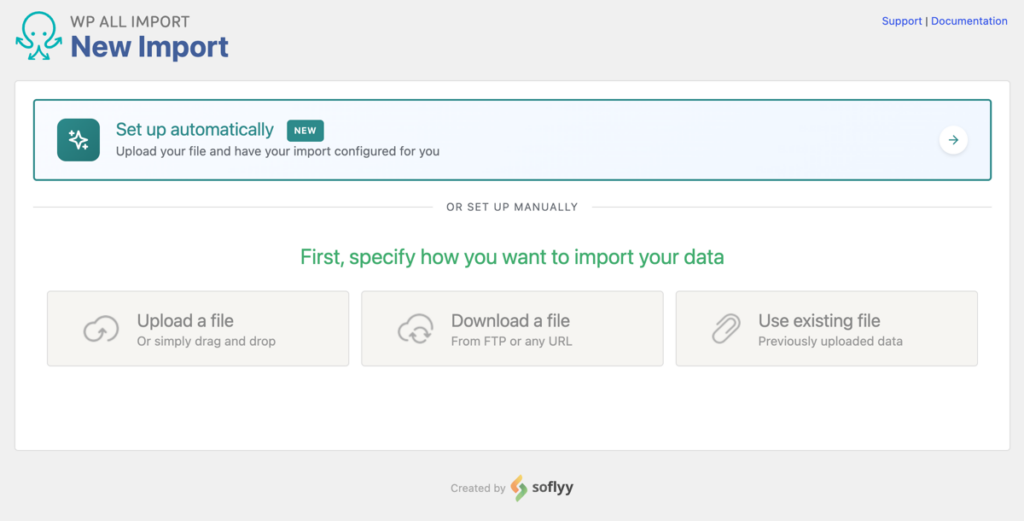
WP All Import lets you import product categories from CSV, XML, Excel, and JSON files up to 256 MB, as well as live Google Sheets URLs. Load your file, choose Taxonomies as the import type, and select Product Categories as the taxonomy.
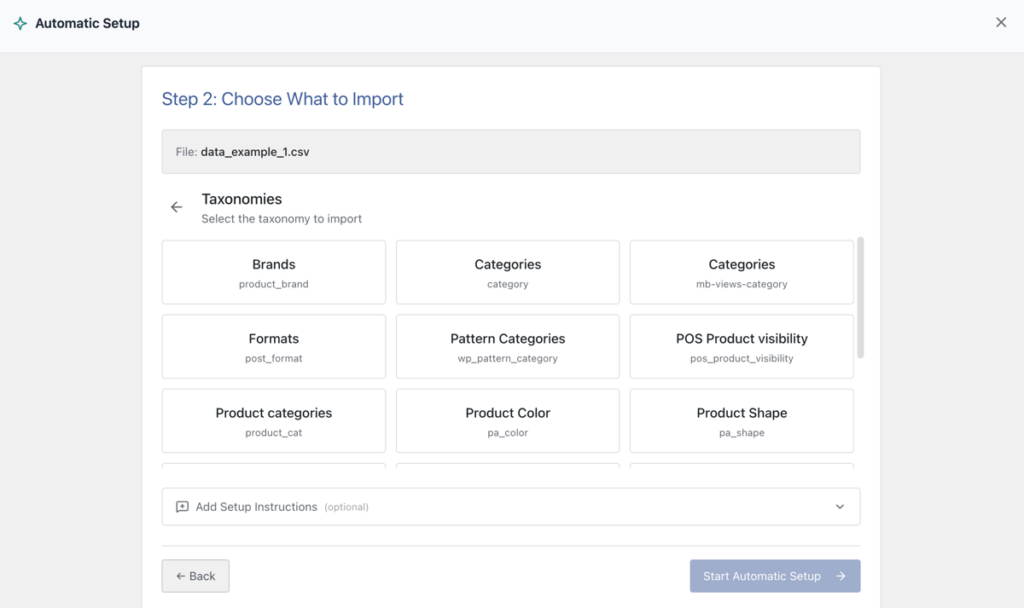
Click Start Automatic Setup to allow the plugin to analyze your file and map category terms and parent-child relationships automatically.
Step 2: Review the Product Category Import File
Once analysis completes, WP All Import displays the Your Import Is Ready summary card showing total category records and mapped fields.
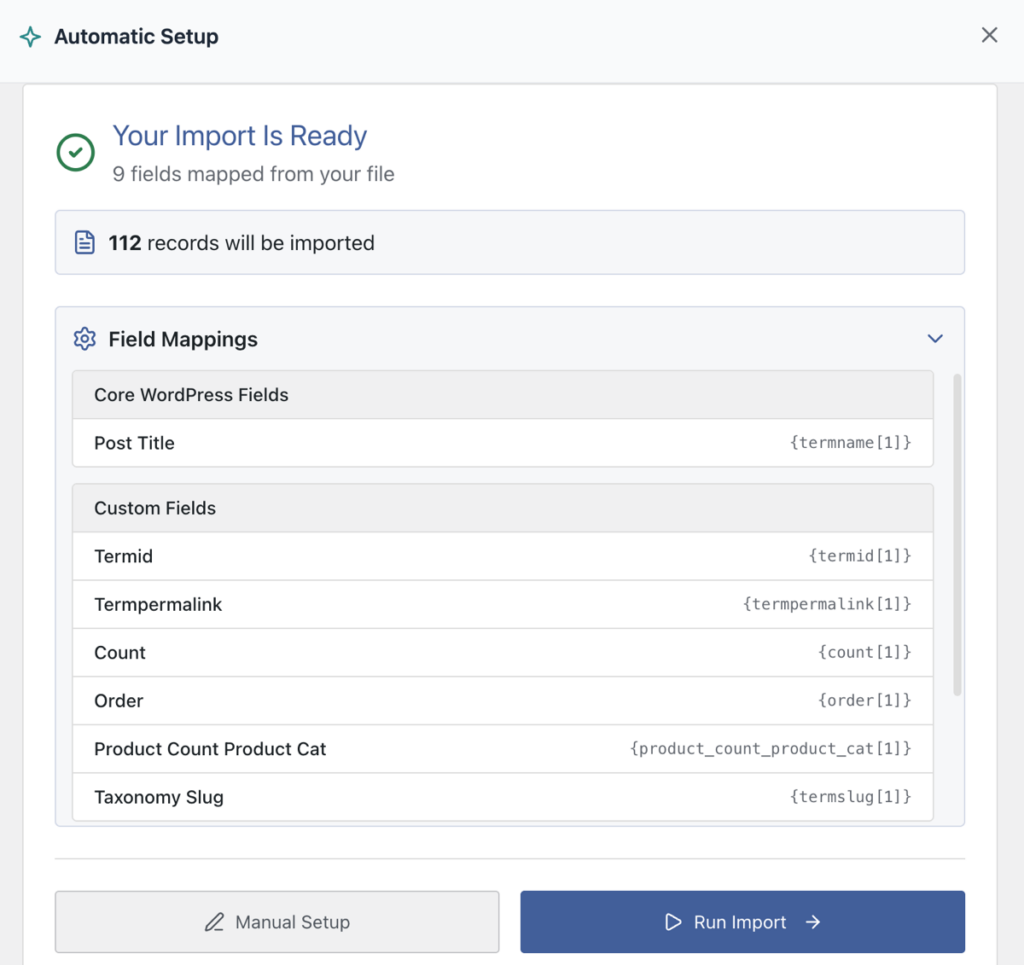
Check the summary card to ensure that WP All Import has successfully parsed your import file. If everything looks correct, you can run the import immediately or click Manual Setup to inspect field mappings.
Step 3: Review Auto-Mapped Category Fields in the Template Editor
The template editor opens with your category names and parent structures already in place, meaning you only need to step in if you want to make custom adjustments. Your source data appears in the panel on the right, while the pre-filled WooCommerce category fields sit on the left.
In the Name & Description section, you will see that the wizard has already assigned your incoming termname column to the Name field. If you want to customize your category titles, such as appending a department name or adjusting text formatting, you can edit the field directly or drag additional columns from the right-hand panel.

Scroll down to the Other Category Options section to check your category hierarchy.
The wizard automatically places the parentname data element into the Parent Term field. This tells WP All Import how to nest subcategories under their respective parent categories. If your spreadsheet uses different identifiers to define parent-child relationships, you can easily change this mapping to use parentid or parentslug instead.

This mapping tells WP All Import how to relate product categories to their parent categories. Using the parentname element is only one option. With this file, we could have also used the parentid or parentslug elements.
Once you have verified that the names and parent terms reflect your intended catalog structure, click Continue to Import Settings.
Step 4: Confirm Category Update Rules and Unique Identifiers
The Import Settings screen controls how WP All Import distinguishes between categories, handles recurring updates, and prevents duplicate taxonomy records.
At the top of the screen, confirm the Unique Identifier. Automatic Setup configures this key automatically (typically using the category slug or term name) to track each category across import runs. This ensures that if you re-run the import later with updated category descriptions or altered parent relationships, WP All Import updates the existing terms rather than creating duplicate entries.

Beneath the identifier, review the rules that govern subsequent runs of this import:
- Create new categories: Automatically adds new terms if they appear in future spreadsheet updates.
- Update existing categories: Refreshes category descriptions, parent assignments, or custom meta for matching terms. You can choose to update all fields or selectively update only specific fields.
- Delete categories: Removes or detaches terms in WooCommerce if they are no longer present in your source file.
If you are importing thousands of taxonomy terms, you can expand Configure Advanced Settings to adjust batch processing sizes, or open Scheduling Options to automate category syncs from remote feeds.
Once your update rules are confirmed, click Continue.
Step 5: Complete the Product Category Import
The Confirm & Run screen should appear next. This displays a summary of your intended import:

If everything looks okay, click Confirm & Run Import to start the import. Once the import finishes, the screen should update as follows:

After the import is complete, you should navigate to Products › Categories in the WordPress main menu to check that your data was imported as expected:

And that’s it — that’s how you import product categories directly!
Importing WooCommerce Product Categories as Part of a Product Import
Explaining how to import WooCommerce products requires a lengthy article, so we’re not going to present that information here. If you want a good overview of the topic, see How to Import WooCommerce Products.
In this section, we’re going to focus on the product category portion of a product import. When using WP All Import to import products from CSV, XML, Excel, or JSON, Automatic Setup automatically detects category columns in your spreadsheet and maps both flat and hierarchical categories on upload.
If you click Manual Setup to inspect the auto-mapped fields, you can review category settings under the Taxonomies, Categories, Tags panel.

There are many options on this screen, so we’re going to describe the ones we’ve used to match the simple hierarchical structure of the product categories used in the previous demonstration.
To start with, we’ve checked Product categories (first red rectangle) because we’re importing product categories in this example.
In the second red rectangle, we’ve selected Products have hierarchal (parent/child) Product Categories (i.e. Sports › Golf › Clubs › Putters) because our product categories are indeed hierarchal.
In the third red rectangle, we’ve selected An element in my file contains the entire hierarchy (i.e., you have an element with a value = Sports › Golf › Clubs › Putters) because if you look at the productcategories data element in the right panel, you will see that our import file does indeed use this approach.
What about the other options? In some cases, the hierarchy data in your import file may be spread across multiple fields, in which case you’ll have to manually identify those fields and how they relate to each other, like this:

In other situations, you may want to map the incoming product category values to different product category values in your store:

For more information on other possibilities, please see How to Import Taxonomies, Categories, Tags.
The Best Way to Import Product Categories into WooCommerce
The main point of this article is to make you aware that importing product categories to WooCommerce can be more complex than you might expect.
When this is the case, WooCommerce’s built-in import tool will not be able to handle the import. Nor can simple plugins. To handle the full range of scenarios for importing WooCommerce product categories, WP All Import is the most complete solution. Its Automatic Setup configures category taxonomies, parent-child hierarchies, and product assignments automatically across CSV, XML, Excel, and JSON files.
Import Product Categories – Frequently Asked Questions
How Do I Add Product Categories in Bulk in Woocommerce?
To import categories in WooCommerce, navigate to All Import › New Import in WP All Import, click the Set up automatically banner, and upload your category file (CSV, XML, Excel, or JSON). Select Taxonomies and choose Product Categories as the post type. Click Start Automatic Setup to detect category names and parent terms automatically, verify the summary card, and click Run Import.
How do I import product categories in WooCommerce as part of a product import?
To import product categories in WooCommerce during a product import, upload your product spreadsheet via All Import › New Import and select WooCommerce Products. Automatic Setup identifies category columns and hierarchy separators automatically. You can review mapped categories under the Taxonomies, Categories, Tags section in the template editor before running the import.
How Do I Add a WooCommerce Product Category Manually?
- Navigate to Products › Categories in the WordPress main menu.
- Fill in the fields on the left-hand side of the screen.
- Below these fields, click the Add new category button.
How do I export and import product categories in WooCommerce?
To export and import product categories in WooCommerce between stores, use WP All Export to export Product Categories as a Bundle file. On your destination website, upload the bundle zip file into WP All Import under All Import › New Import; the plugin reads the configuration template and executes the category import with zero manual mapping.
Import Product Categories – Related Docs
- How to Import WooCommerce Products
- How to Create a WooCommerce Product Import Template
- A Quick Look at Importing Variable Products into WooCommerce
- The 5 Best WooCommerce Product Import Plugins
Import Product Categories – Related Videos

Get Oxygen
Build it your way with Oxygen.
Not per year, not per site, not per seat. 60 day money back guarantee.