
A Quick Look at Importing Variable Products into WooCommerce
Importing variable products into WooCommerce can be quite challenging, depending on the state of the data you’re importing. Most of this challenge revolves around handling product attribute and variation data.
In these types of articles, we normally like to use a few different plugins for our demonstrations. However, in this article, we’re going to use WP All Import for all of our examples because we want to get into some data details, and it is much easier to do this using just one plugin.
Table of Contents
- What Makes Importing Variable Products Different?
- Setting the Product Type to Variable Product
- Mapping Incoming Data Elements to the Attributes Tab
- Mapping Incoming Data Elements to the Variations Tab
- Our Experience Importing Variable Products with WP All Import
- Wrapping Up
- Related Info
What Makes Importing Variable Products Different?
To help you understand the basics of importing WooCommerce products, please give this article a quick read: How to Import WooCommerce Products from CSV and XML. If you don’t do this, you may not understand the context of some of the screens we’re about to show you.
As you will see from that article, importing even simple WooCommerce products is not all that simple. You need to map a lot more incoming data elements to fields for WooCommerce products than you do for other data types, and those mappings can have a significant impact on how those products interact with your WooCommerce store.
Importing variable products adds another layer of complexity to the process and involves three specific touchpoints:
- Specifying that you are importing a variable product;
- Mapping incoming data elements to the fields in the Attributes tab of the WooCommerce Add-On section of the Drag & Drop screen;
- Mapping incoming data elements to the fields of the Variations tab in the same section;
Let’s have a look at each of these.
Setting the Product Type to Variable Product
This is a simple task with two different scenarios. The first scenario involves an import file that contains only variable products. In this case, you can simply set the Product Type to “Variable product” in the WooCommerce Add-On section:

As soon as you do this, the Variations tab will appear in the lower left portion of the screen.
The other scenario involves a file that contains multiple product types but has an incoming data element that identifies the product type for each product. In this case, you use the Set Product Type With XPath option. This opens up an edit field where you can drag the incoming data element that contains the product type for each product:
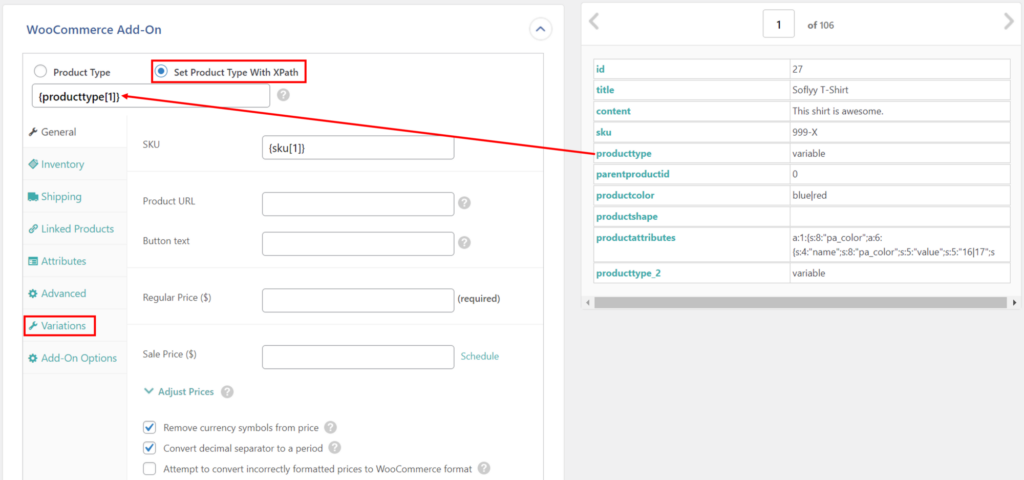
Again, the Variations tab will appear on the lower left.
Mapping Incoming Data Elements to the Attributes Tab
Attributes are data elements that allow you to describe certain qualities of a product. In many cases, such as size or color, they combine to form variations like a large blue sweatshirt. In other cases, they are used for added description of the product, such as whether it is flammable or machine washable.
You import product attribute data in the Attributes tab of the WooCommerce Add-On section of WP All Import’s Drag & Drop interface:
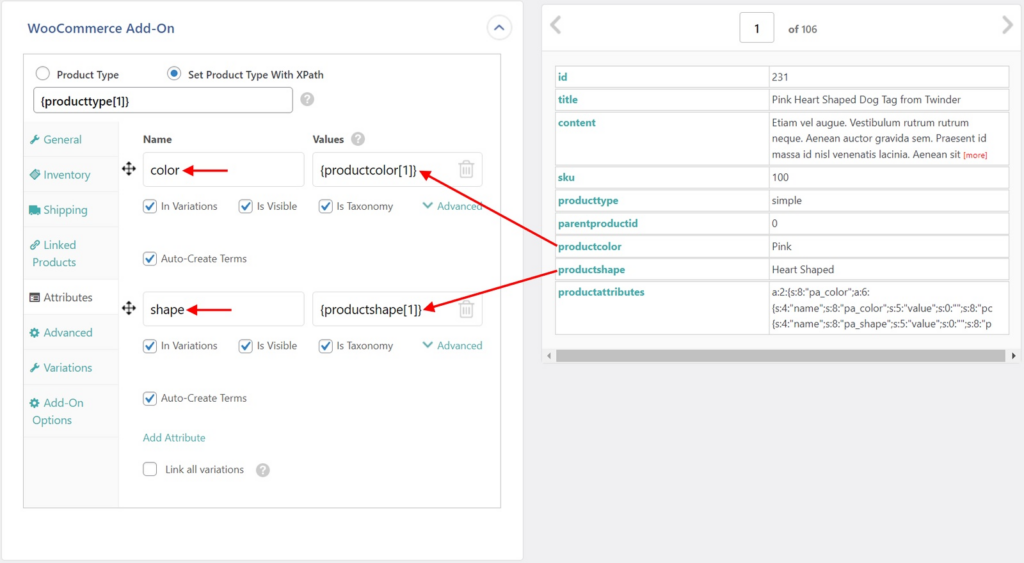
For each attribute that you want to import, you must do the following:
- Click the Add Attribute link, shown near the bottom of the above image. This creates a new attribute “row” in the tab, with each row consisting of two fields: Name and Values.
- Type the attribute’s name in the Name field.
- Drag and drop the incoming data that contains the attribute’s values into the Values fields.
That’s all there is to know for the basics of importing product attributes, and there is really only one complication: you need to know the number and general description of the attributes, as well as which incoming data elements contain their values.
However, if you expand the Advanced option for any given attribute row, you will see several additional options:

Here are what these options mean:
Variations
- In Variations: Enabled by default and makes the attribute usable for variations.
- Not in Variations: This does the opposite and prevents the attribute from being used in variations.
- Set with XPath: Used to define this option dynamically. Accepts either
yesorno.
Taxonomy
- Is Taxonomy: Enabled by default and defines whether the attribute is imported as a taxonomy (global attribute) or not (custom attribute).
- Not Taxonomy: Select this to import the attribute as a custom attribute.
- Set with XPath: Used to define this option dynamically. Accepts either
yesorno.
Visible
- Is Visible: Enabled by default. This makes the attribute visible on the product page.
- Not Visible: Select this to make the attribute not visible on the product page.
- Set with XPath: Used to define this option dynamically. Accepts either
yesorno.
Auto-Create
- Auto-Create Terms: Enabled by default and ensures that any newly found terms are automatically created during the import.
- Do Not Create Terms: Select this if you don’t want to create new terms and only wish to import attributes to a product if the term already exists.
- Set with XPath: Used to define this option dynamically. Accepts either
yesorno.
Finally, if you look toward the bottom of the preceding image, you will see a Link all variations option. Checking this causes WP All Import to automatically generate variations for every possible combination of attributes. If you do this, the Variations tab will disappear because there’s no longer any need for it.
As you can see, there is a bit to know about attributes and their relationship to variations.
Speaking of variations…
Mapping Incoming Data Elements to the Variations Tab
WooCommerce stores a variable product as one parent product with multiple child variations. The goal of the Variations tab is to specify how incoming child variations should be associated with the parent product.
This would be quite easy if everyone simply agreed on a universal way to store this data in an import file, but that’s not what happens. What happens is that you end up with multiple ways of storing the same data:
Example 1 – Linking Variations to Parent Based on Parent SKU

In this example, the import file contains two parent products with two variations each (based on color).
The variations are associated with their parent products using the SKU and Parent SKU columns.
Example 2 – Product Variations Grouped by a Unique Identifier

Here, there are four variations based on size but no parent products. However, the variations are grouped together with a common Group ID value.
Since WooCommerce requires parent products, WP All Import will automatically create the parent products for us and automatically associate them with the variations that have the same Group ID.
Example 3 – Variations Grouped by Title
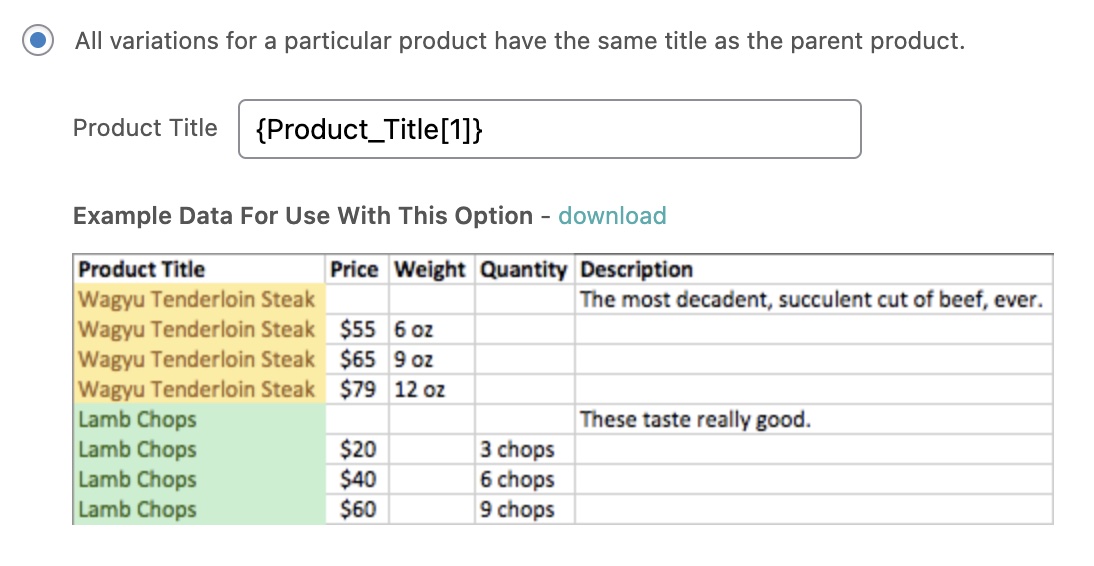
In this example, there are two products with three variations, each based on the weight of the steak or the quantity of the lamb.
The variations are grouped together with their parent by common values in the Product Title column.
There are actually six common ways for an import file to define parent products, variations, and the relationship between them. This is what often confuses users when importing WooCommerce variable products. It’s also the area of an import plugin’s functionality that matters most because the plugin should help you resolve any confusion, not add to it.
WP All Import does a great job of this. It actually provides you options with the six most common ways of dealing with incoming product variation data, each accompanied by a very clear example:
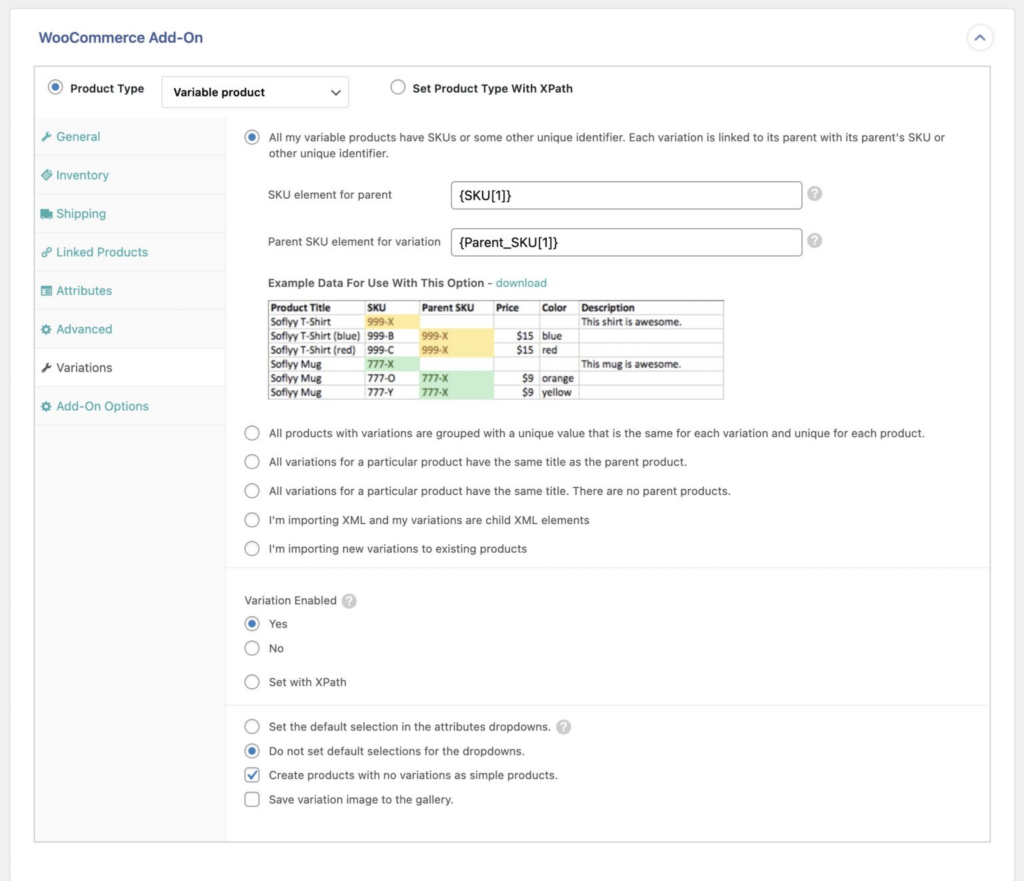
In fact, all of the preceding samples were copied directly from WP All Import’s interface!
Finally, WP All Import lets you control other important variation options near the bottom of the Variations tab, including whether variations are enabled for a product, the default selection in the attributes dropdowns (i.e., the dropdowns customers use to select variations through the WooCommerce store), whether products without variations should be converted to simple products instead, and so.
Our Experience Importing Variable Products with WP All Import
There’s a reason that we chose WP All Import for all the screen examples in this article: it’s the only WooCommerce import plugin sophisticated enough to handle every possible issue that you can run into when importing variable products, and we haven’t even touched upon its more advanced features like the use of inline PHP functions and the embedded function feature that lets you create your own functions. We honestly can’t imagine trying to product import problems without these features.
If you want to try these capabilities out yourself, see WP All Import’s online sandbox.
Wrapping Up
We wrote this short article because we wanted to make you aware that importing variable products often involves complex data structures. Actually, if you’re just importing variable products that you exported from another WooCommerce store, it can be fairly straightforward. But if you’re trying to import product lists from multiple suppliers, you’ll likely encounter everything we’ve described in this article and more.
Now that you’re aware, we highly recommend that you do some additional reading, starting with this documentation page from WooCommerce. If you like what you’ve seen from WP All Import, you should also check out their official documentation page at How to Import Variable Products into WooCommerce.
Whatever you do, don’t get frustrated if you run into problems. That pretty much happens to everyone when importing variable products into WooCommerce. Just push through it, and you’ll be a variable product import expert in no time!
Related Info
Import WooCommerce Products from CSV, XML, or Excel
The 5 Best WooCommerce Product Import Plugins
The 5 Best Plugins for WooCommerce Product Import from CSV
The 5 Best Plugins for WooCommerce Product Import from Excel
The 5 Best Plugins for WooCommerce Product Import from XML
Related Videos