How to Import WooCommerce Reviews Quickly
Unfortunately, there is no built-in option to import WooCommerce reviews. To do this, you must use a plugin. In this article, we’ll use WP All Import — a leading import/export plugin for WooCommerce and WordPress.
If you like, you can follow along using this online sandbox. Choose the WooCommerce Store option and click Create Sandbox.
Table of Contents
- Step 1: Create a New Import for WooCommerce Reviews
- Step 2: Check the Import File
- Step 3: Map the Import Data to the WooCommerce Review Fields
- Step 4: Configure Your Import Settings
- Step 5: Complete the Import
- Advanced Topics
- Frequently Asked Questions
- Related Docs
- Related Videos
Step 1: Create a New Import for WooCommerce Reviews
In the WordPress main menu, navigate to All Import › New Import, load your import file, and choose WooCommerce Reviews as the import post type.
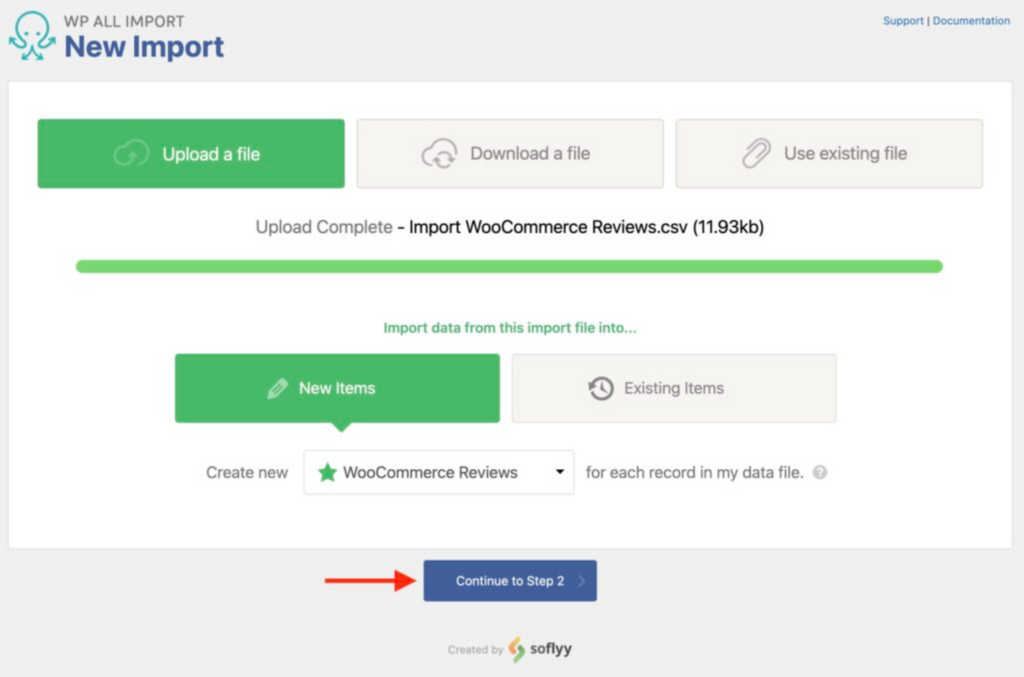
To continue, click the Continue to Step 2 button.
Step 2: Check the Import File
The Review Import File screen lets you verify that WP All Import has successfully interpreted your import file.
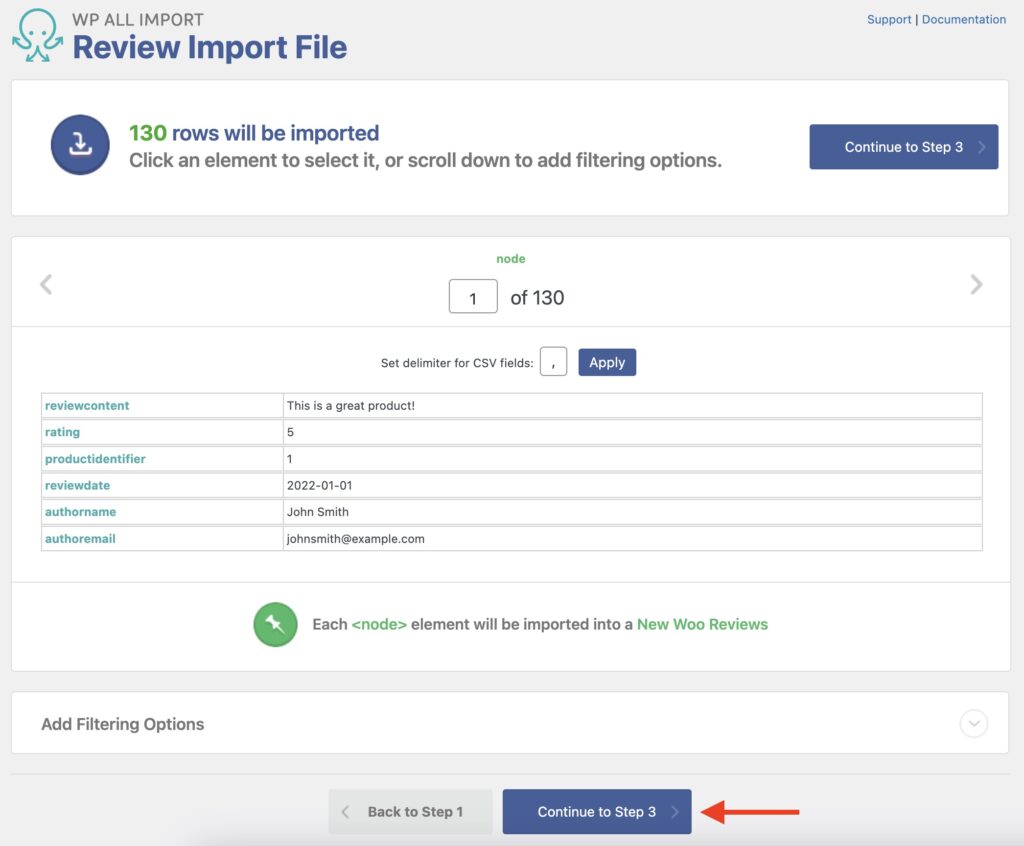
If there is a problem with the data, you have two choices: you can fix the file and try again, or you can use WP All Import’s more advanced features to correct the data later in the import process “on the fly.” This often depends on the nature of the problem.
You can also filter your import data by expanding the Add Filtering Options section near the bottom of the screen. To learn more about this, see Can You Select Specific Reviews to Import? in the Advanced Topics section.
After verifying your import file, click Continue to Step 3.
Step 3: Map the Import Data to the WooCommerce Review Fields
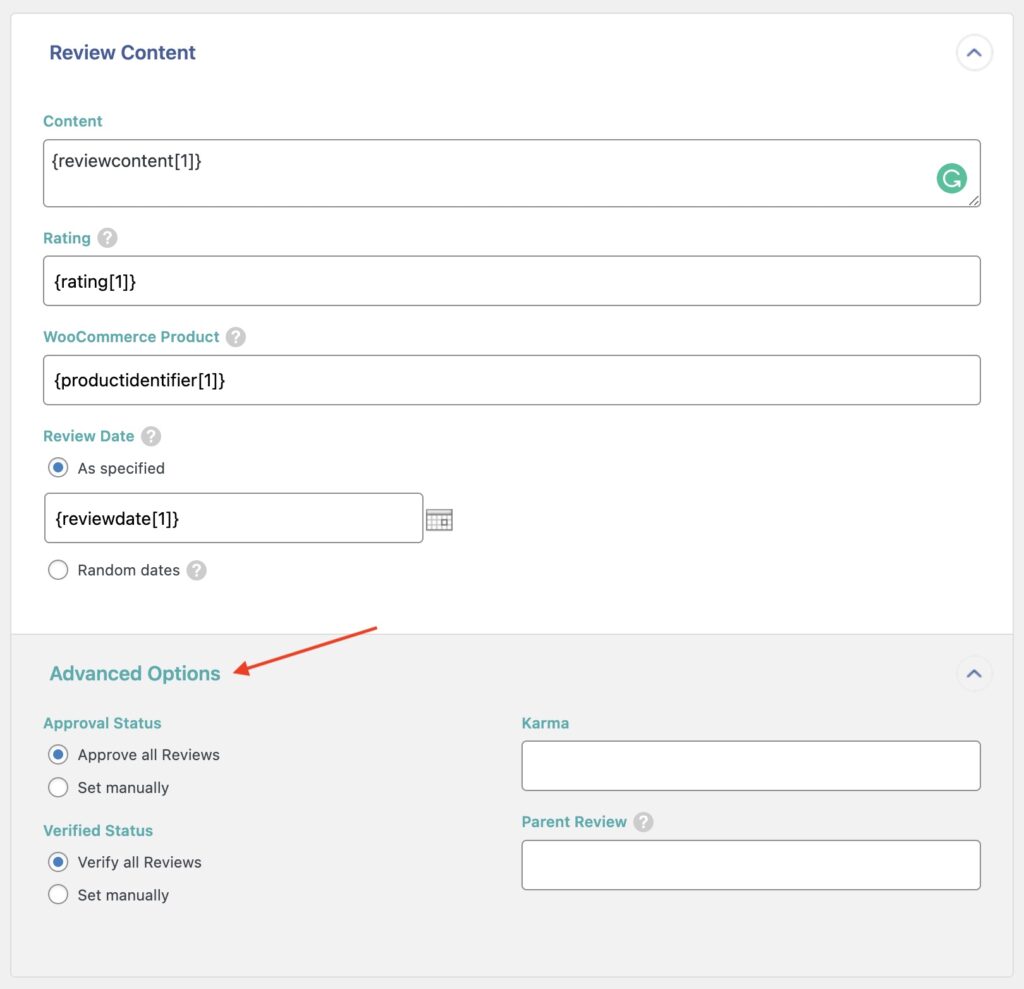
Next up is the Drag & Drop interface. This screen lets you map the import data to the WooCommerce review fields, which you do simply by dragging the incoming data elements from the right to the target fields on the left. You do this first in the Review Content section:
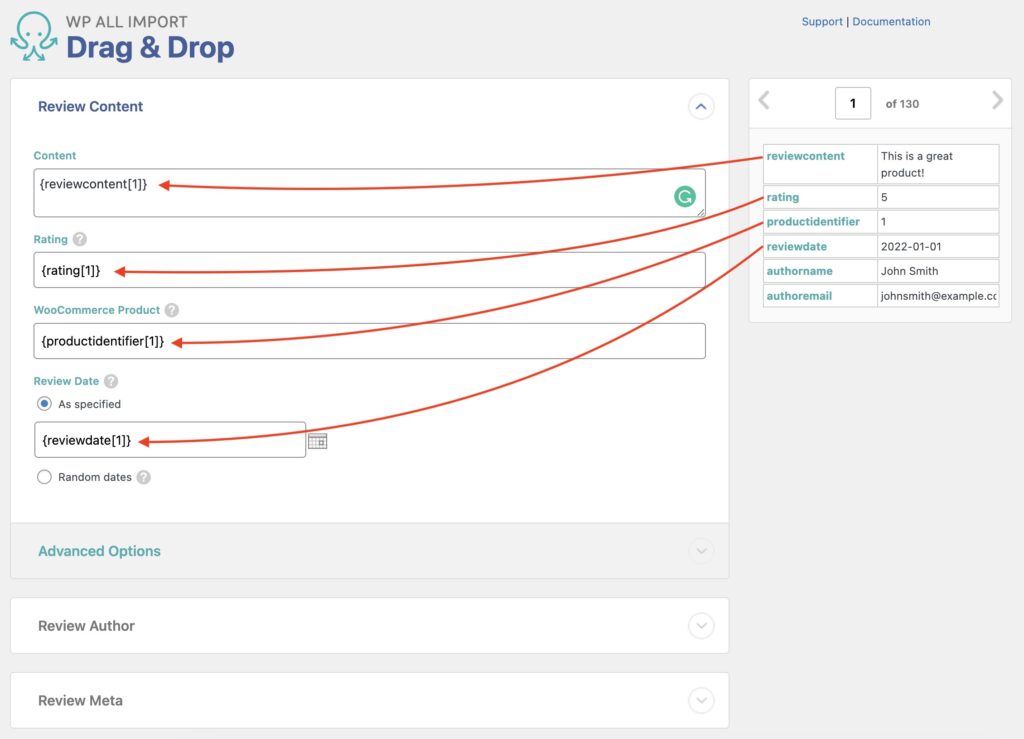
Fields here include Content, Rating, WooCommerce Product, and the Review Date.
Expand the Advanced Options subsection. Here, you can map the Karma and Parent Review fields. You can also set the Approval Status and Verified Status fields automatically. If you choose to set them manually, you can do so either by entering values or mapping incoming data elements to them.
The next section to address is the Review Author section, which lets you map the Author Name and Author Email fields:
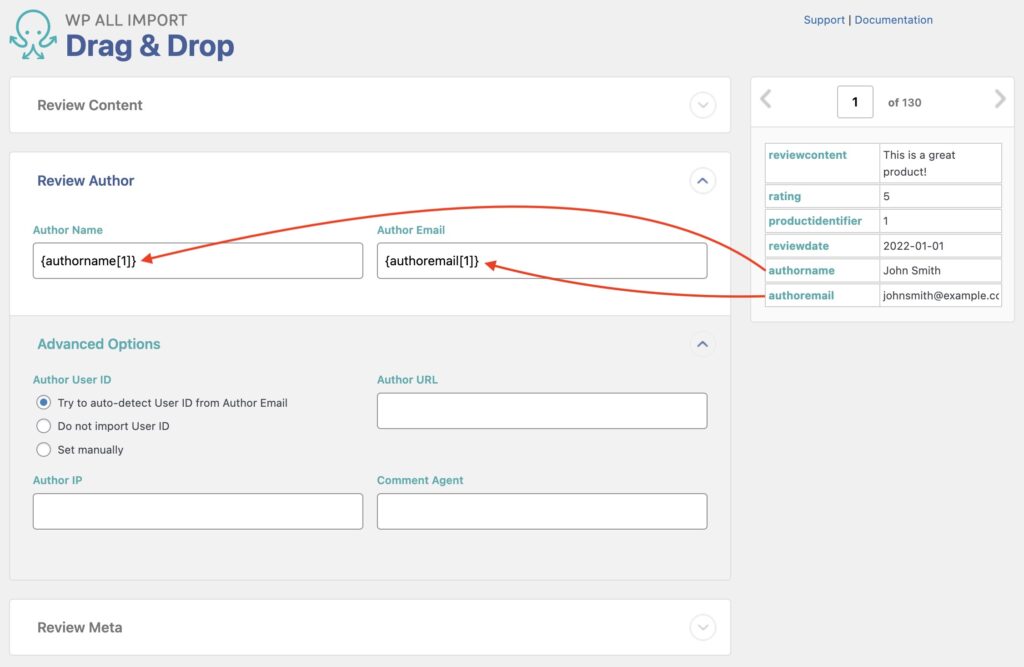
You can also add additional author information under Advanced Options.
Scrolling down a little further, expand the Review Meta section, where you can map the review metadata fields:

Note that these fields are actually custom fields.
Once you’ve mapped your import data to the WooCommece review fields, click the Continue to Step 4 button (not shown) at the bottom of the Drag & Drop screen.
Step 4: Configure Your Import Settings
As the name implies, the Import Settings screen lets you configure your import settings. To do this, first click on Auto-detect to generate a unique identifier, which is used internally by WP All Import to keep track of your imported reviews.
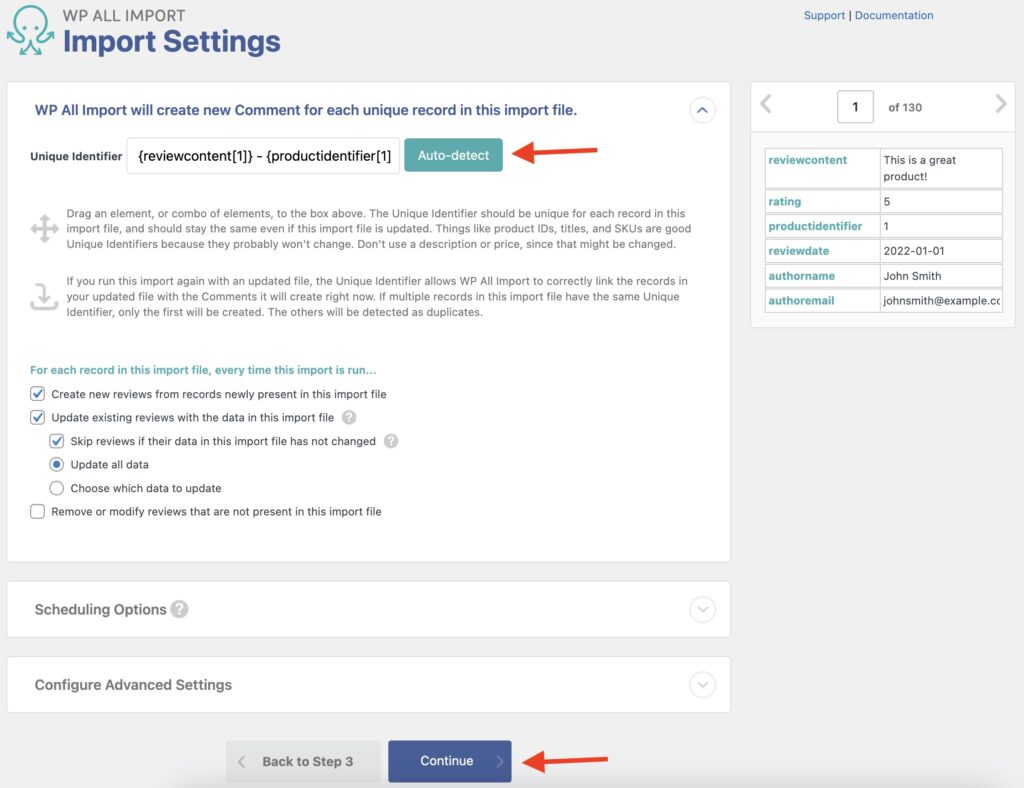
Under the For each record in this file, every time this import is run… heading, you can then set options to dictate what happens if you run the import again. Options include:
- Creating new reviews from records newly present in the import file
- Updating existing reviews with the data in the import file
- Removing or modifying existing reviews that are not in the import file
If you choose to update existing reviews, you have sub-options to:
- Skip existing reviews if their data has not changed
- Update all data
- Choose which data to update
If you choose which data to update, you will be presented with a list of all fields available for update, along with options for some of them.
Near the bottom of this screen, you’ll find a Scheduling Options section, where you can schedule your WooCommerce reviews import. For more information on this, see this Recurring Imports Overview.
The final section on this screen is Configure Advanced Settings, which you can ignore for now. Instead, click the Continue button.
Step 5: Complete the Import
The Confirm & Run should appear next. This displays a summary of your intended import:
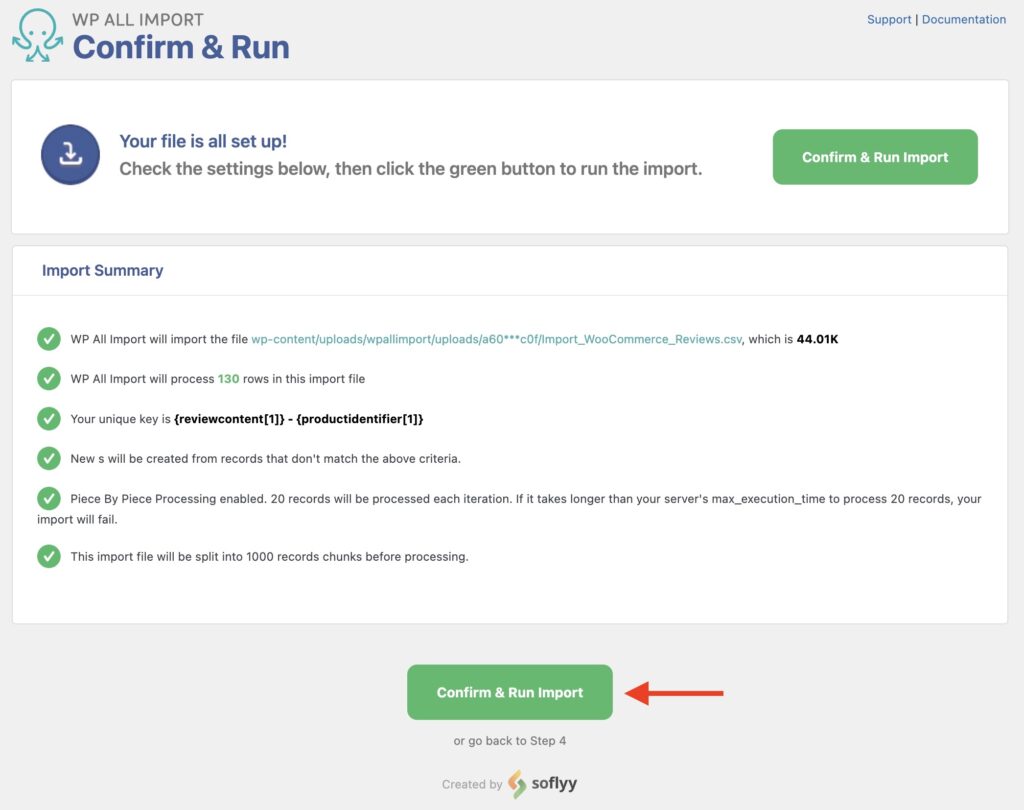
If everything looks okay, click Confirm & Run Import to complete the import. As soon as the import finishes, the screen should update as follows:
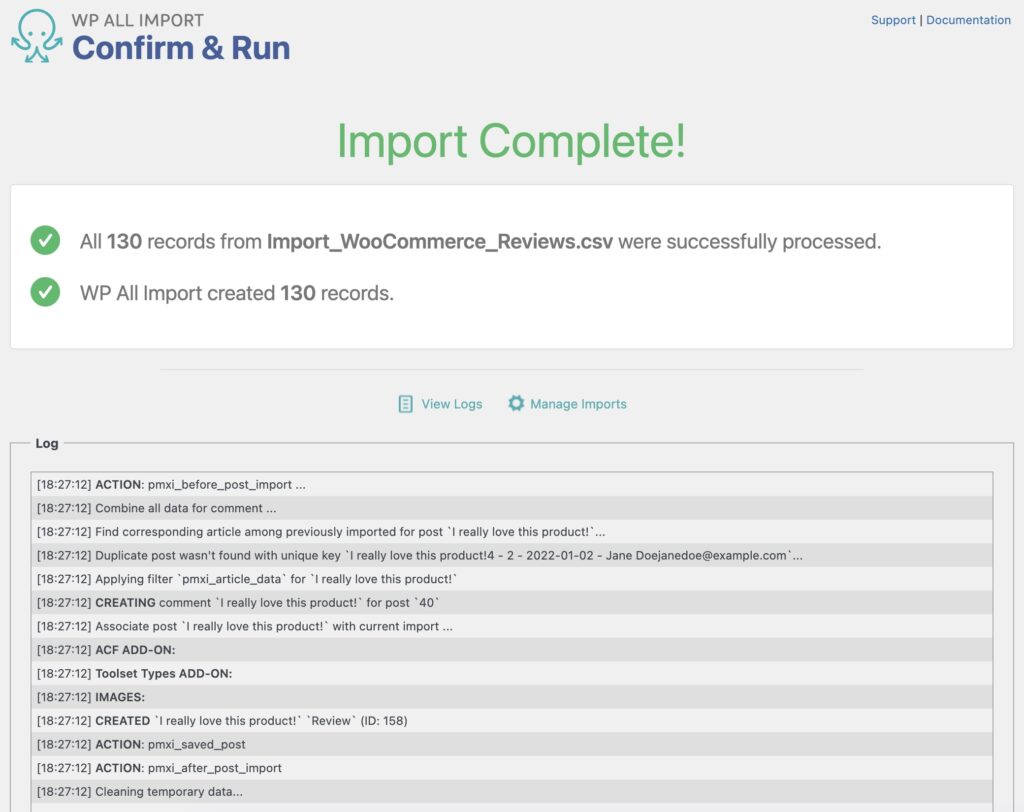
You should then go to Products > Reviews to verify that your import worked as expected. It is a good idea to check the results after every WooCommerce or WordPress import.
Import WooCommerce Reviews – Advanced Topics
What Happens if You Can’t Match to a Product?
Sometimes, a WooCommerce review will get skipped because WP All Import can’t match the incoming review data to a product. When this happens, you’ll see the following type of message:
[15:59:10] SKIPPED: Review product not found by id `ROSÉ FAVORI 2020 - FAVORI - IGP MEDITERANEE`
To overcome this problem, start by checking that your WooCommerce store has a valid product for the review. If it does, but the match didn’t succeed, you may have to change how you’re matching to your products. For example, if product names have changed, you may have to match to products using SKUs.
How Do You Match Reviews to Products Using SKUs?
There is no built-in option to match reviews to products using the product’s SKU, but you can use this custom code to perform the match:
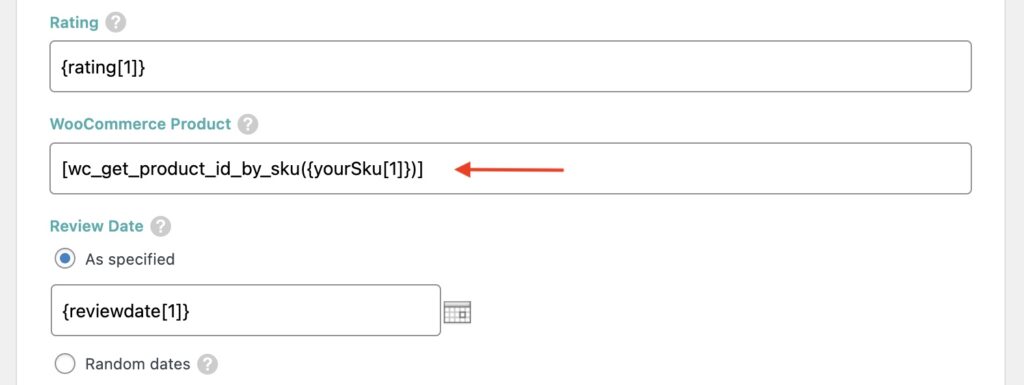
This uses an internal WooCommerce function that retrieves the product ID by using the SKU.
Can You Select Specific Reviews to Import?
Yes. Start by expanding the Add Filtering Options section at the bottom of the Review Import File screen. To create a filter, you need to specify an element, a rule, and a value.

In this example, our rule says, “Only import reviews with a product identifier of 40.”
To learn more, see Filtering with XPath.
Import WooCommerce Reviews – Frequently Asked Questions
Where are WooCommerce Reviews Stored?
WooCommerce reviews are stored in the wp_comments table. As the name of the table suggests, regular comments are stored there, also. WP All Import is able to access this table on your behalf.
How Do I Add a Product Review Manually?
- Open a specific product via Products › All Products.
- Expand the Reviews section.
- Click the Add Comment button.
- Enter and save your review.
How Do I Add Reviews in Bulk?
Just follow this tutorial, as every review import is treated as bulk import whether you’re importing 1 review or 100,000. The only difference with a large import is that you might want to control the import’s batch processing size in the Configure Advanced Settings section of the Import Settings screen.
How Do I Export Reviews in WooCommerce?
- Create a new export in All Export › New Export.
- Build your export using drag & drop.
- Filter the export, if desired.
- Run the export and download the exported file.
For more information, see How To Export WooCommerce Reviews.
Import WooCommerce Reviews – Related Docs
How to Import WooCommerce Products
How to Create a WooCommerce Product Import Template
A Quick Look at Importing Variable Products into WooCommerce
The 5 Best WooCommerce Product Import Plugins
Import WooCommerce Reviews – Related Videos

