
How to Export and Import Variable Products in WooCommerce
In this article, we describe WooCommerce variable products, how they’re defined, and how to successfully export and import them.
To follow the examples, you can use this free online sandbox. Just choose the WooCommerce Store option and click Create Sandbox.
Here are the section headings:
What is a WooCommerce Variable Product and How is it Defined?
How to Export a WooCommerce Variable Product
How to Import a WooCommerce Variable Product
WooCommerce Import Variable Product Walkthrough
Export and Import Variable Products in WooCommerce Wrap-Up
What is a WooCommerce Variable Product and How is it Defined?
A variable product in WooCommerce is a product that has multiple versions. For example, a t-shirt may have different sizes and colors. Each unique combination of size and color is considered a variant.
This is easy enough to grasp in the real world, where we deal with variable products all the time. But to export and import variable products in WooCommerce, you need to understand how they are treated at the data level.
In WooCommerce, this begins with attributes and terms. Attributes let you define additional characteristics of a product, such as color. Terms are the options that make up an attribute, such as green, blue, red, etc.
To create a new attribute, go to Products > Attributes in the WordPress main menu:
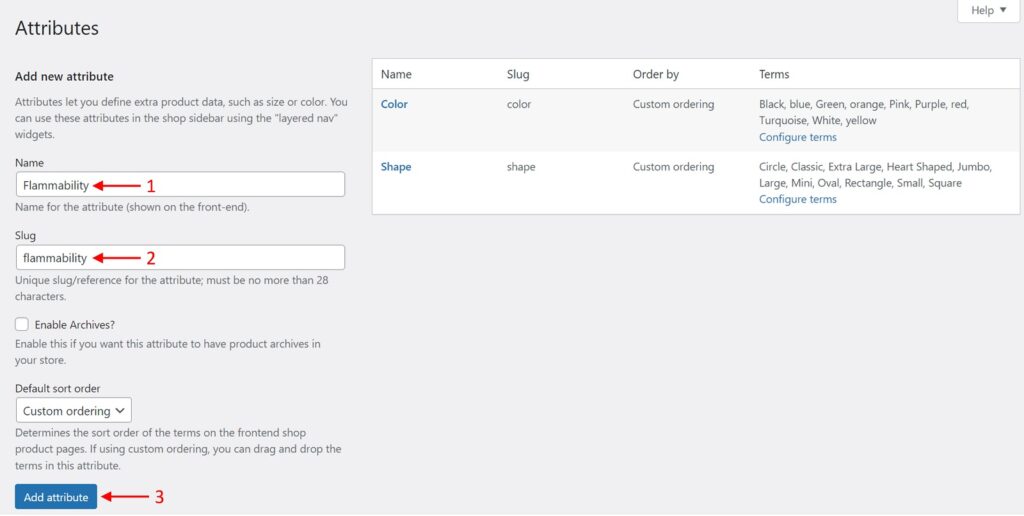
- Enter the name of the new attribute. For this example, use the name “Flammability”.
- Enter the slug (this is optional since WooCommerce will generate its own slug if you leave this field blank).
- Click the Add attribute button.
This will update the screen as follows:
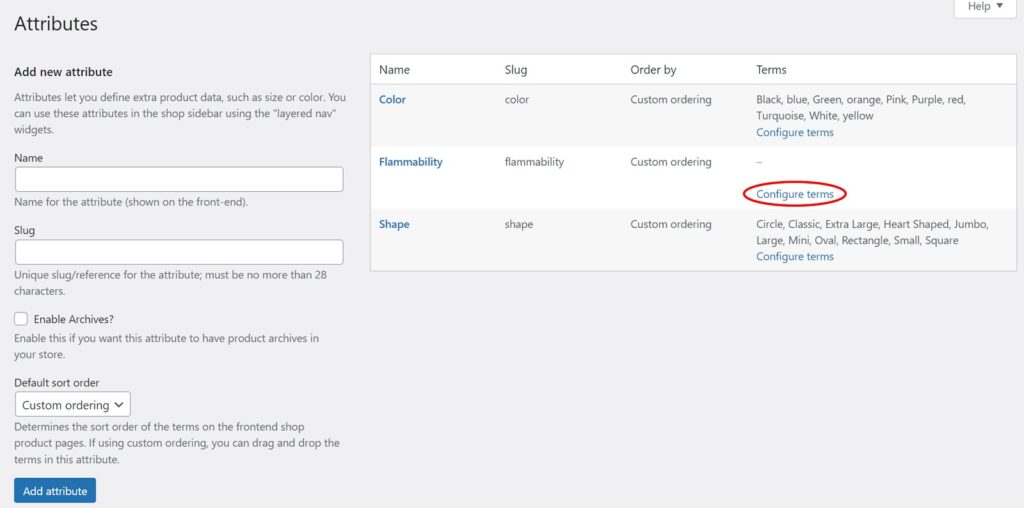
Click the Configure terms link opposite your new Flammability attribute, as shown above. This will bring you to this screen:
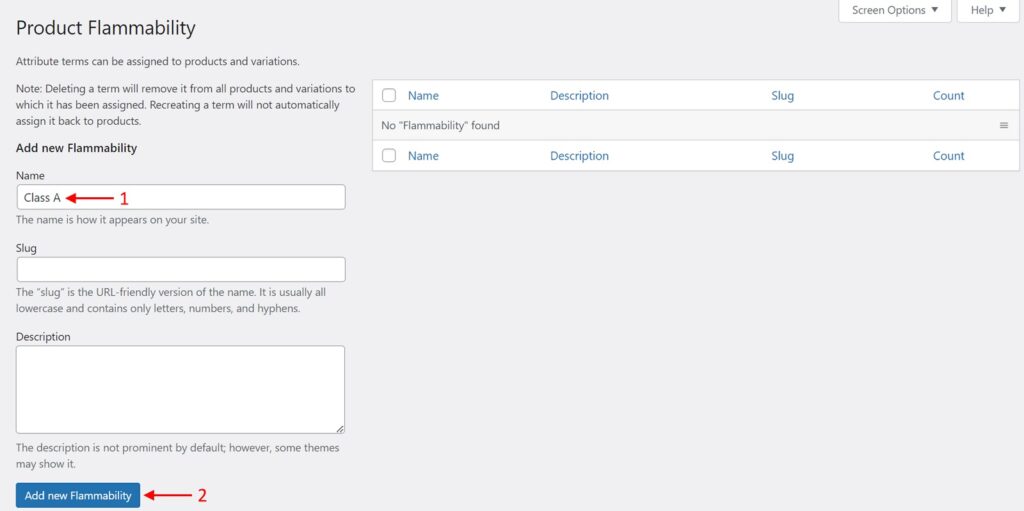
- Enter “Class A” as the name of your first term.
- Click Add new Flammability.
Repeat this process for terms “Class B” and “Class C” until your screen looks like this:

Navigate back to Products > Attributes, where your Flammability attribute should now appear as follows:

At this point, the Flammability attribute is not connected to any products. It is a global product attribute, which is essentially just a named list, as you can see from the screen above.
Before we continue, create the simplest possible test product in WooCommerce. In our test system, we have called this “Test Product 1”. If you don’t know how to create a product in WooCommerce, see How to Add Products in WooCommerce.
You can assign attributes to a product in the Attributes tab of the WooCommerce Add-On section when adding or editing the product:
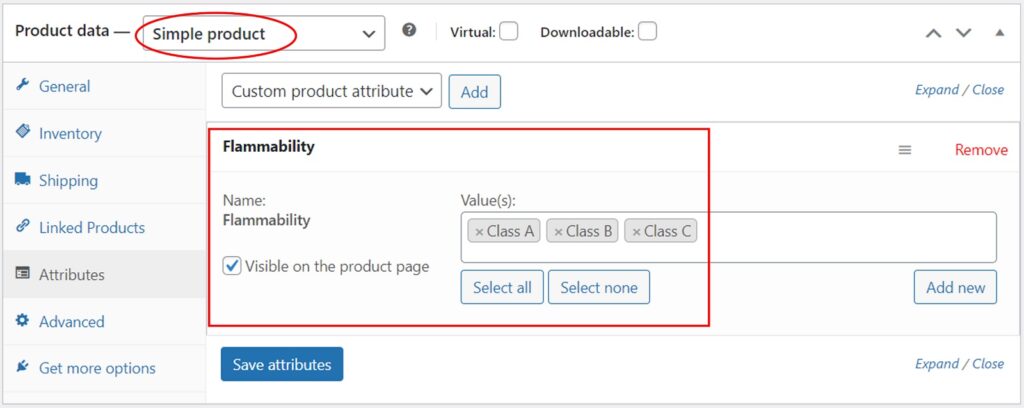
When you do this, you are not creating product variants. Attributes can be used independently of variants. For example, we could use the Flammability attribute simply to describe Test Product 1’s degree of flammability, with no intention of creating multiple versions of that product.
In fact, when a product is defined as a Simple product, as is the case in the preceding image, you’re not allowed to create variants. To change this, you must first change the product type to Variable product. When you do this, a new Used for variations option appears in the Attributes tab,

Check this option, click the Save attributes button, and then update the product.
At this point, you still haven’t created any product variants. You’ve just created the conditions required to generate variants.
To complete the task, switch to the Variations tab:
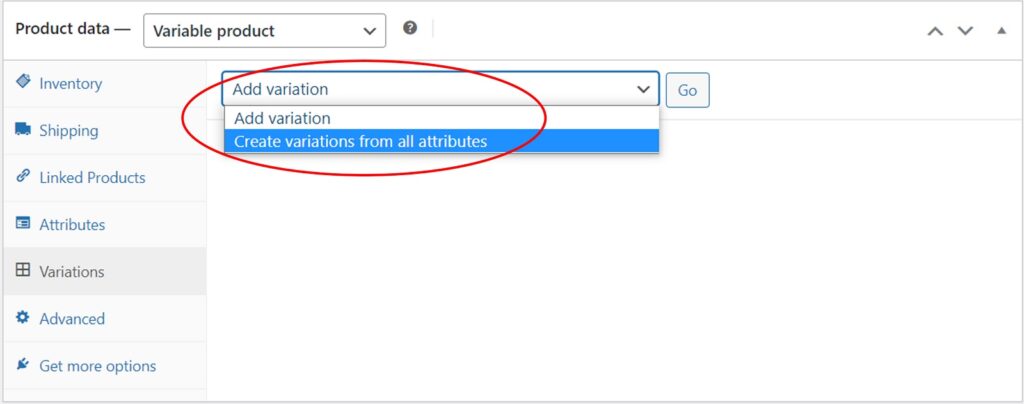
Here, you have two options. You can choose to Create variations from all attributes, or you can be more selective and add variations one at a time. In this case, select Create variations from all attributes and click the Go button.
When you do this, you will receive a warning that says, “Are you sure you want to link all variations? This will create a new variation for each and every possible combination of variation attributes (max 50 per run).”
The reason for this warning is simple. Create variations from all attributes means generating all possible combinations of attributes attached to a product. So, if you have a Size attribute with three terms (Small, Medium, Large), and a Color attribute with four terms (Blue, Green, Red, Yellow), this option will generate 3 x 4 = 12 variants, i.e., Small Blue, Medium Blue, Large Blue, Small Green, etc.
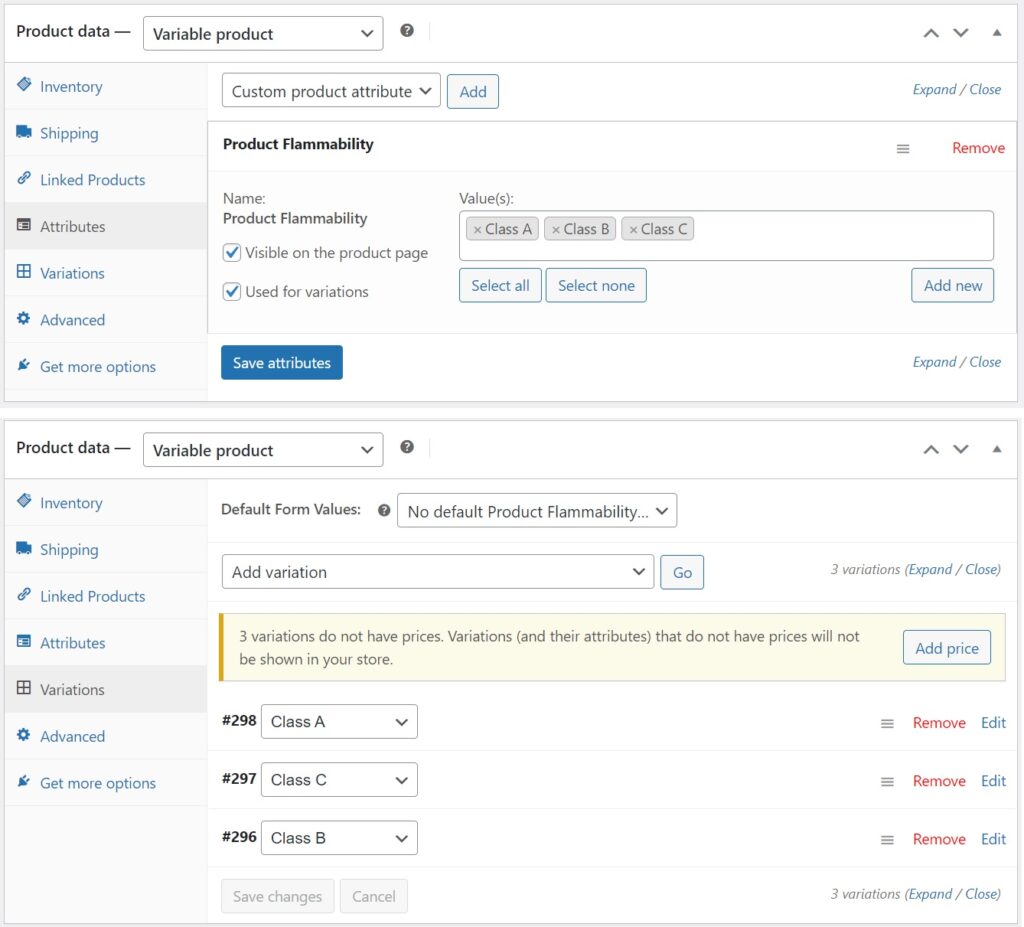
In this case, we have only one attribute (Flammability) with three terms, so go ahead and generate variants for all of them:

When you’re finished, click the blue Save Changes button at the bottom of the Variations tab, then update the product.
Now you’re ready to export this data.
How to Export a WooCommerce Variable Product
Navigate to All Export > New Export in the WordPress main menu:
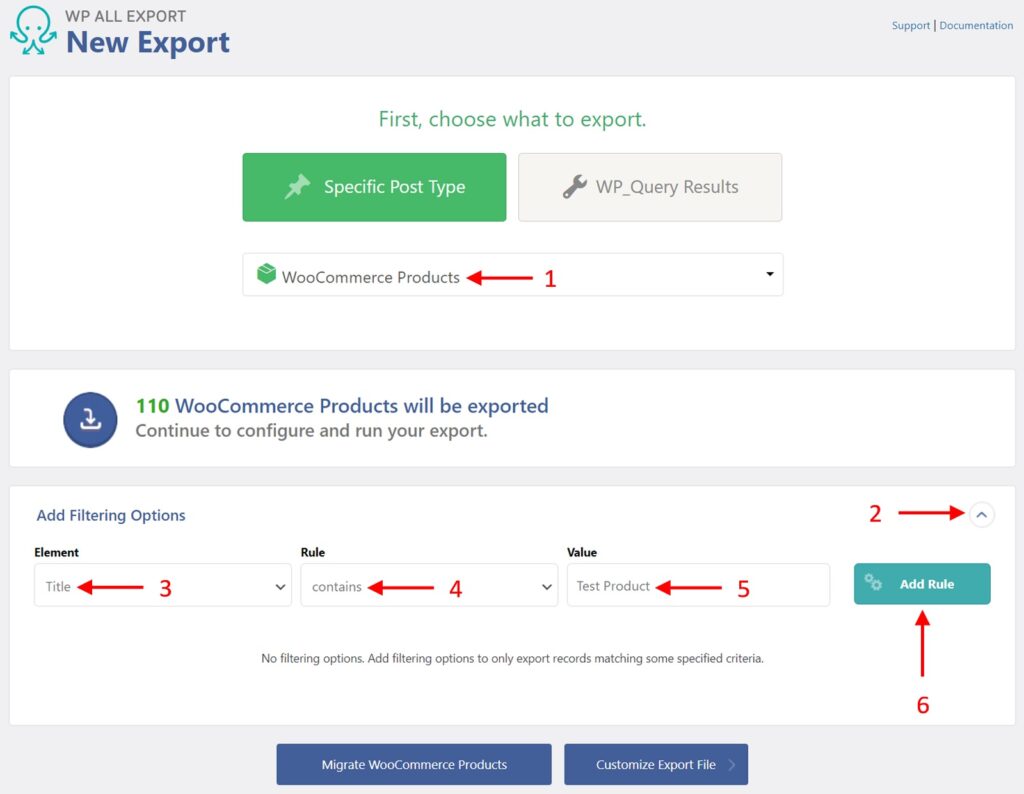
- Select WooCommerce Products as the export post type.
- Expand the Add Filtering Options section. We’re going to create a filter here so that we export only our test product.
- Choose Title as the filter Element.
- Select contains as the filter Rule.
- Enter “Test Product” as the value (or the main part of whatever you have named your variable product).
- Click the Add Rule button.
As soon as you click the Add Rule button, WP All Export will apply the filter:

As you can see, the product count has been reduced from 110 products to 4. Why 4? You will see shortly.
Click the Customize Export File to proceed to the Drag & Drop screen:
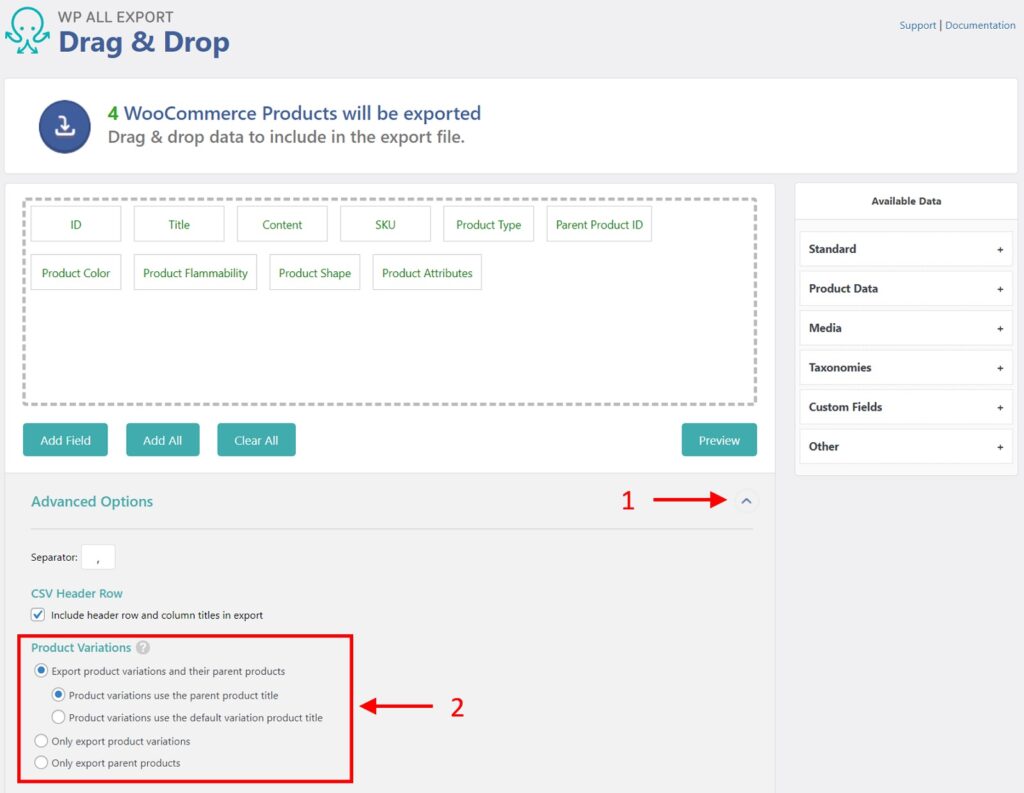
This screen is normally used to select which data fields to include in the export. To learn how this is done, see How to Export and Import WooCommerce Products.
However, as you can see, the second row of fields in the export column selection area (left upper half) already contains the attribute/variation fields. Instead:
- Expand the Advanced Options section.
- Take note of the Product Variations options, which, among other things, allow you to export just the parent products, just the variations, or both.
Click the blue Continue button at the bottom (not shown). This will bring you to the Export Settings screen:

Let’s skip over this screen, too, by clicking the Save & Run Export button. This will initiate the export. When it’s complete, you will see this Confirm & Run screen:
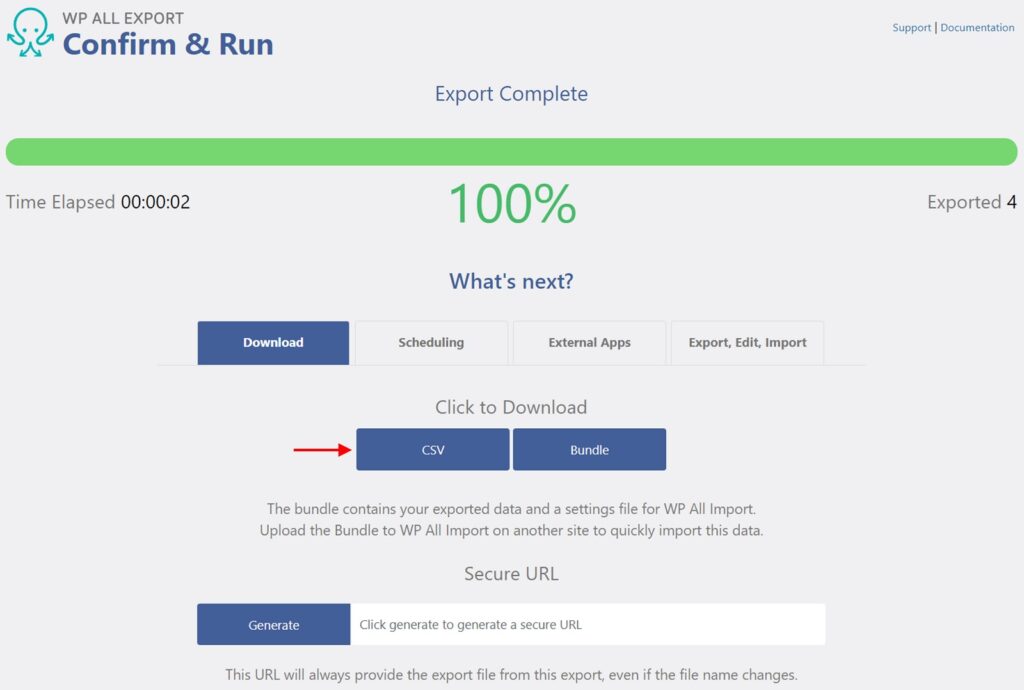
Click the CSV button to download a CSV version of the export file. Open this file in your favorite spreadsheet software. We’ve done this in Excel. We also narrowed some columns so that we can focus on the ones relevant to variable products:
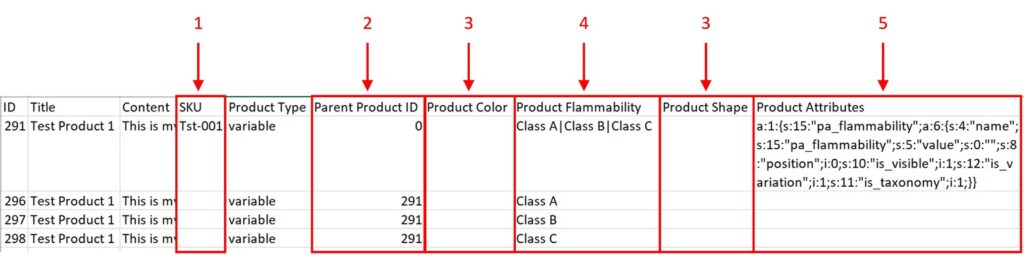
First, note that there are four product records: one for the parent test product and one for each of the three Flammability variants.
Here is a description of the relevant columns:
- SKU. In this setup, only the parent product has an SKU, but you can set it up so that variants get their own SKU, too.
- Parent Product ID. This is a key link between parent products and their variants. One of the ways we can tell that variants are variants is because they reference the ID of the parent product.
- Product Color and Product Shape. These are both global product attributes, which is why they are included in the default export column configuration. But they are not attached to our test product, so they are blank.
- Product Flammability. This attribute is attached to our test product. The parent product contains the set of all attribute terms in this column, each separated by a pipe (“|”) character. The product variants each have one term that defines them as a variant.
- Product Attributes. This is a serialized form of the attribute data, which is not very readable for the average user.
That’s it. There are a few issues we haven’t covered, but one of the essential factors with any export is being able to read/understand the output data, and you should now be able to do this for the export of a WooCommerce variable product.
How to Import a WooCommerce Variable Product
Importing WooCommerce variable products can be a lot more difficult than exporting them, especially when the import data is coming from a third party that may not understand (or care) how WooCommerce structures its data.
To create an import, you would normally go to All Import > New Import. However, we’re going to take a shortcut and instead go to All Export > Manage Exports.
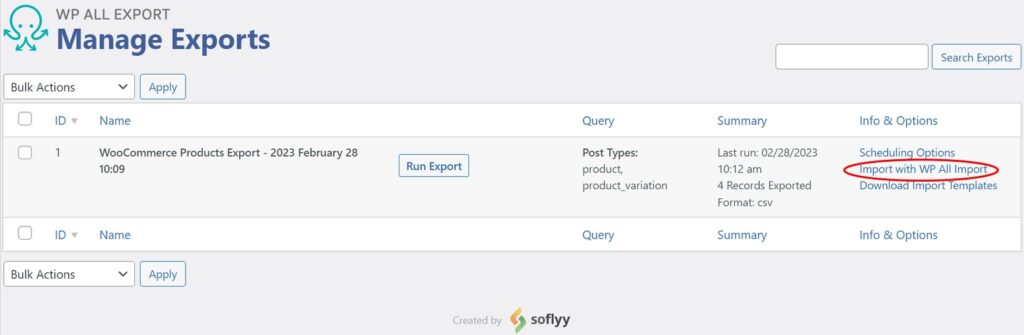
Here, click Import with WP All Import for the export that you just completed.
Why is this a shortcut? Because one of the cool features about WP All Export is that it not only remembers all of your exports. It can also access the field mappings and other settings applied to each export, which allows it to automatically configure an import when dealing with a file that has the exact same structure as the export file.
This is a huge time-saver when performing tasks like bulk edits, where you export data, edit it in a spreadsheet, and then import the changed data back into WooCommerce. But it’s also an excellent way to learn how to import data for WooCommerce variable products, which is how we’re going to use it here.
After you click Import with WP All Import, you will be brought to the New Import screen:
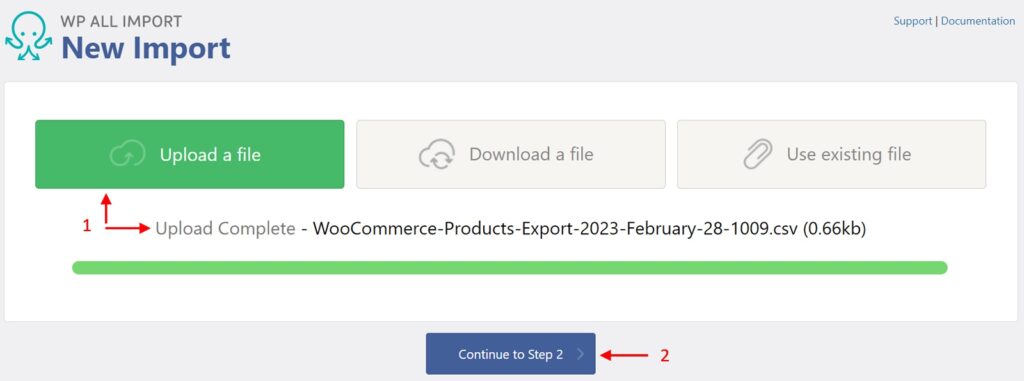
- Upload the exact same file that you just exported.
- Click Continue to Step 2.
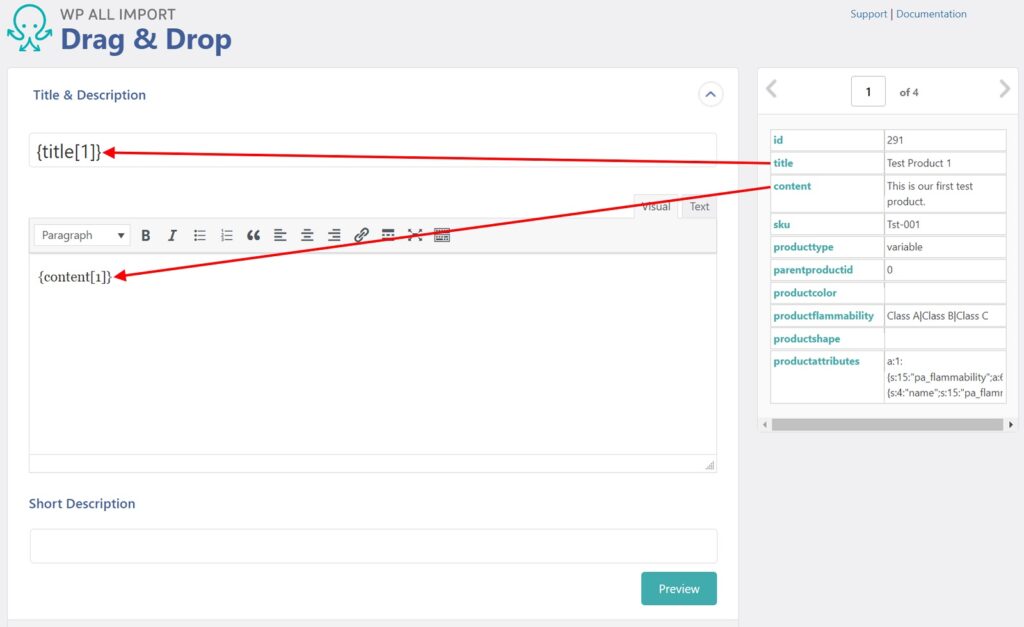
This brings you directly to the Drag & Drop screen. All the incoming data elements are already mapped to their target WooCommerce fields in this scenario — you don’t have to take any actions — but we’re going to draw red mapping lines just to illustrate how to map these elements manually, starting with the Title & Description section:
Collapse the Title & Description section and instead expand the WooCommerce Add-On section. Here, click on the Attributes tab:

As you can see, you can drag the incoming data elements that contain attribute data to the fields shown above. In other words, you can create the attributes as part of the import process.
Expand the Advanced option on the right of the flammability attribute:
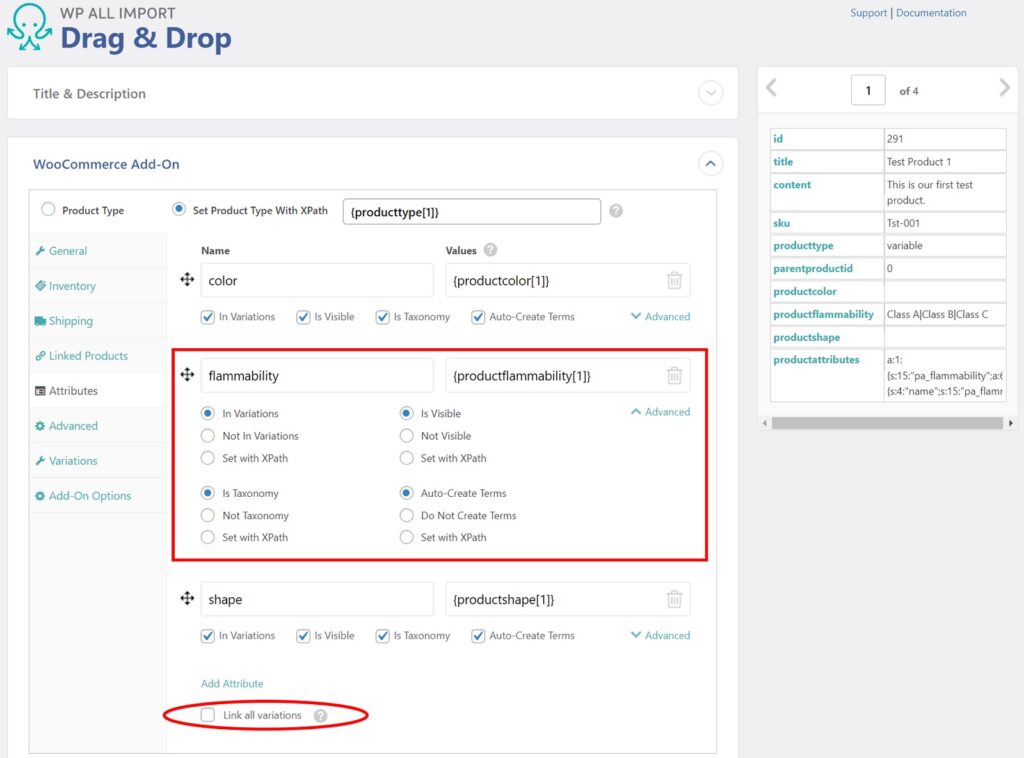
Notice how you can set all of the options during the import that you can set when creating the attributes manually through the interface. In fact, you can go a step further by auto-creating the terms!
Finally, note the Link all variations option. This allows you to autogenerate all possible variations given the incoming attribute data.
Switch to the Variations tab:
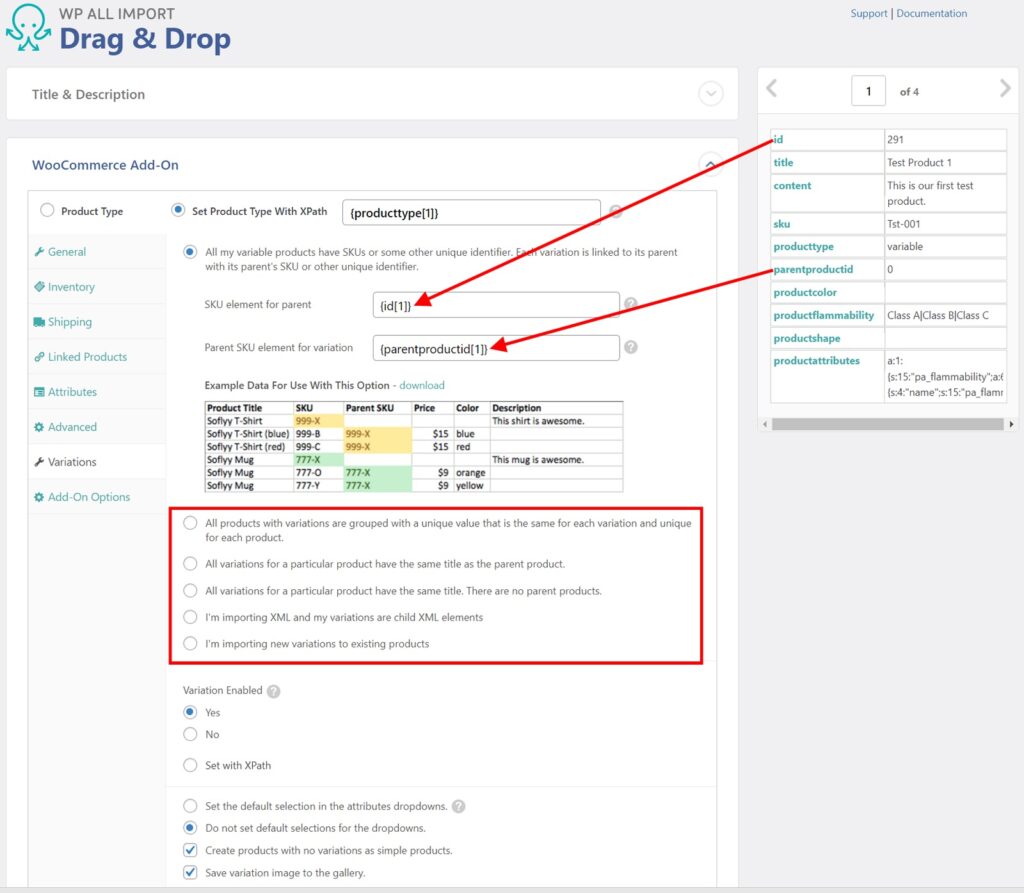
Here, notice that we’re not mapping incoming data to individual variants. Instead, we’re mapping the relationship between parent products and their variations. Once WP All Import knows that, it can figure out the rest.
However, this is not the only way to map this relationship. If you look at the area inside the red rectangle, you will see these other options:
- All products with variations are grouped with a unique value that is the same for each variation and unique for each product.
- All variations for a particular product have the same title as the parent product.
- All variations for a particular product have the same title. There are no parent products.
- I’m importing XML and my variations are child XML elements.
- I’m importing new variations to existing products.
In other words, WP All Import is trying to address all the different ways that variable product data might come to you.
If you click on these options, you will see that they each have their own unique settings. Some of them even have sample data to help you confirm that you’re using the right approach.
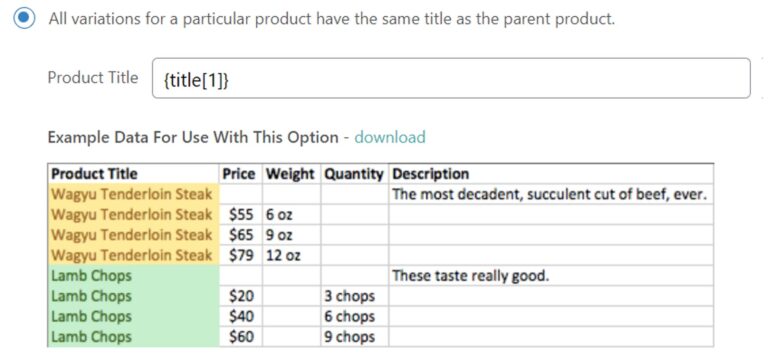
For example, if you select All variations for a particular product have the same title as the parent product, you will see the following options and sample data:
Why are we showing you all this? Because between the ability to:
- Export data in different ways
- Use All Export > Manage Exports > Import with WP All Import to import the same file so that you can examine the default mappings/settings
- Examine sample data
- Experiment with different import options
You should be able to figure out how to handle any variable product import in WooCommerce.
To emphasize this, let’s do a complete walkthrough of such an import from A to Z.
WooCommerce Import Variable Product Walkthrough
Start by doing the following:
- Delete Test Product 1 (or whatever you named it) from your test system.
- Delete the Flammability attribute.
We’ll now create these things, along with the product variants, by importing variable product data step by step.
1. Create New Product Import
Go to All Import > New Import:
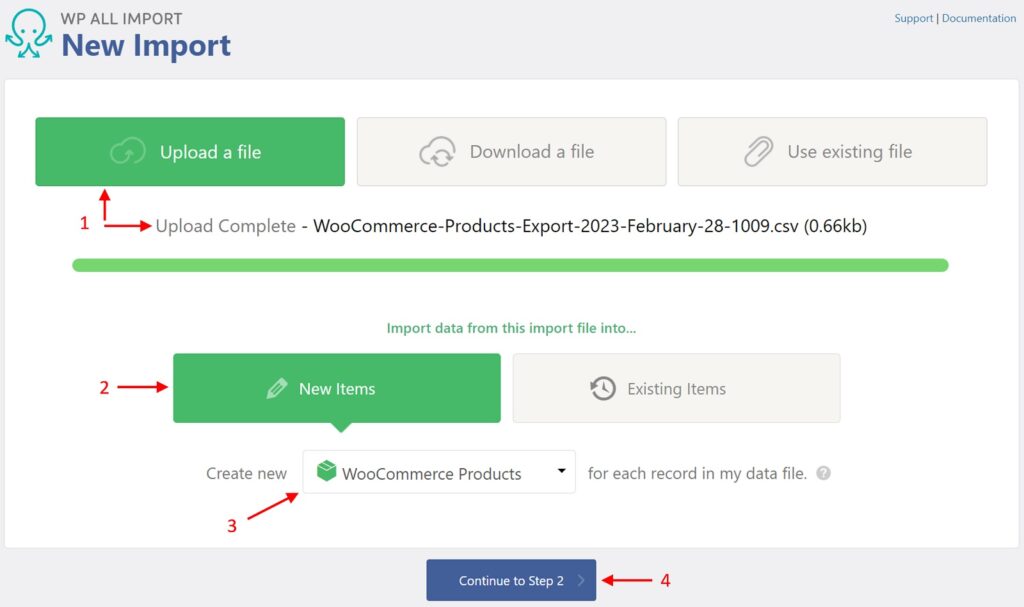
- Upload the file that you previously exported.
- Choose New Items.
- Select WooCommerce Products.
- Click Continue to Step 2.
This brings you to the Review Import File screen.
2. Review the Import File
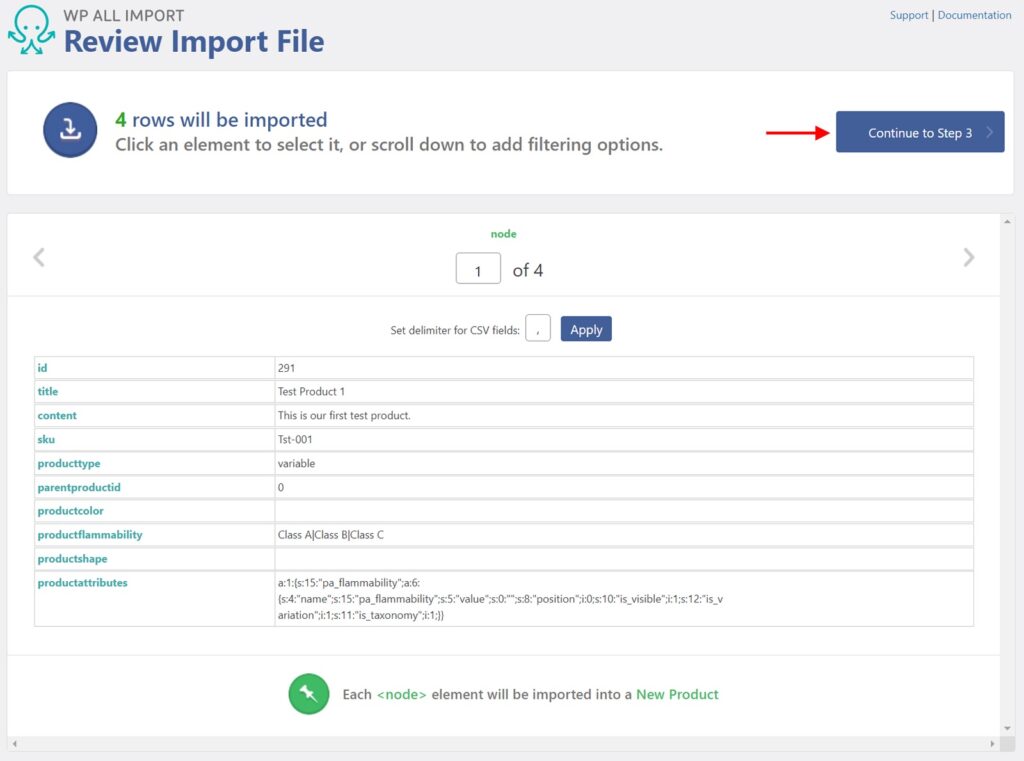
Here, you can review the content of your import file as interpreted by WP All Import. Since this content looks as expected, click the Continue to Step 3 button, which brings you to the Drag & Drop screen.
3. Map Incoming Data Elements to the WooCommerce Product Fields
This time, drag the incoming title and content data elements to the target fields shown above, then collapse the Title & Description section and expand the WooCommerce Add-On section:
Here, set the Product Type to Variable product. Note, if you’re importing data with different types of products, you can also set this with an incoming data element (producttype in this example) using the Set Product Type With XPath option.
Also, drag the sku incoming data element to the SKU field.
Next, switch to the Attributes tab:
- Enter “Product Flammability” as the name of the attribute that we’re going to import.
- Drag the productflammability data element to the Values field.
- Expand the Advanced section.
- Select the Link all variations option.
At the bottom of this screen, click the Continue to Step 4 button (not shown). This will bring you to the Import Settings screen.
4. Configure the Import Settings
First, click the Auto Detect button at the top. This will cause WP All Import to identify the field or fields that make up a Unique Identifier for the data you are importing, in this case, one that accounts for the presence of variants.
Click the Continue button at the bottom. This will bring you to the Confirm & Run screen.
5. Confirm and Run the Product Import

Click the Confirm & Run Import button. After the import completes, you will see this confirmation screen:
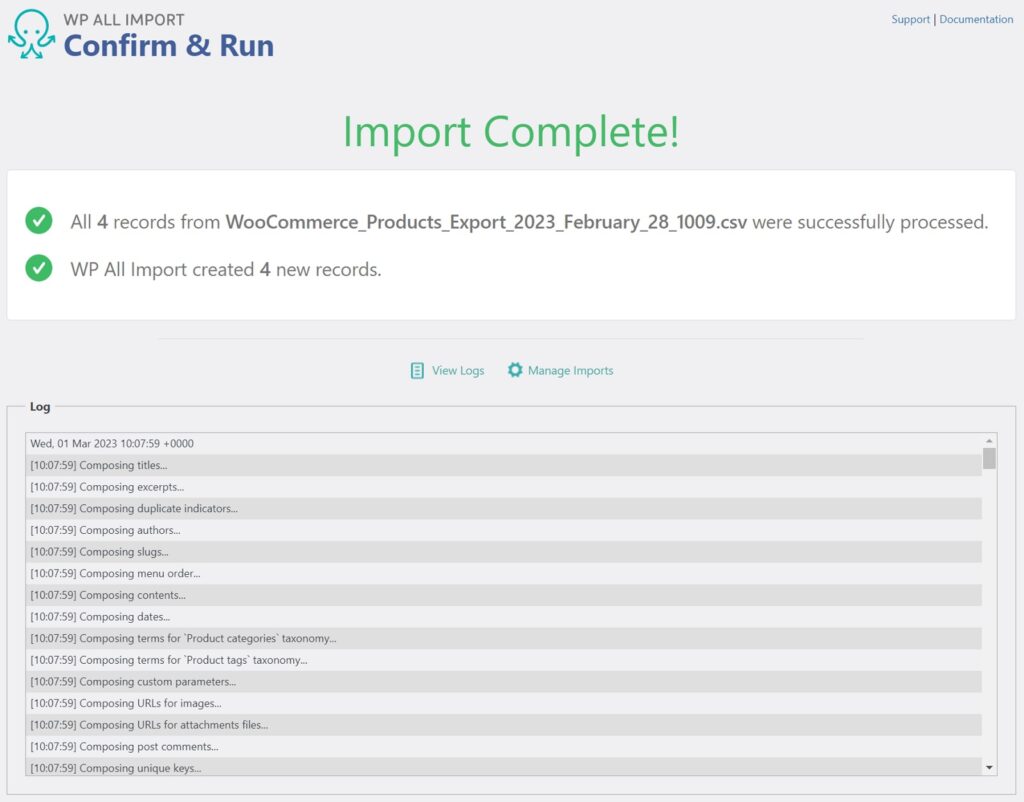
6. Check the Imported Data
At this point, if you navigate to Products > All Products, edit your test product, and examine the Attributes and Variations tabs, you should see the same data that you previously created manually, this time created entirely by the import process:
Export and Import Variable Products in WooCommerce Wrap-Up
In this article, we showed you how to export and import WooCommerce variable products using just one data configuration.
More importantly, we showed you how to use WP All Export/Import’s online sandbox and its automatic mapping capabilities to figure out how to handle any variable product import scenario. Having this understanding is important because variable product import data can have so many different configurations.
If you run into an import that is especially complicated, and you’re a paid customer of WP All Export/Import, you can also contact their support team via email. They have more than a decade of experience handling every form of export and import imaginable, so they should be able to help you out.
Related Information
Want more information on how to export and import WooCommerce variable products? See these key articles:
WooCommerce Product Export – Plugin Description
WooCommerce Product Import – Plugin Description
Official Documentation: How to Export WooCommerce Products
Official Documentation: How to Import WooCommerce Products
Official Documentation: How to Export WooCommerce Variable Products
Official Documentation: How To Import Variable Products in WooCommerce
Official Documentation: How To Export WooCommerce Products with Images
Official Documentation: How To Import WooCommerce Products with Images
Official Documentation: How to Bulk Edit WooCommerce Products
Official Documentation: How to Migrate WooCommerce Products to a Different Website
Cheat Sheet: How to Import Product Attributes in WooCommerce
Cheat Sheet: How to Get a List of Product Attributes from WooCommerce
How to Import and Export WooCommerce Customers
How to Import and Export WooCommerce Orders
Best WooCommerce Bulk Edit Plugins
How to Import and Export WordPress Users
How to Export and Import WordPress Categories and Tags
How to Import and Export Advanced Custom Fields
How to Export and Import Gravity Forms Entries