How to Export and Import WooCommerce Products
Want to know how to export and import WooCommerce products? You’ve come to the right place.
Whether you’re migrating to a new store, updating multiple products at once, or syncing with external platforms, knowing how to export and import WooCommerce products is a crucial skill for any store owner.
In this article, we’ll show you how to perform basic product exports and imports, then dive into more advanced topics, such as exporting products to the Google Merchant Center and scheduling product imports to run automatically.
Let’s get started!
Table of Contents
How to Easily Export WooCommerce Products
When you own a WooCommerce store, you will likely need to export your products at some point.
You may need to create product feeds for other sales platforms so that you can list your products in as many places as possible.
Or perhaps you’ll want to export your products, make bulk changes to them, and then import those changes back into your store to avoid many hours of manual editing through the WooCommerce interface.
Whatever your goal, it always helps to know your options.
Your Options to Export WooCommerce Products
Option #1 — Use the Default WooCommerce Export Tool
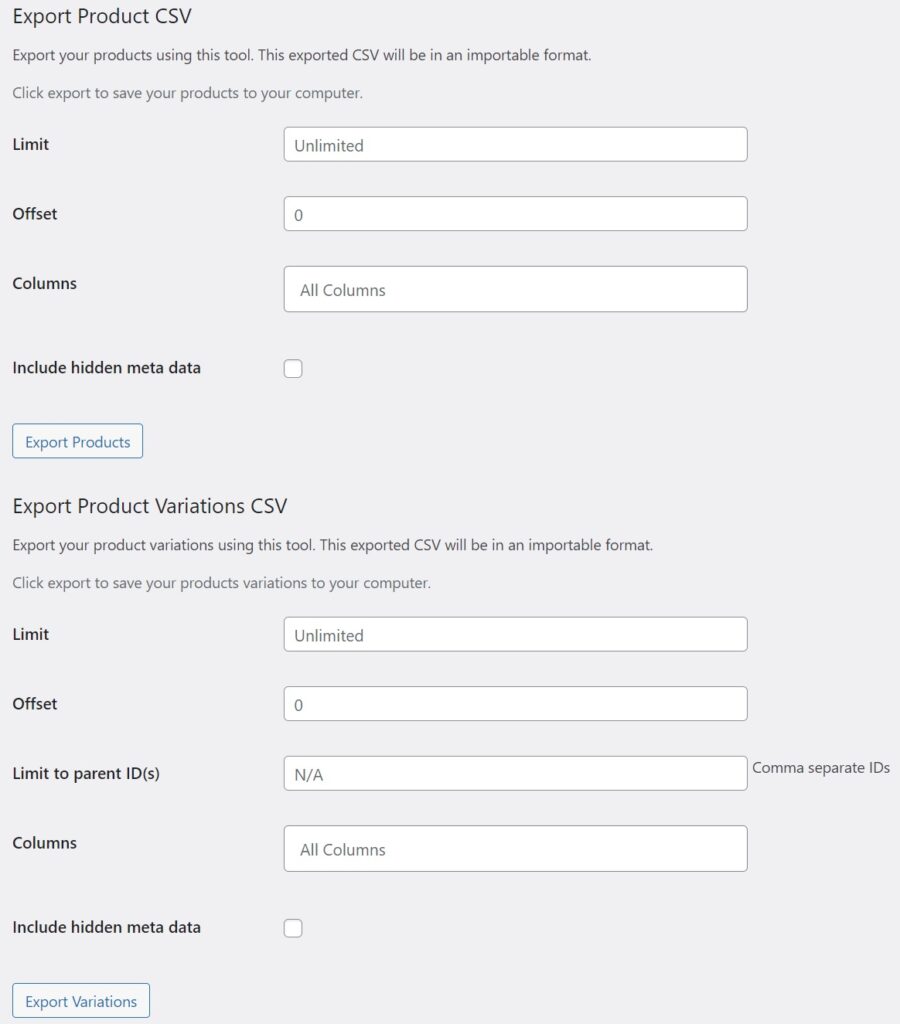
Unlike with WooCommerce orders, there is a built-in tool for exporting products, which you can access by going to Products › All Products and clicking the Export button:

This will open the following screen, which we’ve populated in advance:
As you can see, there are not a lot of options here. You can choose your columns, though you can’t control the column layout. You can filter by product type and/or product category. And you can opt to include custom metadata.
Unfortunately, you can only export data to a CSV file format.
In short, this is a quick data dump tool. It’s okay if you just want to export data to a spreadsheet for analysis or to move an exact copy of product data from one WooCommerce store to another, but it lacks the sophistication required for other product export tasks, especially generating a proper data feed for an external system.
For more information on this tool, see WooCommerce Product Exporter.
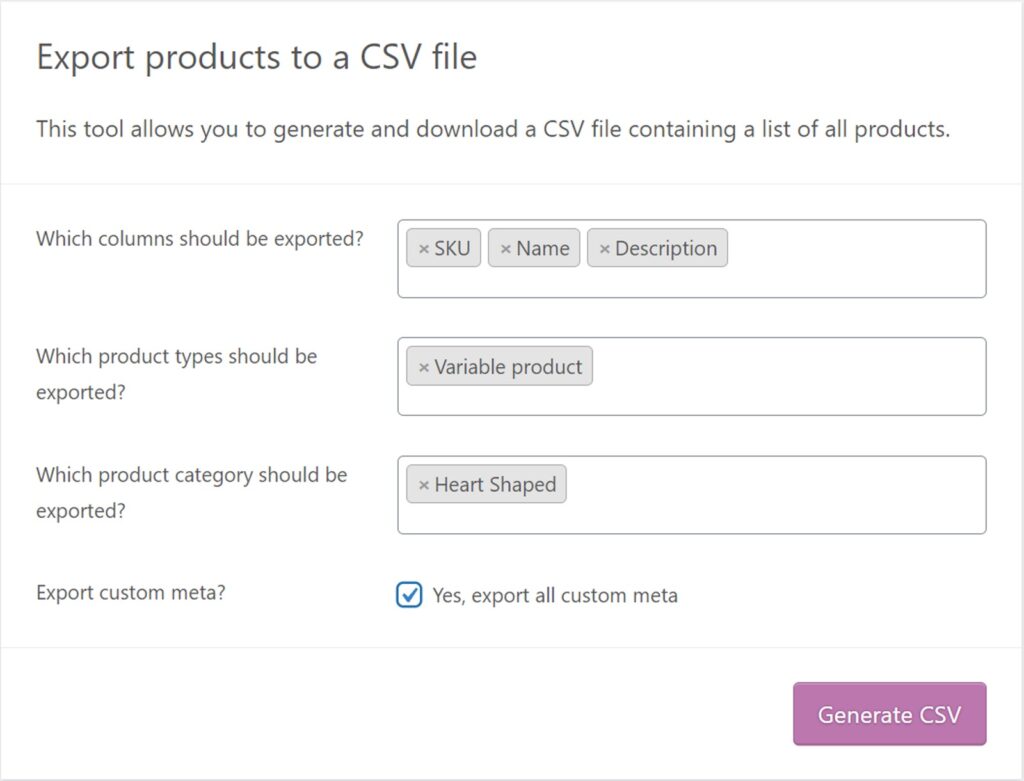
Option #2 — Buy the Product CSV Import Suite
Many WooCommerce users who find the built-in product export tool too limited are directed to the WooCommerce Product CSV Import Suite add-on:
The biggest advantages of this add-on over the default export tool are:
- It does a better job of handling product variations.
- It automatically recognizes the fields of other official WooCommerce add-ons, such as WooCommerce Bookings, WooCommerce Subscriptions, WooCommerce Composite Products, and WooCommerce Brands.
But, to be honest, this tool is still far too limited. As you can see from the screenshot above, it has even less filter capability than the default tool. It doesn’t allow you to truly control the output format of variable products. You can’t automatically schedule your product exports, which means every export, even those needed daily or weekly, remains a manual task. And it still forces you to use the CSV file format, which is unfortunate because many external systems require XML data feeds.
Finally, at the cost of $49 per year, this tool can only import and export product data. If you want to export WooCommerce customer and order data, that will cost you an additional $79 per year for another add-on. And if you ever need broader export capabilities, you’ll have to step outside WooCommerce add-ons, meaning that you’ll need to learn multiple tools to manage your import/export tasks.
For more information on this tool, see the Product Import Suite. But, frankly, there is a better option.
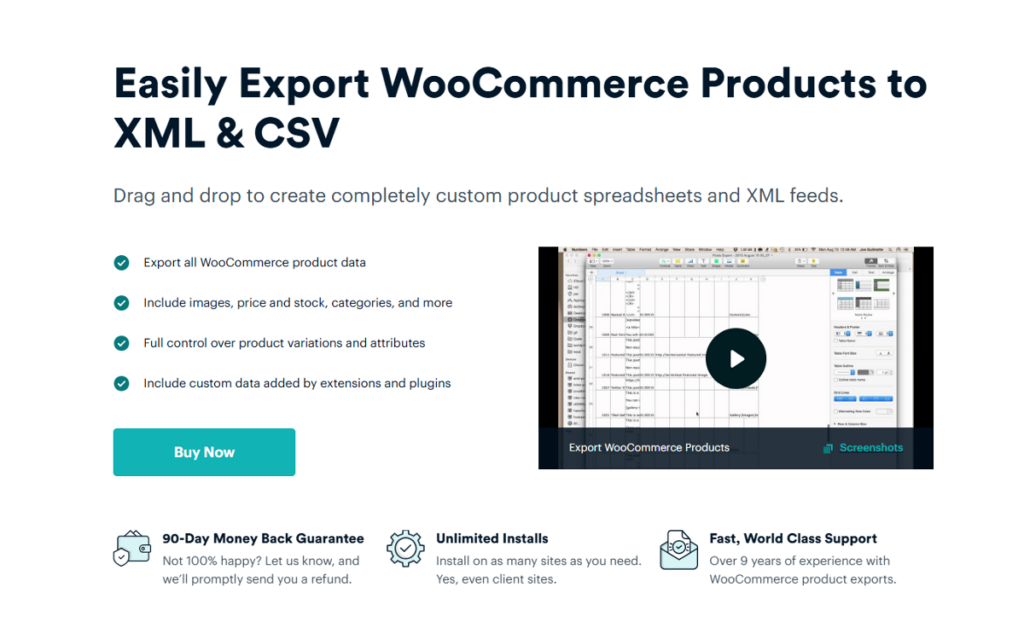
Option #3 — WP All Export – The Best WooCommerce Product Export Plugin
As the saying goes, if you want a job done right, hire a professional.
WP All Export is that professional, allowing you to export all types of WordPress and WooCommerce data, including data from third-party plugins and add-ons.
The core product gives you the ability to:
- choose exactly the columns and column layout that you need.
- build any filter, no matter how complex.
- export to CSV, Excel, or XML.
- manipulate your export data on the fly, including the use of PHP formulas and conditional logic.
- schedule your exports.
- integrate your exports with 1000s of external applications using Zapier.
- generate exports in multiple languages.
To address issues specific to WooCommerce products, there is also a product export add-on:
Among other things, this add-on allows you to:
- control every aspect of product variation data, including exact layouts, which can be extremely important for integrating with external systems
- build custom XML product feeds — another must for external integrations
- generate a product feed for the Google Merchant Center using easy-to-follow templates
Perhaps the biggest selling point of this combined solution is that it will handle all your export needs using the same interface and the same basic process — no need to ever acquire or learn other tools. This will save you not only money but also a great deal of time.
To see this tool in action, let’s do a basic walkthrough.
Step-by-Step: Export WooCommerce Products
Step 1: Download and Install the WP All Export Plugin
Download and install the base WP All Export plugin and its WooCommerce Export Product add-on. Alternatively, you can use this free online sandbox. Just choose the WooCommerce Store option and click Create Sandbox.
Step 2: Create a New WooCommerce Order Export
Go to All Export › New Export and select WooCommerce Products as the export type. Then click the Customize Export File button:

Step 3: Choose Your WooCommerce Product Export Fields
When exporting WooCommerce products, most users need only a subset of the available fields. WP All Export simplifies this requirement with a simple Drag & Drop interface.
The available product tables and fields are displayed in the Available Data section on the right. To export a field, drag and drop it into the column selection area on the left:
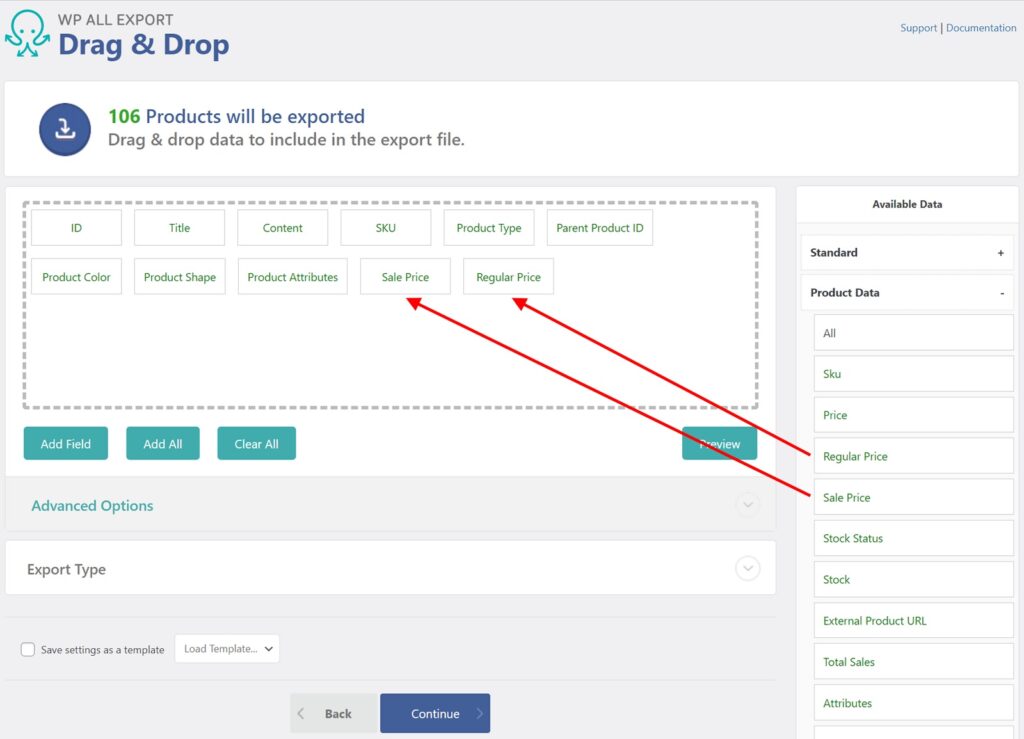
To remove a field, simply drag and drop it outside the column selection area.
To change the column layout, just drag the selected columns into the order that you want them.
You can select fields from all of these categories:
- WooCommerce Standard Data
- WooCommerce Product Data
- Media
- Taxonomies
- WooCommerce Custom Fields
- All other WooCommerce product fields
Finally, you can change the export type to Excel (.xls or .xlsx) or XML in the Export Type section of this screen.
Step 4: Download the WooCommerce Product Export File
Once you’ve completed setting up your product export, click Continue, then verify the export settings. To run the export, click Confirm & Run Export. You can then click either the CSV or Bundle button in the Click to Download section. Note, that if you change the export type to Excel or XML, the label for the CSV button will change accordingly.
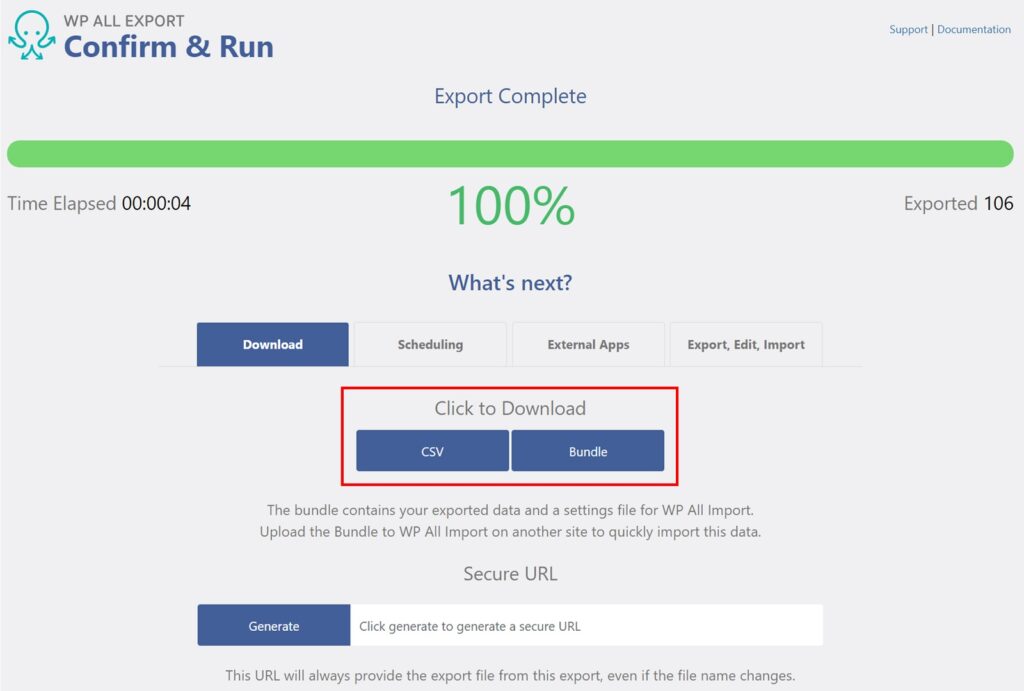
The bundle file contains both the data file and an import template that helps WP All Import automatically process the data. This is extremely helpful if you’re trying to copy WooCommerce products from one site to another.
And that’s it. That’s how you perform a basic WooCommerce product export!
Export WooCommerce Products — Advanced Topics
Some of the instructions in this section require the Pro version of the plugin, which you can read about at Export WooCommerce Products. In case you do not have this version, you can use either the free online sandbox or just follow the visuals below.
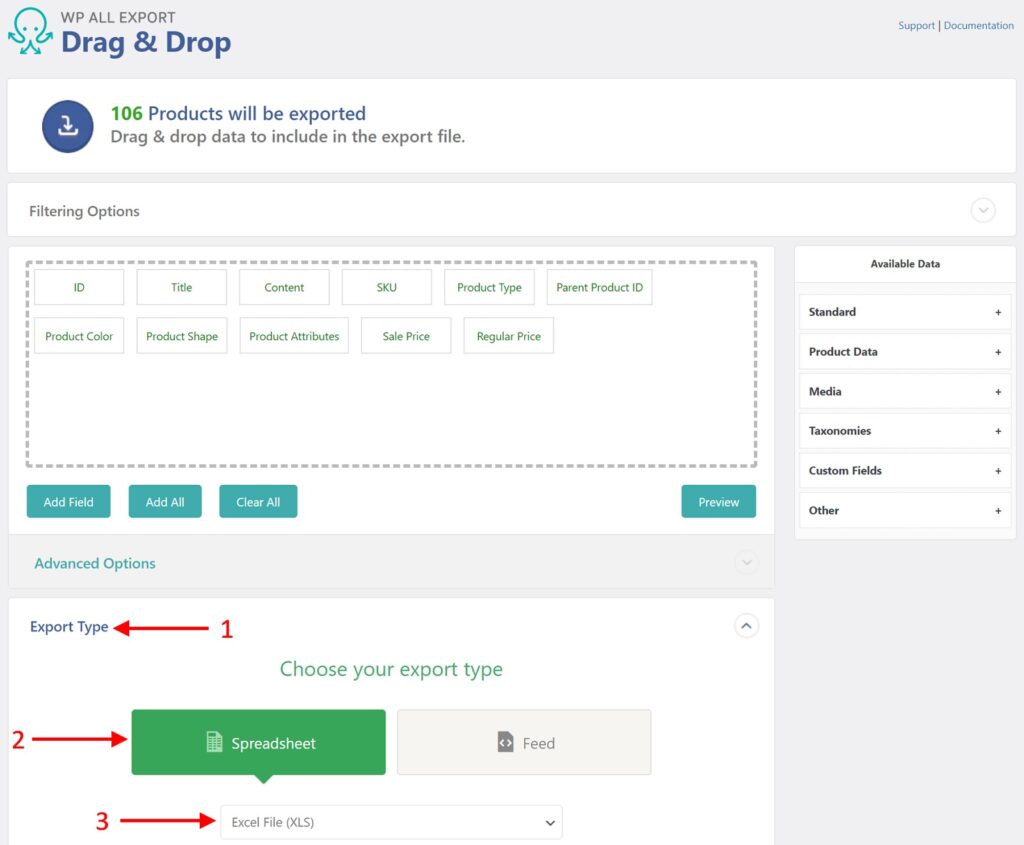
Export WooCommerce Products to a Different File Type
The preceding example exported products to a CSV file, but you can quickly change this to Excel simply by changing the export type in the Drag & Drop interface:
Prefer XML?
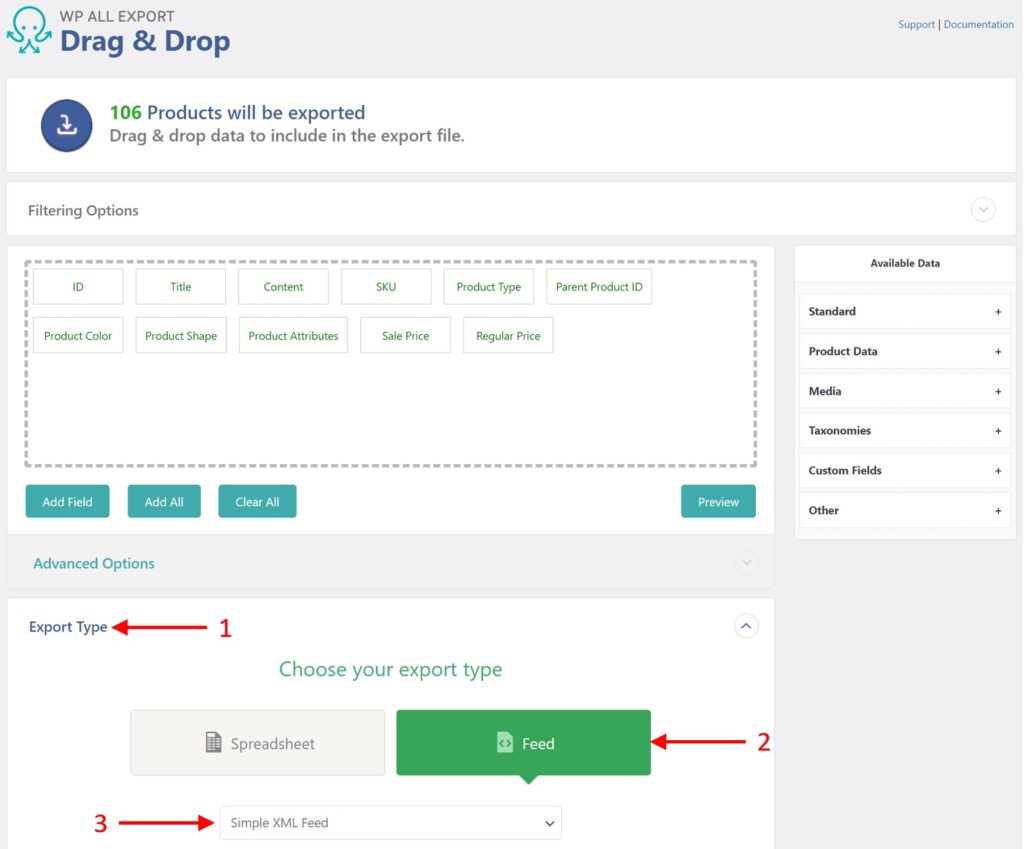
Note, that you can export WooCommerce products to a Simple XML Feed or a Custom XML Feed. If you choose a custom feed, you can make this feed as complex/sophisticated as you require.
Apply Powerful Filters to Your WooCommerce Product Export
Applying filters to your WooCommerce product export is easy. You can do this in the Add Filtering Options section of the New Export screen:
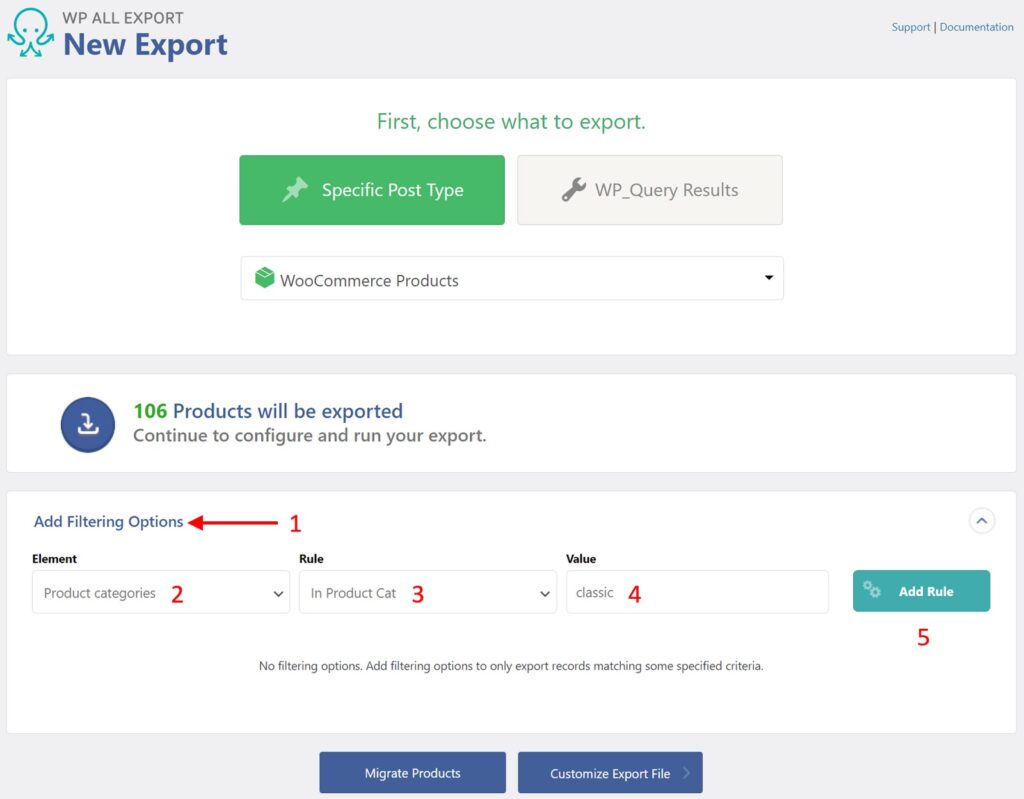
- Expand the Add Filtering Options section.
- Select the Element that you want to use in the filter.
- Select the Rule.
- Enter the filter Value.
- Click the Add Rule button.
In this example, our filter is equivalent to saying, “Export WooCommerce products with a product category of ‘classic’.”
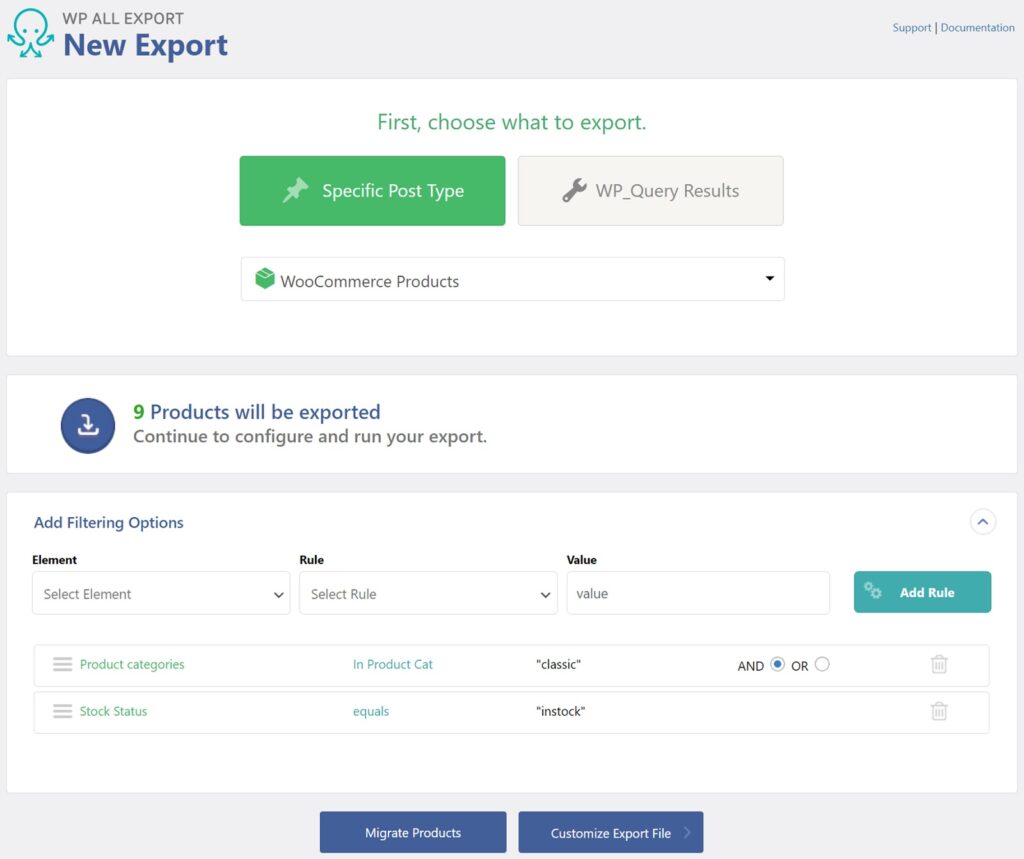
You can also combine filters. In this next screenshot, we’ve added the condition that the Stock Status field must equal “instock”:
You can even write your WooCommerce product export filters using PHP:
function exclude_drafts_from_gmc_export($articles, $options, $export_id) {
// Only filter GMC exports.
if ($options[“xml_template_type”] == “XmlGoogleMerchants”) {
// Process every exported product.
foreach ($articles as $key => $article) {
// If IDs aren’t set to be exported, do nothing.
if ( ! empty($article[‘id’]) ) {
$post_id = $article[‘id’];
$parent_id = wp_get_post_parent_id($post_id);
// Check the parent’s Status.
if ( get_post_status($parent_id) == “draft” ) {
// Don’t export variation if parent is ‘draft’.
unset($articles[$key]);
}
}
}
}
return $articles;
}
add_filter(‘wp_all_export_csv_rows’, ‘exclude_drafts_from_gmc_export’, 10, 3);
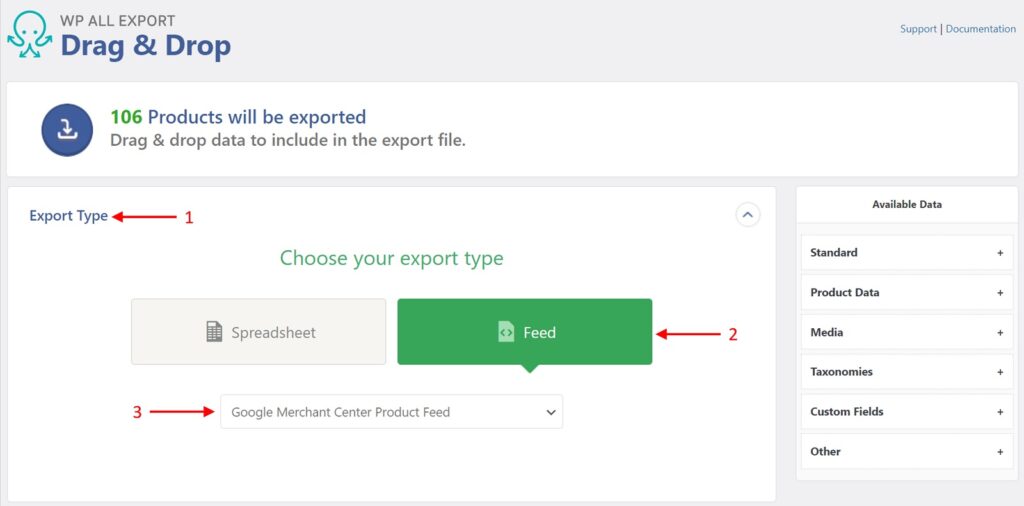
Export Your WooCommerce Products to the Google Merchant Center
To export WooCommerce products to the Google Merchant Center, just change your product export type to Google Merchant Center Product Feed, as shown below:
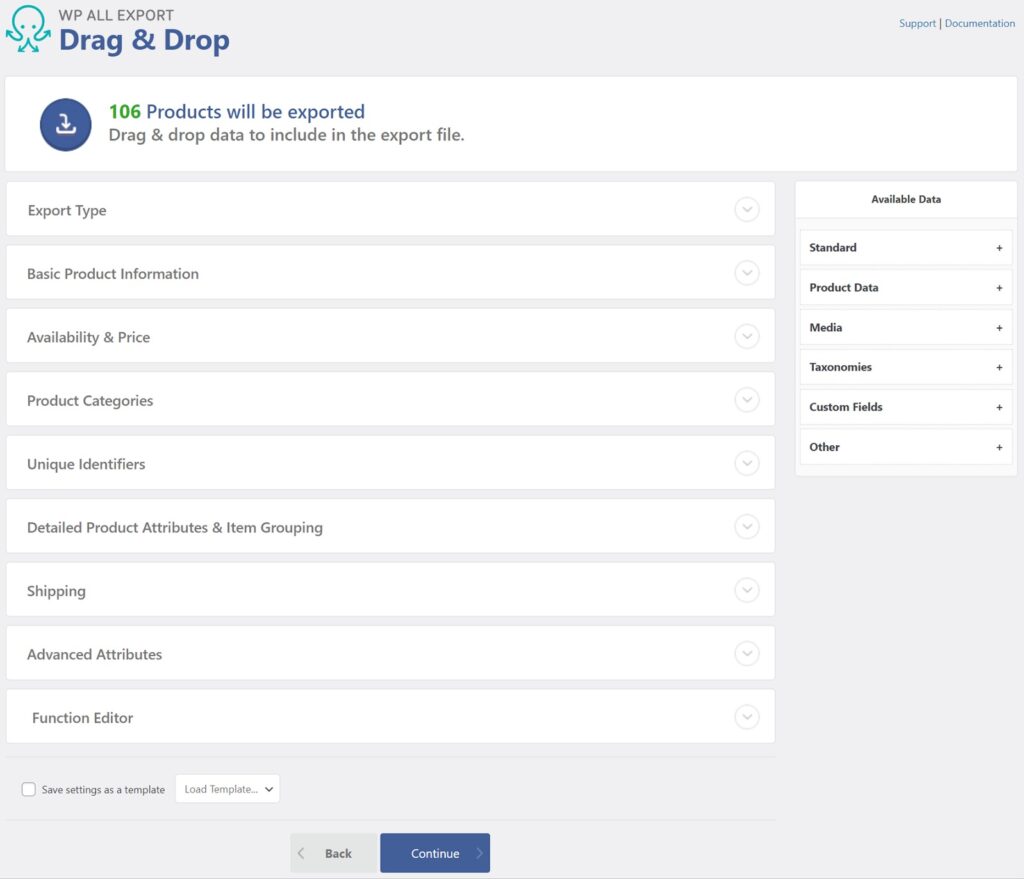
The plugin will respond by presenting the Google Merchant Center options divided into various sections:
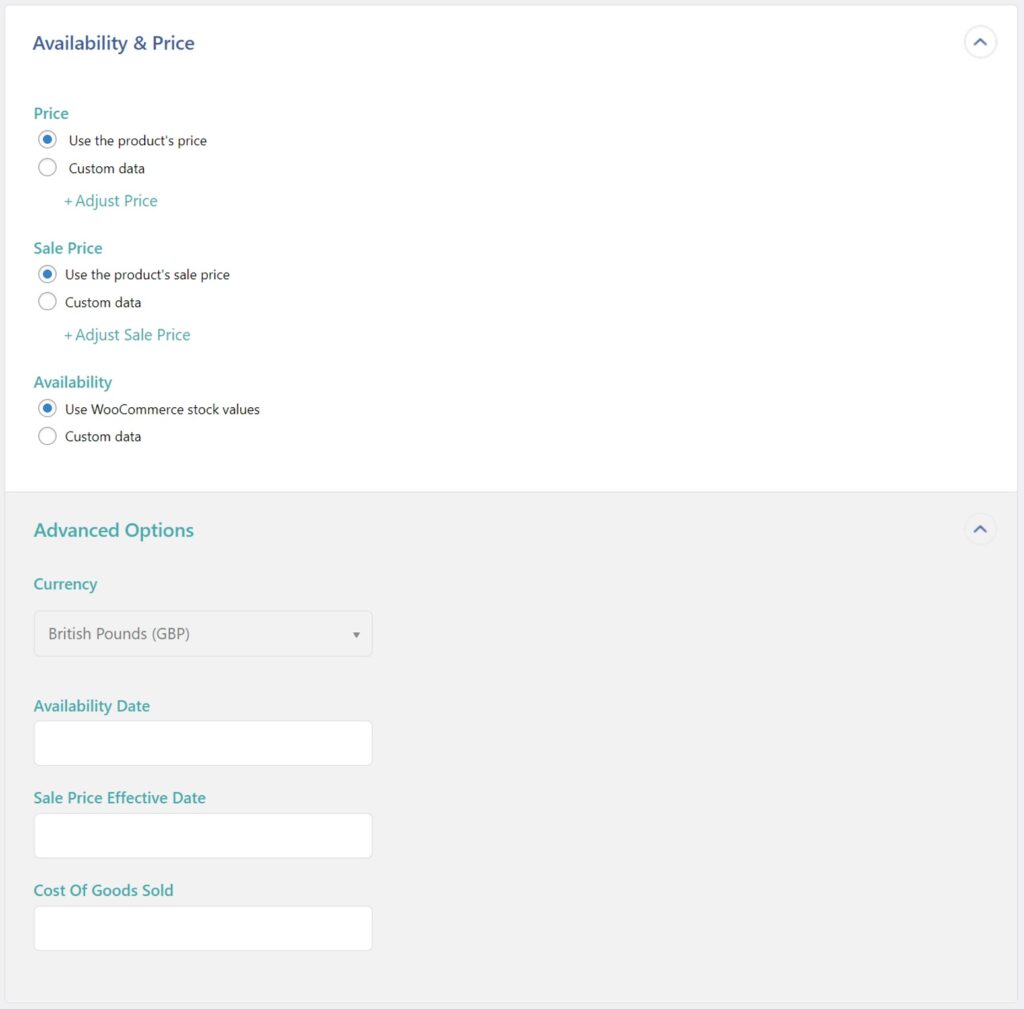
You can modify the settings for each of these sections. For example, here are the typical settings for the Basic Product Information panel.

And here’s a typical setup for the Availability & Price panel:
For complete instructions on exporting WooCommerce products to the Google Merchant Center, please see the dedicated documentation article, How to Export WooCommerce Products to the Google Merchant Center from WP All Export.
In addition to guiding you through this special export process, WP All Export will create an export file that is automatically set up for submission to the Google Merchant Center. And what happens if submission requirements change? No problem. WP All Export will change right along with them.
This plugin also allows you to:
- Use WP_Query to create queries that can’t be created any other way, at least not efficiently
- Use WPML to export your products in different languages
- Bulk edit your Woocommerce product data
- Automatically schedule your WooComerce product exports
- Split large product exports into different batches and files
- Integrate with Zapier to send WooCommerce product exports to 1,000s of external apps
Export WooCommerce Products — Frequently Asked Questions
Can I Export Custom WooCommerce Product Data Added by a Plugin? What About WooCommerce Extensions?
Yes. WP All Export automatically detects all custom fields created by any theme, plugin, or WooCommerce extension. In the rare case where it doesn’t (usually because the theme or plugin is storing its data in a non-standard way), just contact the support team and they’ll help you figure it out.
Is There Any XML Product Export Requirement That is Too Complicated for This Plugin to Handle?
No. You can control every aspect and detail of the XML output.
How Do I Export WooCommerce Product Categories?
- Set up a new export via All Export › New Export.
- Choose WooCommerece Products from the dropdown list.
- When building your export file, drag and drop the product categories from Available Data › Taxonomies.
- Complete the export.
- Download and review your exported products along with their product categories.
See How to Export WordPress Categories and Tags for additional information.
How to Export WooCommerce Products With Images?
Using WP All Export and the WooCommerce Product Export Add-On, you can easily export your products with images.
- Create a new export for WooCommerce products.
- Add the images and attachments to the export using the Media › Images subsection of the Available Data panel in the Drag & Drop interface.
- Run the export and download the export file with the product images.
For more information, see Export WordPress Images.
How to Export Product Attributes?
- Create a new export via All Export › New Export.
- Select to export WooCommerce Products from the dropdown list.
- Drag and drop the desired attributes from Available Data › Product Data › Attributes.
- Continue the export and download the exported file.
- Review the exported product attributes.
See Export WooCommerce Products for additional details.
How to Schedule WooCommerce Product Exports?
You can schedule your WooCommerce product exports to run on any schedule. You can do this using either cron jobs manually via your server, or by using WP All Export’s Automatic Scheduling service to set your product export schedule directly from the plugin’s interface.
To learn more, please see How to Schedule WordPress Exports.
How to Import WooCommerce Products
If your WooCommerce store has external suppliers, you will probably want to import their products, and not just once. You’ll likely need to import product data on a regular basis to keep your store in sync with the latest supplier updates. The alternative is to spend an enormous amount of time creating and updating your product information by hand.
Your Options to Import WooCommerce Products
You have the same basic options for importing WooCommerce products as you do for exporting them:
Default WooCommerce Import Tool
The argument in favor of WooCommerce’s built-in tool to import products is a little stronger than its export counterpart in that you can selectively import specific data elements and also map those data elements to specific WooCommerce product fields.
In theory, then, you can use the default tool to successfully import products from a supplier file, and even use the data from subsequent files to update existing product information. The problem here is that if you need to filter or modify the incoming data in any way, you’re out of luck. And if you’re receiving product files from multiple suppliers, what are the odds that they’re all going to just magically line up with your existing product data requirements? Very low.
Product CSV Import Suite
The advantages of WooCommerce’s Product CSV Import Suite over the default import tool are roughly the same as for exports. It still does a better job of handling product variations and recognizing the custom fields of some key WooCommerce add-ons. But its field mapping capability merely equals that of the default import tool, without any ability to manipulate incoming data on the fly. It also lacks any kind of filter.
So, again, you’re left hoping for a perfect match in terms of data requirements.
WP All Import – Best WooCommerce Product Import Plugin
Everything we said about the core abilities of WP All Export also applies to the import side. You have complete control over incoming data, including filtering and modifying that data on the fly. You also have complete control over the data mapping process.
The fields of all third-party themes and plugins are automatically detected and immediately accessible.
You can import categories, tags, and anything else stored in either WordPress or WooCommerce.
You can import images regardless of where they are stored (your server, another server, FTP, etc.).
You can import from multiple file types, including CSV, Excel, and XML.
You can import data to multilingual sites.
Finally, you can set up your imports just once and then schedule them to run automatically from that point on.
To address issues specific to WooCommerce products, there is also a product import add-on:

This add-on provides the most in-depth support for importing variable products. In short, you can import variable products regardless of how their data is organized in the import file.
You can also import External/Affiliate products and Grouped products.
You can import products from a URL, which is ideal if you’re trying to sync your store with supplier updates that are hosted elsewhere.
Finally, you get the same consistent interface and process regardless of whether you’re importing WooCommerce products or WordPress posts, pages, taxonomies, etc.
Step-by-Step: Import WooCommerce Products — The Basics
Step 1: Download and Install the WP All Import Plugin
Download and install the base WP All Import plugin and its WooCommerce Import Product add-on. Alternatively, you can use the same free online sandbox that we used for the product export walkthrough. Just choose the WooCommerce Store option and click Create Sandbox.
Step 2: Start a New WooCommerce Product Import
After both the plugin and the add-ons are installed on your site, go to All Import › New Import in your WordPress dashboard.
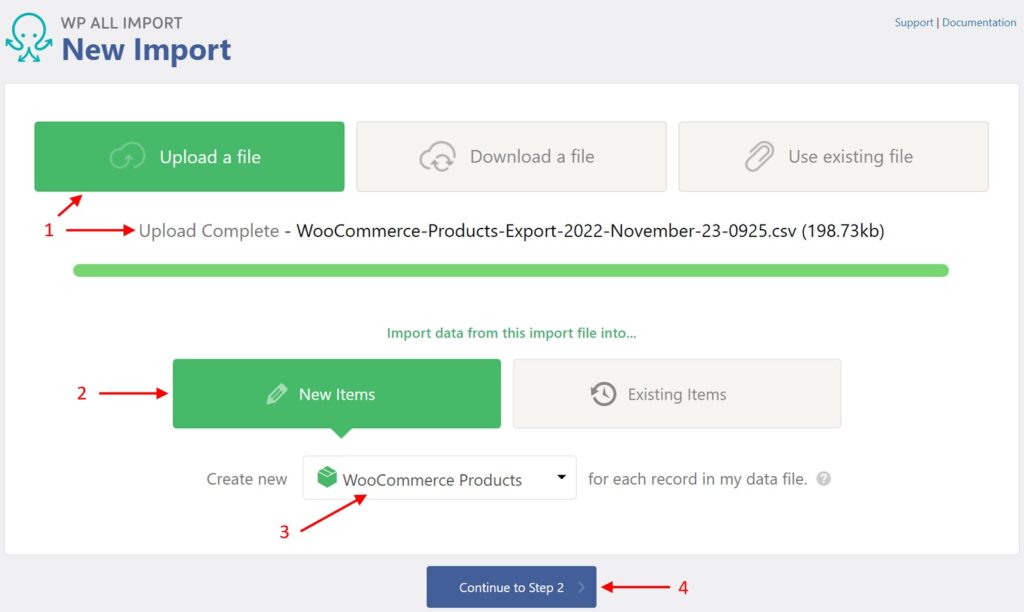
- Select Upload a file and then specify the file. Note, to download from a URL or FTP/SFTP site, select Download a file instead. The Use existing file option lets you choose a file that you’ve previously uploaded to your server.
- Choose New Items.
- Select WooCommerce Products.
- Click Continue to Step 2.
Step 3: Review the WooCommerce Products Import File
The Review Import File screen will appear next. It lets you verify that the import data has been correctly interpreted.

In most cases, you won’t spot any problems (WP All Import has seen pretty much every type of import file imaginable in its 12 years of doing this), so you can just click the Continue to Step 3 button.
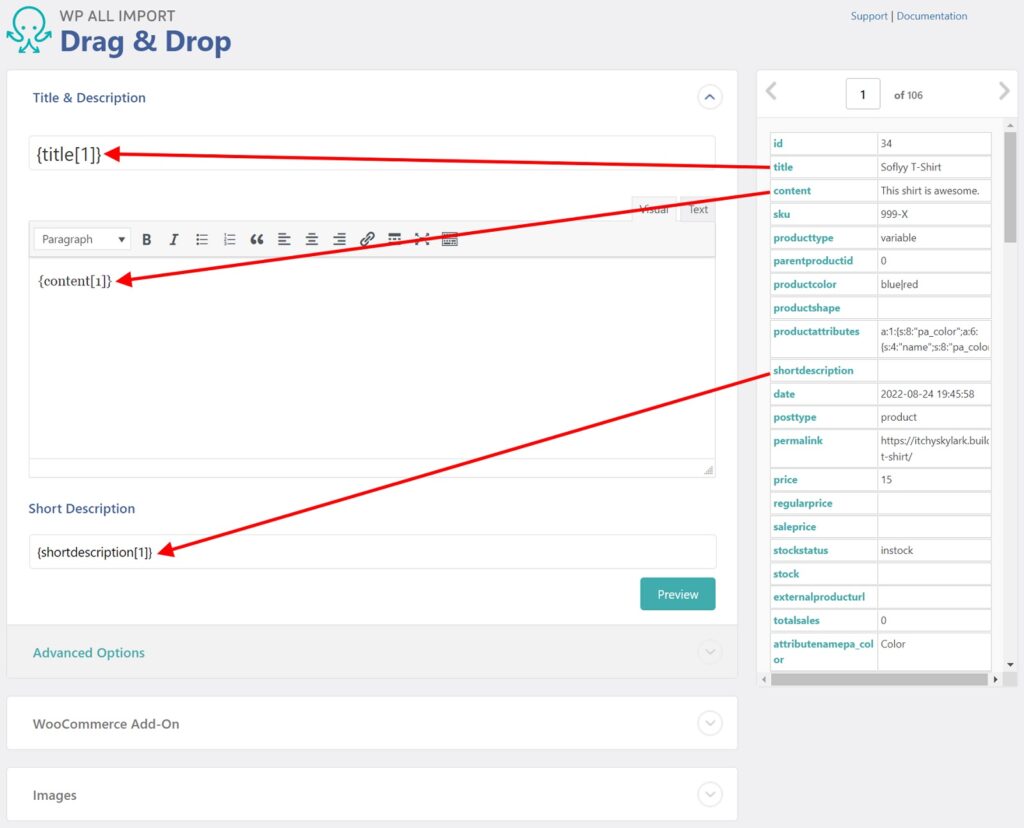
Step 4: Map Incoming Data to Target WooCommerce Product Fields
The Drag & Drop interface will now appear. In many respects, this interface is similar to the drag-and-drop tool used for exports. In its basic use, you simply drag the incoming data elements from the panel on the right to the appropriate target fields on the left:
But in other respects, this interface is far more sophisticated than its export counterpart, especially when importing products. For one, it consists of many more target sections (additional sections continue down the page and are not shown here).
Additionally, each section can contain a significant number of target fields and options related to those fields. For example, here’s a look at just part of the General panel of the WooCommerce Add-On section:

And here’s a look at part of the Inventory panel:
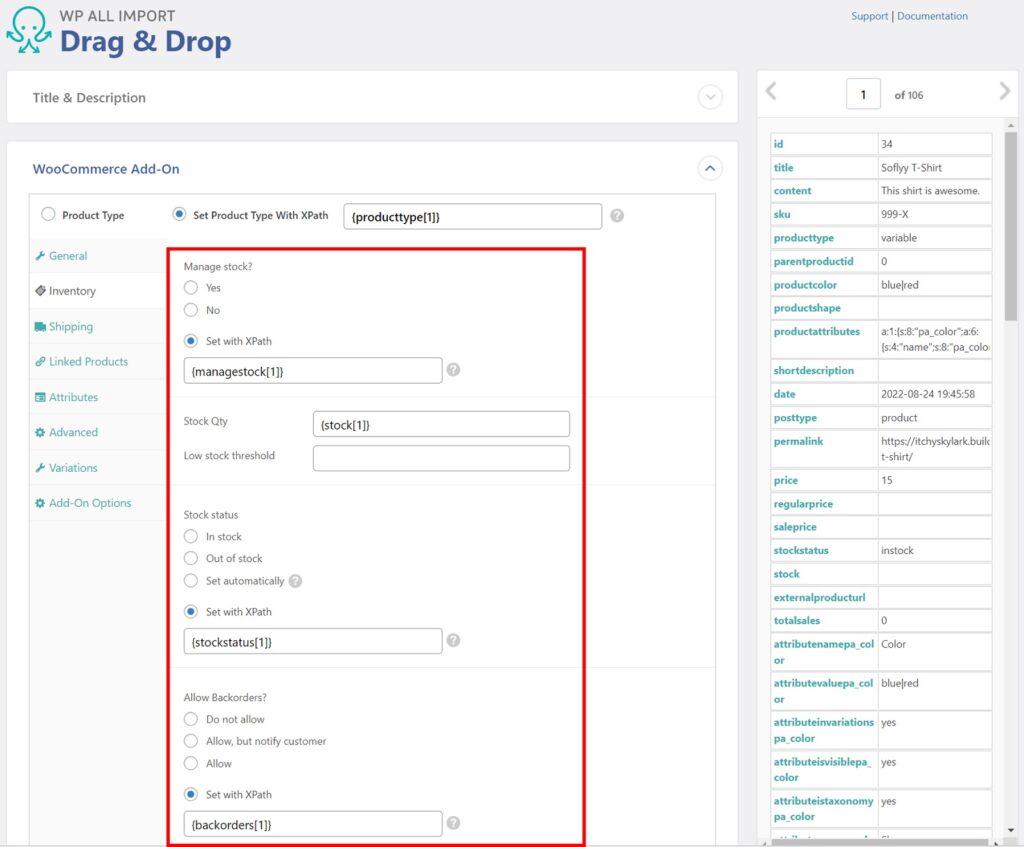
Notice all the little settings related to product prices, stock status, and backorders in these two panels (outlined in red)?
WP All Import provides scores of these settings, allowing you to specify exactly how you want product information to be imported.
In most cases, you won’t have to use these settings. The defaults should suffice. But compare the sophistication of these interfaces to WooCommerce’s default import tool or the Product CSV Import Suite. They’re not even in the same universe. With this plugin, you are guaranteed to be able to handle any product import, no matter how complex or challenging.
Worried about being able to understand all these options? Don’t be. They are fully described in the official documentation at How to Import WooCommerce Products. There are other documentation articles and videos available to explain more complex tasks, such as How to Import Variable Products in WooCommerce, How to Import WooCommerce Products with Images, Syncing Stock Levels, Updating Prices, and more. And if you have any confusion about what to do, just contact the support team, which has decades of combined import/export experience.
Step 5: Configure the WooCommerce Product Import Settings
The next screen in the process is the Import Settings screen.
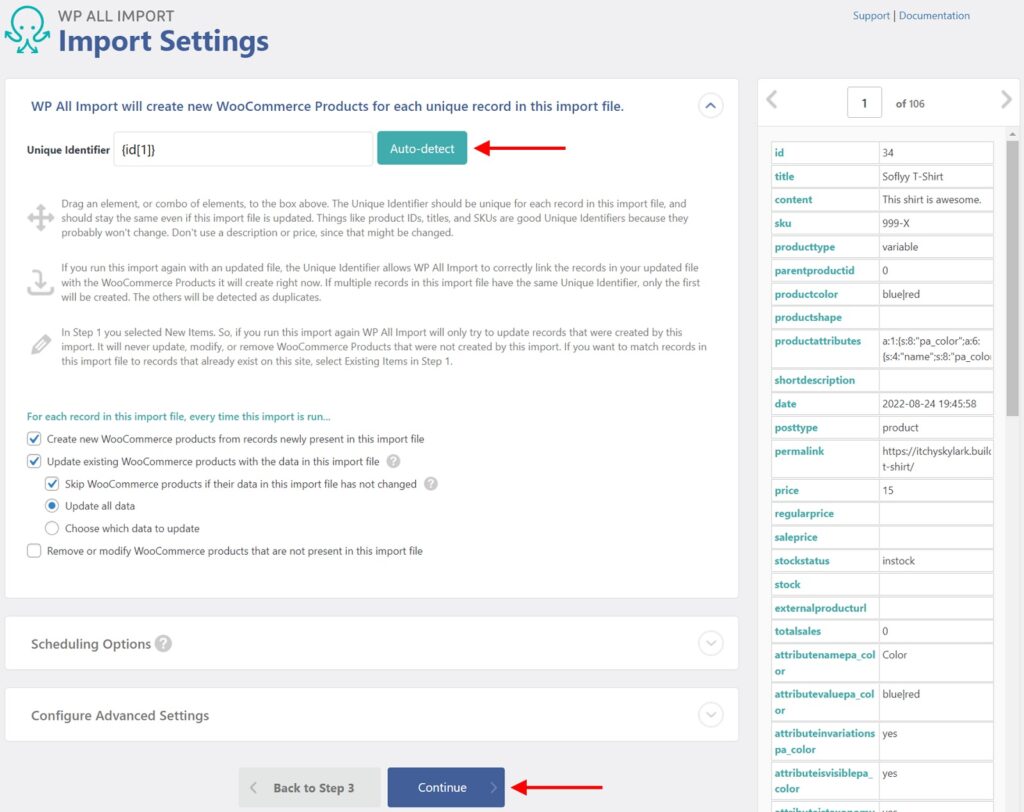
The most important task in this screen is to assign a unique identifier to your incoming products. You can do this manually if you wish, but the plugin actually does a great job of automatically selecting a unique identifier if you click the Auto-detect button near the top.
Why is this important? Because the unique identifier is used to distinguish between products. It’s what helps it identify duplicate products. And if you run this import again (i.e., as an update), it is the basis for matching incoming data to existing products already in your database.
The other settings in the top panel of this screen (those introduced by, For each record in this import file, every time the import is run…) tell the plugin how to handle data during re-runs of this import, i.e., whether to update existing products with new information, remove or modify products that are no longer present in the file, etc.
This screen also contains two other panels in its lower half. The Scheduling Options panel is where you can set up a schedule to automatically run your product import on a recurring basis, which is great for synching product data with supplier updates. The Configure Advanced Settings panel lets you do things like break your import into batches and implement other speed optimization features.
When you’re finished with this screen, click Continue.
Step 6: Run the WooCommerce Product Import
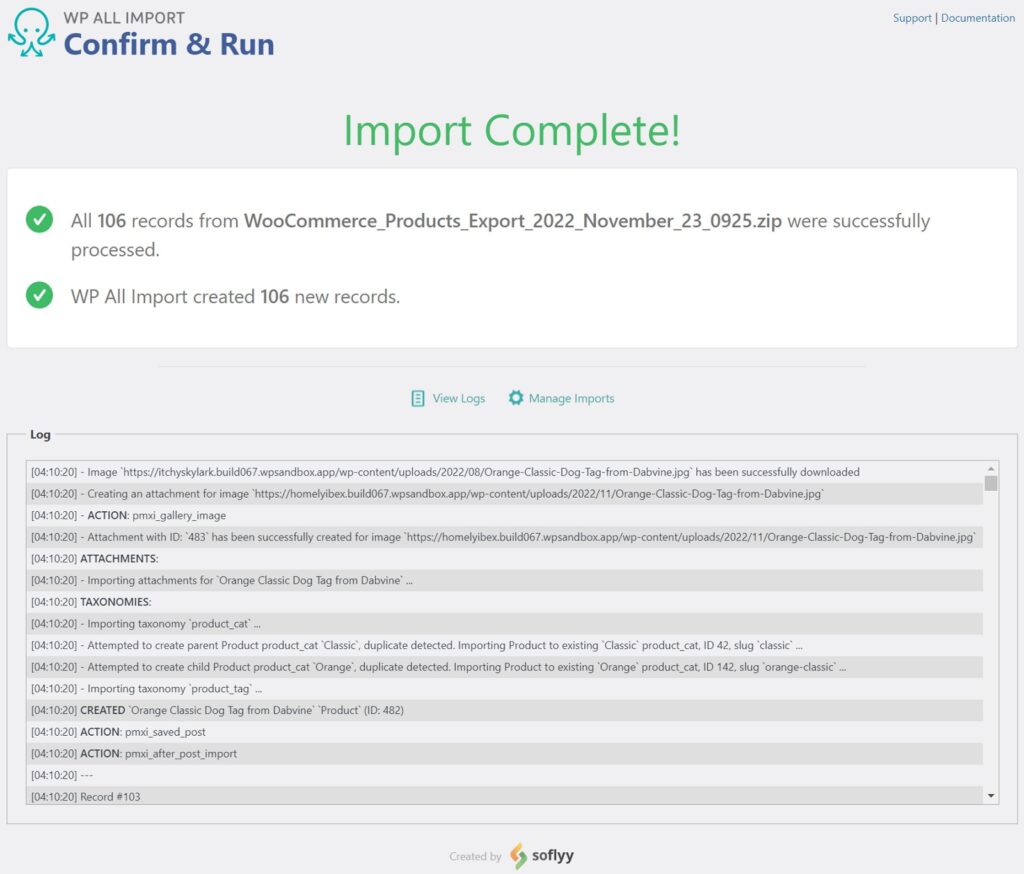
The next screen in the process is the Confirm & Run screen:

The Import Summary section of this interface gives you one last chance to review what will happen before you proceed. This is especially important with import processes, as you will be altering your WordPress and/or WooCommerce data. If you spot something wrong at this point, there is an or go back to Step 4 link (not shown) immediately below the Confirm & Run Import button.
For now, click that button to proceed. When the import is complete, you should see a confirmation screen like this:
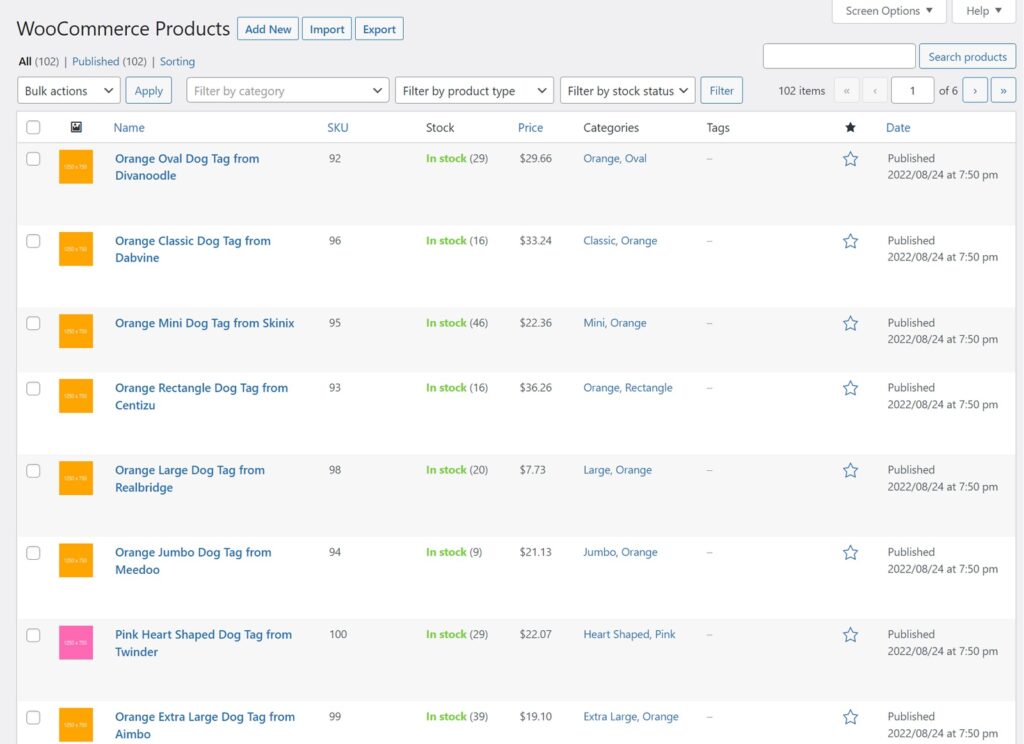
Step 7: Verify the Imported Products
There is a saying in war: no battle plan survives contact with the enemy.
The same is true when exporting or importing data, where the enemy is known as Mr. Murphy.
To combat this phenomenon, always verify the success of your imports.
In this case, that means navigating to Products › All Products in the WordPress menu to confirm that everything is as you expect:
Import WooCommerce Products — Advanced Topics
Some of the instructions in this section require the Pro version of the plugins, which you can read about at Import WooCommerce Products. If you do not have this version, you can use either the free online sandbox or just follow the visuals below.
Product Import File Types and Filters
WP All Import can import many different types of files, including CSV, Excel, and XML. You don’t have to do anything special to work with different file types: just select the file in question and the plugin will automatically detect the type.
You may notice that the interface looks slightly different if you’re importing an XML file versus a CSV, but these differences are not important. The same basic import process applies regardless of the file type.
As for filters, the import filter tool is not significantly different from its export filter counterpart. The process is slightly different, but the principles are the same.
Scheduling a WooCommerce Product Import
As mentioned earlier in this article, a common requirement is the ability to schedule your WooCommmerce product imports. This is especially important for automatically synchronizing your product catalog with supplier updates.
To set up a schedule, the first requirement is that you must download your data from a URL or a file that already exists on your server:

- Select Download a file and choose From URL.
- Specify the URL.
- Select New Items.
- Choose WooCommerce Products.
- Click Continue to Step 2.
The reason for this requirement is that the plugin must have access to the product import file at the scheduled date/time without the need for anyone to log in or interactively upload anything.
As for the scheduling process itself, you have two options:
- Use cron jobs on your server to schedule the import manually.
- Schedule the import using WP All Import’s Automatic Scheduling service.
You can set up your scheduling in the Scheduling Options section of the Import Settings screen. In the example below, we are using Automatic Scheduling:

- Expand the Scheduling Options section.
- Select Automatic Scheduling.
- Choose the Every week on… option.
- Choose the day of the week for the import to run. In this example, we have selected Tuesday.
- Specify the time for the import to run.
- Select a time zone.
- To use this service, you must first subscribe to it.
And that’s it. Your product import will now run every week on Tuesday at 1:00 a.m.!
Import WooCommerce Products With Images
One of the potentially tricky aspects of importing WooCommerce products is handling images.
This is managed through the Images tab of the Drag & Drop interface.
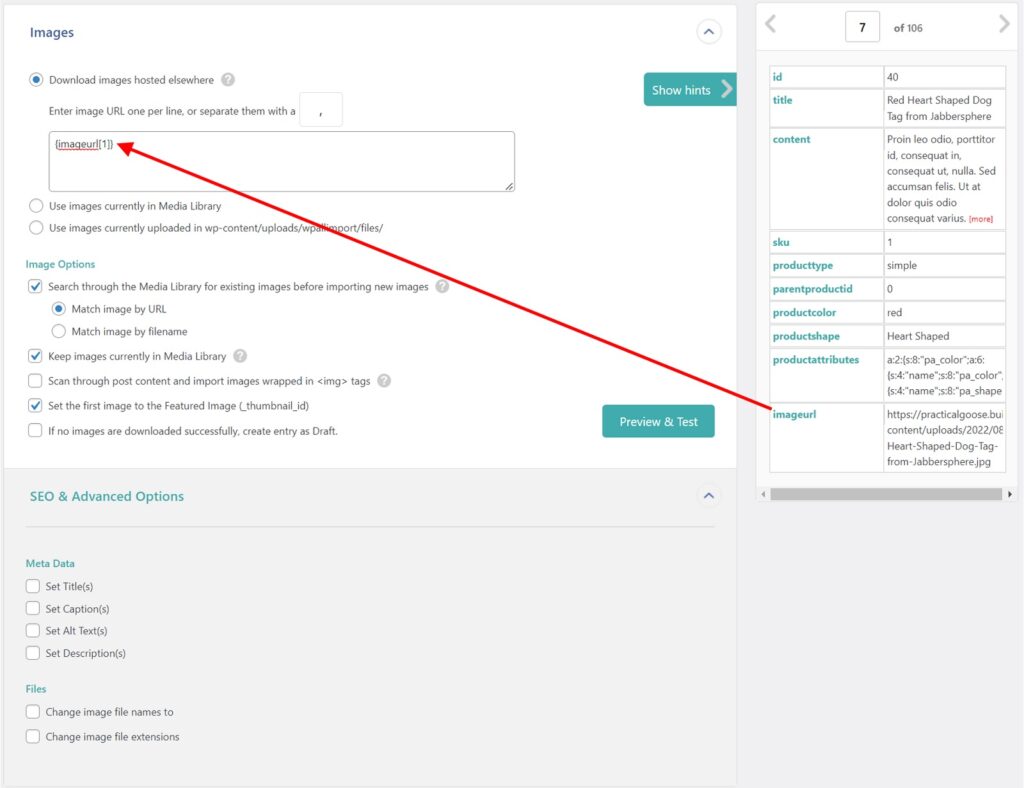
In this scenario, images are stored at an external URL (say, the supplier’s server), the image URLs are complete, and there is only one image per product, so all you have to do is:
- Select Download images hosted elsewhere.
- Drag and drop the incoming imageurl data element into the edit box.
WP All import will then download the images, upload them to the Media Library, and take care of all the necessary linkages.
But what if there are multiple images stored in the same data element? No problem. The plugin will use the separator defined in the …or separate them with a… option to separate them.
What if images are stored on an external server, but only the image name is included in the import file? In that case, you can use something like this: “http://example.com/folder/{image[1]}.jpg”
…where you manually type “http://example.com/folder/.jpg” and then just drag and drop the {image[1]} data element before the “.jpg” portion of your entry.
What if there are multiple image names in the incoming data element, and they all need to have an external URL prepended to the image names? Fortunately, there is a code snippet for that.
What if there are a variable number of images for each product? Again, no problem. There are multiple options to handle that scenario, too.
The point is that images can get complicated, but WP All Import can address every scenario.
For example, if you look at the top section of the preceding screen, you will see that you can also draw your images exclusively from the Media Library or from a folder on your server where you have uploaded them in advance.
In the Image Options section, you can give the plugin specific instructions on how to handle a number of different scenarios:
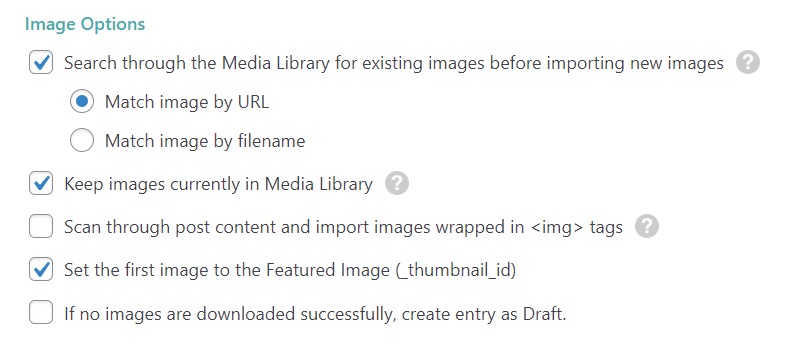
Below this, you can choose how to handle image metadata:

When you see how much there is to consider with just this one aspect of WooCommerce product imports, you quickly realize how improbable it is to meet all of your product import needs with tools that only offer one configuration panel to address everything. That’s the difference between a professional data import tool versus a pretend tool.
For more information on importing images, WP All Import has dedicated documentation articles:
Import WooCommerce Products — Frequently Asked Questions
Can I Import Any Product Type?
Yes. You can import any WooCommerce product type, including simple products, variable products, grouped products, subscription products, and affiliate products. Just set the product type in the WooCommerce Add-On section of the Drag & Drop interface.
How to Migrate WooCommerce Products to Another Website?
Export the products that you wish to migrate. When you do this, download the Bundle option, which contains settings information in addition to the export data.
Import the bundle file on the destination site using WP All Import. It will automatically know how to process the bundle file based on its settings.
How to Bulk Edit WooCommerce Products?
- Export the WooCommerce products that you want to edit.
- Edit the export file in a spreadsheet app. Spreadsheets are ideal for bulk edits thanks to functions like copy-and-paste, search-and-replace, etc.
- Reimport the edited file back into WooCommerce.
- Review your results.
For more information, see Bulk Edit WooCommerce Products.
Related Information
Want more information on how to export and import WooCommerce products? See these key articles:
WooCommerce Product Export – Plugin Description
Export WooCommerce Products to Google Merchant Center – Plugin Description
WooCommerce Product Import – Plugin Description
Bulk Edit WooCommerce Products – Plugin Description
Bulk Edit Price & Stock for WooCommerce Products – Plugin Description
Migrate WooCommerce Products – Plugin Description
Official Documentation: How to Export WooCommerce Products
Official Documentation: How to Import WooCommerce Products
How to Export and Import Variable Products in WooCommerce
How Do I Automatically Import Products into WooCommerce?
How Do I Import Product Attributes in WooCommerce?
How Do I Get a List of Product Attributes from WooCommerce?
How Do I Bulk Upload Variable Products in WooCommerce?
How Do I Bulk Edit WooCommerce Simple Products into Variable Products?
How Do I Export WooCommerce Products with Image?
How to Import WooCommerce Coupons
How to Import Reviews to WooCommerce
How to Import and Export WooCommerce Customers
How to Import and Export WooCommerce Orders
Best WooCommerce Bulk Edit Plugins
How to Import and Export WordPress Users
How to Export and Import WordPress Categories and Tags
How to Import and Export Advanced Custom Fields
How to Export and Import Gravity Forms Entries