A Complete Guide to Exporting Data from Meta Box Custom Fields
Meta Box is a WordPress plugin that lets you customize your website with meta boxes and custom fields. To learn more, see Meta Box Custom Fields.
WP All Export is the leading plugin for exporting WooCommerce and WordPress data. It also has an add-on for exporting Meta Box custom fields. For more information, see Export Meta Box Data From WordPress.
This guide will tell you everything you need to know about using this add-on.
Table of Contents
- Exporting Data from Meta Box Custom Fields – The Basics
- Which Meta Box Custom Fields Can I Export?
- Can I Filter My Meta Box Exports?
- Can I Schedule My Meta Box Exports?
- What If I Need to Modify or Format My Export Data?
- Can I Export Meta Box Data to Different File Types?
- Does the Meta Box Export Add-On Support Multilingual Exports?
- Related Docs
Exporting Data from Meta Box Custom Fields — The Basics
Step 1: Start a New Export
Navigate to All Export › New Export in the main WordPress menu and select the post type with the Meta Box fields attached to it, i.e., the custom fields that you want to export. In this example, we’re exporting the Properties post type:
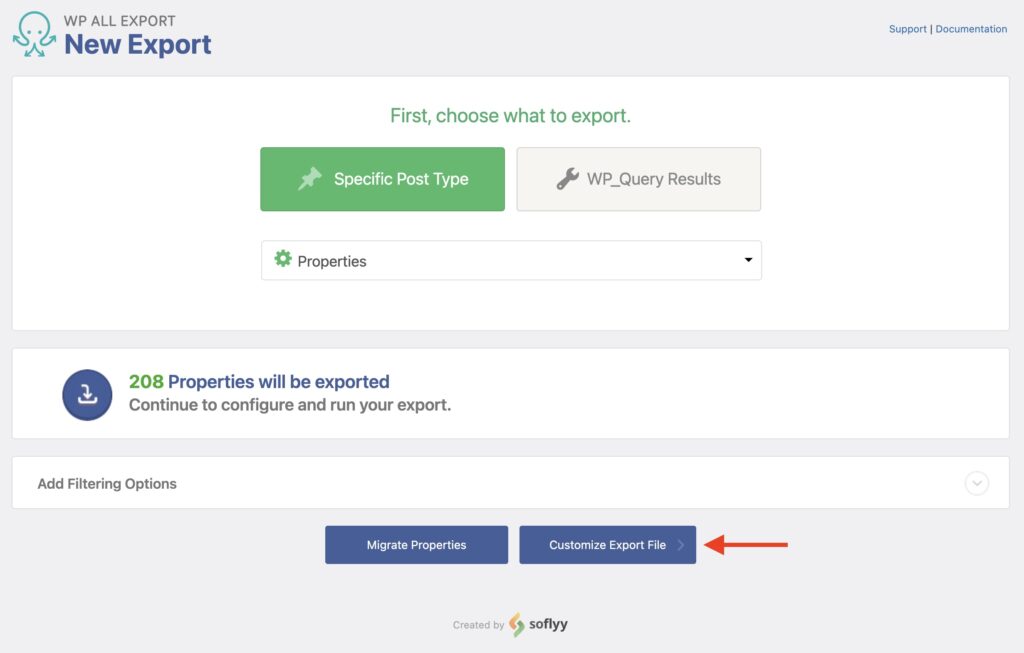
Note that you cannot export Meta Box custom fields independently of the parent post type because the two are inextricably linked. However, after selecting the parent post type (e.g., Properties), you can choose to export mainly its Meta Box fields.
Click Customize Export File to continue.
Step 2: Choose the Meta Box Fields for Your Export
The Drag & Drop screen will appear next. This is where you choose the fields to include in your export.
First, expand the subsection of interest in the Available Data panel on the right, then drag and drop the fields you want to export into the column selection area on the left.
Here, we’ve decided to include all of the Meta Box custom fields in the export:
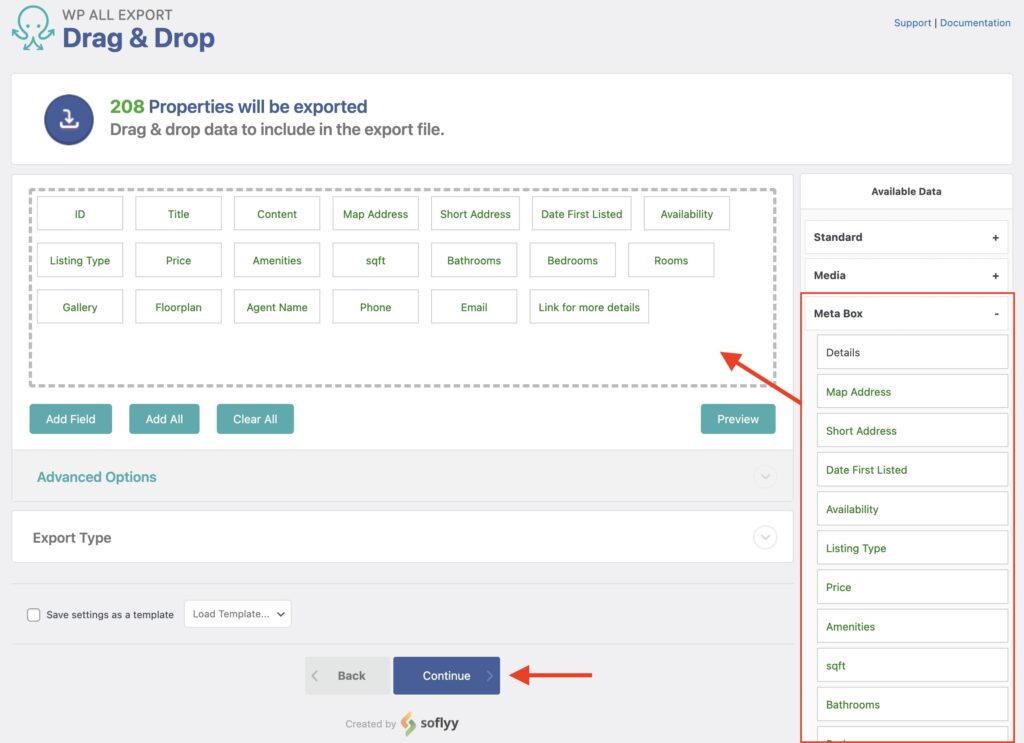
Click the Continue button.
Step 3: Complete the Export
The next stop is the Export Settings screen, which lets you schedule your export and also configure its advanced settings:
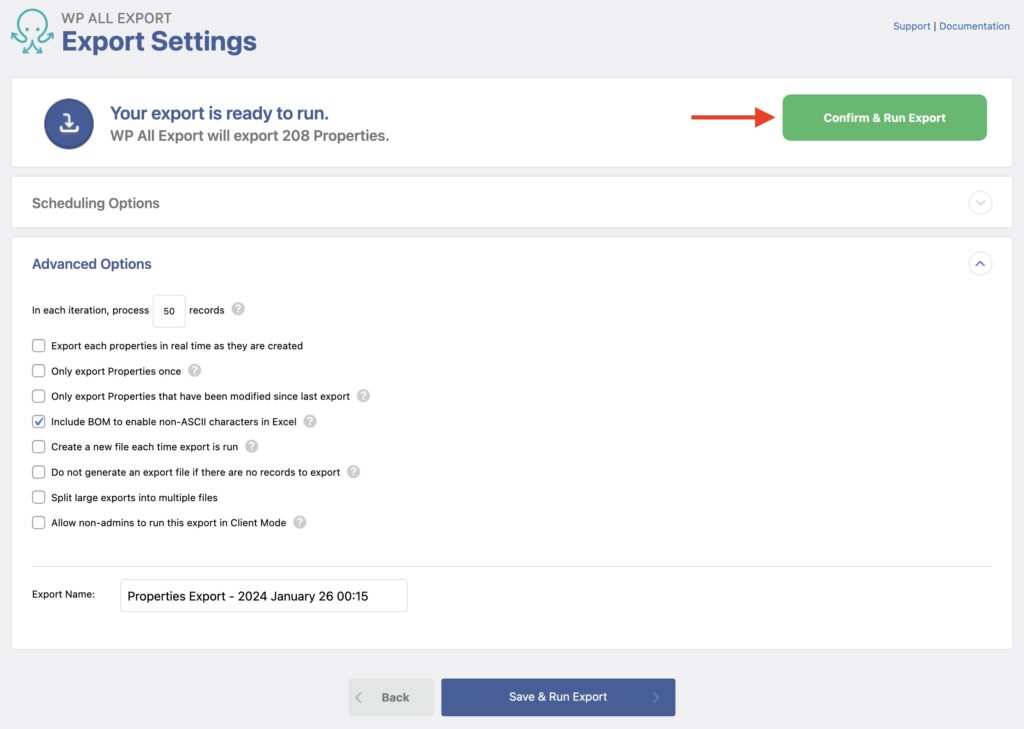
We cover the scheduling options in the Can I Schedule My Meta Box Exports? section of this article.
For a full description of the Advanced Options section, please see WordPress Export Settings Explained.
For now, just leave these settings alone and click the Confirm & Run Export button.
Step 4: Download the Export File
Once the export finishes, you will see the following screen:
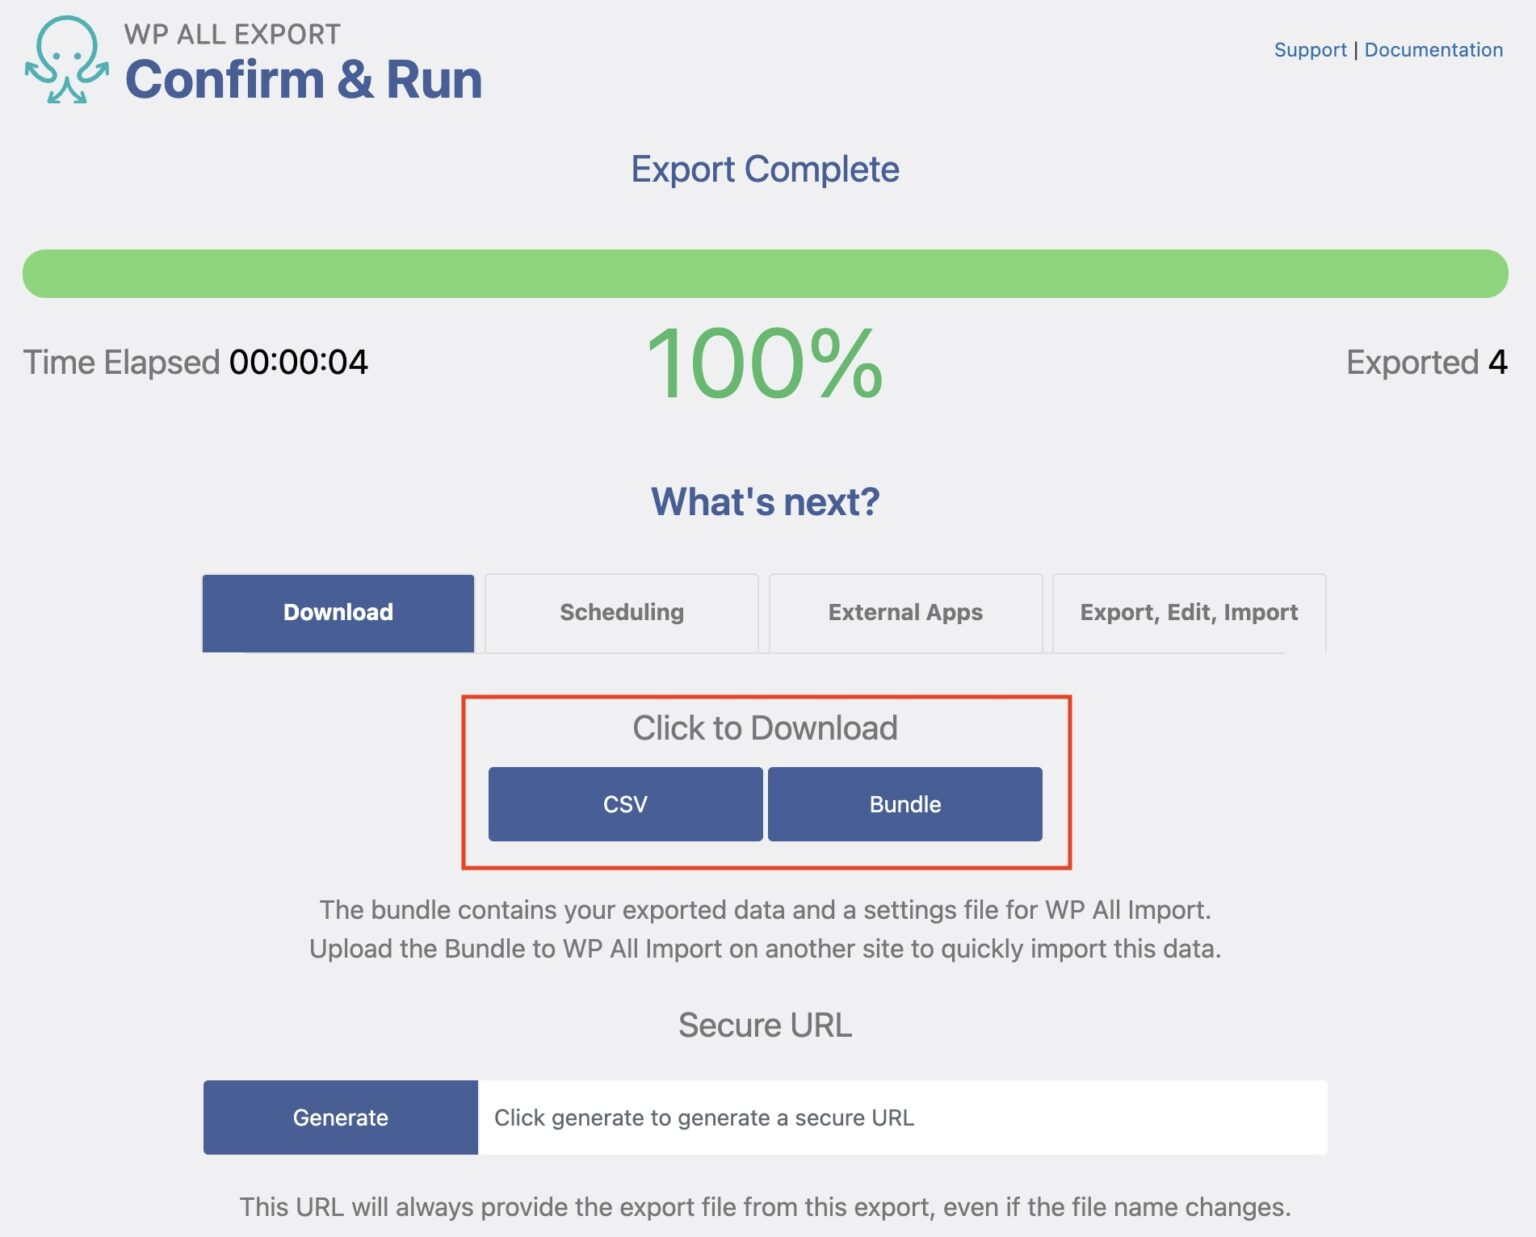
You can download your export file by clicking the CSV button in the Click to Download section of the screen.
Note that you are not limited to exporting data only in CSV file formats. You can also export simple XML, custom XML, and both types of Excel files (.xls and .xlsx). To learn more, see the Can I Export Meta Box Data to Different File Types? section of this article.
In addition to just a data file, you can also download the Bundle bundle option, which includes instructions for WP All Import on how to import the data. This lets you migrate Meta Box custom field data with just a few clicks.
Finally, the Generate button in the Secure URL section lets you generate a URL that you can permanently use to download the data from this export, even if you rerun the export and replace the file. This is ideal for integrating your export data with third-party apps.
No matter if your site is built with a page builder like Elementor or Divi, you can easily export Meta Box data using WP All Export. This flexibility makes it a valuable tool for users across various WordPress setups.
Which Meta Box Custom Fields Can I Export?
WP All Export supports the following Meta Box custom fields:
Text
Textarea
Checkbox
Checkbox List
Radio
Select
Post
Sidebar
Taxonomy
Taxonomy Advanced
User
File
File Advanced
File Input
File Upload
Click on a field to learn more about exporting data from it.
If you want to see the export details for all the custom field types in one place, see Export Details for Each Meta Box Custom Field Type.
Can I Filter My Meta Box Exports?
Yes. Just expand the Add Filtering Options section on the New Export screen and define one or more filter rules.
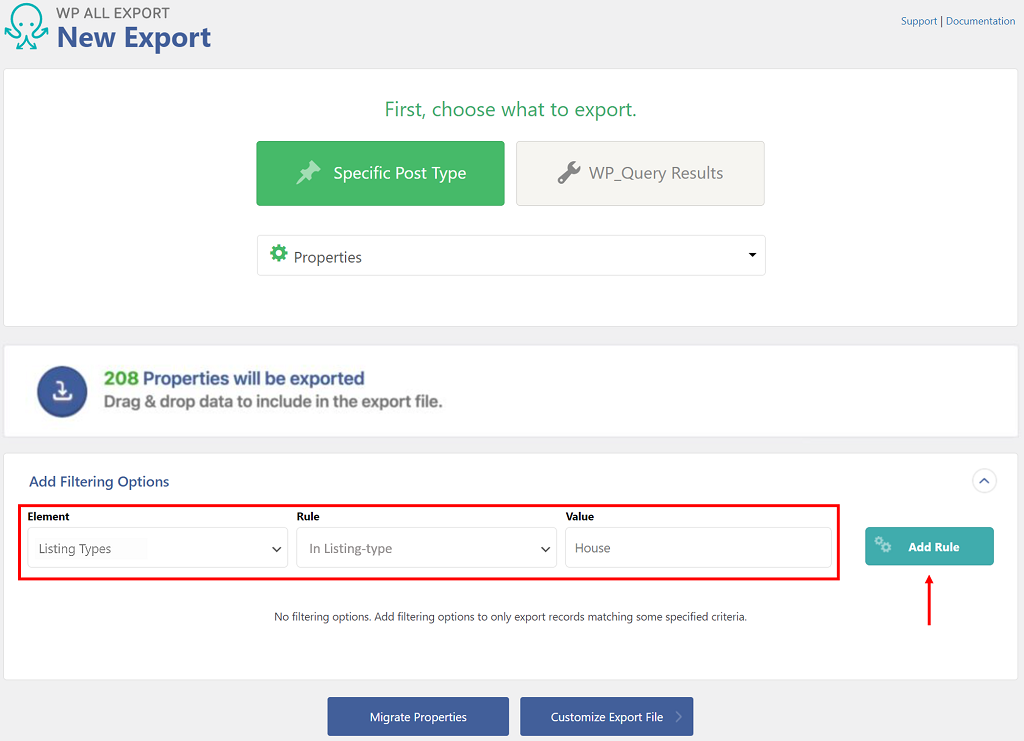
Each filter rule consists of an Element, a Rule, and a Value. In this example, the filter rule means, “Export only those properties with a listing type of ‘House’.”
Click the Add Rule button on the right to apply the filter rule.
If you create multiple filter rules, you must separate them with either an AND or OR condition. An AND condition requires that both filter rules must be true. An OR condition means that either filter rule can be true:
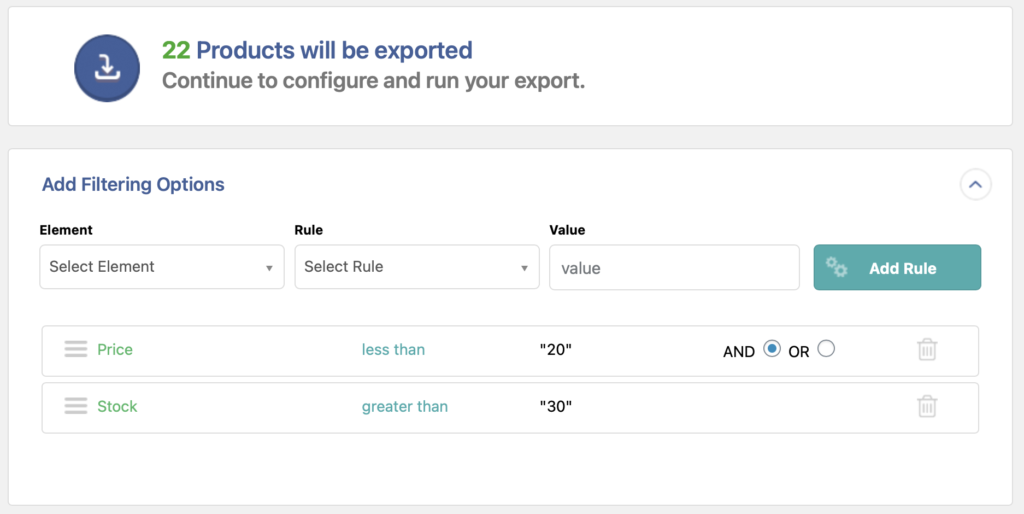
You can even nest rules by indenting them, which is the same as putting parentheses around rules that should be grouped together.
For more information, see How to Filter WordPress Data.
Can I Schedule My Meta Box Exports?
Yes. This is done in the Scheduling Options section of the Export Settings screen, which gives you a choice between Automatic Scheduling and Manual Scheduling.
Automatic Scheduling costs $9 per month but lets you schedule your export directly through WP All Export’s interface:
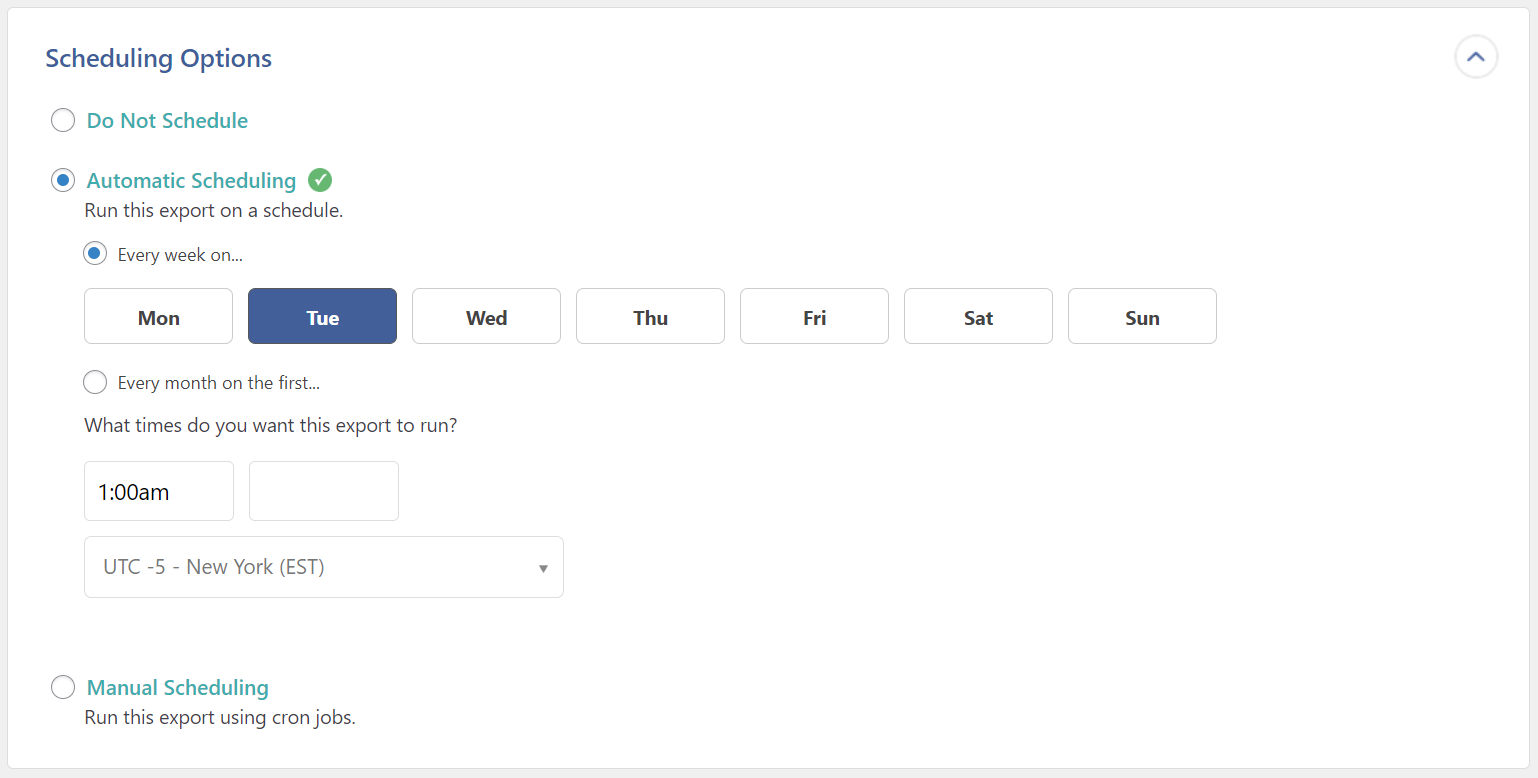
It will also automatically verify that your scheduled experts were completed on time.
Alternatively, you can use Manual Scheduling, which is free but requires you to manually set up cron jobs on your server:
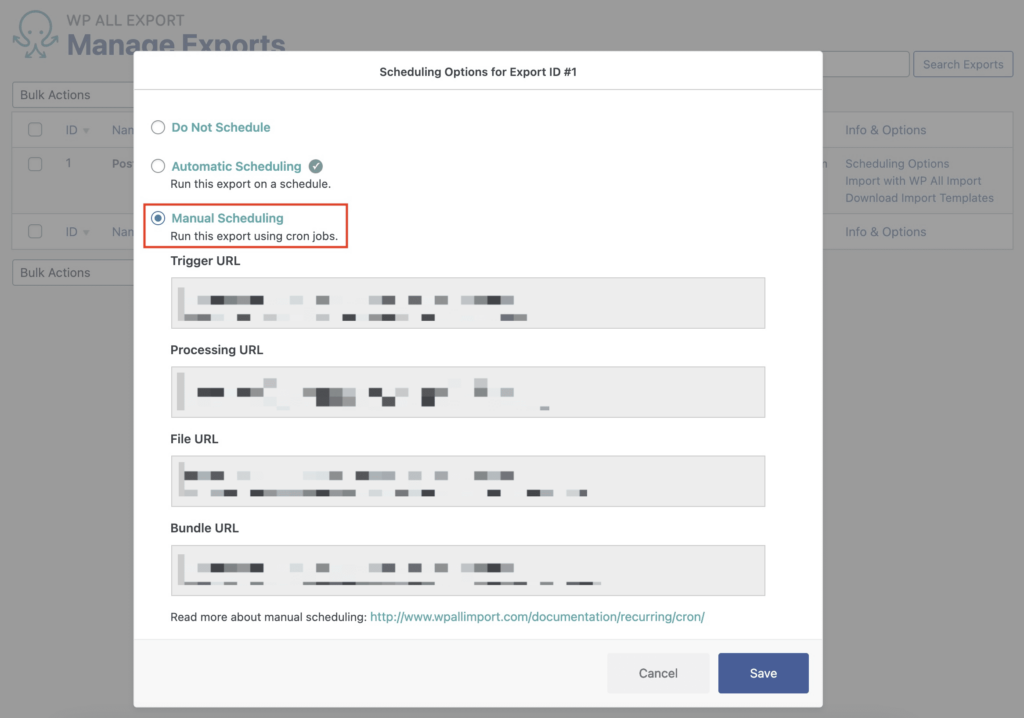
To learn more, see How to Schedule WordPress Exports.
What If I Need to Modify or Format My Export Data?
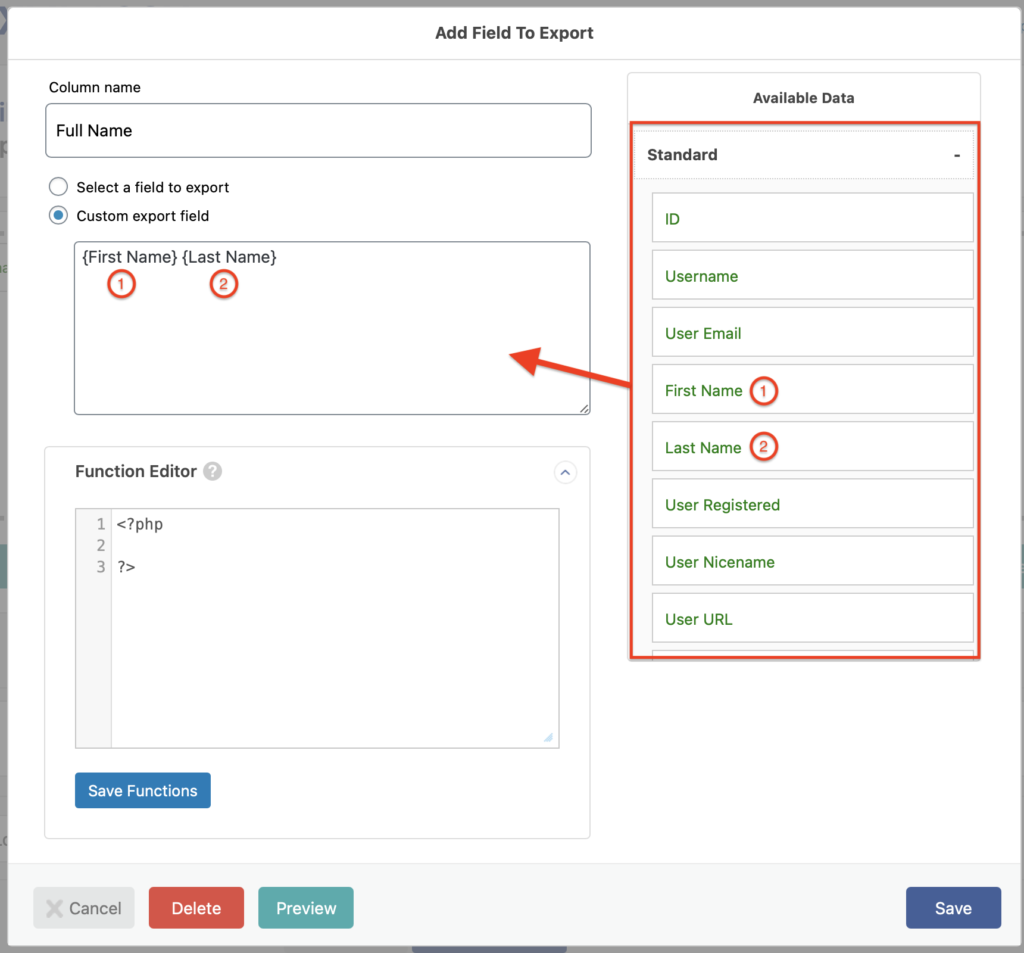
One of the things that sets WP All Export apart from its competitors is its ability to modify and format data “on the fly,” i.e., during the export itself. For example, you can combine multiple fields into one export column:
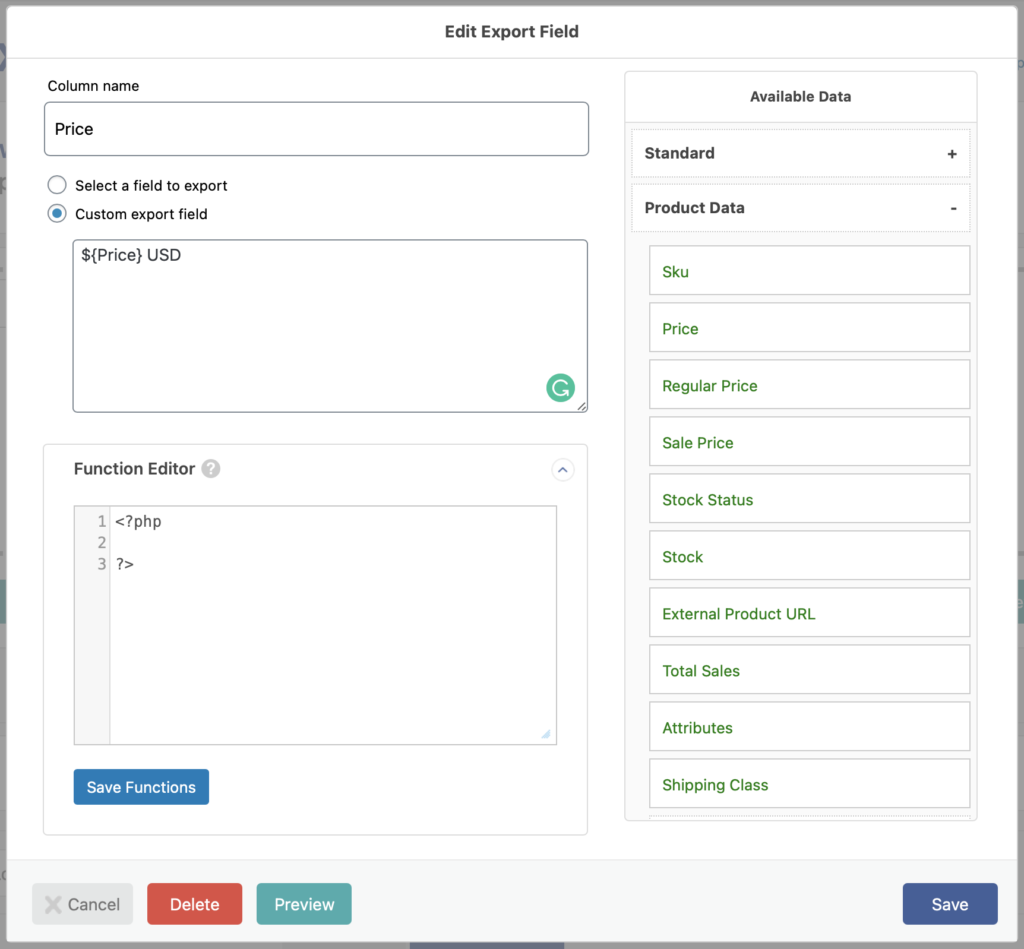
You can also add in static values, such as the $ sign and the “USD” acronym:
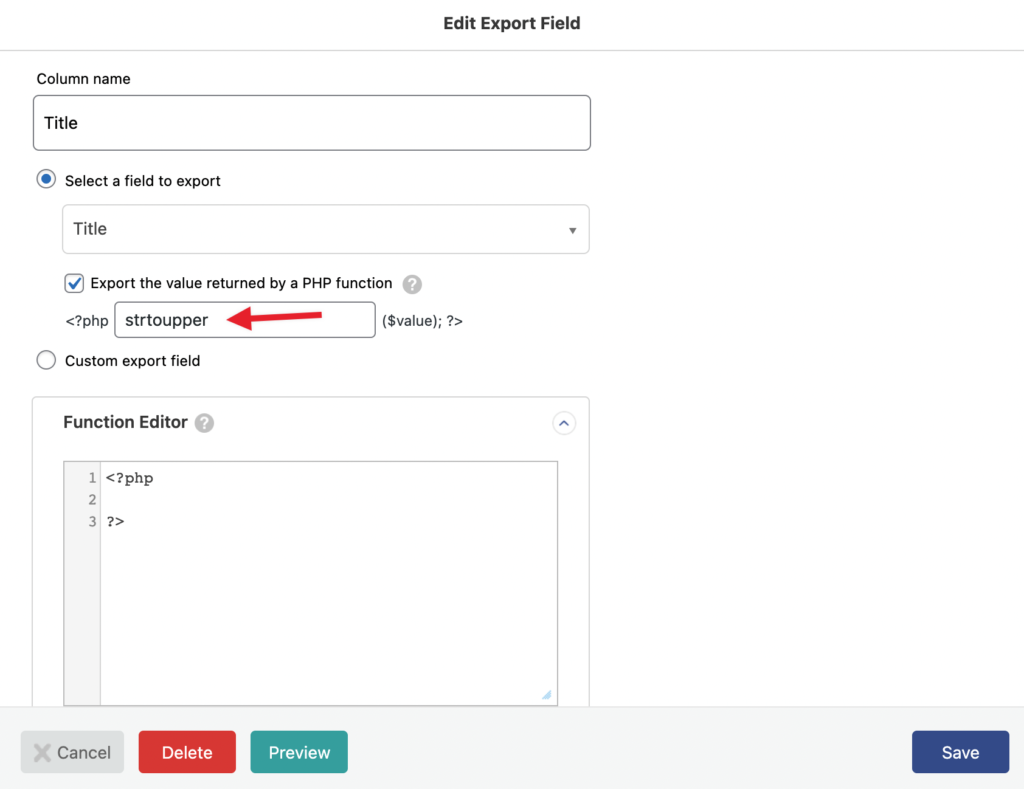
If you need to manipulate data, you can use scores of native PHP functions to apply a broad array of changes to the contents of any export field. Here, we’re converting the contents of the Title field to upper case:
If you can’t find a native PHP function to do what you want, you can also create custom PHP functions and use those to modify your exports:
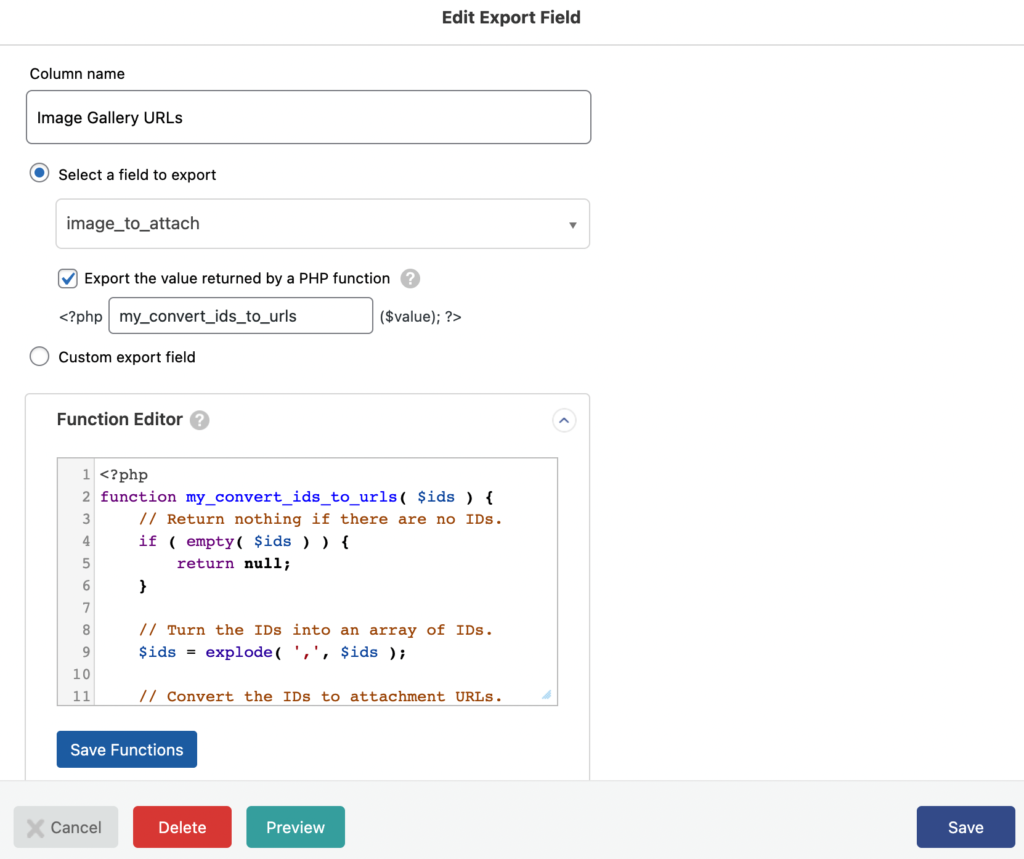
These powerful capabilities allow you to manipulate your export data in any way imaginable.
For more information, see Custom Export Fields and Custom PHP Functions.
Can I Export Meta Box Data to Different File Types?
Yes. In addition to the default CSV format, you can also export to XML and both the .xls and .xlsx Excel file formats.
To achieve this, expand the Export Type section on the Drag & Drop screen and choose your desired file type. Here, we’ve selected Feed instead of Spreadsheet. We then selected the Simple XML Feed subtype:
We could also have selected the Custom XML Feed option here, which allows you to build custom XML feeds that are as complex as you like.
For more information, see Export WordPress to CSV, Excel, or XML.
Does the Meta Box Export Add-On Support Multilingual Exports?
Yes. WP All Export does this through an integration with the WordPress multilingual plugin WPML. To learn more, see Importing Multiple Languages with WP All Import and WPML.
