
How to Automate WooCommerce Product Imports with Server Cron Jobs

Automating a WooCommerce product import means running your import routine on a recurring schedule without logging into the WordPress admin. For store owners managing live inventory, manual file uploads don’t scale when:
- External suppliers provide daily or weekly spreadsheet feeds with updated wholesale costs and retail prices.
- Drop-shipping vendors update stock counts multiple times per day to prevent overselling out-of-stock items.
- Multi-store networks synchronize catalog details from a central inventory feed.
A server cron job automates WooCommerce product imports by triggering an existing import routine at scheduled intervals, allowing product data such as prices, stock levels, and catalog details to stay synchronized with an external feed without manual intervention.
In this guide, I’ll break down how to set up server cron jobs to automate your WooCommerce product imports, explain the mechanics, and show you how to troubleshoot common server timeout issues.
Table of Contents
How Do Cron Jobs Work in WordPress?
Cron is a time-based task scheduler built into Unix-like operating systems (including the Linux servers powering most WordPress web hosts). It allows system administrators and website owners to run commands or scripts automatically at fixed dates, times, or intervals.
In WordPress, automated tasks like publishing scheduled posts or checking for plugin updates are traditionally handled by an internal system called WP-Cron (wp-cron.php).
However, WP-Cron is not a true system cron. Instead of running on an internal clock, WP-Cron only fires when a visitor loads a page on your website. This creates two significant problems for e-commerce stores:
- Low-traffic stores: If no one visits your store for several hours, scheduled tasks do not run on time.
- Heavy catalog imports: If an import script tries to process hundreds of products during a customer page load, the page hangs, triggering server 504 gateway timeouts or exceeding PHP’s
max_execution_time(typically capped at 30 to 60 seconds).
To reliably import products in the background without depending on visitor traffic or crashing your server, you need to use a real server cron job configured through your hosting control panel (such as cPanel) or server crontab.
Why Most Product Import Cron Jobs Fail (And How WP All Import Solves It)
Most basic product import plugins try to run an entire catalog import through a single cron URL. When the server calls that URL, the plugin attempts to download all product rows, calculate prices, and fetch external images in one continuous script. On catalogs with more than a few dozen items, the host’s PHP execution timer runs out, the server terminates the script, and the import halts halfway through.
To handle large product catalogs reliably, you need an import plugin that processes data in small, iterative batches.
In this walkthrough, we will use WP All Import. To automate scheduled imports, it gives you two options: an Automatic Scheduling service managed inside the WordPress admin for $19 per month, or manual server cron jobs, which are completely free to configure on your hosting server.

How Does WP All Import’s Cron System Work?
To run large imports smoothly in the background, WP All Import splits the import routine into two different URL endpoints:
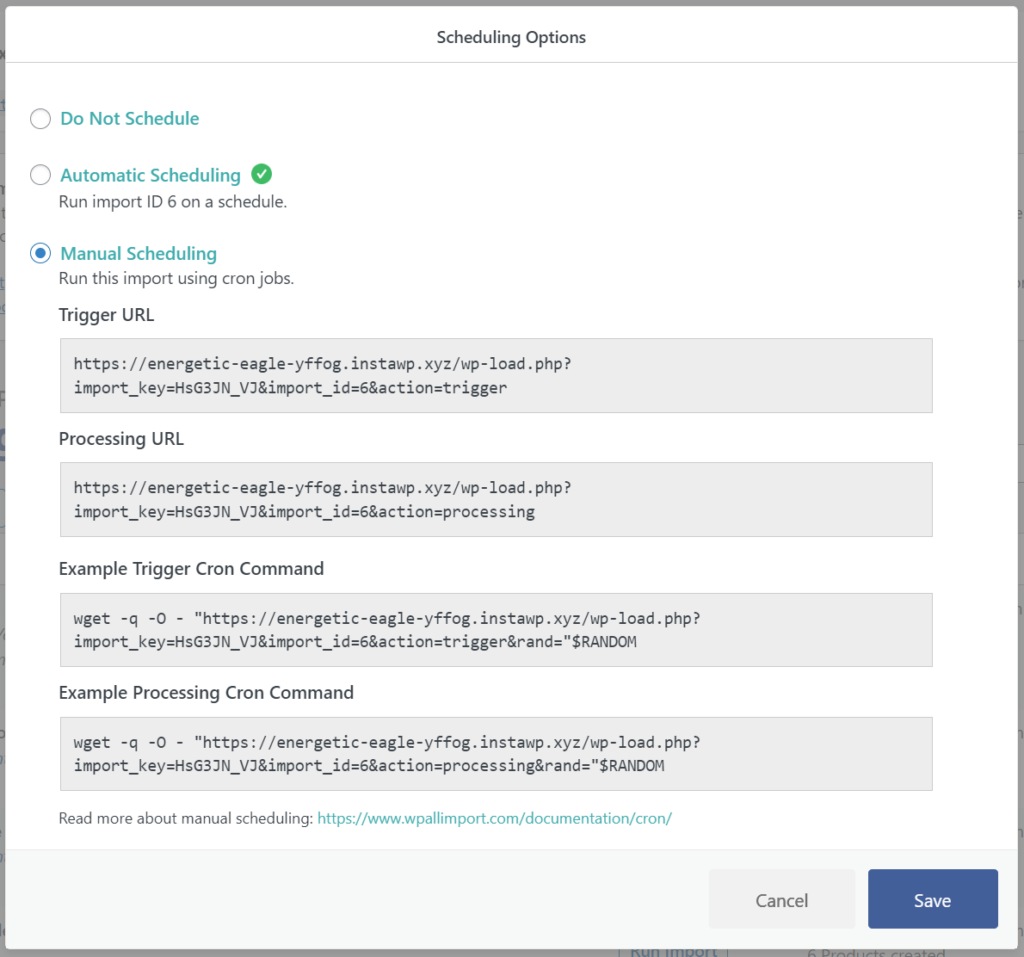
Trigger URL:
https://YOUR-WEBSITE.com/wp-load.php?import_key=[YOUR_SECRET_KEY]&import_id=[YOUR_IMPORT_ID]&action=triggerProcessing URL:
https://YOUR-WEBSITE.com/wp-load.php?import_key=[YOUR_SECRET_KEY]&import_id=[YOUR_IMPORT_ID]&action=processingBoth URLs are generated automatically for every import on your site, but each has a different role in the automation cycle.
1. The Trigger URL (Defines Your Schedule)
The Trigger URL wakes up the import process. It connects to your external file source (such as a remote URL, Google Sheet, or FTP server), verifies that data is available, and flags the import as active in the database.
Because the Trigger URL initiates the update, you schedule it at the exact interval you want your catalog refreshed:
- Daily updates: Schedule the Trigger URL to run once every 24 hours (for example, at midnight).
- Intraday stock syncs: Schedule the Trigger URL to run every 6 or 12 hours.
- Weekly supplier catalogs: Schedule the Trigger URL to run once per week.
The Trigger URL does not download images or create products itself. It simply opens the import window and tells the system that new data is ready.
2. The Processing URL (Executes the Import in Chunks)
The Processing URL handles the actual data processing: inserting new products, updating prices, and downloading image galleries.
The Processing URL must be configured to run every two minutes, regardless of your Trigger URL schedule.
Here is the operational cycle:
- When the Trigger URL fires, it marks the import as ready.
- The next time the Processing URL runs (within two minutes), it picks up the active import and processes a batch of products until your server’s memory or time threshold is reached.
- Two minutes later, the Processing URL fires again, checks where the last batch left off, and processes the next set of records.
- When the final product row is imported, the script automatically “un-triggers” the import and logs the completion timestamp.
- All subsequent Processing URL calls see that the import is inactive and shut down immediately without consuming server resources, remaining idle until the next Trigger URL run.
Where to Locate Your Cron Keys in WP All Import
To find the exact URLs configured for your store:
- Navigate to All Import › Manage Imports in the WordPress menu.
- Find your product import and click Scheduling Options.

- Select Manual Scheduling.
- WP All Import displays the pre-populated Trigger and Processing URLs containing your site’s unique Secret Key and Import ID.
How Do You Prepare a WooCommerce Product Import for Cron Scheduling?
Before scheduling cron jobs on your server, you must build and verify your product import inside WordPress.
Step 1: Choose an Autonomous File Source
Automated cron imports require access to your catalog file without human intervention. When setting up your import via All Import › New Import, you must select one of the following automated file sources:
- Download from URL: Enter a live supplier XML feed URL or a shareable Google Sheets link.
- FTP/SFTP: Enter credentials to connect directly to an external distributor storage server.
- Existing File: Select a file pre-uploaded to the
/wp-content/uploads/wpallimport/files/directory on your server.
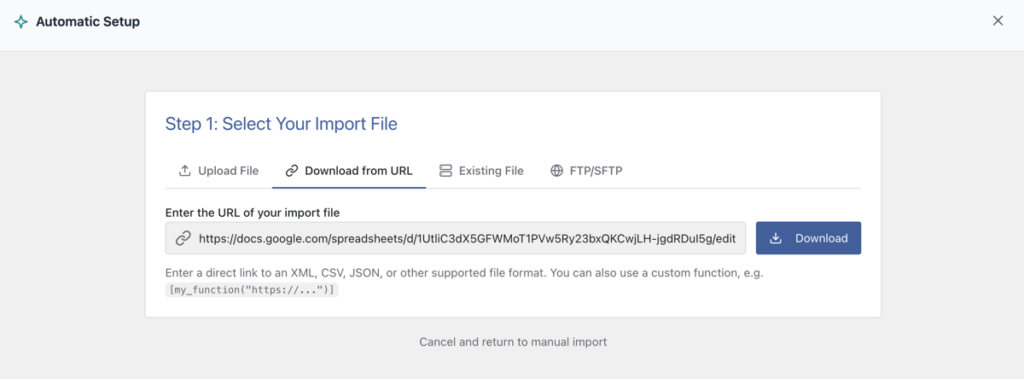
Local computer file uploads cannot be automated via cron because WP All Import cannot reach your desktop to fetch updated files.
Step 2: Configure Catalog Fields with Automatic Setup
Click the Set up automatically banner at the top of the New Import screen. Select WooCommerce, then Products, and click Start Automatic Setup.
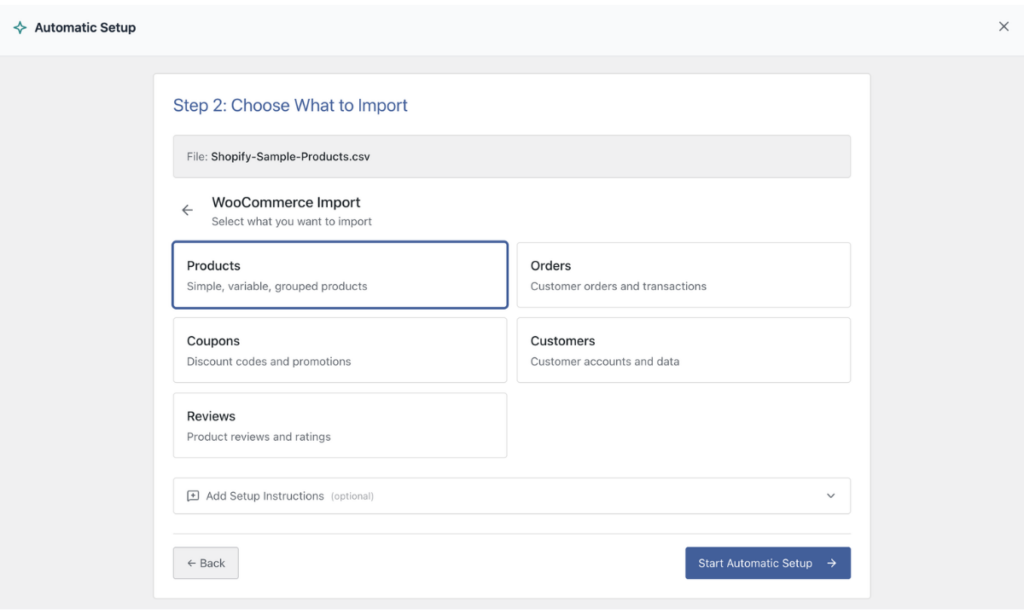
Automatic Setup analyzes your incoming columns, maps product titles, prices, SKUs, and images, and detects variable product attributes automatically.
Step 3: Test the Import Manually
Run the import manually one time to completion. This verifies that your product data, image galleries, and pricing rules populate accurately in WooCommerce. It also registers the import in the database and assigns the permanent Import ID required for your cron commands.
How to Configure Cron Jobs on Your Hosting Server
Once you’ve verified your import routine, you can set up the cron schedule in your hosting control panel.
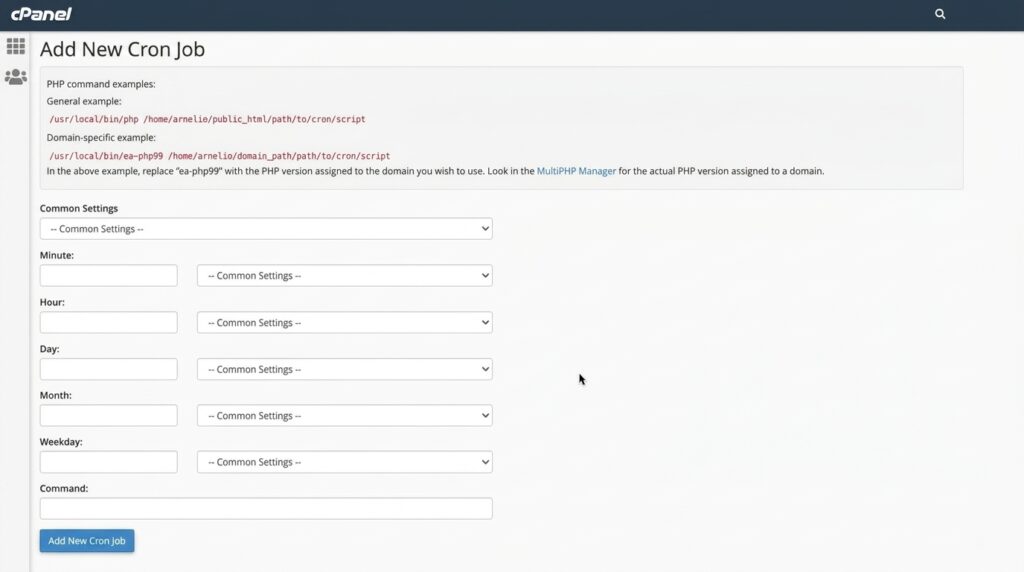
Method 1: Configuring Cron Jobs in cPanel
Most web hosts using cPanel provide a graphical interface for scheduling cron tasks:
- Log into your hosting account and open cPanel.
- Scroll to the Advanced section and click Cron Jobs.
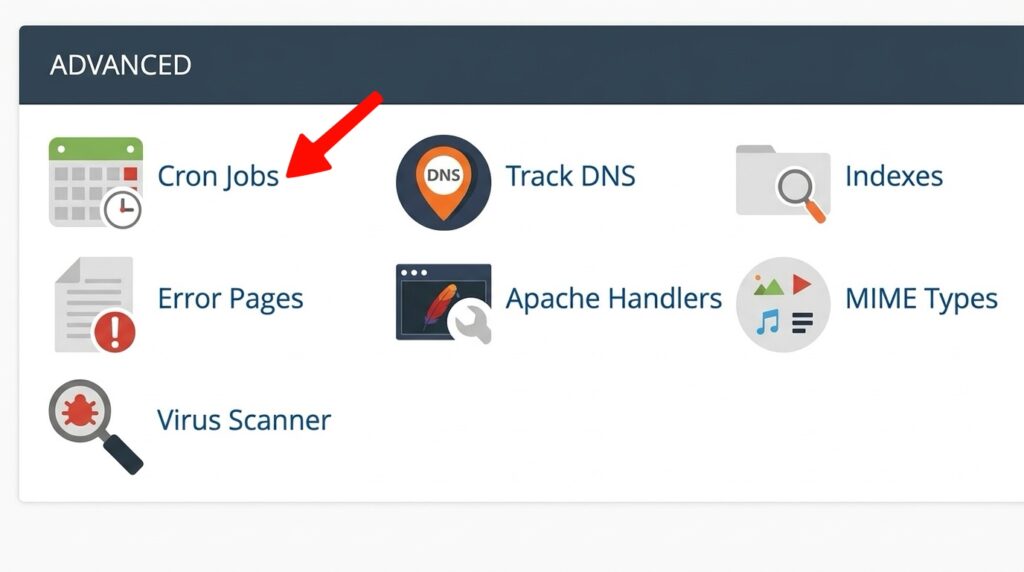
- Under Add New Cron Job, set up your Trigger URL:
- In the Common Settings dropdown, select your preferred interval (for example, *Once Per Day (0 0 * * )).
- In the Command field, enter your trigger command (see below).
- Click Add New Cron Job.
- Create a second cron job for your Processing URL:
- In the Common Settings dropdown, select Every 2 Minutes (*/2 * * * *).
- In the Command field, enter your processing command.
- Click Add New Cron Job.
Recommended Command Syntax (curl and wget)
The exact command utility supported by your server can vary from host to host. Most web hosting environments support either curl or wget to request your cron URLs.
When configuring these commands, always append &rand=$RANDOM to the end of each URL. This acts as a cache-busting technique, which is essential on hosts using aggressive server-level caching (such as Varnish, Nginx FastCGI cache, or external CDNs). Without this parameter, your server may return a cached response rather than executing the PHP script.
Below are the standard command examples for both utilities:
Using curl (Recommended)
# Trigger Command (Runs once daily at midnight)
0 0 * * * curl -s "https://YOUR-WEBSITE.com/wp-load.php?import_key=YOUR_SECRET_KEY&import_id=YOUR_IMPORT_ID&action=trigger&rand="$RANDOM >/dev/null 2>&1

# Processing Command (Runs every 2 minutes)
*/2 * * * * curl -s "https://YOUR-WEBSITE.com/wp-load.php?import_key=YOUR_SECRET_KEY&import_id=YOUR_IMPORT_ID&action=processing&rand="$RANDOM >/dev/null 2>&1
Using wget
# Trigger Command (Runs once daily at midnight)
0 0 * * * wget -q -O - "https://YOUR-WEBSITE.com/wp-load.php?import_key=YOUR_SECRET_KEY&import_id=YOUR_IMPORT_ID&action=trigger&rand="$RANDOM >/dev/null 2>&1

# Processing Command (Runs every 2 minutes)
*/2 * * * * wget -q -O - "https://YOUR-WEBSITE.com/wp-load.php?import_key=YOUR_SECRET_KEY&import_id=YOUR_IMPORT_ID&action=processing&rand="$RANDOM >/dev/null 2>&1
If neither command works in your hosting control panel, contact your host’s support team to confirm which HTTP fetch binary is enabled on your server.
Automatic Scheduling vs. Server Cron Jobs: Which Should You Use?
WP All Import supports two scheduling paths. Here is how they compare:
| Feature | Manual Server Cron | Automatic Scheduling Service |
|---|---|---|
| Cost | 100% Free | $19 / month (unlimited sites & imports) |
| Setup Interface | Hosting panel (cPanel/SSH/crontab) | Directly inside the WordPress dashboard |
| Host Configuration | Requires host access & command setup | Zero host configuration required |
| Timeout Handling | Two-URL batch execution | Managed external cloud workers |
| Completion Checks | Manual log inspection | Built-in email alerts and status verification |
| Best For | Developers & technical store owners | Agencies & non-technical store managers |
You can choose server cron if you are comfortable working in cPanel or SSH, manage your own server, and want a reliable, free automation workflow.
However, if you’re not comfortable, you can choose the Automatic Scheduling service if you manage client stores on managed hosts with strict cron restrictions, or prefer setting schedules using simple dropdown menus inside WordPress without touching server terminal commands.
How to Troubleshoot Stalled or Failed Cron Imports
If your scheduled product imports are not updating your catalog as expected, check these four common issues:
- Imports Stalling Halfway Through: If large imports halt after processing a few hundred items, your host’s PHP timeout is interrupting the batch. Navigate to All Import › Manage Imports › Edit Import › Import Settings, expand Configure Advanced Settings, and lower the Records per iteration setting from 20 to 5 or 10.
- HTTP 403 Forbidden Errors: Security firewalls (such as Cloudflare, Wordfence, or server-level ModSecurity) often flag automated
curlrequests as bot traffic. Whitelist your server’s outgoing IP address in your firewall settings, or add a custom user-agent string to your curl command. - Inspect Execution Logs: Navigate to All Import › Manage Imports and click History Log. WP All Import logs the exact timestamp of every cron trigger and processing pass, showing how many products were updated and highlighting broken supplier URLs.
- Stuck Imports: If an import status remains locked on “Processing,” click the Cancel button on the Manage Imports screen to unlock the process and allow the next scheduled cron cycle to resume cleanly.
Frequently Asked Questions About WooCommerce Cron Imports
How do I automate WooCommerce product imports on a schedule?
You can automate WooCommerce product imports on a schedule using WP All Import with server cron jobs or its built-in Automatic Scheduling service. After creating an import from a live URL, Google Sheet, or FTP server, configure your server’s Trigger URL to fire at your chosen frequency and the Processing URL to run every two minutes to process inventory updates in the background.
Can you schedule WooCommerce product imports for free?
Yes. You can schedule WooCommerce product imports for free by configuring manual cron jobs directly on your web hosting server or cPanel. WP All Import generates free Trigger and Processing cron URLs for every import routine, allowing you to automate catalog syncs using standard server commands like curl or wget without paying recurring subscription fees.
Why do WooCommerce product import cron jobs time out?
WooCommerce product import cron jobs time out when a web host’s PHP max_execution_time limit (typically 30 to 60 seconds) expires before a large catalog finishes processing. WP All Import prevents server timeouts by splitting the routine across two URLs, allowing a Processing URL to process products in small, iterative batches every two minutes until the catalog update finishes cleanly.
How do I set up a WooCommerce product import cron job in cPanel?
To set up a WooCommerce product import cron job in cPanel, navigate to the Cron Jobs menu in your hosting dashboard and create two separate tasks. Add your WP All Import Trigger URL command set to your desired schedule (such as once daily at midnight), then add your Processing URL command set to execute every two minutes (*/2 * * * *).
Can I automatically sync WooCommerce products from a live Google Sheet?
Yes. WP All Import can automatically sync WooCommerce products from a live Google Sheet on a schedule. Paste your shareable Google Sheets link into WP All Import under Download from URL, map your fields with Automatic Setup, and configure server cron jobs to check the sheet URL automatically for price changes, new items, and updated stock levels.
Get Oxygen
Build it your way with Oxygen.
Not per year, not per site, not per seat. 60 day money back guarantee.