
How to Import and Export WooCommerce Customers
In this article, we’re going to describe everything you need to know to import and export WooCommerce customers, including:
What is a WooCommerce Customer?
Your Options to Export WooCommerce Customers
How to Export WooCommerce Customers
How to Create Custom Export Columns
How to Export WooCommerce Customer Data Added By Third-Party Plugins
How to Filter a WooCommerce Customer Export
How to Schedule a WooCommerce Customer Export
Managing Passwords During a Customer Export
Your Options to Import WooCommerce Customers
How to Import WooCommerce Customers
How to Keep the Same WooCommerce Customer ID During an Import
How to Modify Data During a Customer Import
How to Import WooCommerce Customer Data Into Custom Fields
How to Filter a WooCommerce Customer Import
How to Schedule a WooCommerce Customer Import
How to Sync Your Data on Recurring Customer Imports
Other Reliable Sources Around the Web
What is a WooCommerce Customer?
Every WooCommerce store owner knows what a customer is in the real world. From a technical perspective, a WooCommerce customer is a WordPress user that has been assigned a custom user role of Customer. This grants the user additional capabilities. More importantly for exporting and importing data, WooCommerce customers also acquire new billing and shipping address fields.
When do WordPress users become WooCommerce customers? When they place their first order. This can create some confusion. For example, say 100 people fill out a customer registration form for your store. Immediately after doing so, 93 of them place an order. From your perspective, you may think that you have 100 new customers, 93 of whom have placed an order. But, from a technical perspective, you have 100 new WordPress users, 93 of whom have been assigned a user role of Customer. Until they place an order, the other 7 are just regular WordPress users.
We’re making this distinction at the start of this article because it may affect your WooCommerce customer exports and imports.
Your Options to Export WooCommerce Customers
You have three main options to export WooCommerce customers. Below is a brief description of each of them.
WooCommerce Customers Built-in Download Feature
You can find this free option by navigating to WooCommerce > Customers:
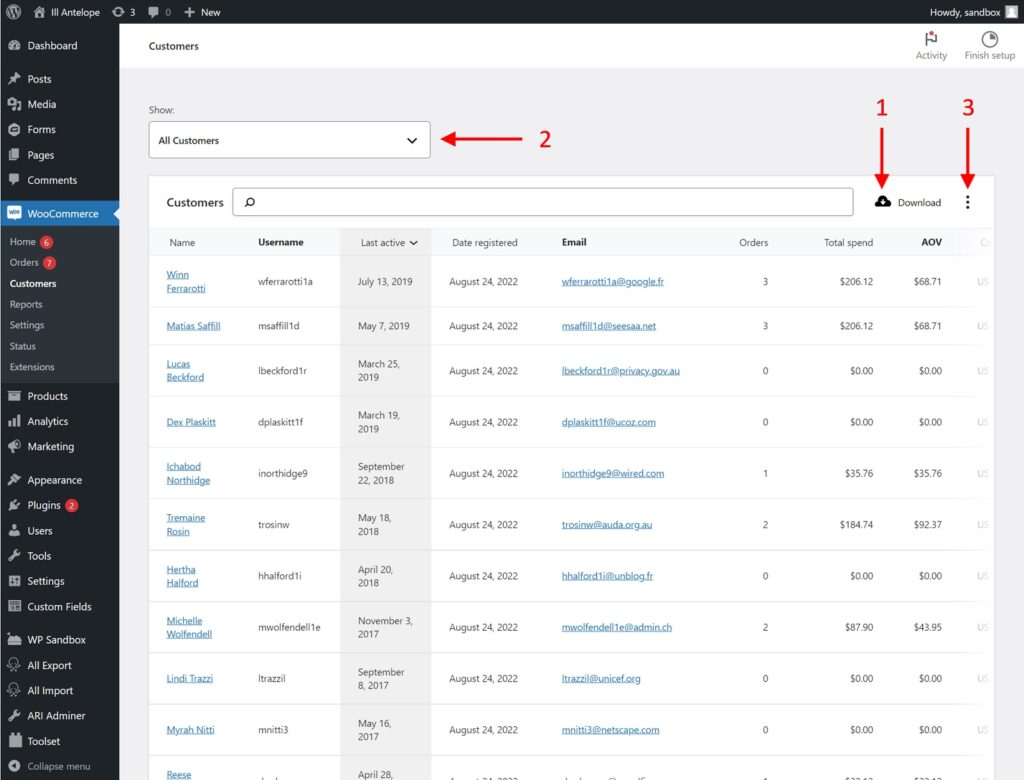
- Click the Download button to download existing customers to a CSV file. Note, this is the only available export file format.
- You can filter the list of WooCommerce customers here using a limited and rather simple filter. This filter will be applied to both the interface and the export.
- You can choose which columns appear in the interface here, but this will not affect the export. For example, if you exclude the Date Registered column, it will still be exported.
Given the severe limitations of both the filter and column selection, this is not a serious export tool beyond generating a quick dump of WooCommerce customer data.
WP All Export

This is the top WordPress and WooCommerce export plugin in the industry. A summary description of WP All Export is that it will handle a quick export of WooCommerce customers in seconds, while also allowing you to manage every detail of the most challenging customer export imaginable.
Specifically, it will let you:
- choose, rename, and rearrange your customer export columns using a convenient drag-and-drop interface;
- merge data from multiple customer fields into a new column;
- modify export data on the fly;
- apply conditional logic to individual fields or records;
- apply filters of unlimited flexibility;
- run your exports on demand or schedule them to run automatically;
- export all customer fields, including those added by third-party plugins and extensions;
- export customer data to CSV, Excel, or XML file formats, including advanced custom XML feeds;
- bulk edit customer data by exporting it to any spreadsheet software, performing bulk edits there, then reimporting the data back into WooCommerce;
- automatically integrate your customer data with 1000s of external apps using Zapier;
- migrate customers from one WooCommerce store to another with just a few clicks.
And the best feature of all? Once you learn how to export WooCommerce customers, you can use the same plugin to export WooCommerce products, orders, coupons, and reviews, as well as WordPress posts, pages, taxonomies, comments, and pretty much every other type of data in WordPress and WooCommerce. This also includes any data generated by custom themes and plugins!
Other WooCommerce Export Plugins
There are a number of other plugins that can export WooCommerce customers, including Import and Export Users and Customers from Codection and Import Export WordPress Users and WooCommerce Customers from Webtoffee.
The main problem with these plugins is that they are too narrow in scope. To understand why, picture a scenario in which you pay for one of these plugins to export WooCommerce customers. Depending on the option you select, let’s say that costs you $70 per year. It also costs you time because you have to learn how to use each plugin.
Sometime later, you discover that you also need to export another type of data, say WordPress categories and tags, or WordPress posts with images. What do you do? You’ll have to buy and learn an entirely new plugin. This makes no sense, either in time or money.
With WP All Export, you can handle all of your WordPress and WooCommerce export needs. Better yet, the interface and process are exactly the same regardless of what you’re exporting. Learn them once, and you’ll never have to learn another export process ever again.
For this reason, we’ll use WP All Export for all the examples in this article. If you want to follow along, you can do so in the online sandbox at: https://www.wpallimport.com/try/.
How to Export WooCommerce Customers
Export WooCommerce Customers Step 1: Create a New Export
Navigate to All Export › New Export:
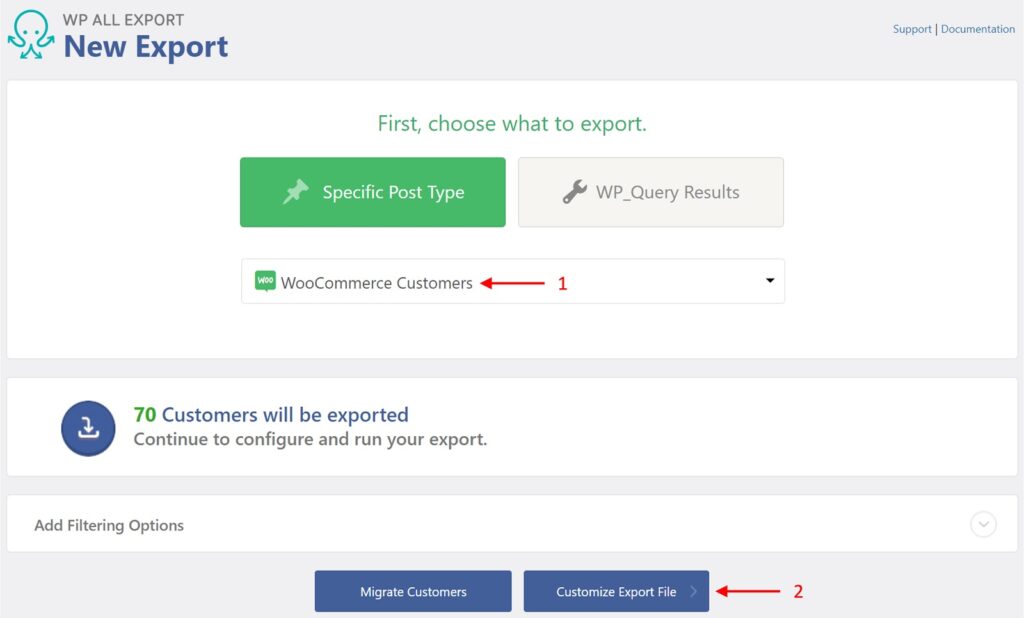
- Choose WooCommerce Customers.
- Click the Customize Export File button.
This will export all WooCommerce customers. We’ll explain how to filter your customer export later in this article.
Export WooCommerce Customers Step 2: Choose Export Columns
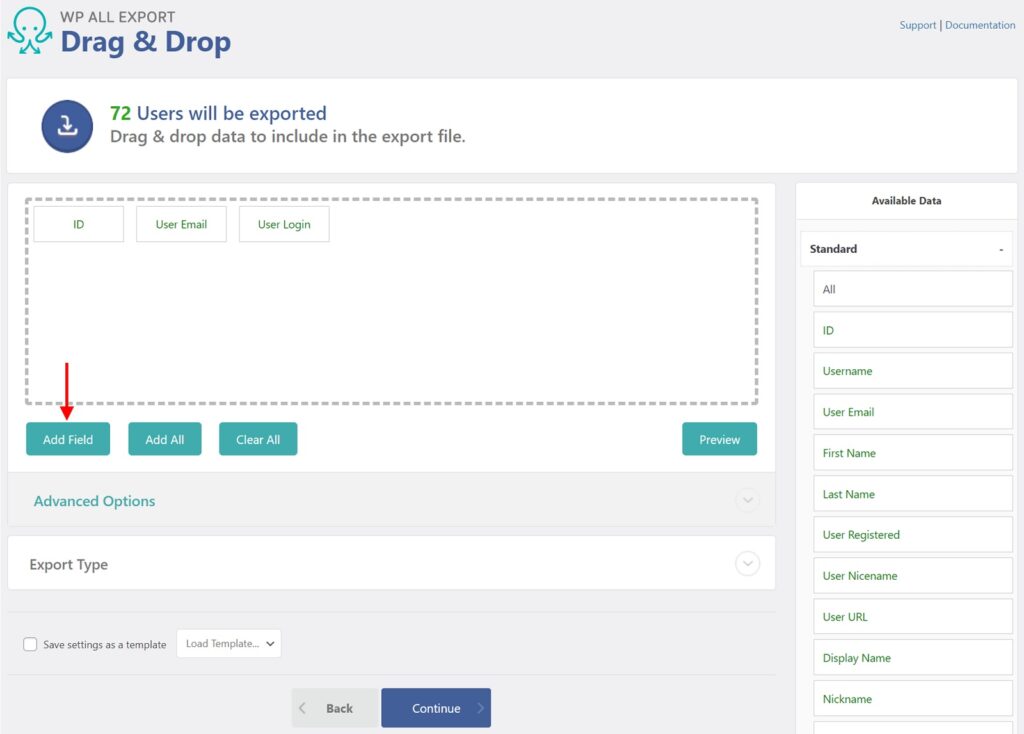
Clicking the Customize Export File button in the preceding screen will bring you to the Drag & Drop interface.
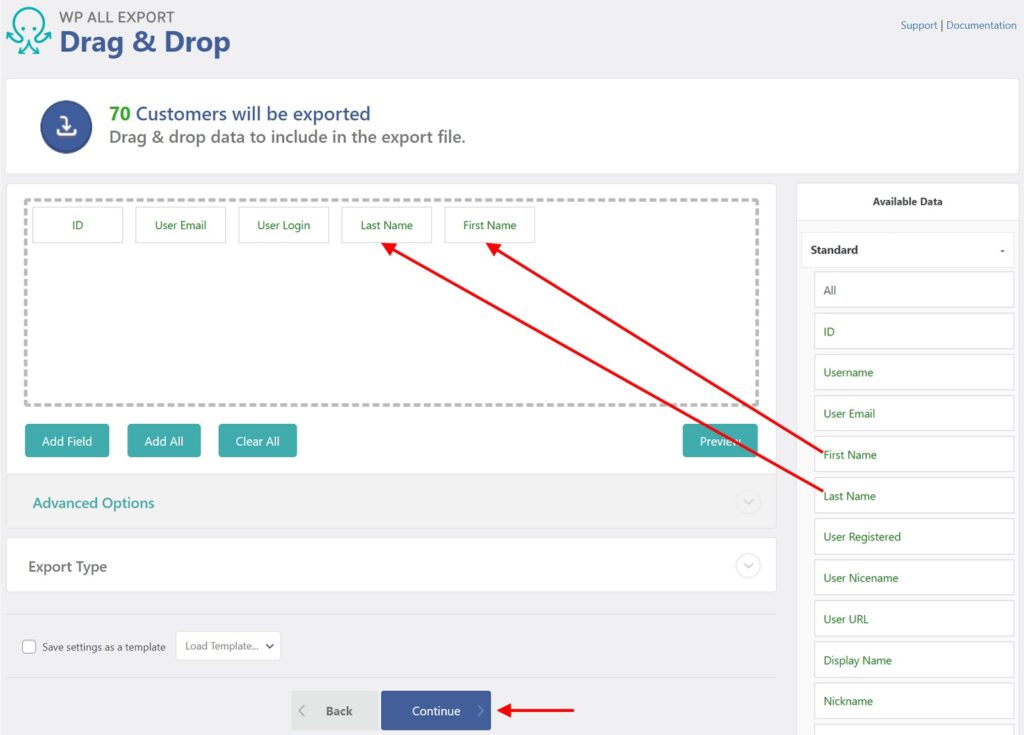
The primary purpose of this screen is to select your customer export columns.
You do this mainly by dragging fields from the Available Data panel on the right into the column selection area on the left. Note, there are several data sections in the Available Data panel. In the above image, we are dragging fields from the Standard section. There is also an Address section, a Custom Fields section that contains fields added by third-party themes or plugins, and an Other section that contains all other fields.
In addition to selecting fields for your customer export, you can perform far more advanced tasks on this screen. We’ll describe some of these later in this article.
For now, click the Continue button.
Export WooCommerce Customers Step 3: Configure the Export Settings
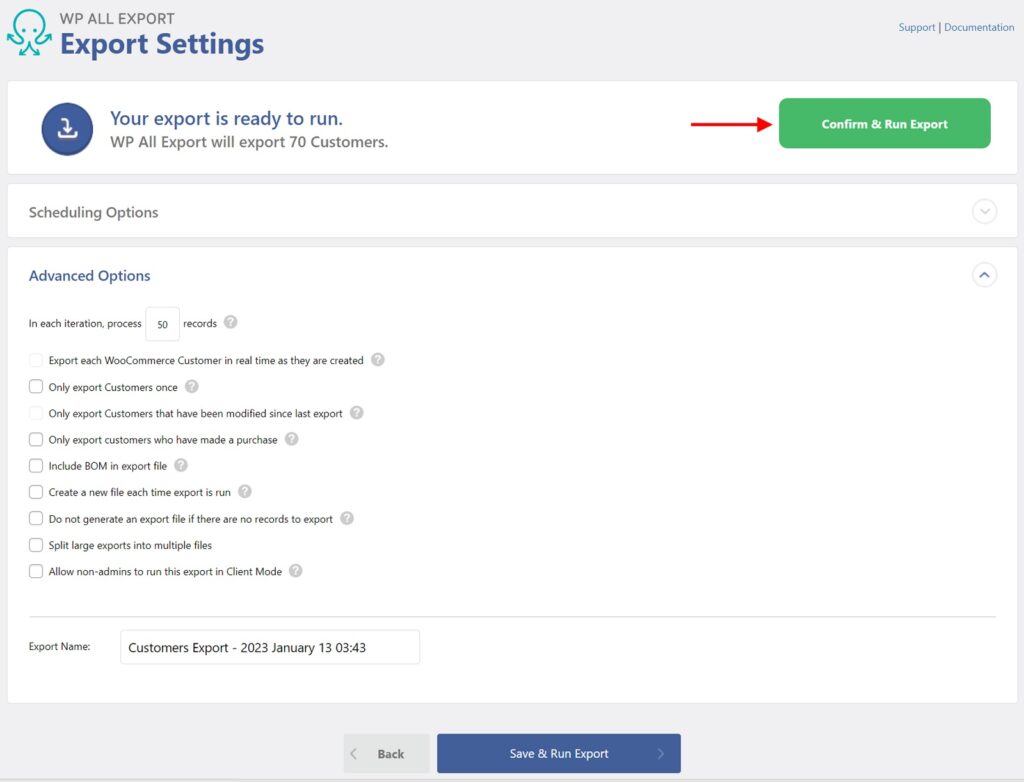
This screen shows a count of the WooCommerce customers that will be exported, which is 70 in this example. It also has sections for Scheduling Options and Advanced Options, which we’ll describe in more detail later.
For now, just click the Confirm & Run Export button.
Export WooCommerce Customers Step 4: Confirm and Run the Export
After the export finishes processing, you’ll see this confirmation screen.
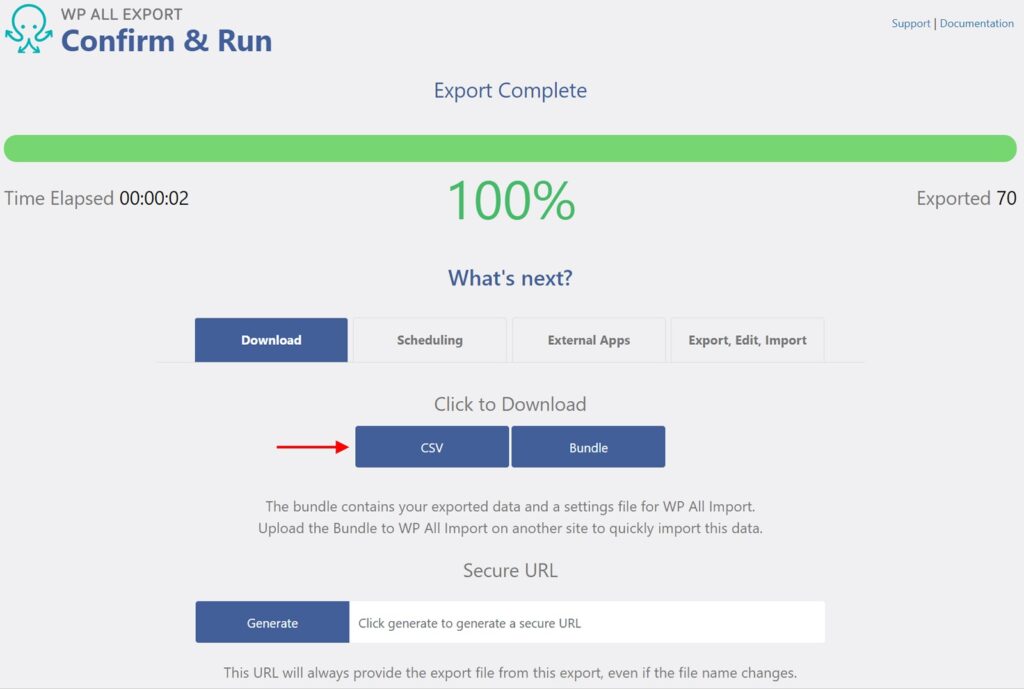
As shown in the image, click the CSV button to download your export file in the CSV file format.
And that’s it. That’s all you have to do to perform a basic export of WooCommerce customers. Now, let’s get into the details!
How to Create Custom Export Columns
Most times, you can just export customer columns as they are. If this is the case, you can finish your customer export in less than a minute. Other times, you will need to modify the data that you are exporting.
A common example of this is combining customer first and last names (provided that the Display Name field does not already serve this purpose). To achieve this, start by clicking the Add Field button in the Drag & Drop screen:
This will open this form:
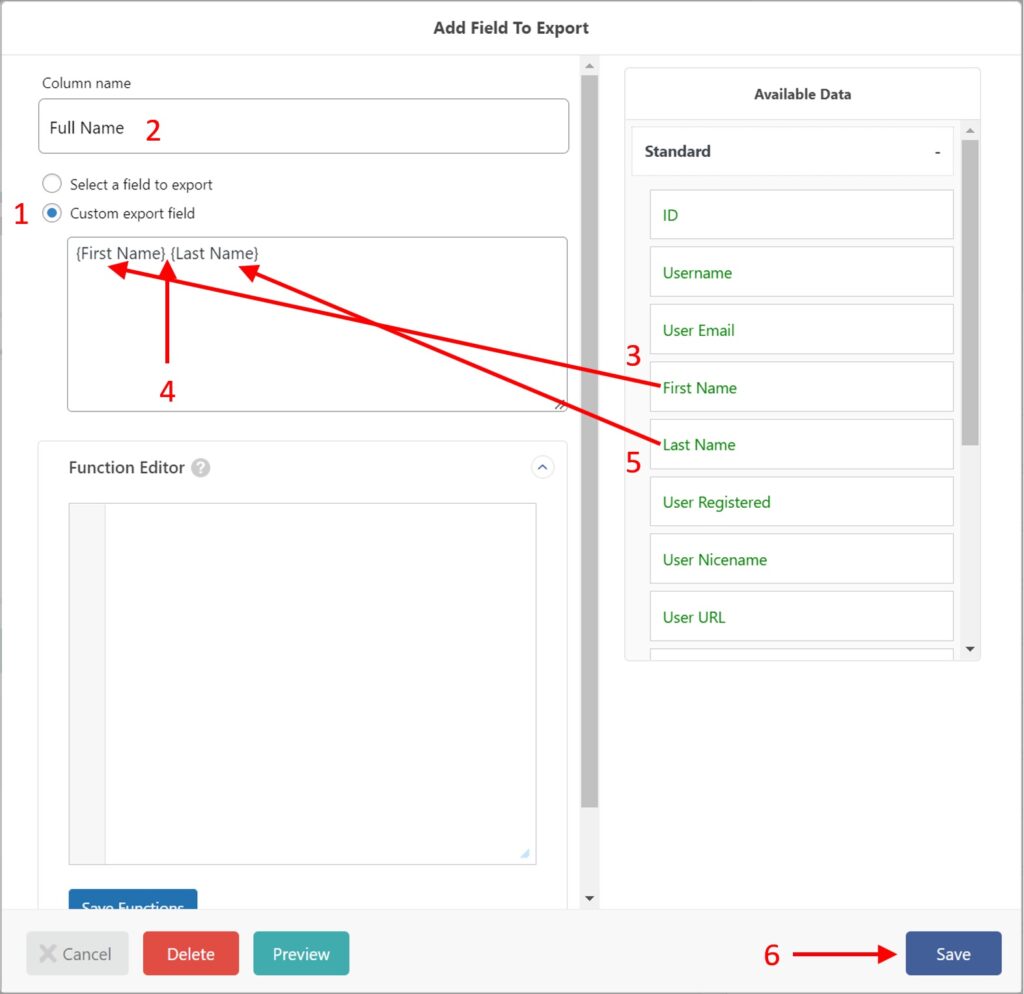
- Choose the Custom export field option.
- Type “Full Name” in the Column name field.
- Drag and drop the First Name field from the Standard section of the Available Data panel into the Custom export field edit box.
- Enter a space after the First Name field.
- Drag and drop the Last Name field into the Custom export field edit box.
- Click the green Save button at the bottom right of the form.
This will cause the Full Name field to appear in the column selection area.
Note, this only scratches the surface of these capabilities. In addition to combining literals and fields, as shown in this example, you can also use PHP functions or even your own custom functions. This means that you have complete programmatic control over custom fields, including the use of conditional logic.
To learn more, see custom export fields.
How to Export WooCommerce Customer Data Added by Third-Party Plugins
Many WordPress and WooCommerce plugins or extensions create custom data fields.
Fortunately, WP All Export detects most of these fields and lists them in the Available Data panel of the Drag & Drop interface.
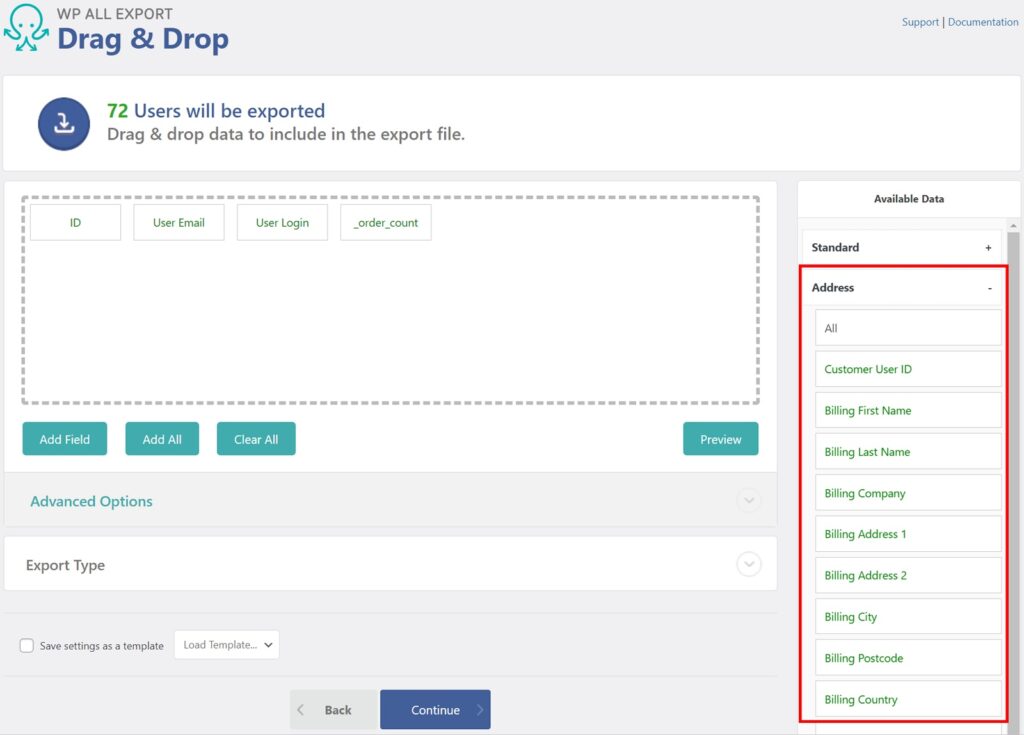
The first place to look for these fields is in the Custom Fields section:

In this example, we’re exporting the paying-customer custom field.
In situations where a recognized plugin has a set of custom fields that should be grouped together, WP All Export may create a specific section in the Available Data panel for those fields. A good example of this are the customer address fields in the Address section:
How to Filter a WooCommerce Customer Export
The ability to filter WooCommerce customers is fundamental to any export process.
To access WP All Export’s filter tool, expand the Add Filtering Options section in the New Export screen. Here is how you would select any customers from the state of Texas:
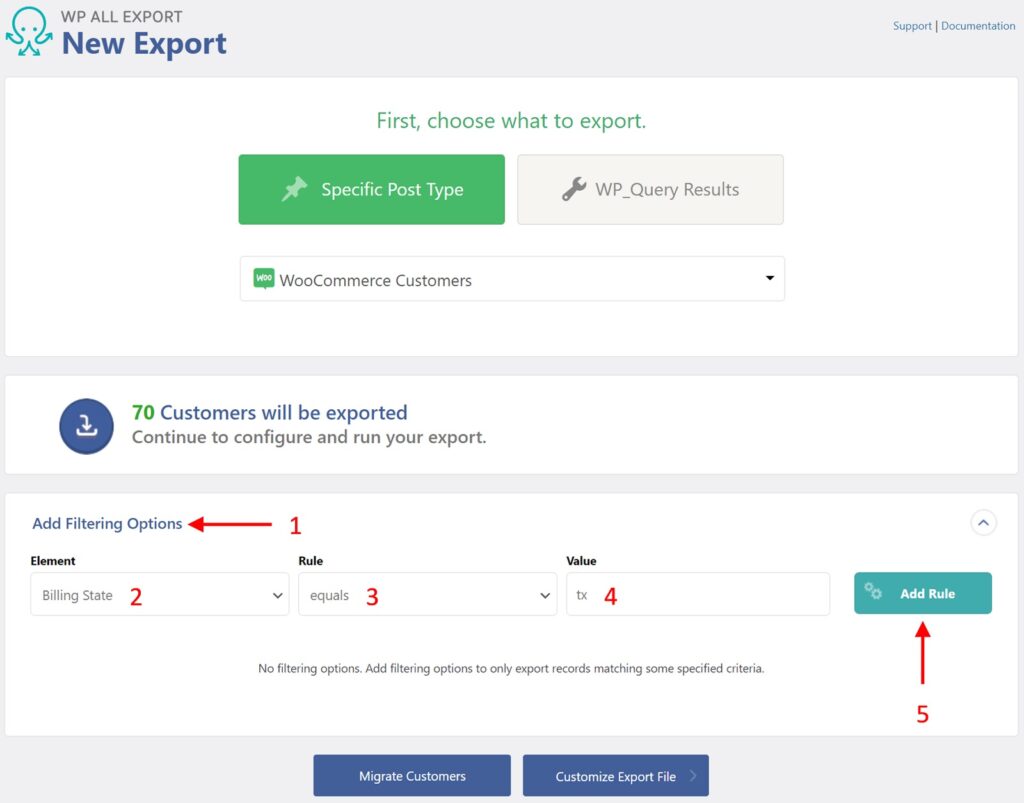
- Expand the Add Filtering Options section.
- Choose Billing State as the filter element.
- Select the equals rule.
- Type “tx” in the Value edit box.
- Click the Add Rule button.
The filter is then applied, which causes the customer count to recalculate, in this case to a count of 5.
You can apply filters to any of the fields that you see in the Available Data panel of the Drag & Drop interface.
The available filter rules will change depending on the data type of the field being filtered:
- For text fields, the available rules are equals, doesn’t equal, contains, doesn’t contain, is empty, and is not empty.
- For numeric fields, additional rules include greater than, equal to or greater than, less than, and equal to or less than.
- For fields that store multiple values, such as taxonomies and product attributes, you can use the In and Not In conditions.
- For date fields, you can use relative date values like “last month” or “last day of last month”, etc.
You can also combine filters using any mix of AND or OR conditions, including nested sets of conditions.
The extent of these filter capabilities is just one reason why WP All Export stands apart from its competitors.
How to Schedule a WooCommerce Customer Export
Manual exports are fine for one-off requests, but if you plan to send your WooCommece customer list to a marketing platform like Mailchimp or some other external partner, you’ll likely want to export customers automatically on a regular schedule.
There are multiple options to do this with WP All Export. One is to use their Automatic Scheduling Service, which you can configure in the Scheduling Options section of the Export Settings screen:

- Choose Automatic Scheduling.
- Select the scheduling period. In this case, we want to run the export every week. Alternatively, you can run it every month.
- Select the day of the week to run the export. In the above image, we’ve selected Wed (Wednesday).
- Enter the different times to run the export. Here, we’ve decided to run the report at 4:00 a.m.
- Specify the applicable time zone. In this case, we’ve chosen New York (EST).
- Click the Save & Run Export button.
That’s it. With this interface, you can schedule a customer export in seconds.
If you don’t want to spend $9 per month, you can schedule your exports manually by using cron jobs on your server. For more information, see Scheduling Imports Using Cron Jobs.
Managing Passwords During a Customer Export
This may surprise some WooCommerce customers, but their passwords are not stored in either WordPress or WooCommerce database tables. Only encrypted versions of the passwords are stored. You can see this yourself if you add the User Pass field to a customer export and then click the Preview button:
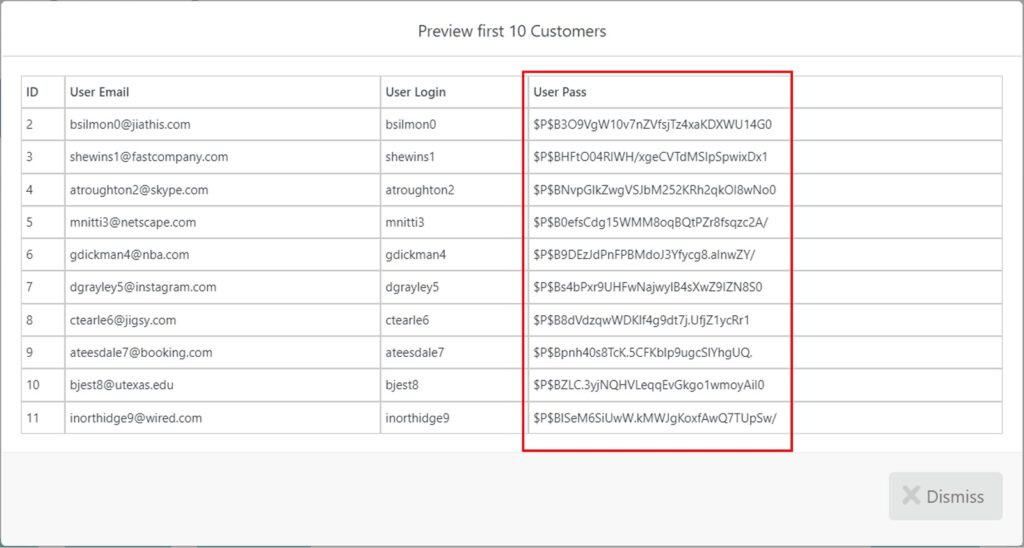
The original password — the one readable by humans — isn’t stored anywhere. So, what happens when you type your password into a WordPress/WooCommerce login form? The password you type is encrypted using the same algorithm used to store your password, so it is the two encrypted values that are compared, not their original values.
What does this mean for managing passwords during a WooCommerce customer export? It means that you don’t have any kind of decision to make. The only password values that you can export are the encrypted ones, which are absolutely useless unless you import them into another WordPress/WooCommerce system, which can only use them because it uses the same encryption algorithm.
What if you want to export human-readable passwords to a non-WordPress/WooCommerce system? The only way to achieve this is if you customize your user registration process to save the original text version of the passwords in an alternative, non-encrypted data field.
This is not recommended. If you want your customers to be able to log into multiple systems using the same password, you are better off exploring third-party OAuth 2 solutions, such as letting users sign in with their Google accounts.
Your Options to Import WooCommerce Customers
There are fewer options for importing Woocommerce customers than there are for exporting them because WooCommerce doesn’t offer a built-in option. This means that you must use a plugin.
The plugin options are the same as we described for customer exports, and, again, the same logic holds. If you’re looking for one plugin to handle WooCommerce customer imports and every other type of WordPress or WooCommerce import, your only option is WP All Import. Otherwise, you’ll have to purchase multiple plugins and learn different processes for what should be similar tasks.
For this reason, we’ll use WP All Import for all examples.
How to Import WooCommerce Customers
Import WooCommerce Customers Step 1: Start a New Import
Go to All Import › New Import:

- Upload your import file, download it from a URL or FTP site, or use a file that is already on your server. In this case, we’ve chosen to upload a file. If you want to follow along but don’t have a suitable import file, use the techniques described in the first half of this article to generate a file by exporting the test WooCommerce customers from the sandbox.
- Choose New Items.
- Select WooCommerce Customers as your import type.
- Click Continue to Step 2.
Import WooCommerce Customers Step 2: Review the Import File
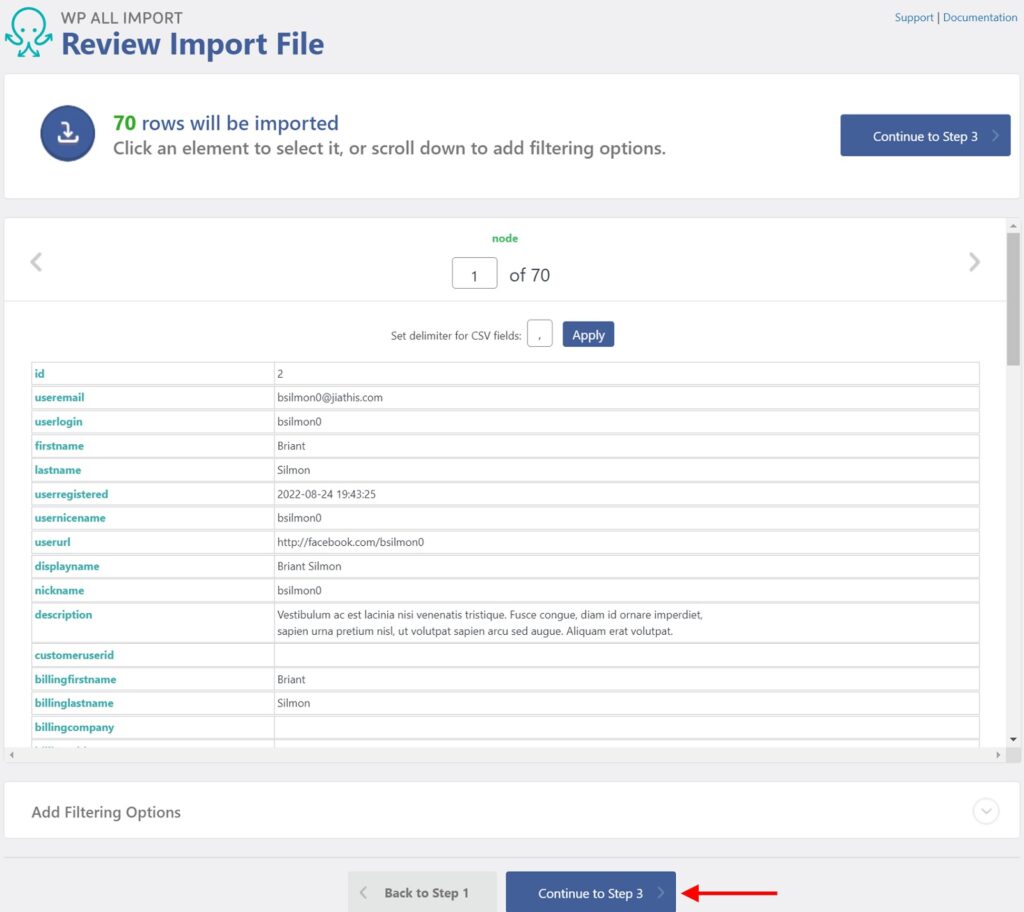
This screen allows you to review the contents of your import file as interpreted by WP All Import.
You don’t normally have to do anything on this screen, but it’s a good idea to review it nonetheless, as it gives you a chance to detect potential errors before setting up your import.
You can also create import filters on this screen by expanding the Add Filtering Options section. We’ll describe this in more detail later in this article.
Click the Continue to Step 3 button to proceed.
Import WooCommerce Customers Step 3: Match Incoming Data Elements to Their Target Fields
In this screen, you drag and drop incoming data elements from the panel on the right to the appropriate target fields on the left:

We’ve mapped only a few fields in this image to avoid cluttering it with red arrows. For some customer imports, you may have to map many fields.
To assist you, these fields are divided into sections. Some of the sections match the sections of the Available Data panel in the export process and should be familiar to you:
- Billing & Shipping Info
- Other Customer Info
- Custom Fields
Other sections may appear because they are add-ons for recognized plugins installed on the site, such as the Advanced Custom Fields Add-On and the Toolset Types Add-On, which have both been installed on the sandbox site.
When you finish the mapping process, click the Continue to Step 4 button.
Import WooCommerce Customers Step 4: Review the Import Settings
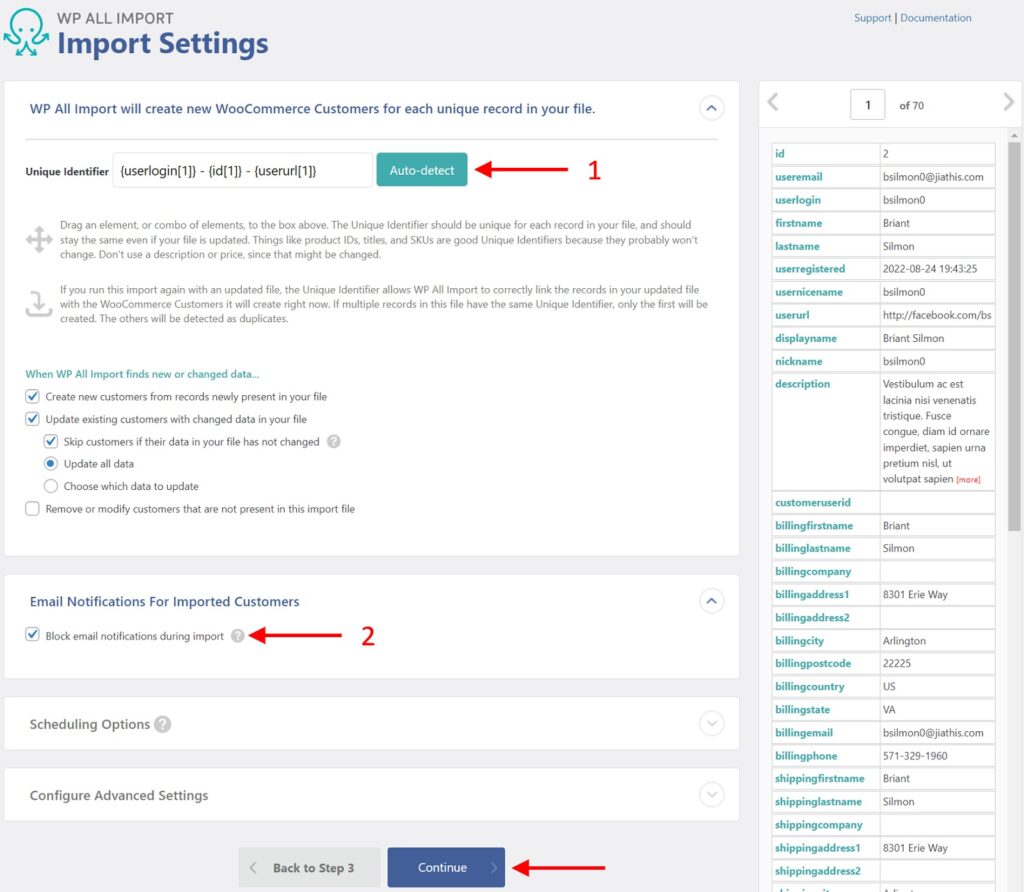
When repeating the same import with an updated file (i.e., a recurring import scenario), this screen takes on great importance because it dictates how to update existing customers. But when importing new customers, there are only a few settings of importance:
- The Unique Identifier. This tells the plugin how to distinguish between incoming customer records, which is essential for avoiding duplicate records. If you’re uncertain which field or combination of fields identifies a unique customer, just click the Auto-detect button and let WP All Import choose for you (it does a great job of this).
- Block email notifications during import. By default, WordPress sends out an email notification to every new customer that you create. This setting blocks these notifications for customers created during your import, which is advisable for more import scenarios. If you don’t do this, and then you have to reverse your import due to errors, you could end up notifying customers that you then must delete from your system. That’s not a good idea!
Click the Continue button.
Import WooCommerce Customers Step 5: Run the Import
The Confirm & Run screen appears next:

This screen provides a convenient summary of the steps the plugin will take to execute your import. In most cases, you won’t have to take any actions here. But keep in mind that this is your last chance to verify that everything is okay before the import alters your WooCommerce database, so don’t take this review lightly.
If you do spot something that needs to be adjusted, click the or go back to Step 4 link at the bottom.
Otherwise, click the Confirm & Run Import button.
When the import is complete, you should see a confirmation screen like this:
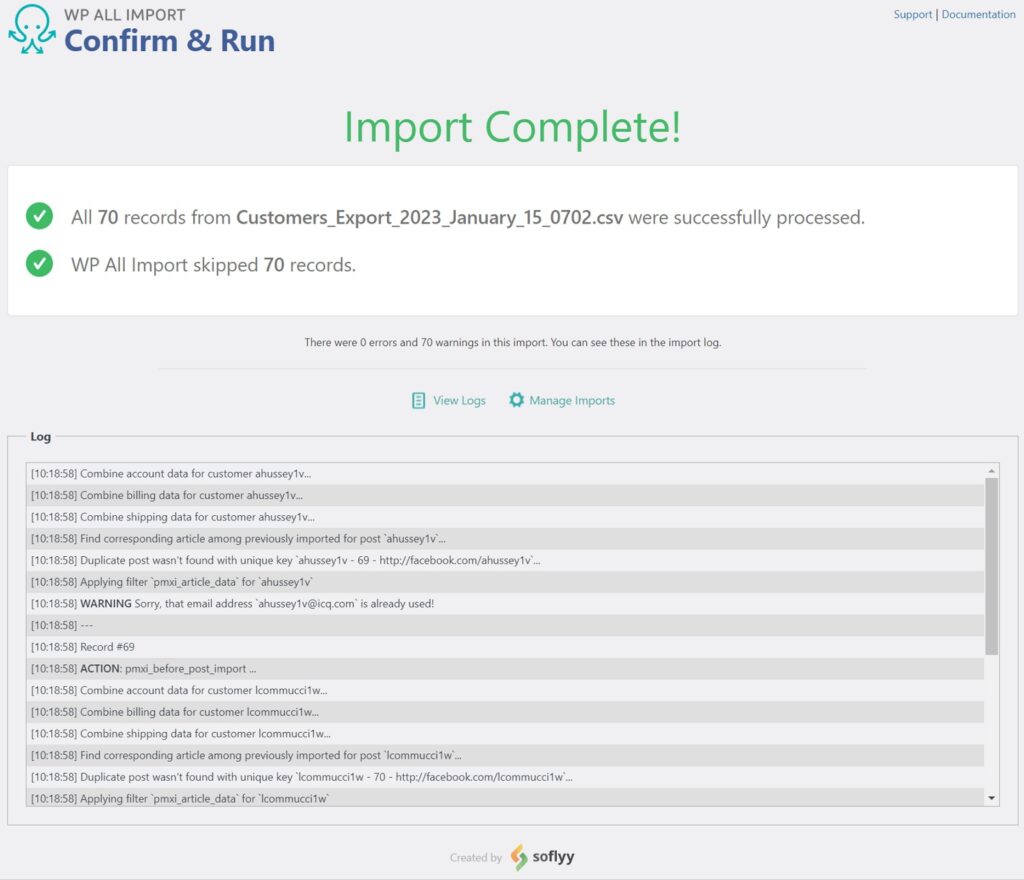
Don’t worry about the message in this example, which says that all 70 customer imports were skipped. We used an export file from the same sandbox site, which meant we were trying to import duplicate customers. WP All Import did the smart thing and skipped the imports.
If customers are imported, you should immediately navigate to WooCommerce > Customers to verify that the import went as expected.
How to Keep the Same WooCommerce Customer ID During an Import
When you import new customers into WooCommerce, they are automatically assigned new IDs. If you plan to import other data that references the old customer IDs, this can cause a problem. In this case, you may want to retain your old customer IDs.
It is possible to do this using a combination of custom code and WP ALL Import’s API, which you can read about here: Keeping Old IDs When Migrating Users or Customers.
However, if an existing customer on the target site already uses one of the old IDs, the imported customer will still be assigned a new ID. To make matters worse, if you import other data that references the old ID, it will end up pointing to the wrong customer.
To avoid this problem, you should check for ID overlaps ahead of time when trying to retain old IDs.
Note, this problem does not exist when importing WooCommerce orders after you have imported customers. This is because the order import includes an option to match order customers to existing customers using a field other than the ID field.
How to Modify Data During a Customer Import
One of the problems when importing customer data from a non-WooCommerce source, such as an external marketing platform or a brick-and-mortar store, is that the data won’t likely match WooCommerce’s data requirements. To get this data into WooCommerce, you will likely have to modify it, preferably “on the fly.” Why is this preferable? Because on-the-fly processes can be automated, whereas manual interventions cannot.
Fortunately, WP All Import is ideally suited to modify data while importing it thanks to these methods:
Merging Fields and Literals
Let’s say that you want the Display Name field in your store to consist of a customer’s first name, followed by a space, followed by the last name, then a dash, then the State code. So, for a customer named Sue Walker from Texas, the Display Name would be “Sue Walker – TX”.
How would you achieve this “on the fly”?
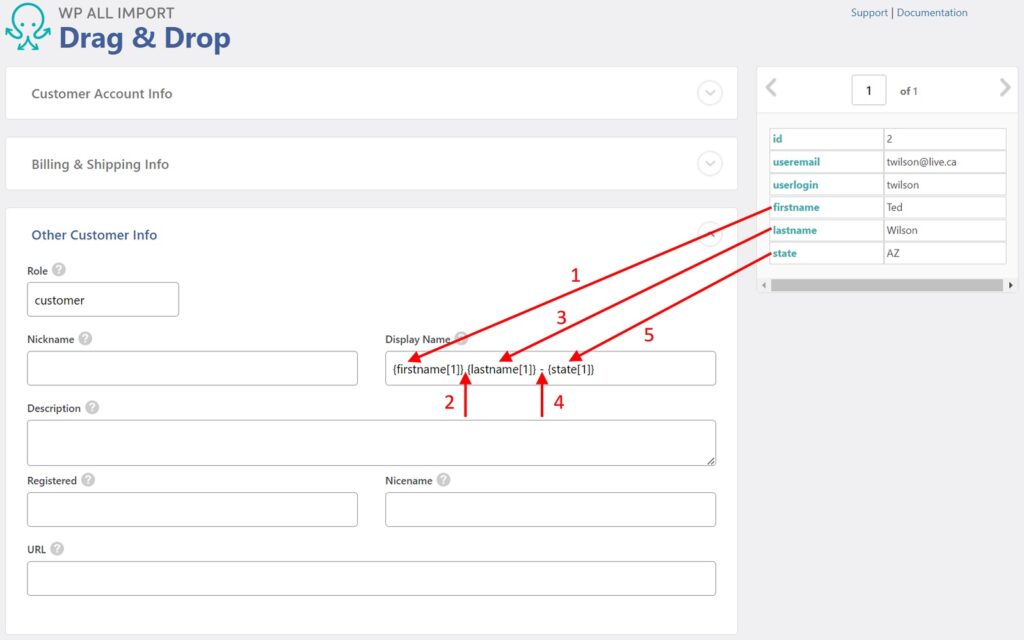
- Drag the incoming firstname data element from the panel on the right into the Display Name field.
- Add a space.
- Drag the incoming lastname data element into the Display Name field.
- Add a space, followed by a dash, followed by another space.
- Drag the incoming state data element to the end of the Display Name field.
In other words, you can freely combine one or more incoming data elements with literal values to populate any WooCommerce customer field.
Inline PHP
In addition to combining literal values with incoming data elements, you can also apply PHP functions to those data elements.
For example, to convert an incoming data value to upper case, you can use PHP’s strtoupper function, like this: [strtoupper({lastname[1]})].
Custom Functions
What if you need a function that doesn’t exist? For example, what if your system requires each customer to have a value in the Nickname field, but only some of the import customers have nicknames?
Where no nickname is present, let’s say that you want to use the customer’s last name as a temporary nickname. How would you implement this during an import? Just write your own function in the Function Editor at the bottom of the Drag & Drop screen:
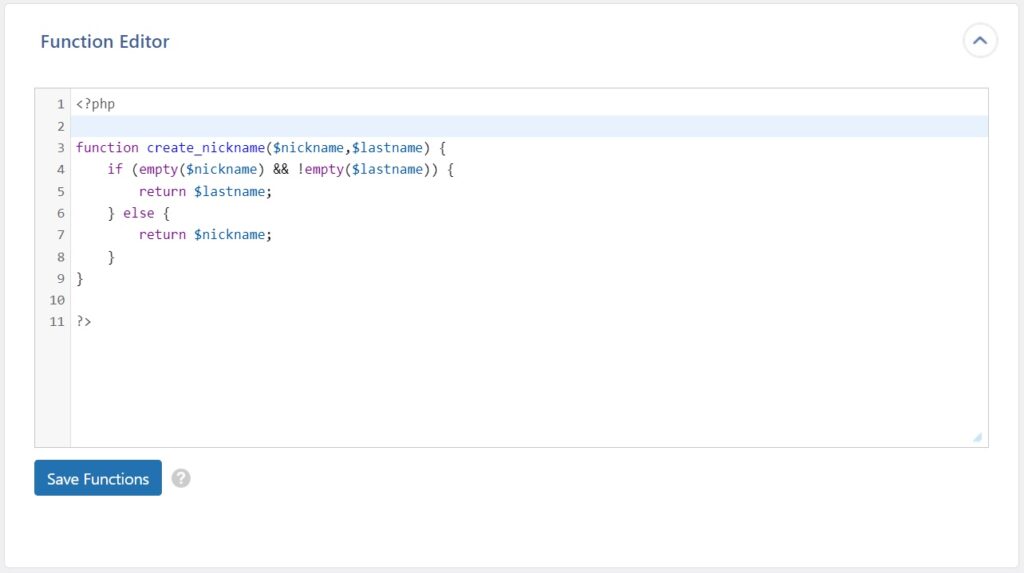
This simple function takes a nickname and a last name as inputs, and then does one of two things:
- If there is no nickname but there is a last name, it returns the last name.
- If there is already a nickname, it returns that.
Make sure to save this function by clicking the Save Functions button. You can then call it like this:
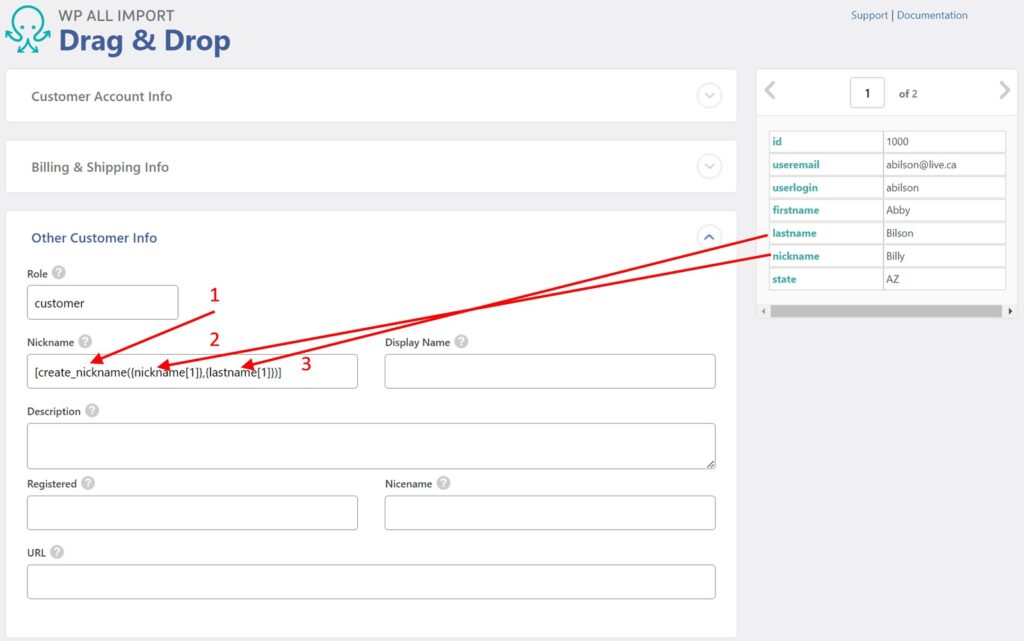
- Enter the function name followed by two round brackets. Enclose all of this with two square brackets, e.g.: “[create_nickname()]”.
- Drag the nickname data element inside the round brackets.
- Enter a comma, then drag the lastname data element inside the brackets immediately after the comma.
There, you have just applied conditional logic to your customer import!
What if you don’t know how to write PHP code? WP All Import’s support staff will point you in the right direction.
What if you have no interest in writing PHP code? Again, no problem. The support staff can refer you to some reliable programmers for hire. The point is, this ability to inject PHP code directly into the import process is already set up in advance. That means you have the full power of custom programming without having to create a big development project. Any custom import functions are likely to require only a few minutes of work from a qualified developer.
For more information on custom code, see inline PHP and custom code overview.
How to Import WooCommerce Customer Data Into Custom Fields
The mechanics of importing customer data into custom fields are no different than importing it into standard WordPress or WooCommerce fields.
The challenge is finding/identifying the correct custom fields.
This is quite easy when it comes to the custom fields that are part of the default WooCommerce data structure because WP All Import has organized those fields into their own sections and labeled them accordingly. For example, all the WooCommerce customer billing and shipping fields can be found in the Drag & Drop screen’s Billing & Shipping Info section:
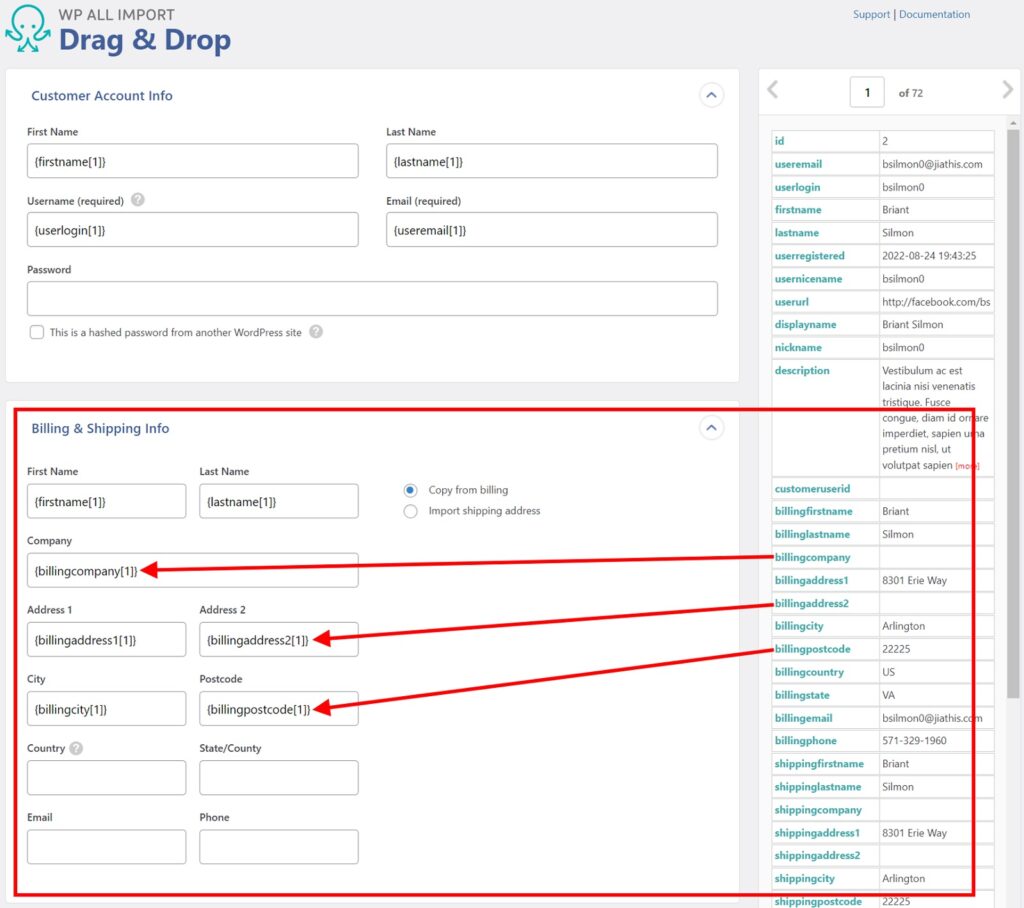
Most users aren’t even aware that these billing and shipping address fields are custom fields. And why should they be? It makes no difference to the import process.
But what happens when custom fields aren’t organized/labeled this way? You have to expand the more generic Custom Fields section of the Drag & Drop interface:

As you can see, the plugin informs you if your site is using custom fields, and even provides a See Detected Fields button to help you identify them. But the process of mapping incoming data elements to those fields can be a little more complicated. To understand why, see these articles:
How to Filter a WooCommerce Customer Import
Filtering a WooCommerce customer import is very similar to filtering a customer export. The main difference is that when you add a filter rule, it isn’t applied to the import right away. Instead, it is saved in a temporary storage area:
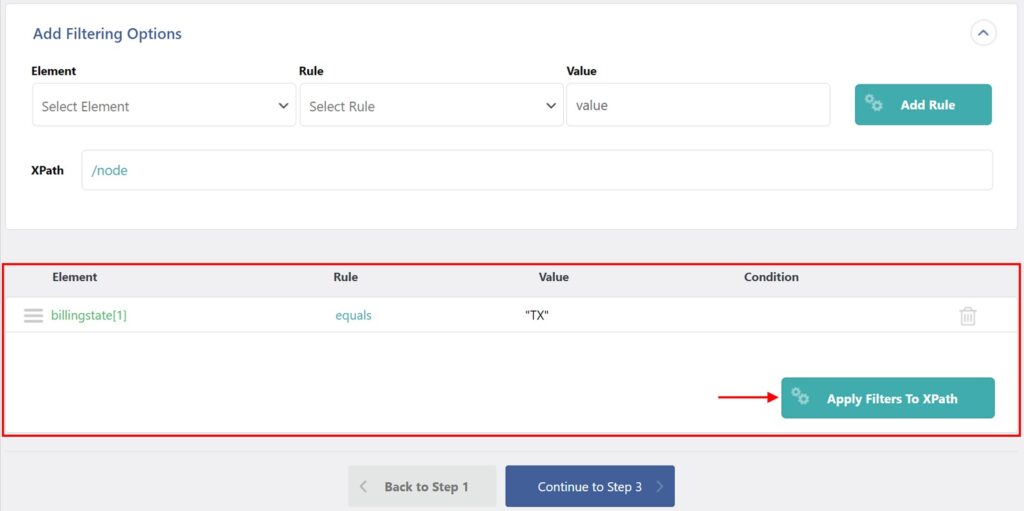
After you’ve added all your rules, you apply them by clicking Apply Filters to XPath. This updates the export count:

As you can see at the bottom of the screen, it also translates your filter into the XPath language, which it stores in the XPath field.
Why should you care about any of this? Because the XPath field is editable, and the XPath language is extremely powerful. If you know how to use it, you can create filters of unlimited power and sophistication.
Of course, you may never use it. But it’s good to know that such a powerful option is available should you need it.
For more information on Xpath, see Using XPath to Retrieve, Modify, and Filter File Elements.
How to Schedule a WooCommerce Customer Import
There is very little difference in the mechanics of scheduling a WooCommerce customer import versus a customer export, so we won’t repeat our description of those mechanics here.
The main difference has to do with preparation. If you’re going to schedule an import, WP All Import insists that you use an import file that is either a) accessible via a URL, or b) already on your server.
The reason for this is simple: the file has to be available for import at the scheduled time. It cannot be dependent on user actions like uploading a file.
It is up to you to ensure that the right file is at the right location before the import starts.
How to Sync Your Data on Recurring Customer Imports
Recurring customer imports pose a problem that is not posed by one-off imports of new customers: how to update data on existing customers.
This is managed by WP All Import in its Import Settings screen in the When WP All Import finds new or changed data… section:

The Create new customers from records newly present in your file is self-explanatory, as are the first two suboptions for Update existing customers with changed data in your file (Skip customers if their data in your file has not changed and Update all data).
But if you click on the third suboption — Choose which data to update — you will see that you have control over updates to individual fields:

Where WP All Import has specific knowledge of certain fields, it will even present additional suboptions.
The Remove or modify customers that are not present in this import file option also expands to reveal additional suboptions:
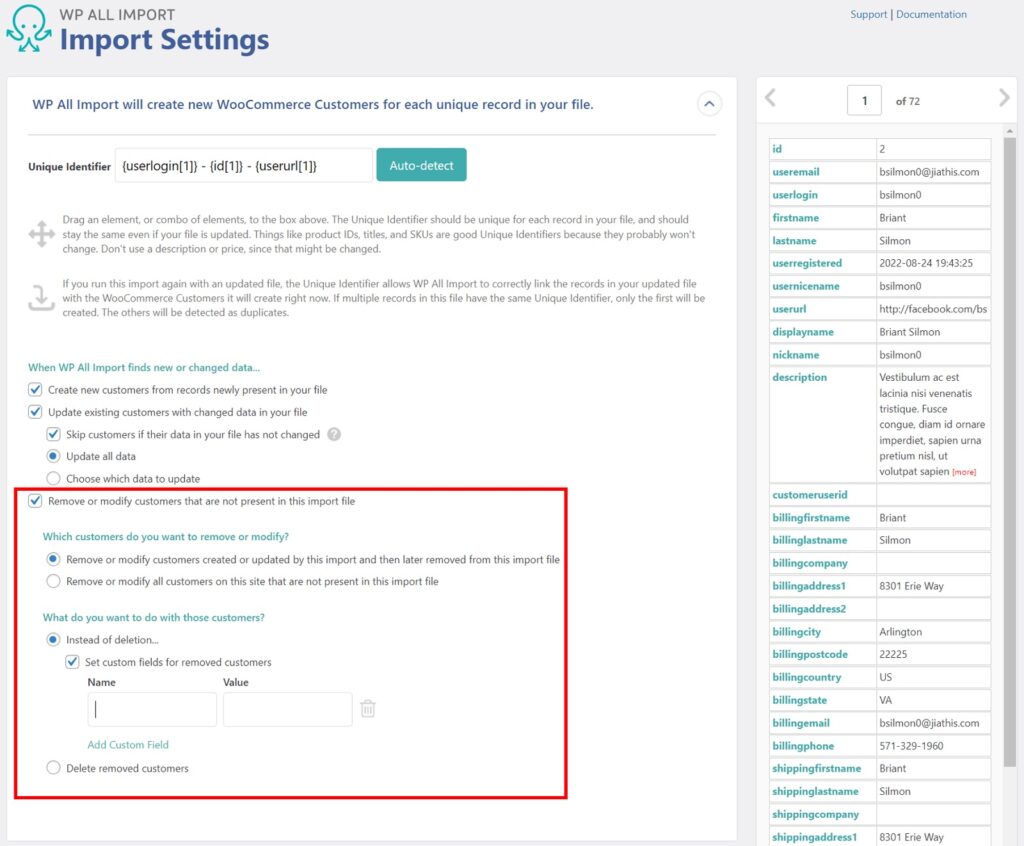
Here, you can instruct the plugin to:
- remove or modify customers that were in a previous version of the import file but are not in the new version
- remove or modify customers that are not in the new version of the import file regardless of their original source
If you decide to modify these customers instead of removing them, you can then set the values for specific fields. For example, you might populate the customer Description field to read “INACTIVE” so that your customer service department knows not to enter new orders for that customer. This ability to modify missing customers instead of deleting them is crucial if you have other data linked to them.
No other plugin even comes close to this level of granular control over updates to WooCommerce customer information.
Related Information
Export WooCommerce Customers – Plugin Description
Import WooCommerce Customers – Plugin Description
Bulk Edit WooCommerce Customers – Plugin Description
Migrate WooCommerce Customers – Plugin Description
Official Documentation: How to Import WooCommerce Customers
Official Documentation: How to Export WooCommerce Customers to CSV, Excel, or XML
Official Documentation: How to Migrate WooCommerce Customers to a Different Site
How to Import and Export WordPress Users
How to Export and Import WordPress Categories and Tags
How To Import and Export Advanced Custom Fields (ACF) Data
How to Export and Import Gravity Forms Entries
How to Import and Export WooCommerce Orders
How to Export and Import WooCommerce Products
How to Export and Import Variable Products in WooCommerce
Best WooCommerce Bulk Edit Plugins
Related Videos
Other Reliable Sources Around the Web
Blocksy: How to Export and Import WooCommerce Customers
Quadlayers: How to Import and Export WooCommerce Customers
WP Mayor: How to Import WooCommerce Customers Into Your Online Shop
WP Mayor: How to Migrate WooCommerce Customers, Products, and Orders to a New Store
Nexcess: How to Export WordPress Users with WP All Export
Nexcess: How to Import WordPress Users with WP All Import
WooCommerce: Import and Export of WooCommerce Users