
How to Import and Export WordPress Users
Are you looking to export and import WordPress users with passwords?
Moving WordPress users from one site to another doesn’t have to be complicated. Whether you’re migrating your website, or consolidating multiple WordPress sites, knowing how to properly export and import users is an essential skill.
In this guide, we’ll show you the quickest and most reliable way to transfer your WordPress users, saving you time and preventing headaches along the way.
Table of Contents
Key Issues When Importing and Exporting WordPress Users
For the most part, importing and exporting WordPress users is relatively straightforward.
However, each data type has its own nuances. To import and export WordPress users, there are four issues that require special attention:
- User passwords. When exporting and importing users between sites, it is often desirable to preserve their passwords. However, this isn’t always possible. We explain the details.
- User data added by third-party plugins. Sometimes, plugins will add new custom user fields to WordPress. When this happens, you need to know how to access this data.
- Email notifications. When performing large-scale user imports, most administrators prefer to keep their actions private, especially if there is a glitch or two that requires a redo. WordPress, on the other hand, likes to automatically inform new users when they are added to a site. You will need to disable this feature during a user import.
- Maintaining old user IDs. Normally, importing users into WordPress will automatically generate new user IDs. But what happens if you have a lot of other data connected to the old user ID numbers? Unless you want to spend hours reconnecting everything by hand, you may want to preserve old user IDs during an import.
In addition to describing standard user import and export processes, we’ll address each of these issues specifically.
To seamlessly export and import WordPress users between sites, we’ll use the combination WP All Export and WP All Import plugins. If you don’t have access to this plugin, you can use this free online sandbox. Just choose the WooCommerce Store option and click Create Sandbox.
Let’s begin with a simple walkthrough.
How to Export WordPress Users for Migration
To export WordPress users for migration, we’ll need to install the WP All Export plugin on the source site. Once that’s installed, let’s look at the user import process in detail.
Step 1: Create a New WordPress Users Export
To start the WordPress user export process, go to All Export › New Export in your WordPress dashboard.
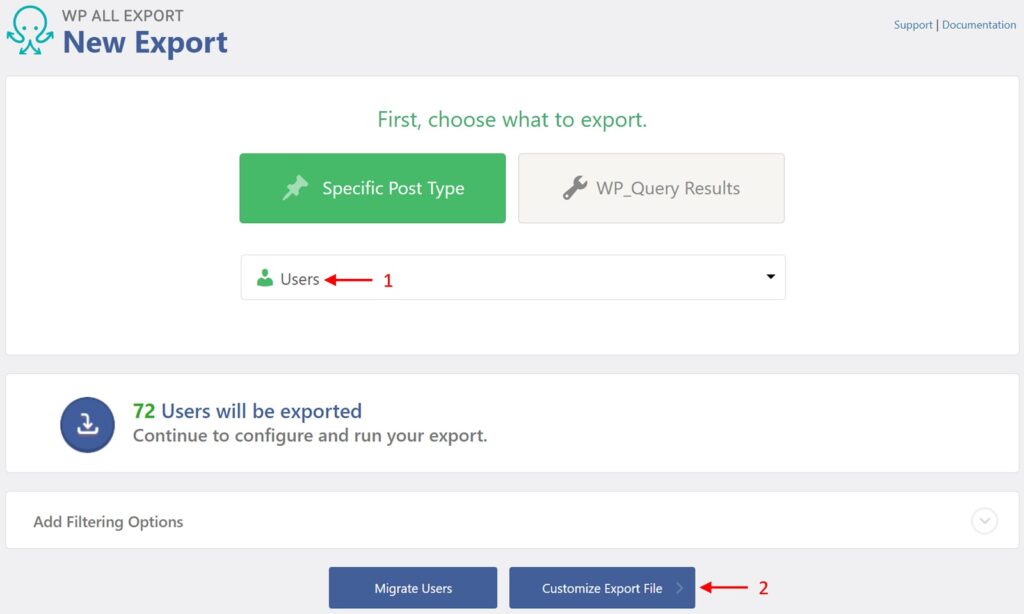
- Select Users as your export type.
- Click the Customize Export File button.
This will export all WordPress users. To filter your user export, you need to expand the Add Filtering Options section. We’ll return to this topic later in this article.
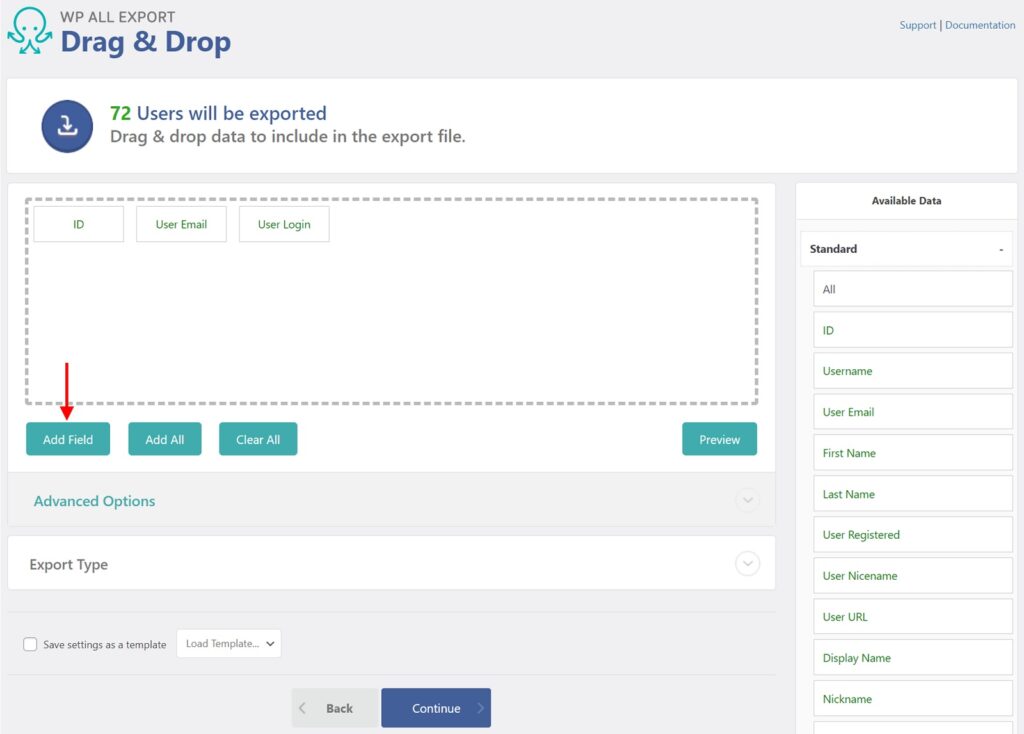
Clicking the Customize Export File button will bring up the Drag & Drop interface.
Step 2: Select WordPress Users Export Columns

The main function of this screen is to allow you to select the columns for your user export.
You do this primarily by dragging fields from the Available Data panel on the right into the column selection area on the left, as shown above. The above image only shows Available Data‘s Standard section, which contains the most common WordPress user fields.
There is also an Other section (not shown), which contains less common user fields (from an export perspective), such as user roles and passwords.
The Custom Fields section (also not shown) contains custom user data that is typically added by third-party plugins.
Also, some plugins will add their own sections, such as the Address section added by WooCommerce, which contains customer billing and shipping information.
WP All Export gathers all this data and presents it in the Available Data panel so that you don’t have to go looking for it elsewhere.
In addition to selecting fields for your user export, this interface offers far more advanced capabilities to create or modify export columns, which we’ll describe later.
Click the blue Continue button to proceed.
Step 3: Configure the WordPress Users Export Settings
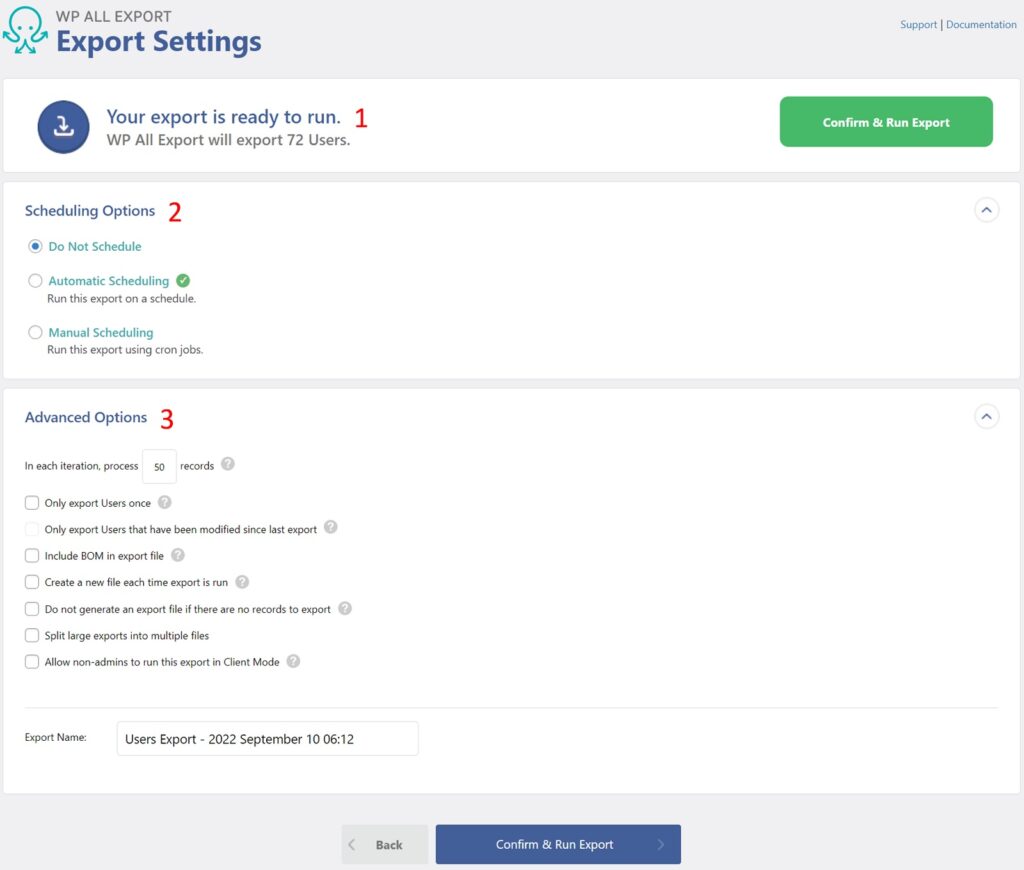
This screen consists of three sections:
- A count of the WordPress users that will be exported.
- A Scheduling Options section that allows you to schedule your recurring user exports. We’ll elaborate on this later.
- An Advanced Options section lets you control such things as the batch processing size for the export and whether to split the export into multiple output files — both very useful options to make sure that you don’t overwhelm the server.
For now, just click the Confirm & Run Export button.
Step 4: Confirm and Run the WordPress User Export
After the export finishes processing, you will see this screen:
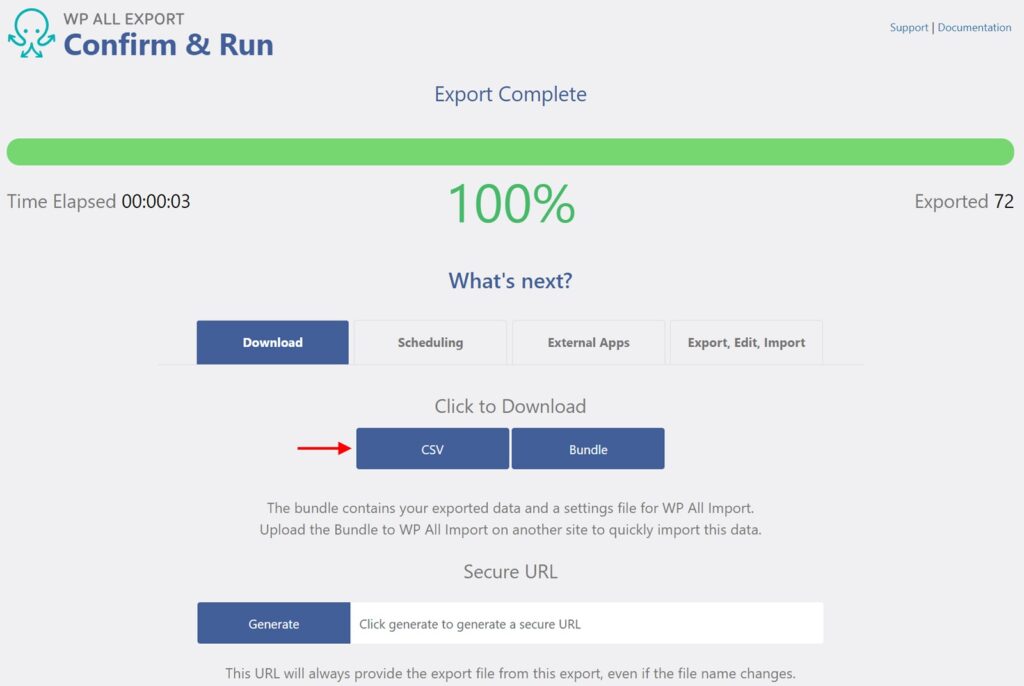
If you need to edit the user data before migrating to the new site, just click the CSV button, as shown in the above image.
If you want to migrate the user data without any changes, you can click the Bundle file which also includes an import template for the WP All Import plugin.
That’s all you need to do to perform a simple WordPress user export! Now let’s loop back to cover some of the topics that we skipped over earlier, along with some of the key issues that we identified at the start of this article.
How to Filter a WordPress User Export
One of the most important features of any export plugin is its ability to apply data filters. As mentioned earlier, you can access WP All Export’s filter tool by expanding the Add Filtering Options section in the New Export screen. Here is how you would filter out the “admin” user:
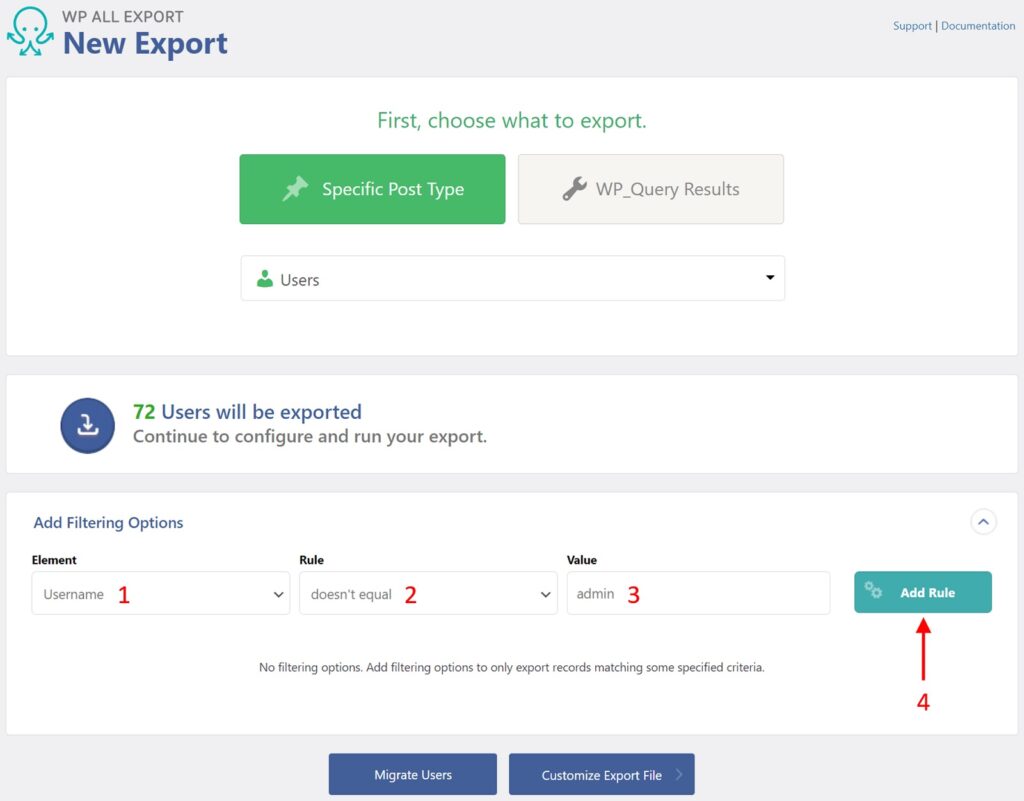
- For Element, select the Username field.
- Choose the doesn’t equal rule.
- Type “admin” into the Value field.
- Click the Add Rule button.
Here is what the same interface looks like after you have applied the rule:
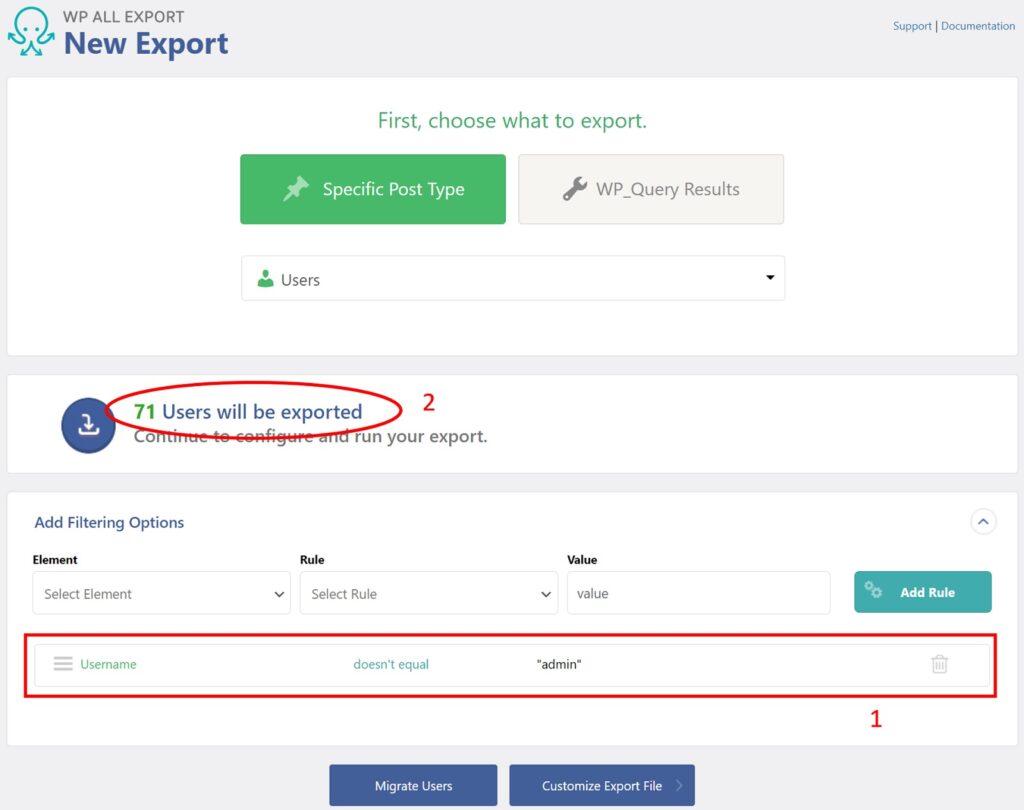
Note the:
- Applied filter rule.
- The reduced user count (it was previously 72).
You can apply filters to any of the fields that you see in the Available Data panel of the Drag & Drop interface, which basically means any user-related field regardless of its origin.
You can also apply a flexible range of rules depending on the data type of the field that you are filtering against, including equals, doesn’t equal, contains, doesn’t contain, is empty, is not empty, greater than, equal to or greater than, less than, and equal to or less than.
When filtering against fields that store multiple values, such as taxonomies and attributes, you can use the In and Not In conditions.
When filtering against date fields, you can use relative date values like “last month” or “last day of last month”, etc.
Finally, you can combine filters using any mix of AND or OR conditions, including nested sets of conditions.
What this essentially means is that you can create pretty much any kind of user filter imaginable with WP All Export, which is one of the features that separates it from all of its competitors.
How to Create Custom WordPress User Export Columns
Another feature that we skipped over earlier is the ability to modify and even create columns in the Drag & Drop interface. A simple example of this is combining multiple fields into one.
For instance, say you want to combine users’ first and last names into one name. Instead of dragging those fields into the column selection area, just click the Add Field button.
This will open up this popup window:
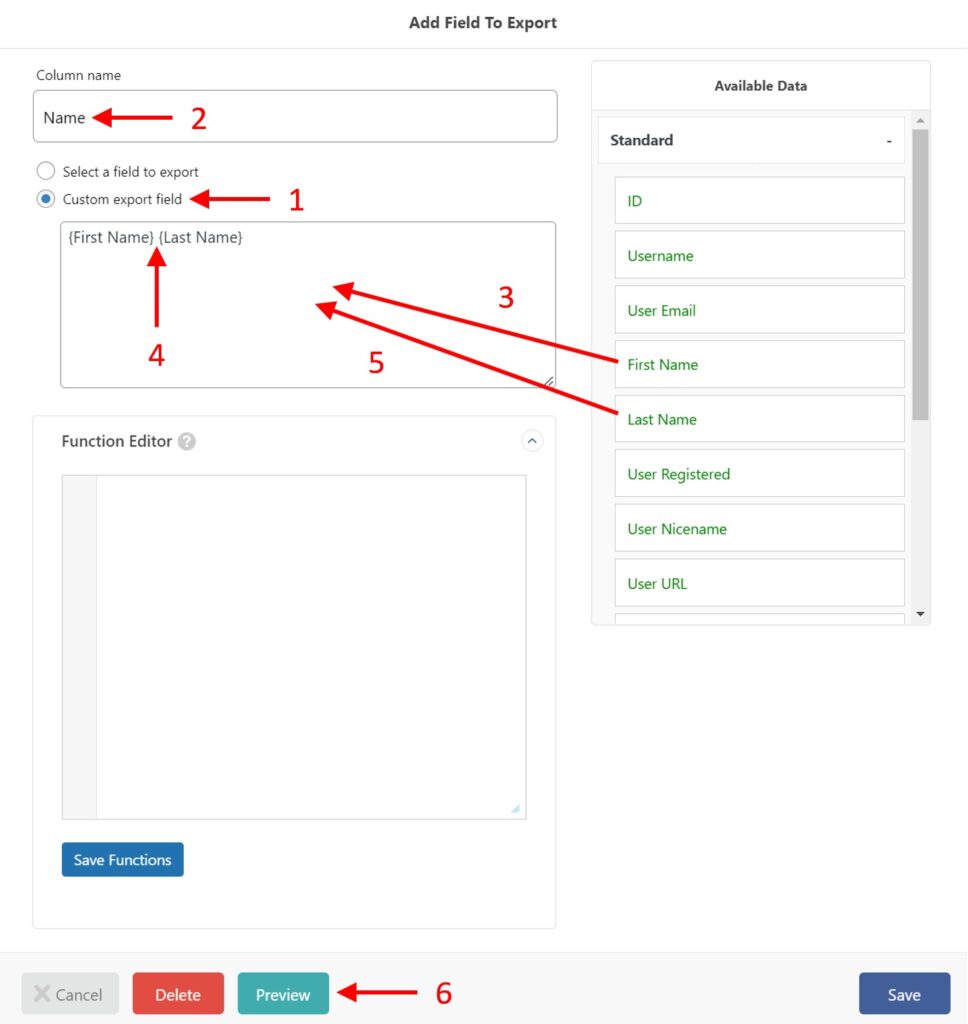
As shown above, do the following:
- Select the Custom export field option.
- Type “Name” in the Column name field.
- Expand the Standard section of the Available Data panel and drag the First Name field into the Custom export field edit box.
- Enter a space after the First Name field.
- Drag and drop the Last Name field from the Available Data panel into the Custom export field edit box.
- Click the green Preview button at the bottom.
You will now see this preview:
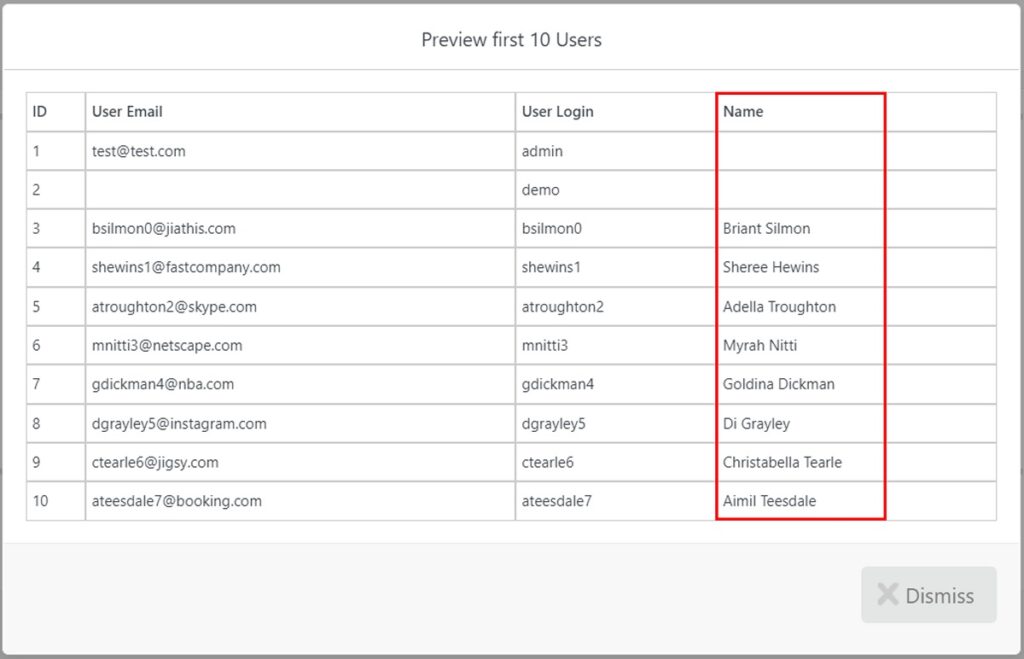
Voila, you just created a custom user export field!
But wait, there’s more. Creating a custom field by combining two existing fields merely scratches the surface of the ability to customize your user export. By using the Function Editor, you can also use custom PHP code to create or help modify custom fields, including conditional logic, which is incredibly powerful.
For more information, see the main article on custom export fields.
How to Schedule a WordPress User Export
One of the more common reasons to export WordPress users is to synchronize that data with an external system, such as an email marketing platform. This, in turn, requires automated, recurring user exports.
The easiest way to set up these exports is to use WP All Export’s paid automatic scheduling service for $9 per month. After you’ve done this, just expand the Scheduling Options section of the Export Settings screen and do the following:
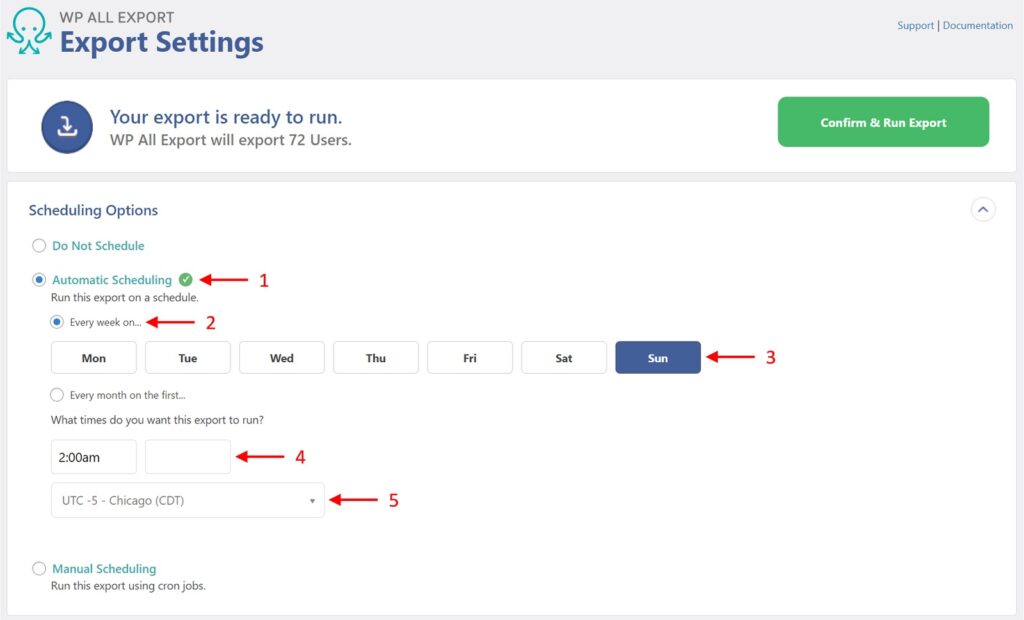
- Select the Automatic Scheduling option.
- Choose the scheduling period. In the above image, we’ve chosen to run this export every week. If you glance down to the next option, we also could have chosen to run it every month.
- Choose the day of the week on which you would like to run the export.
- Enter the different times to run the export. In this example, we have decided to run the report at 2:00 a.m.
- Specify the applicable time zone. In this case, we’re using the time zone for Chicago, USA.
That’s it. This interface couldn’t be more intuitive.
What if you don’t want to spend any money on the scheduling feature? Not a problem. You can also schedule user exports manually using cron jobs on your server. To learn more about this option, see Scheduling Imports Using Cron Jobs.
How to Export WordPress Users With Passwords
As mentioned in this article’s introduction, it is often desirable to preserve user passwords when moving user data from one site or system to another. The alternative is to force users to go through the password recovery process when they log onto the target site, which can cause a fair bit of grief if you’re dealing with hundreds or thousands of users.
On the other hand, trying to move password information electronically can pose a serious security risk if the information is intercepted.
The answer? Encryption. But encryption requires the use of the same encryption key at both the source and target sites.
This is easy enough if the two sites in question are both WordPress. You just include the Available Data > Other > User Pass field in the export:
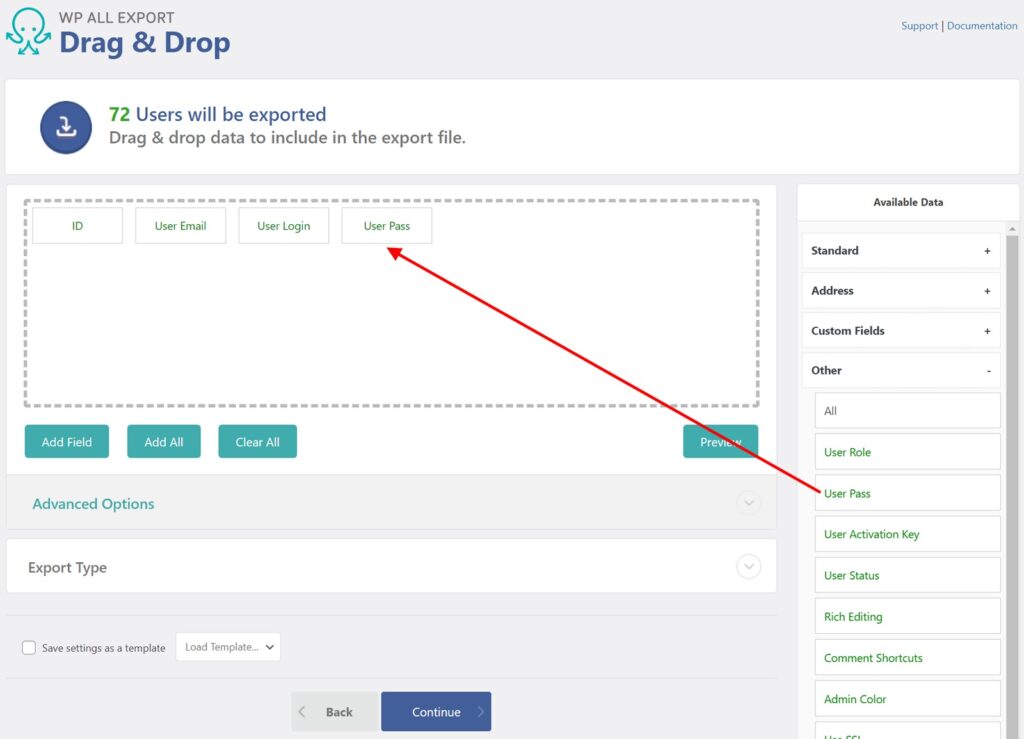
If you click the green Preview button, you will see that the resulting user password information is already encrypted:

Even better, when you import these users into WordPress, they will be able to log onto the target site using their original passwords (technically, what’s happening here is that the password entered at login on the new site is being automatically encrypted using the same algorithm that was used to generate the stored passwords, so all WordPress has to do is compare the two encrypted values).
But what if you’re attempting to export WordPress users and their passwords to a non-WordPress site? If you’ve used the default WordPress security system, you’re simply out of luck. There is no way to export the plain text version of the passwords. To do this, you would have had to set up a custom user registration form that stores a version of the user password in another field using the plain text format, which is not advisable.
Alternatively, if you know there’s a good chance that you’ll eventually need to export your WordPress users to a non-WordPress external site, you might consider using an OAuth plugin to configure WordPress logins using an external authentication provider, such as Google (i.e., using Google credentials). You could then export your WordPress user data to the target site and set up a similar OAuth solution there. Properly configured, users wouldn’t notice any difference between logging into the two sites since they’d be using the same credentials for both.
How to Export User Data Added By Plugins
In most cases, WordPress plugins create custom data fields. Some of these fields may contain data that is associated with WordPress users.
The good news is that WP All Export will most likely detect these fields and let you export them from one of the sections in the Available Data panel of the Drag & Drop interface.
The most obvious section is Custom Fields:
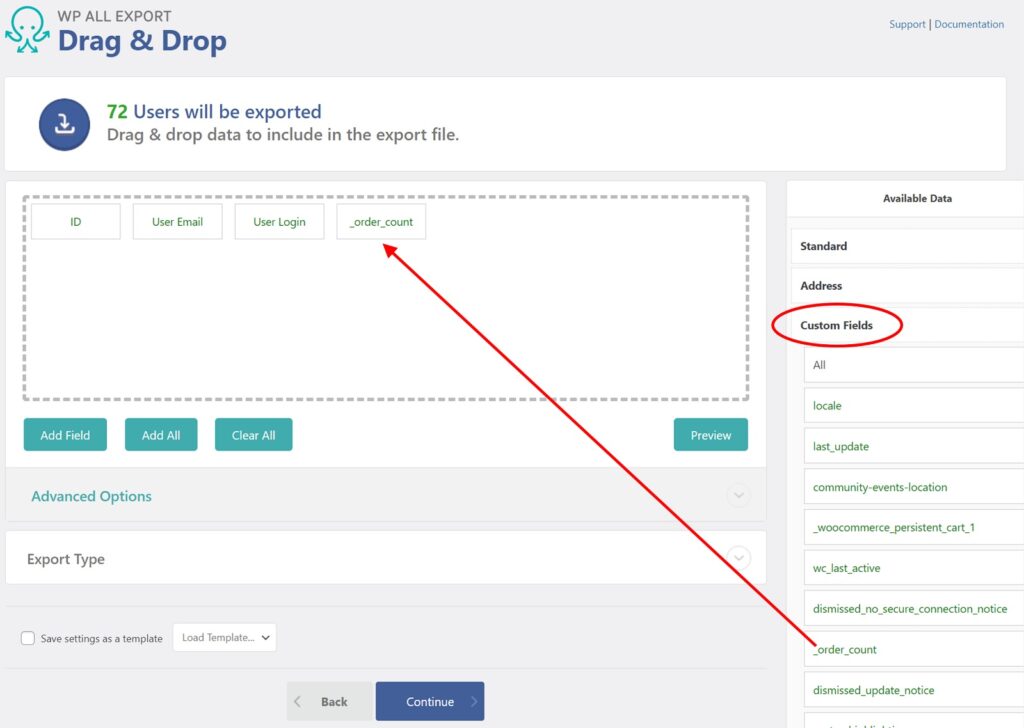
In this example, we’re trying to export the WooCommerce order count for each user (i.e., customer).
How did we know to use the _order_count field? We didn’t. We knew we were looking for a custom field (i.e., a WooCommerce field), so we naturally checked the Custom Fields section first, where we saw what looked like a good candidate.
Is it the right field? One way to verify this is to drag the field into the column selection area and click the green Preview button:
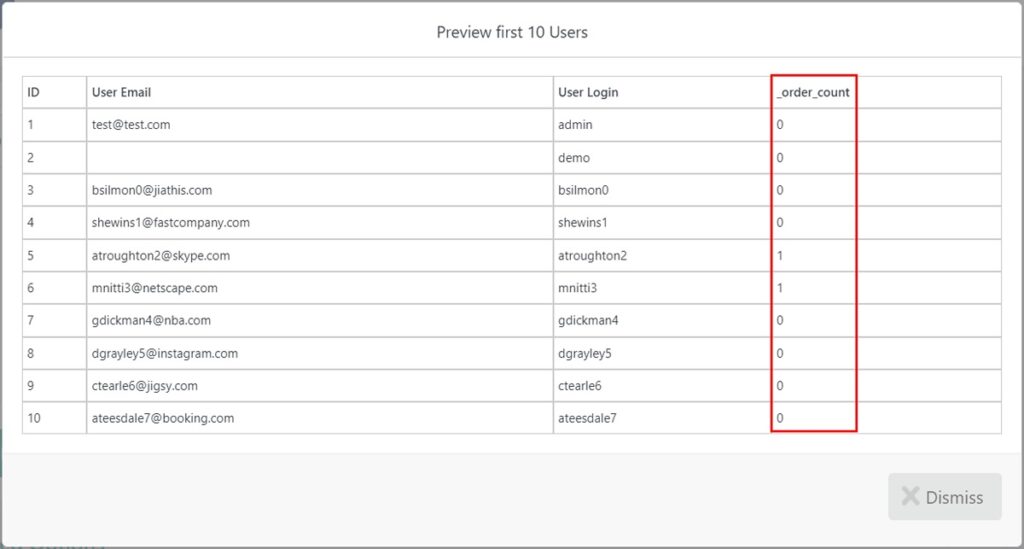
Now you have data that you can compare to the WooCommerce interface to see if you’ve found the right field.
Of course, a more precise way to identify custom user fields is just to ask the plugin maker for a list, which may be available in the documentation anyways. But if you can’t obtain the exact field names, there’s nothing wrong with a good old-fashioned fishing expedition.
In other cases, a plugin maker may create a set of custom user fields that WP All Export will present as a separate section in Available Data. Such is the case with the Address section:
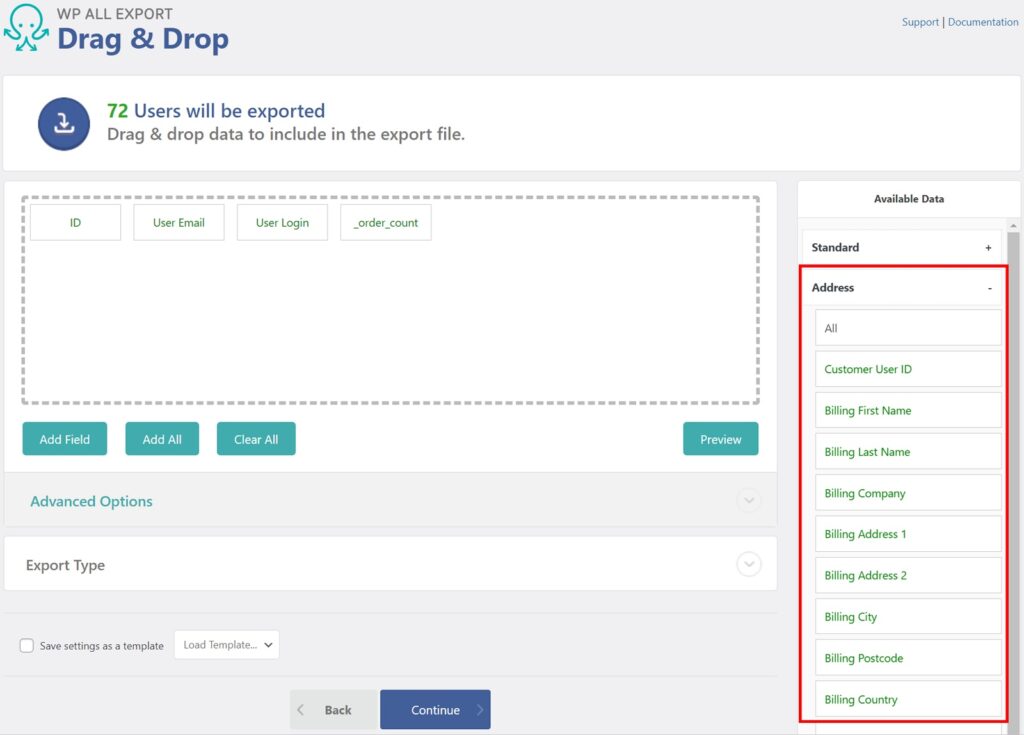
WP All Export makes it easy to find this information, but you will likely need an understanding of the source plugin to use it properly.
That’s it. These are some of the advanced features that make WP All Export the best WordPress user export plugin.
How to Import WordPress Users for Migration
Now that we have the data from the source site, let’s look at how to import WordPress users to the destination site using the WP All Import site.
Step 1: Create a New WordPress Users Import
Go to All Import › New Import:
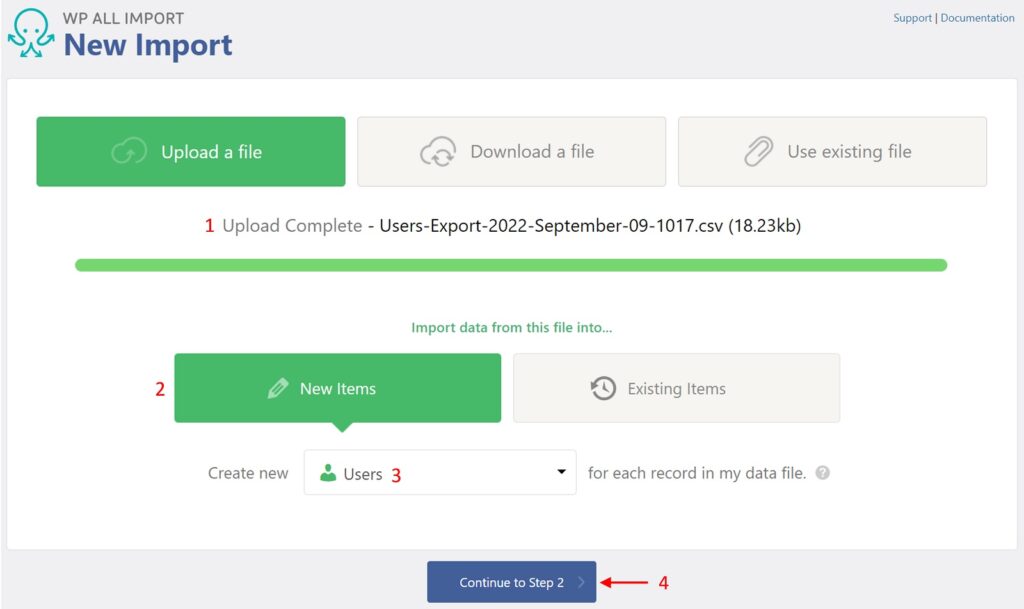
- Upload your file (or download it from a URL or FTP site, or use an existing file, i.e., one that you’ve already uploaded).
- Select New Items.
- Choose Users as your import post type.
- Click the blue Continue to Step 2 button.
Step 2: Review the WordPress User Import File

This screen allows you to review how WP All Import has parsed your user import file.
In most cases, you won’t have to do anything in response to this screen. But it is an important review screen nonetheless, in that if your import data is incorrectly parsed, it will likely mess up your user import and possibly a lot more.
Note the Add Filtering Options section in the lower half of this screen. You can use this to filter incoming user data the same way that you filter export user data, i.e., it is the same basic filter tool that we described earlier in How to Filter a WordPress User Export. For that reason, we won’t repeat the description here.
Click the Continue to Step 3 button to proceed.
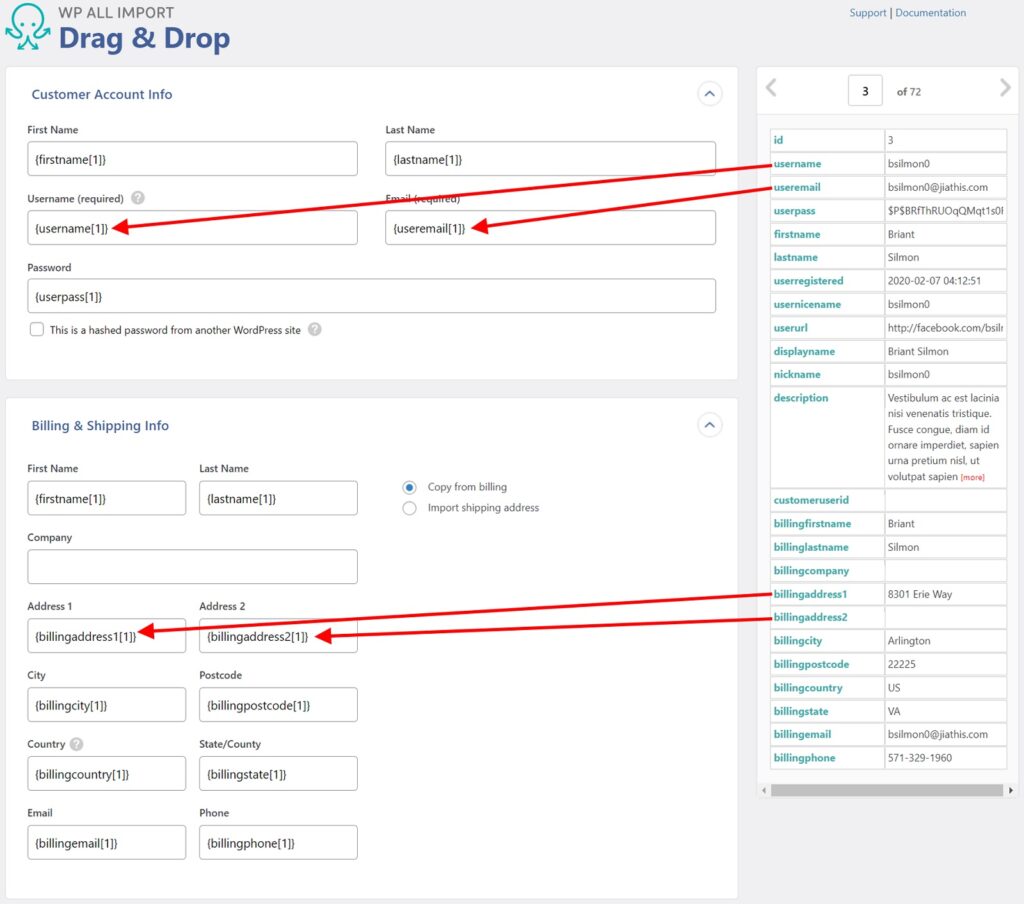
Step 3: Map Incoming Data to the Correct Users Fields

The red arrows are a bit cluttered in this image, but you get the idea.
In many ways, this screen represents the essence of WP All Import’s user import process (and, for that matter, every import process). Unless WP All Export has generated a bundle file for user migration, or you are importing users that were previously exported from the same site, WP All Import doesn’t inherently understand the data in your import file. You are the one who must map the incoming data elements to the appropriate target fields using the kind of drag & drop mapping process shown above.
In addition to the fields in the User Account Info section, the Other User Info section also contains common user fields:
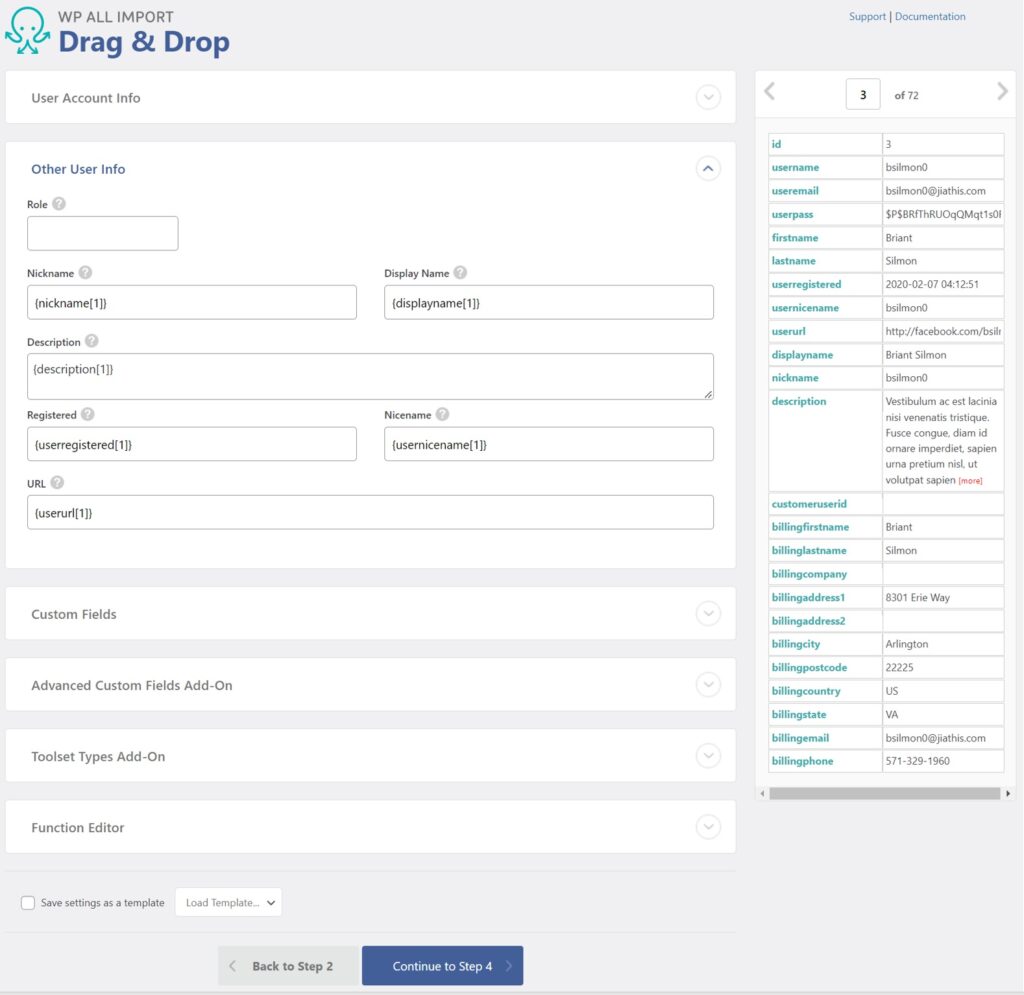
We haven’t drawn the red arrows in this image, but the mapping process is the same.
After you finish mapping incoming data elements to the appropriate target fields, click Continue to Step 4.
Step 4: Review the WordPress User Import Settings
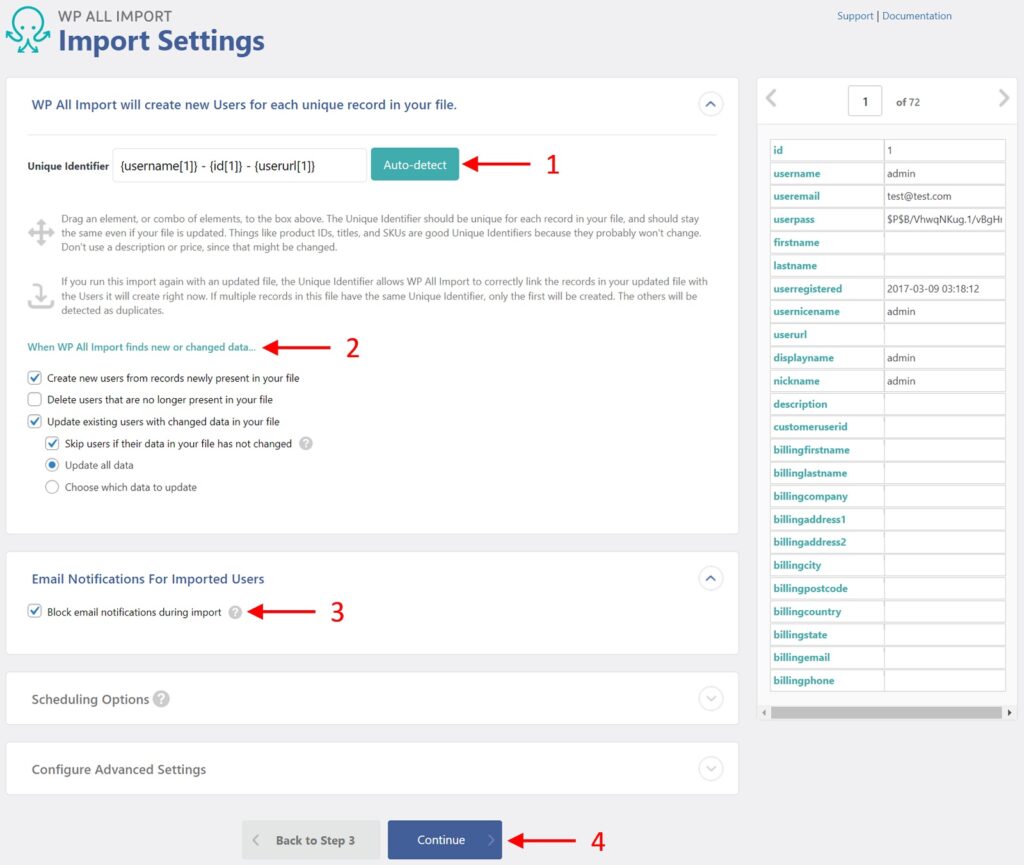
The following settings/actions are of interest on this screen:
- Click the Auto-detect button. This will automatically identify a unique ID for each incoming user. Provided that you use the same ID each time you repeat the import, this will assist in updating existing user records and also help you avoid creating duplicates.
- Note the area introduced by the wording: When WP All Import finds new or changed data… The options in this area govern how WP All Import will behave when re-running the same user import, as would be the case for recurring imports. The options themselves are self-explanatory, but they do not apply to a new user import, so we won’t elaborate on them in this article.
- Leave the Block email notifications during the import option checked. This is one of the key issues identified at the beginning of this article. If you want to avoid accidental email exchanges with users during imports, this is how you do it.
- Click the Continue button.
Step 5: Run the WordPress User Import
The next screen to appear is the Confirm & Run screen:

Much like the Review Import File screen described earlier, there is typically very little for you to do on this screen. You should simply scan the Import Summary to ensure that your user import has been configured as you intended. After that, simply click the Confirm & Run Import button. This will execute the import. When the import is complete, you should see the following screen:
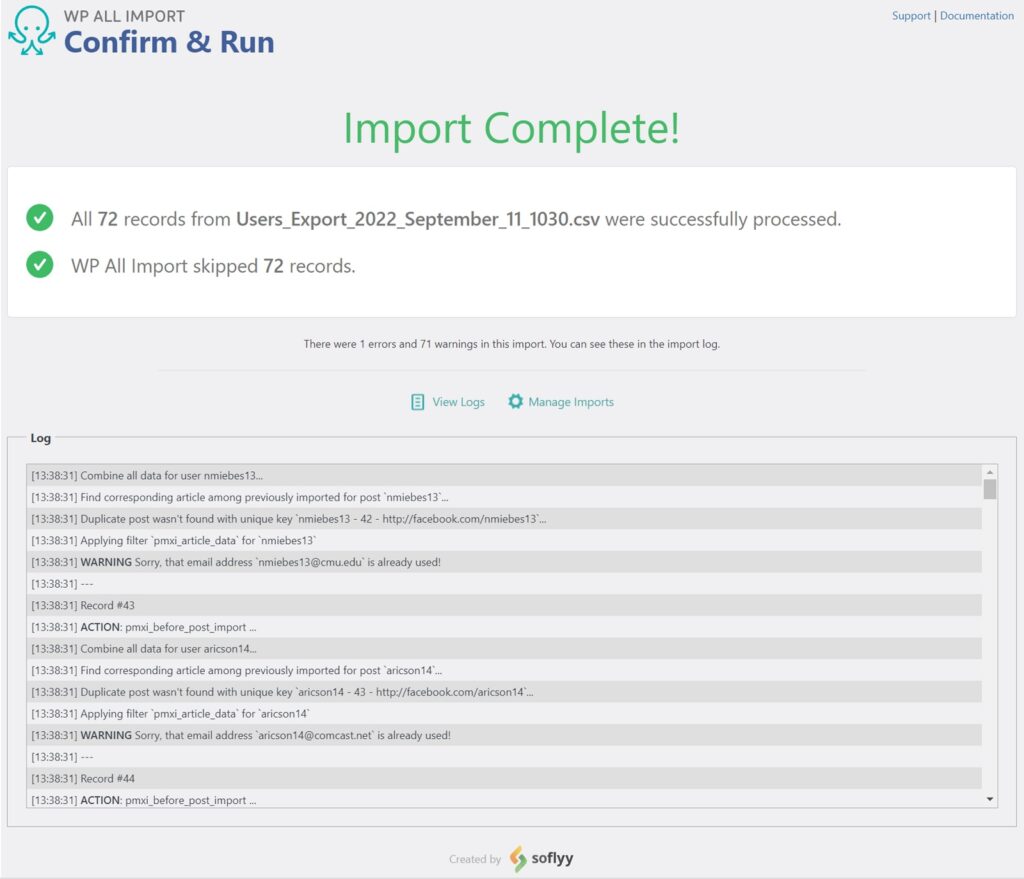
Ignore the message at the top that all 72 incoming records were skipped. That’s just because we attempted to import users that were already present. When truly adding new users, this message will indicate that WP All Import created new user records.
After any import like this, you should check Users > All Users in the main WordPress menu to ensure that your user records are as expected.
How to Filter a WordPress User Import
The basic principles of filtering a user import are the same as filtering a user export. Just the mechanics differ slightly. The filter tool itself is found in the lower section of the Review Import File screen:
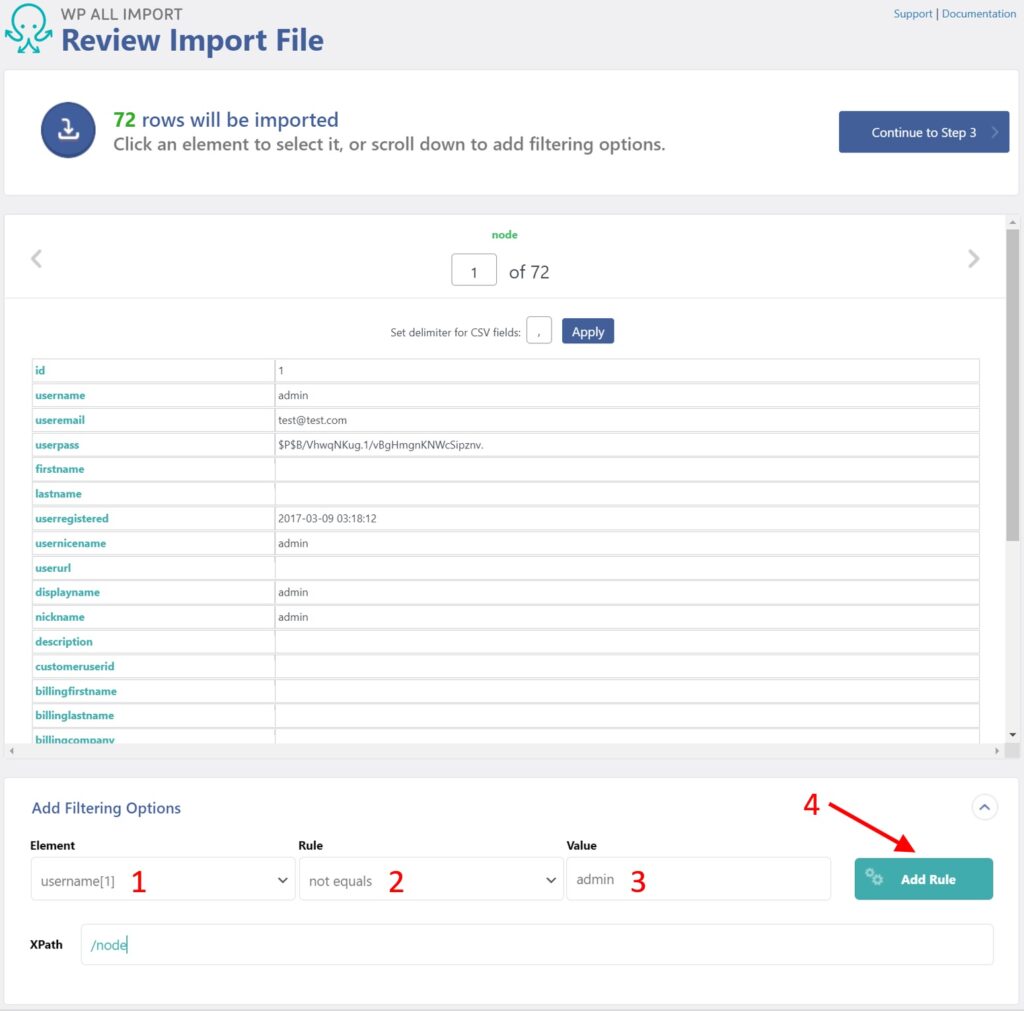
Let’s say that you wish to filter out any incoming users with a user name of “admin”. Here is what you would do:
- In the Element field, select the username(1) incoming data element.
- Choose the not equals rule.
- Type “admin” into the Value field.
- Click the Add Rule button.
So far, the filtering process looks identical to that of export filtering, right? But here is where the process differs. After you click the Add Rule button, that rule is not immediately applied to the data. Instead, it goes into a kind of holding area:
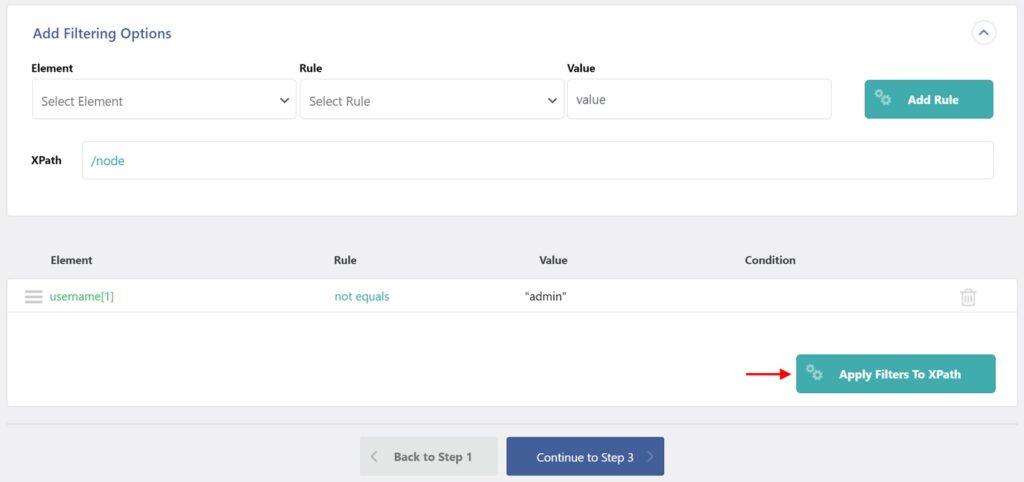
Here, you build your entire filter (i.e., add more rules) before you apply it to the incoming data, which you do by clicking the Apply Filters to XPath button. This is the result:
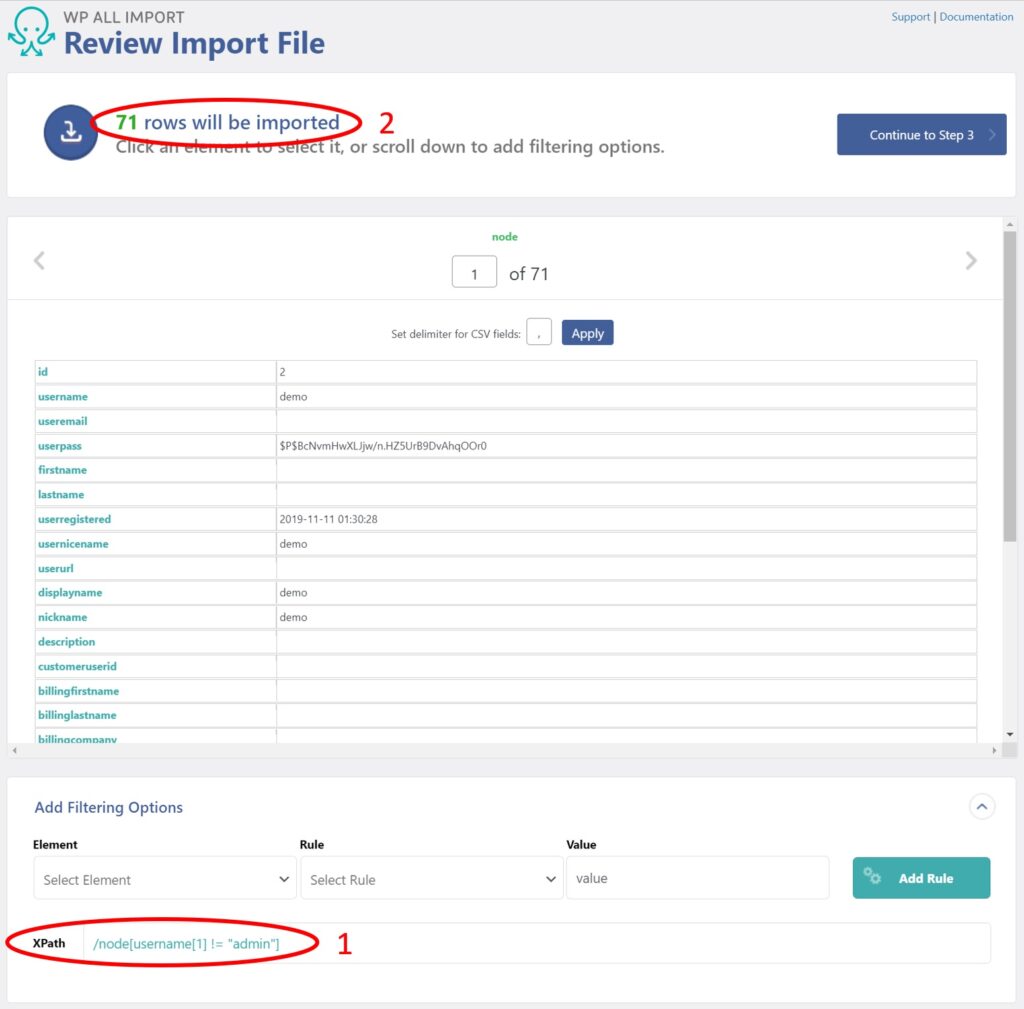
- The entire filter (i.e., all the filter rules) is applied via XPath, which is a language used for addressing parts of an XML document.
- In this case, applying the filter reduces the incoming record count from 72 to 71.
How to Schedule a WordPress User Import
Scheduling a WordPress user import is no different than scheduling a user export except for one key issue: WordPress doesn’t control the import file. That is, if you’re setting up a recurring user import on a schedule, it is up to you (or whoever is producing the file) to ensure that the new file is placed in its designated location prior to the scheduled import. Otherwise, the import will a) fail or b) repeat a previous import using an old version of the import file.
For this same reason, WP All Import insists that you use a URL or existing file location for your import file — in other words, a location that our plugin can access without human assistance.
How to Import WordPress Users With Passwords
The method used to import WordPress user passwords is very simple. In the Drag & Drop screen, just map the incoming data element containing the user password data to the Password field in the User Account Info section:
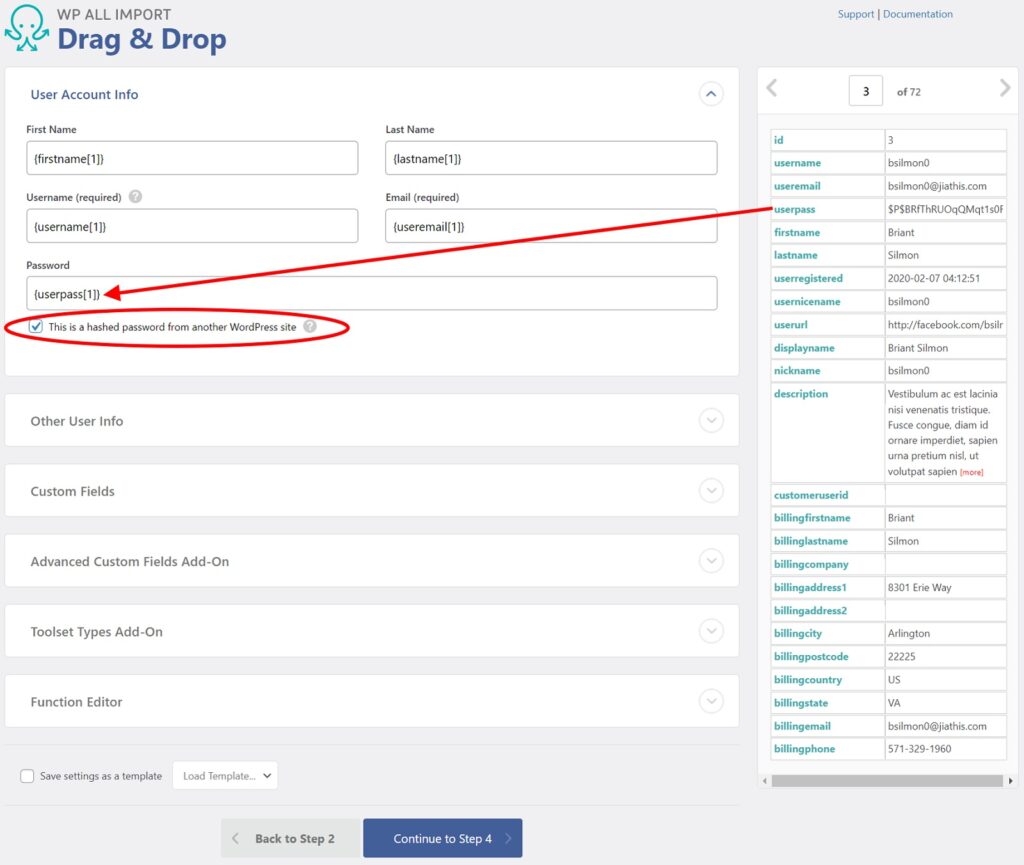
The key to getting the correct result is the This is a hashed password from another WordPress site setting. As explained earlier, WordPress only stores the hashed versions of user passwords. This means that it can only export hashed values.
If, as in this example, the incoming password data is coming from another WordPress site, then you should select the This is a hashed password from another WordPress site setting. This will prevent WordPress from hashing the password values again, which means that users from the source site will be able to log into the target site using their old passwords because all WordPress sites use the same hashing algorithm.
If the incoming password data is coming from a non-WordPress source and is plaintext, then you should uncheck the This is a hashed password from another WordPress site setting. WordPress will then hash the values during the import, and, again, users should be able to log in using their old passwords, though you must worry about whether the plaintext passwords were exposed during transit. The safest thing to do in this situation is to force all imported users to manually reset their passwords.
If the incoming password data is coming from a non-WordPress source and is hashed, then it doesn’t matter whether you check the This is a hashed password from another WordPress site setting. The passwords won’t work in either case. The only course of action here is to force all imported users to manually reset their passwords.
Importing WordPress User Data Into Plugin Custom Fields
There are two ways to import data into custom user fields.
The first and most convenient method is when the custom fields warrant their own import post type and their own section in the Available Data panel of the Drag & Drop interface. The custom fields created by WooCommerce for its customer data are a perfect example of this. When importing this data, you actually choose an import post type of WooCommerce Customers, not Users:

Similarly, in the Drag & Drop interface, the custom fields are organized into their own sections and named fields, so all you have to do is map the incoming data elements to the appropriate target fields, exactly like you did earlier while importing WordPress users.
Put another way, there is no difference between the process used to import WooCommerce customers versus importing WordPress users, even though the data fields used to store customer-specific information (such as billing and shipping info) are custom fields.
This is an easy way to import custom field data.
A slightly more difficult method is used to import data into custom fields that are less common and don’t warrant their own post types or drag & drop field sections. You start this method by expanding the Custom Fields section of the Drag & Drop interface:

As you can see, WP All Import will immediately inform you if your website is using custom fields to store user data. If it is, click the See Detected Fields button.
This will identify the available custom fields and allow you to map incoming data elements to those fields. But because this process is a bit more involved, we’re not going to describe it here. Instead, we direct you to these articles:
How to Maintain Old User IDS During an Import
When you import new users into WordPress, those users will automatically receive new user IDs. However, if you are also importing other data related to the old user IDs, you might want to retain those old IDs. The alternative is a lot of manual editing to reconnect data after you’ve imported it.
The only way to retain old IDs during a user import is to use custom code in combination with WP All Import’s API. A complete example of this can be found here: Keeping Old IDs When Migrating Users or Customers.
When using this custom code, keep in mind that it is merely an attempt to use the old user IDs. If an existing user on the target site already uses one of the old IDs that you are attempting to preserve, this code won’t work, and the imported user will still end up with a new user ID. To make matters worse, if you import other data that references the old user ID, it will end up pointing to the wrong user.
For this process to work, you need to check user IDs on both the source and target sites very closely, then plan your import accordingly.
Related Information
Bulk Edit WordPress Users – Plugin Description
Export Users for WordPress Add-on
Official Documentation: How to Export WordPress Users to CSV, Excel, or XML
Official Documentation: How to Import WordPress Users from CSV, Excel, or XML
Official Documentation: How to Migrate WordPress Users from One Website to Another
How to Export and Import WordPress Categories and Tags
How To Import and Export Advanced Custom Fields (ACF) Data
How to Export and Import Gravity Forms Entries
How to Import and Export WooCommerce Customers
How to Export and Import WooCommerce Products
How to Export and Import Variable Products in WooCommerce
How to Import and Export WooCommerce Orders
How to Import WooCommerce Comments
Best WooCommerce Bulk Edit Plugins
Related Videos
Other Reliable Sources Around the Web
This article from Nexcess explains how to export WordPress users with WP All Export. In this related article, Nexcess demonstrates how to import WordPress users with WP All Import.
This tutorial from ProfilePress describes how to export, import, and migrate WordPress users.
Oxygen Builder Plugin Review Team