How To Import and Export Advanced Custom Fields (ACF) Data
Want to know how to import and export Advanced Custom Fields (AFC) Data? We’re going to show you how. We’ll also link you to more in-depth articles on the same topics.
Here is what is contained in this article:
What is an Advanced Custom Field?
How to Add Advanced Custom Fields
How to Import Advanced Custom Fields
How to Export Advanced Custom Fields
Step 1: Create a New WooCommerce Product Export
Step 2: Customize Your WooCommerce Product Export to Include ACF Fields
Step 3: Configure Your Export Settings
Step 4: Run Your Export and Download Your File
Advanced Custom Fields — Frequently Asked Questions
Can I Import ACF Fields on Their Own?
How to Modify Advanced Custom Fields in Bulk?
What is an Advanced Custom Field (ACF)?
An Advanced Custom Field is a custom WordPress field created through the Advanced Custom Fields (ACF) plugin. ACF fields go well beyond the native ability of WordPress to add and display custom data. This gives designers much greater control over the content and appearance of their websites.

How to Add Advanced Custom Fields
Every Advanced Custom Field that exists on your website belongs to a Field Group. A Field Group is used by the ACF plugin to attach fields to post types or custom post types. Each Field Group has a title, fields, rules, and visual settings.
Here is how you add a new custom field group:
- Go to Custom Fields › Field Groups.
- Click Add New.
- Input a title for the field group
- Use the + Add Field button to add each Advanced Custom Field.
- Set a Location to define where the field group should display.
- Click Publish to create the new field group.
This video provides a good basic description of Advanced Custom Fields and how to add them to your website:
This is part of a 21-video series on ACF, which you can find here: https://www.youtube.com/playlist?list=PLgFB6lmeXFOoyP8YUj7TmDnzFrrPcjCf3
How to Import Advanced Custom Fields
- Obtain and Install a version of WP All Import that includes ACF import functionality. If you don’t have access to this plugin, you can use this free online sandbox. Just choose both the WooCommerce and ACF Fields options, then click Create Sandbox.
- Create a new import for the post type for which you have created Advanced Custom Fields.
- Specify an import file and review the import data.
- Map each data element from the import file to its Advanced Custom Field, if applicable.
- Configure the remaining settings and run the import.
- Verify that the Advanced Custom Field data was imported correctly.
To see this process in action, watch this video:
For written instructions, see How to Import Advanced Custom Fields (ACF).
How to Export Advanced Custom Fields
- Obtain and Install a version of WP All Import that includes ACF export functionality. If you don’t have access to this plugin, you can use this free online sandbox. Just choose both the WooCommerce and ACF Fields options, then click Create Sandbox.
- Create a new export for the post type that has Advanced Custom Fields.
- Define which Advanced Custom Fields to export.
- Configure the remaining export settings.
- Download the export file.
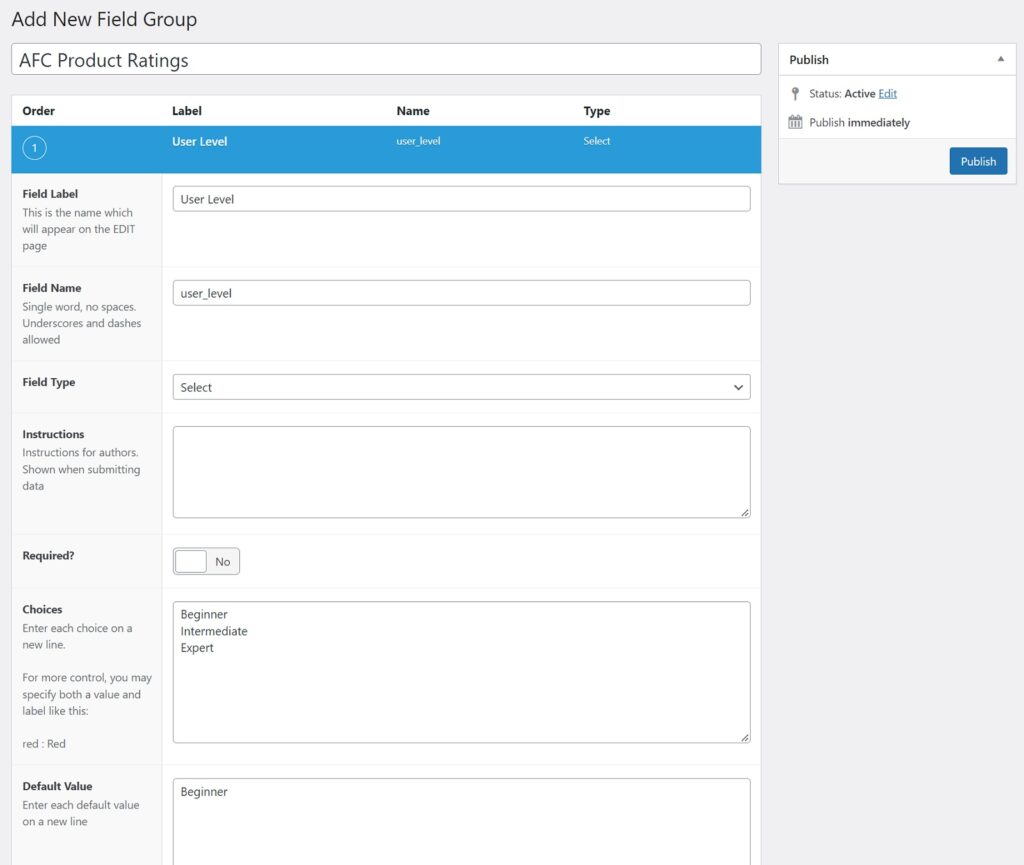
Let’s walk through an example. Suppose that you have a WooCommerce website and that you have decided to add a special User Level rating to your products. Each product can be classified as Beginner, Intermediate, or Expert. Here is the setup in Advanced Custom Fields just prior to publication:
Over time, you have classified some of your products as Expert, and you now wish to export a list of these products. Here is what you would do:
Step 1: Create a New WooCommerce Product Export
To begin your export, go to All Export › New Export.

- Select WooCommerce Products as the post type.
- Expand the Add Filtering Options panel.
- Select User Level as the filter Element.
- Choose the equals rule.
- Enter “Expert” as the target value.
- Click the Add Rule button.
WP All Export will apply the filter and update the screen:
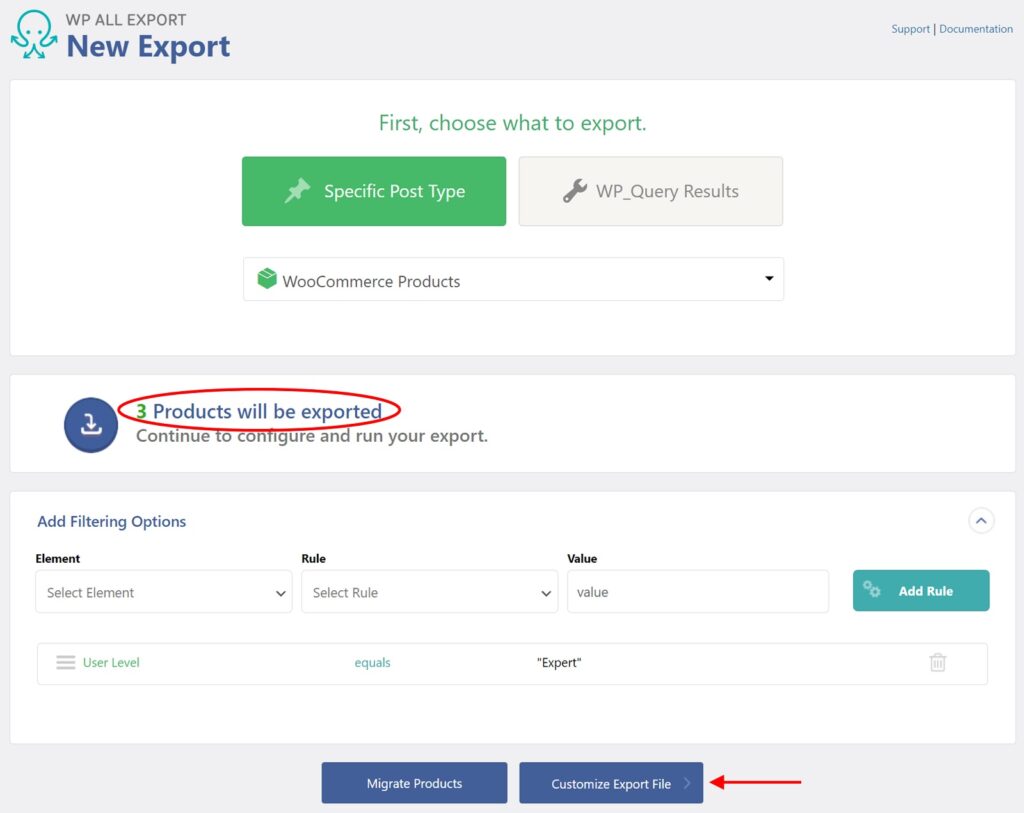
Note that only three products meet the filter requirements by having a User Level of “Expert”.
To continue, click the Customize Export File button. This will bring you to the Drag & Drop screen.
Step 2: Customize Your WooCommerce Product Export to Include ACF Fields
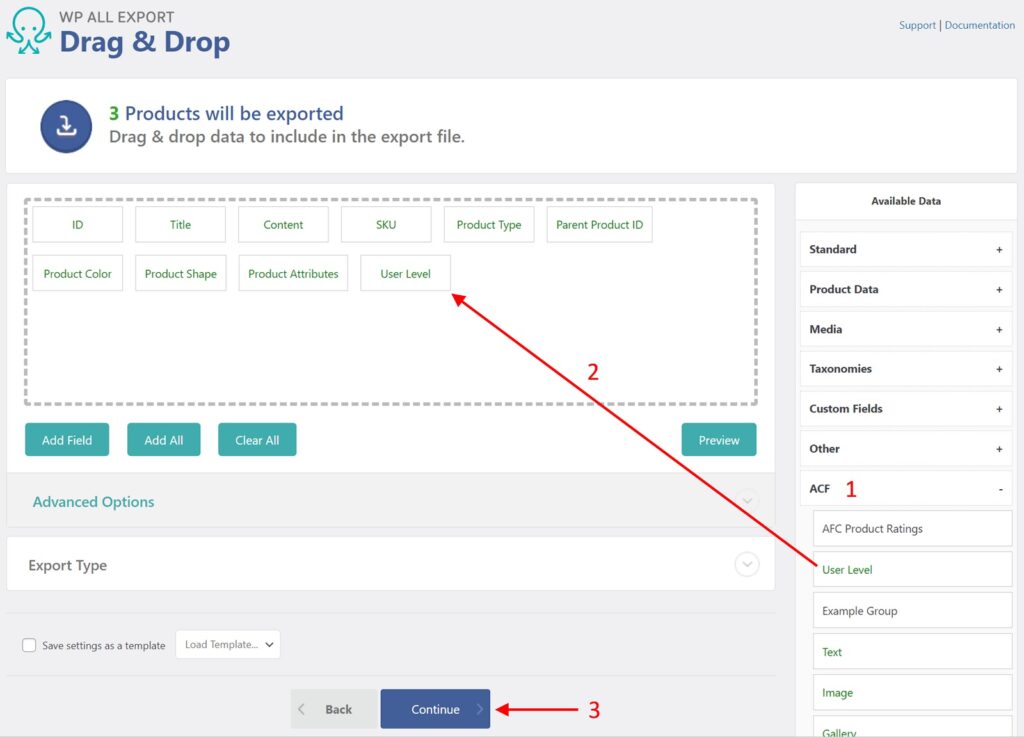
- Expand the ACF panel in the Available Data section.
- Drag the User Level field into the column selection area.
- Click Continue. This will bring you to the Export Settings interface.
Step 3: Configure Your Export Settings

- Expand the Advanced Options panel.
- Set the advanced options. These allow you to control settings such as how many records are processed in each iteration of the export, whether to split large exports into multiple output files, etc. In this example, we won’t change these settings.
- Click the Confirm & Run Export button.
Step 4: Run Your ACF Export and Download Your File
When the export is complete, it will display this screen:
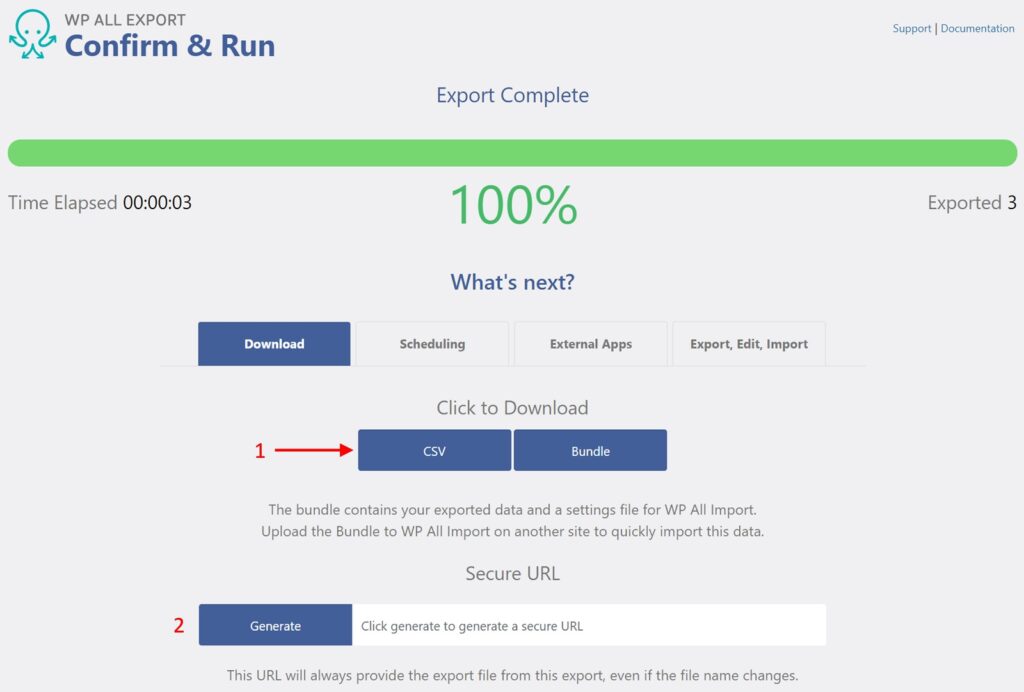
- Click CSV in the Click to Download section. This is because we are exporting to the default CSV file format. If we had changed the export file type to XML, this option would change to XML, also. If we had selected an export file type of Excel, it would change to XLS or XLSX, depending on which version of Excel you selected.
- Alternatively, you can generate a secure URL to retrieve your file.
And that’s it. That’s how easily you can create Advanced Custom Fields and then export them using WP All Export!
For more information, see How to Export Advanced Custom Fields (ACF).
Advanced Custom Fields — Frequently Asked Questions
As you’ve seen from the preceding examples, the basic use of Advanced Custom Fields is pretty straightforward. When combined with WP All import and WP All Export, so are the tasks of importing and exporting ACF data.
However, with such powerful tools, there are invariably many nuances and complexities. We try to address some of these here.
What are ACF Repeater Fields?
Repeater fields are subfields that can be repeated as a way to loop through rows of data. WP All Import’s ACF Import Add-On allows you full control over your ACF import, including repeater fields. In fact, it offers three different modes for importing ACF repeating data.
These modes are:
- Fixed Repeater Mode: used when each piece of the repeating data is stored in separated columns or elements.
- Variable Repeater Mode (XML): used when each piece of the repeating data is stored in XML format as a sibling element.
- Variable Repeater Mode (CSV): used when each piece of data is stored in different columns but with multiple data entries that are also separated by a character.
Can I Import ACF Fields on Their Own?
No. This isn’t possible because all ACF fields are attached to a post type or custom post type. This means that you need to import data into the post type or custom post type where the ACF fields are attached (i.e., the children cannot exist without their parent).
Also, WP All Import and the ACF Import Add-On can only import data into ACF fields that already exist, i.e., it is not possible to create them while importing.
To import or export the ACF Field Groups and their fields, use the options in Custom Fields > Tools.
How to Modify Advanced Custom Fields in Bulk?
- Use WP All Export to create an export file that contains the ACF data that you want to change. WP All Export will record the settings for this export and make these settings available in its Manage Exports interface.
- Open the export file in a spreadsheet tool like Excel, Google Sheets, or Numbers, where you can use bulk actions like search-and-replace, copy-and-paste, etc., to modify the file’s contents.
- Reimport the export file back into WordPress. If you use the Import with WP WP All Import option in the Manage Exports interface, WP All Import will already know how to perform the import.
- Review your imported changes.
Related Information
Import to ACF From CSV, Excel, and XML – Plugin Description
Export Advanced Custom Fields Data From WordPress – Plugin Description
Official Documentation: How to Import Advanced Custom Fields
Official Documentation: How to Export Advanced Custom Fields
How to Export and Import Gravity Forms Entries
How to Import and Export WordPress Users
How to Export and Import WordPress Categories and Tags
How to Import and Export WooCommerce Customers
How to Export and Import WooCommerce Products
How to Export and Import Variable Products in WooCommerce
How to Import and Export WooCommerce Orders
Best WooCommerce Bulk Edit Plugins