Importing a WooCommerce Product Gallery
Importing a WooCommerce product gallery really just means importing multiple images to WooCommerce products or product variations. There is nothing magical about it, but the devil is in the details.
The details in this case involve three key factors:
- Dealing with the different potential sources of product gallery images;
- Importing multiple images per product;
- Importing multiple images per product variation;
We’ll walk you through each of these issues. To follow along, use this online Sandbox and choose the WooCommerce Store option.
To start, we’ll create a new product import and bring you to the point where you have to make decisions about how to handle your images.
Table of Contents
- Step 1: Build a New Product Import
- Step 2: Review the Import Data
- Step 3: Map the Incoming Data to Product Fields
- Dealing with Different Potential Sources of Product Gallery Images
- Importing Multiple Gallery Images per Product
- Importing Multiple Gallery Images to Product Variations
- Completing Your Product Import
- Troubleshooting Product Gallery Imports
- Related Info
- Related Videos
Step 1: Build a New Product Import
Navigate to All Import › New Import in the main WordPress menu, upload your import file, then choose New Items › WooCommerce Products as the import post type.
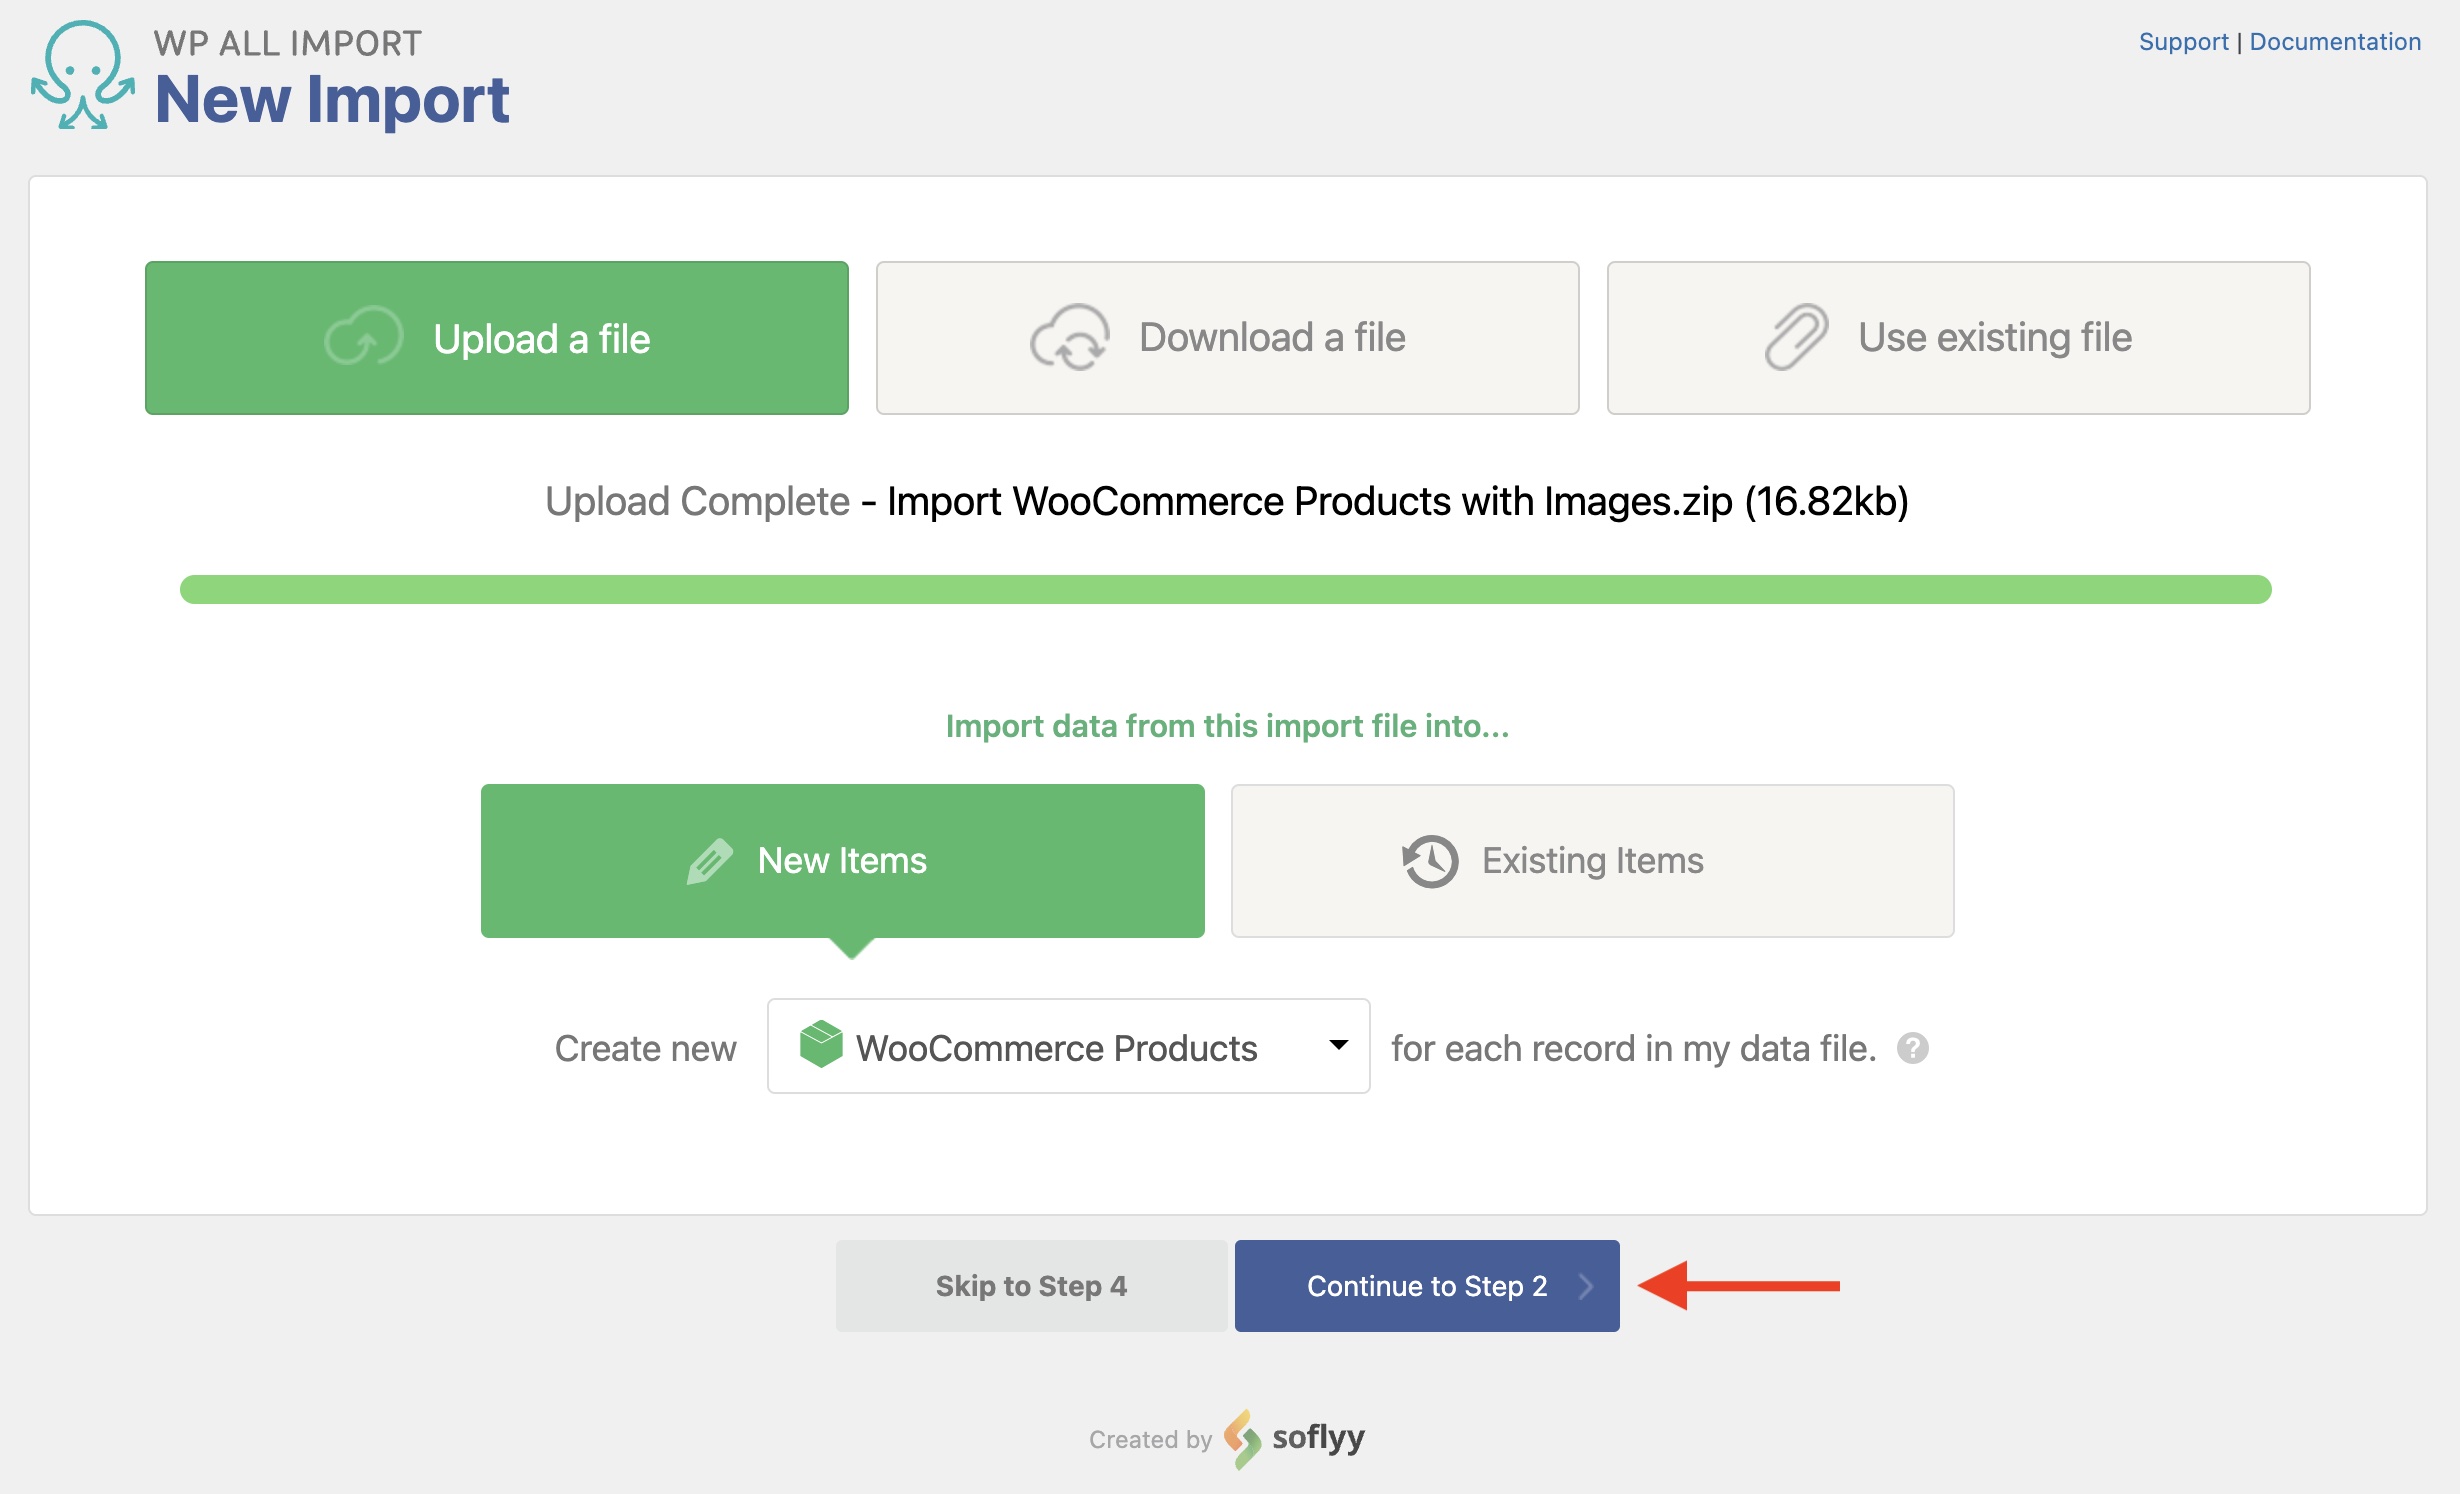
Click the blue Continue to Step 2 at the bottom.
Step 2: Review the Import Data
The Review Import File screen will appear next. Here, just check to make sure that the data in the import file looks correct.
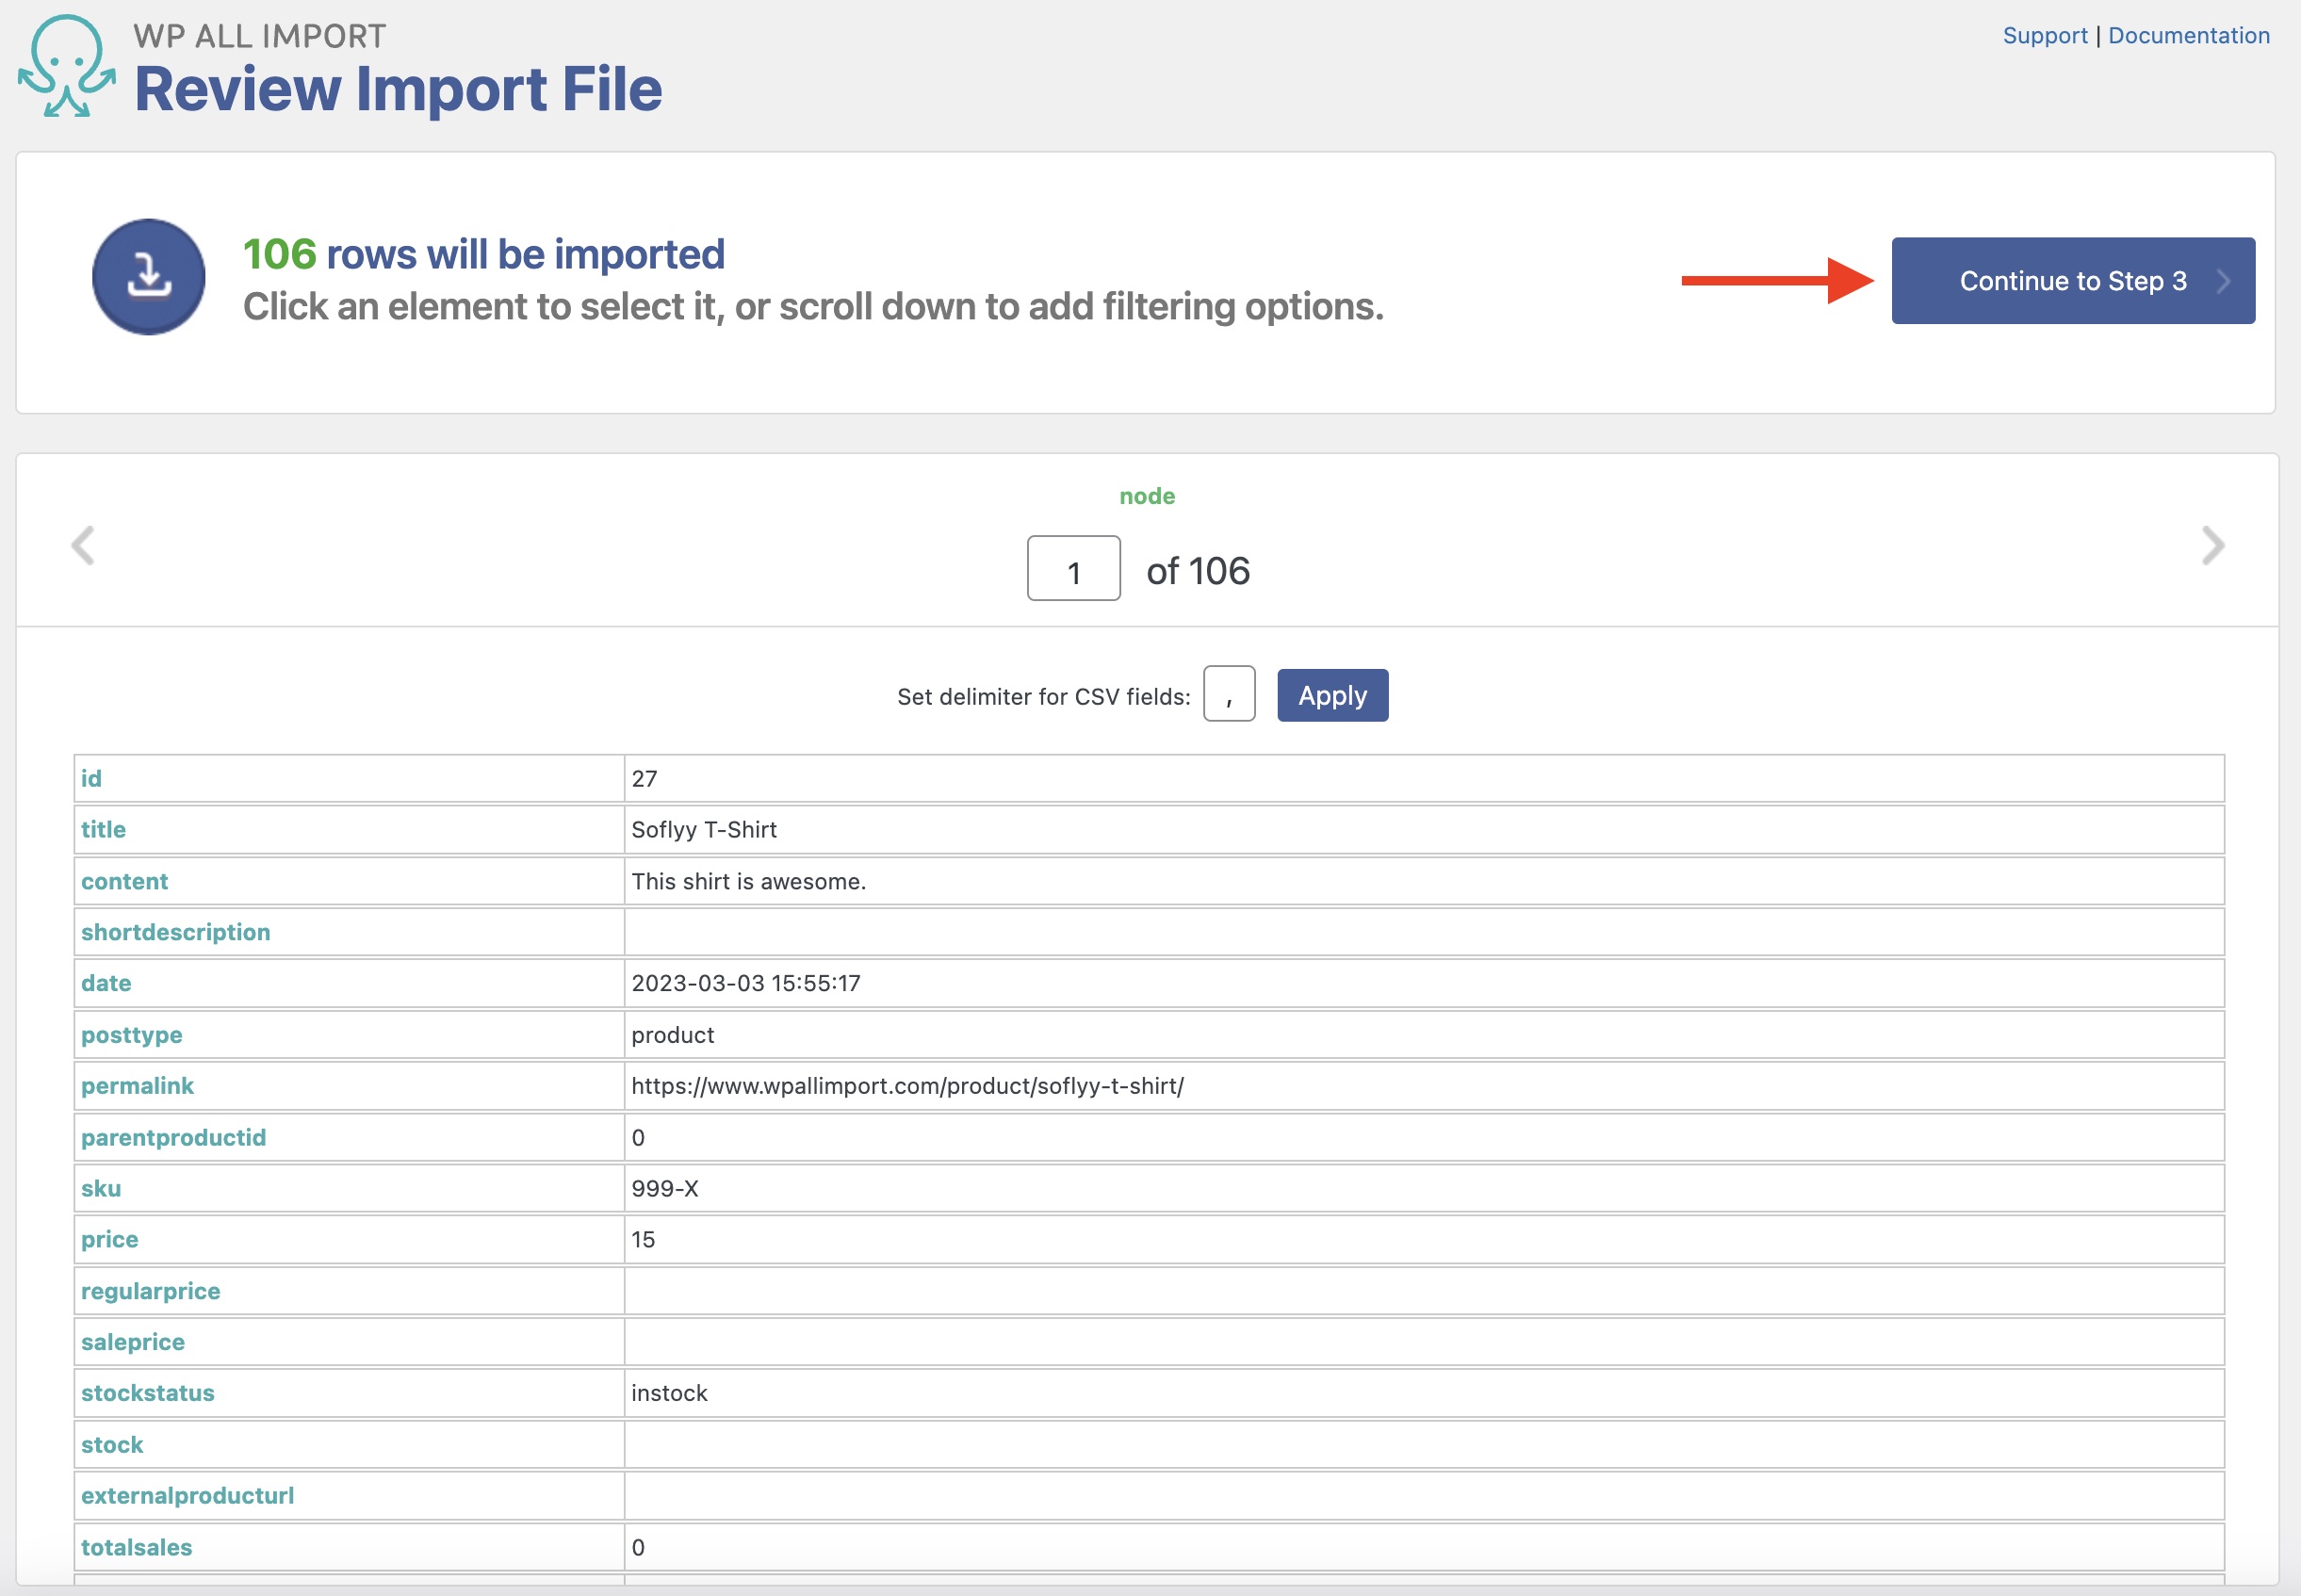
Once you’ve done this, click Continue to Step 3.
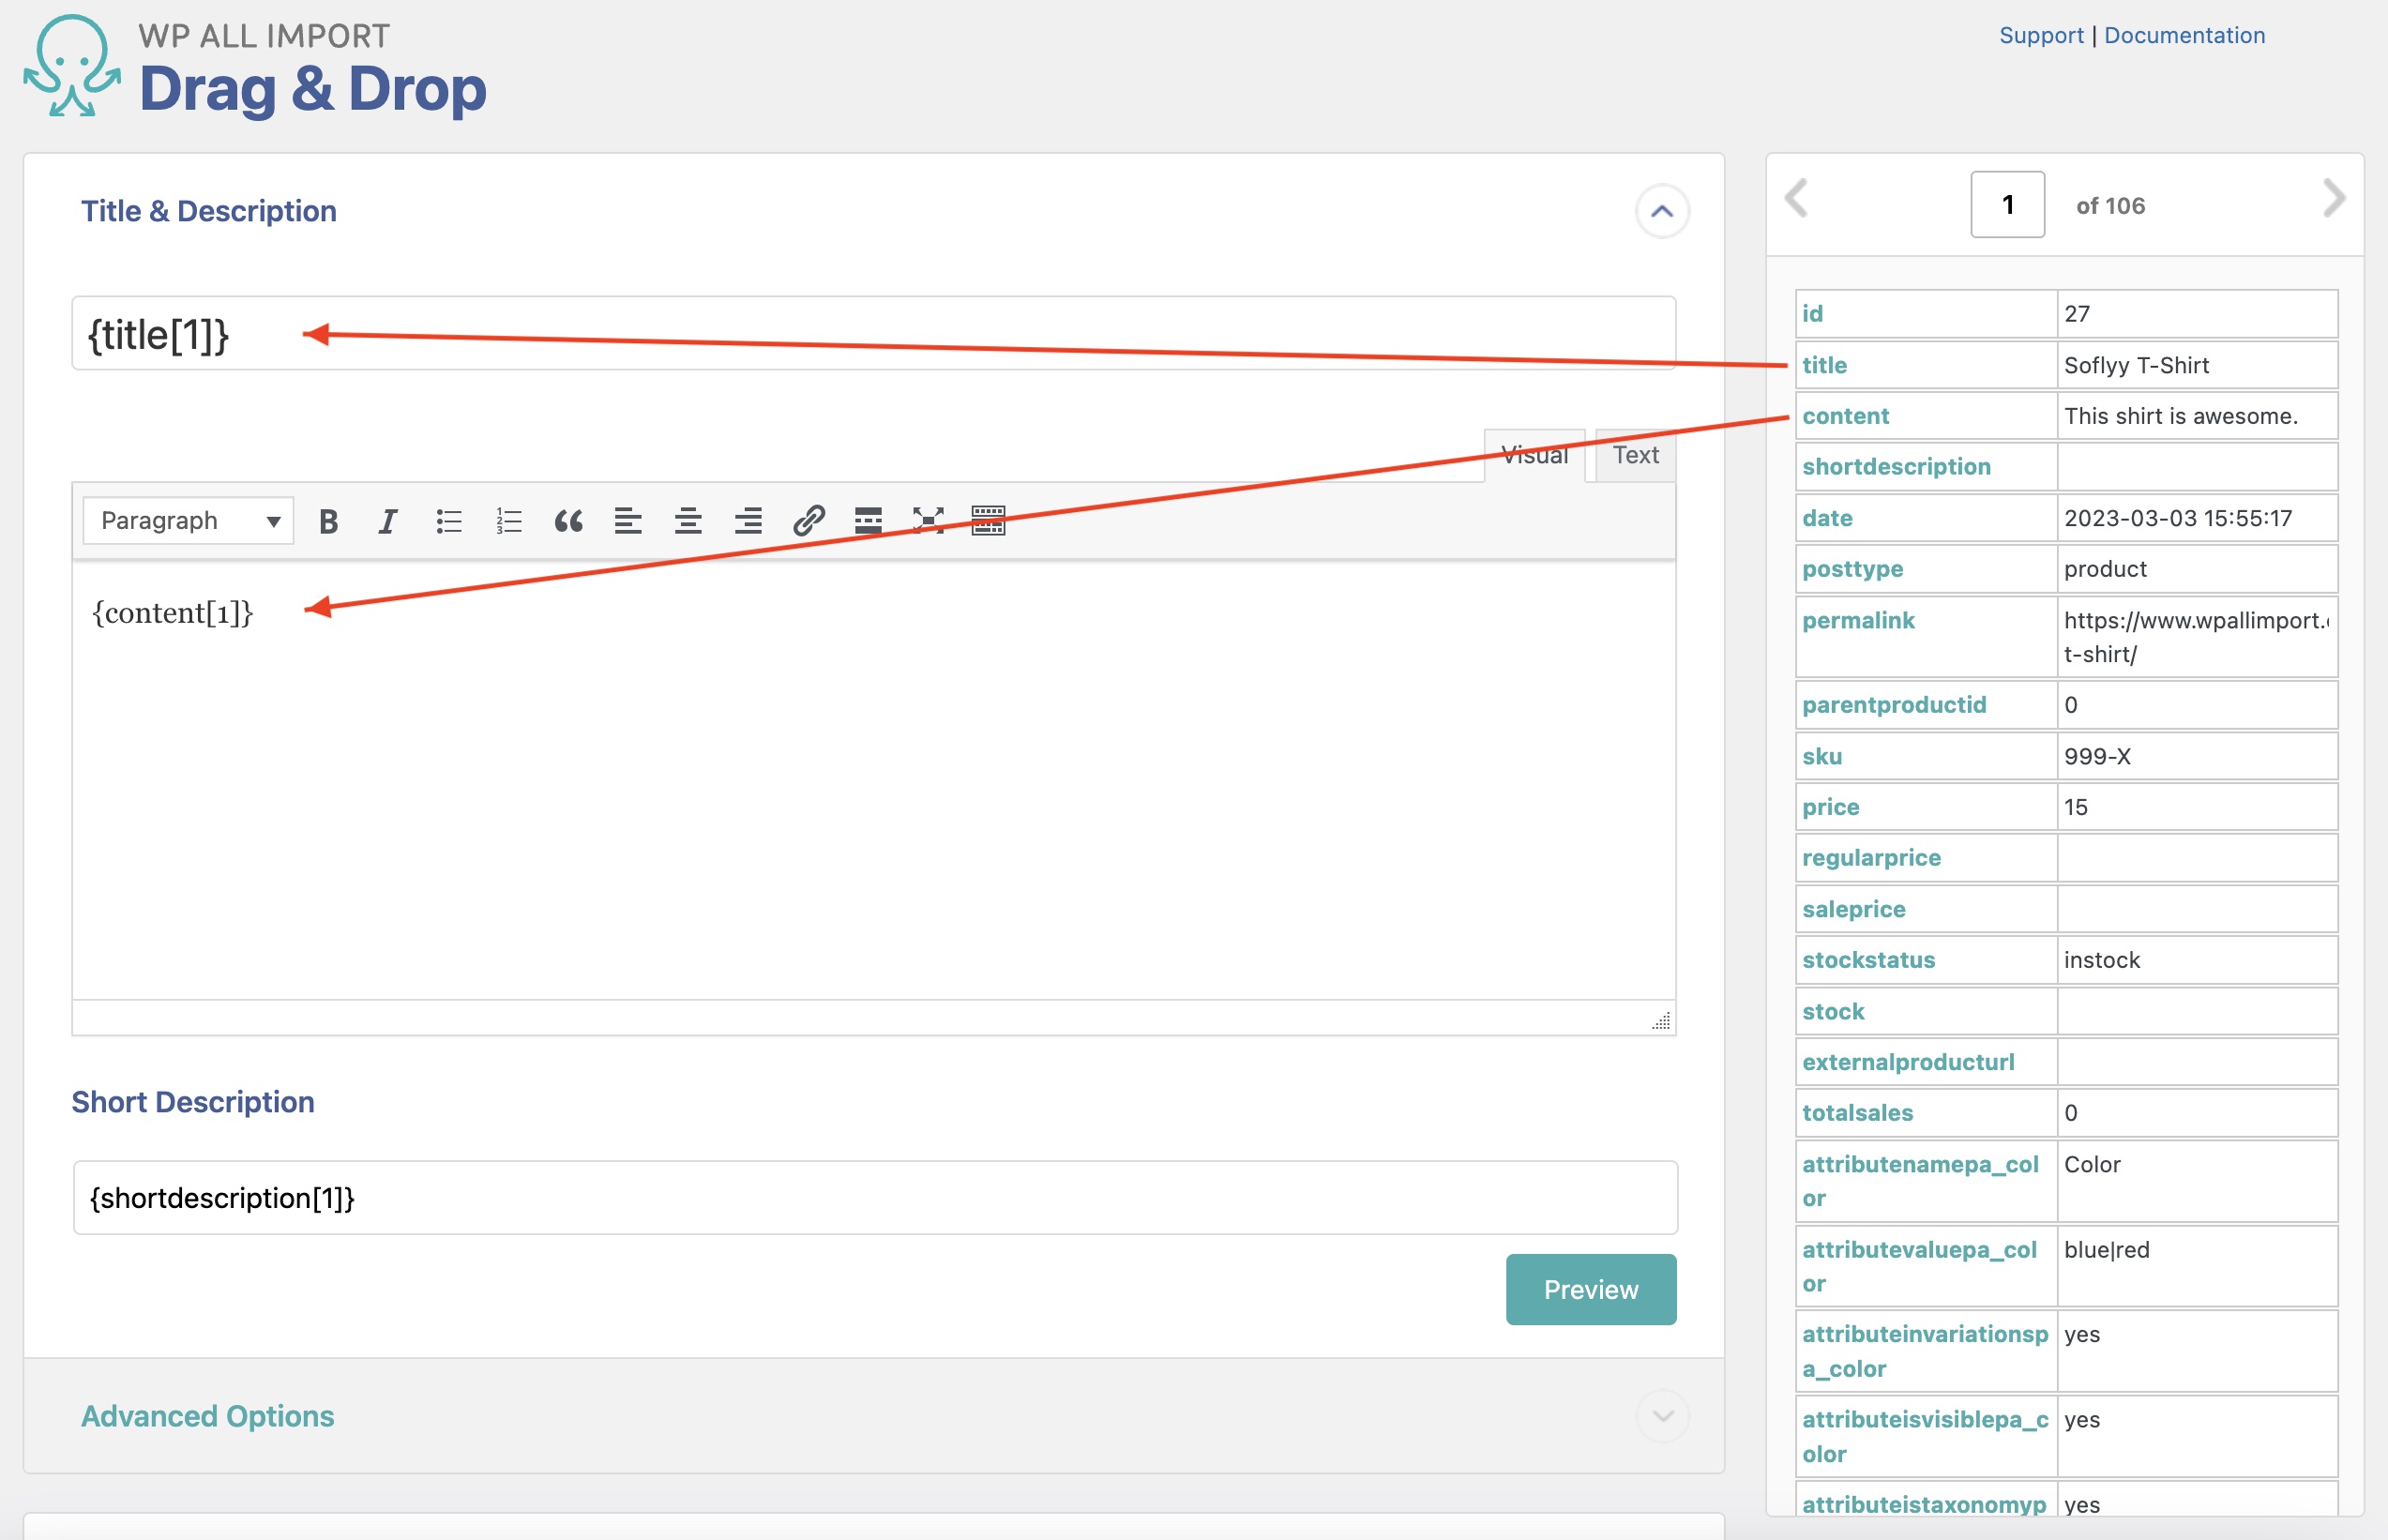
Step 3: Map the Incoming Data to Product Fields
Next up is the Drag & Drop screen, where you map the incoming data to the corresponding WooCommerce fields.
The Title & Description and WooCommerce Add-On Sections
Begin by mapping the incoming title and description data elements to the relevant fields in the Title & Description section.
Expand the WooCommerce Add-On section and map those fields, too. For more information on how to do this, see WooCommerce Add-On Section.
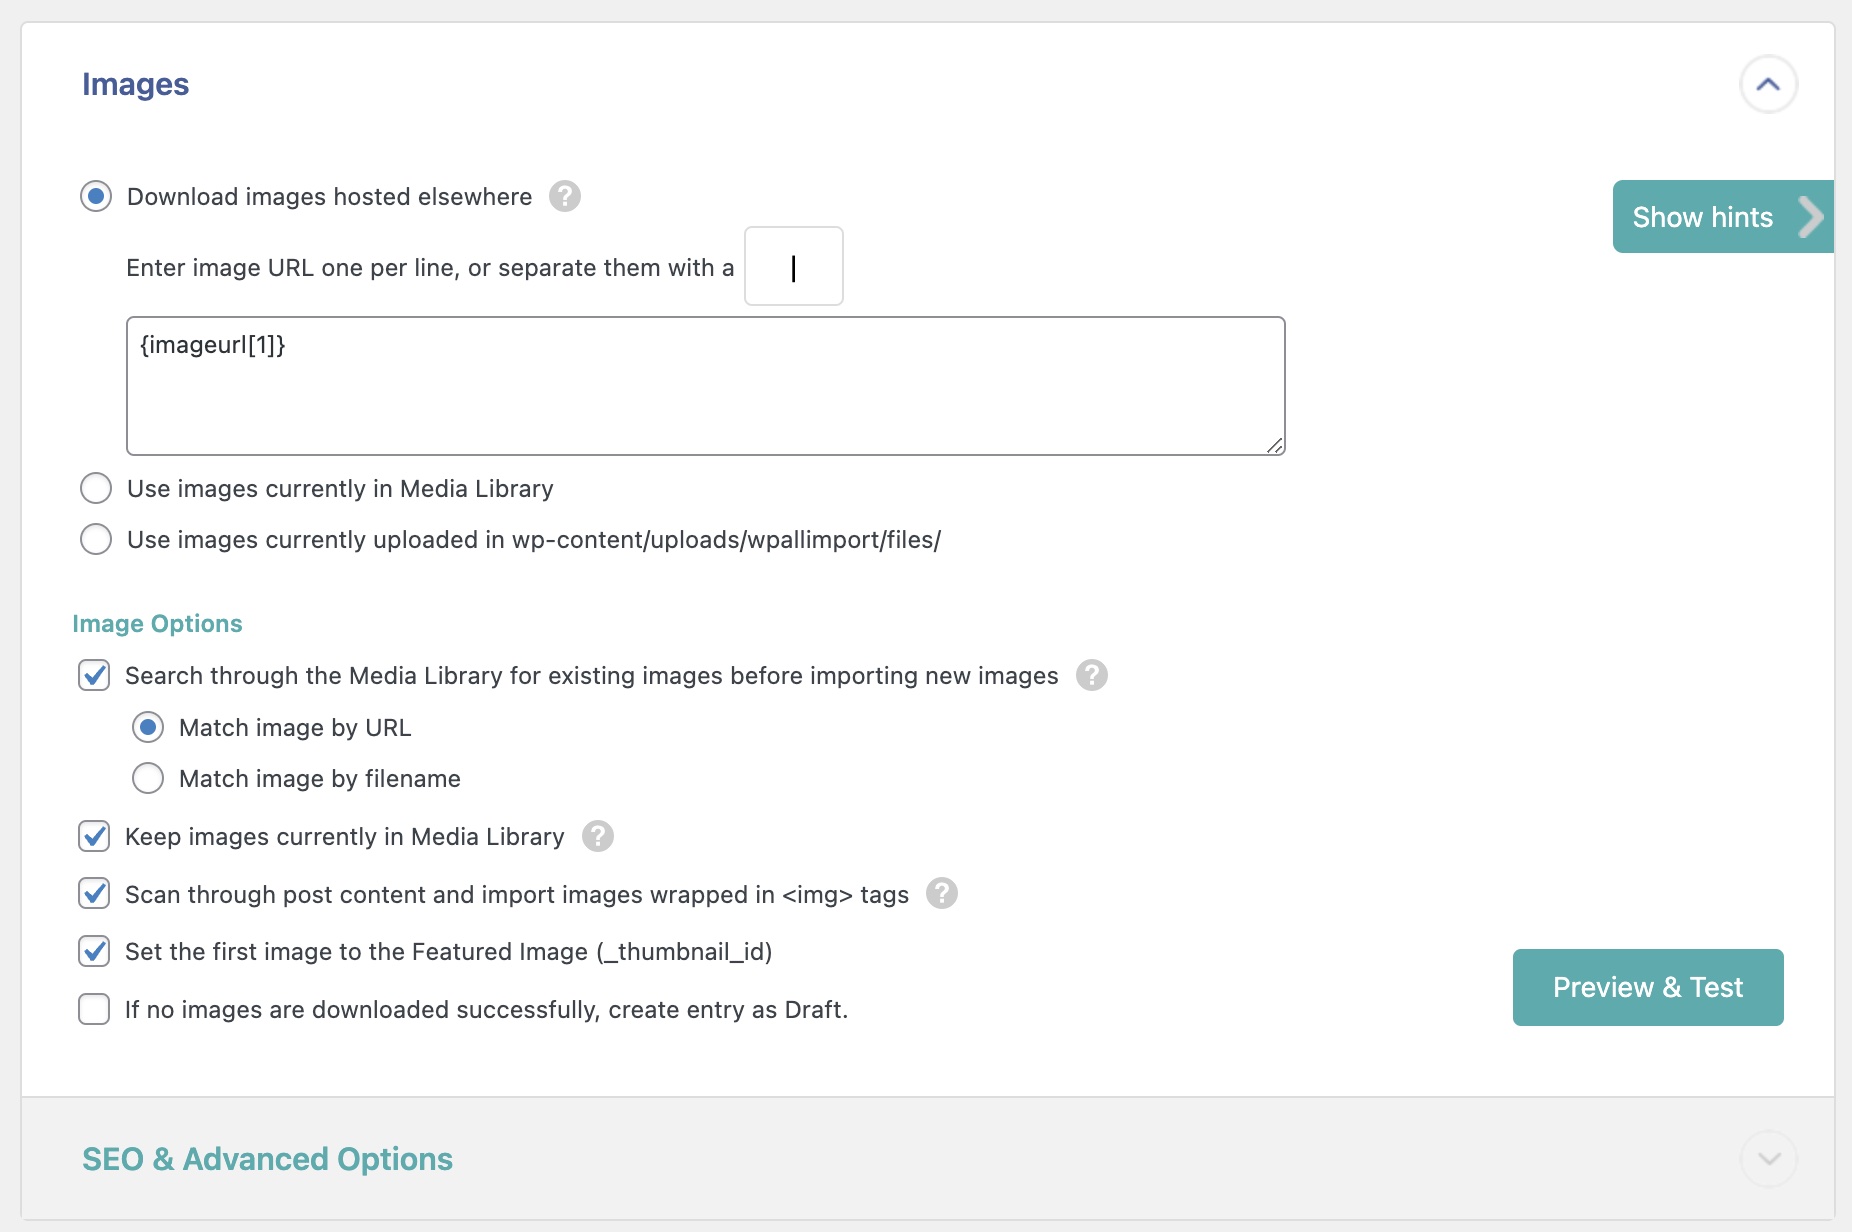
In this article, we’re going to focus on the Images section, where you specify how to import your product images.
Let’s now examine the three key issues described at the beginning of this article.
Dealing with Different Potential Sources of Product Gallery Images
There are five potential types of sources for images. The first three can be addressed using the options at the top of the preceding image:
- Download images hosted elsewhere. This option lets you provide image URLs using either the HTTP or HTTPS protocol. You typically do this by dragging and dropping an incoming data element that contains the URLs. The images are then added to both the Media Library and the associated products.
- Use images currently in Media Library. Using this option, you can import image file names instead of URLs. The file names are then matched to the file names of images already stored in the Media Library, and the matched images are then assigned to the products.
- Use images currently uploaded in wp-content/uploads/wpallimport/files/. This option lets you load your images into the /wp-content/uploads/wpallimport/files/ folder on your server in advance of your import. The file names in the incoming data element are then matched to the file names in /wp-content/uploads/wpallimport/files/ folder. If a match is found, the image is loaded into the Media Library and then assigned to the product.
There are also two other options. One is contained in the Image Options section of the preceding image:
- Scan through post content and import images wrapped in <img> tags. This option does exactly what it says, with images typically defined by a URL.
Finally, you can use custom code to import images stored on an FTP or FTP site. See Workaround for Importing from FTP for more details.
Importing Multiple Gallery Images Per Product
In the preceding image, there is an edit box associated with the Download images hosted elsewhere option. To import multiple gallery images per product using this option, you have two choices. If the incoming data has more than one image per product but stores those images in separate data elements, you can include all of those elements in this box:
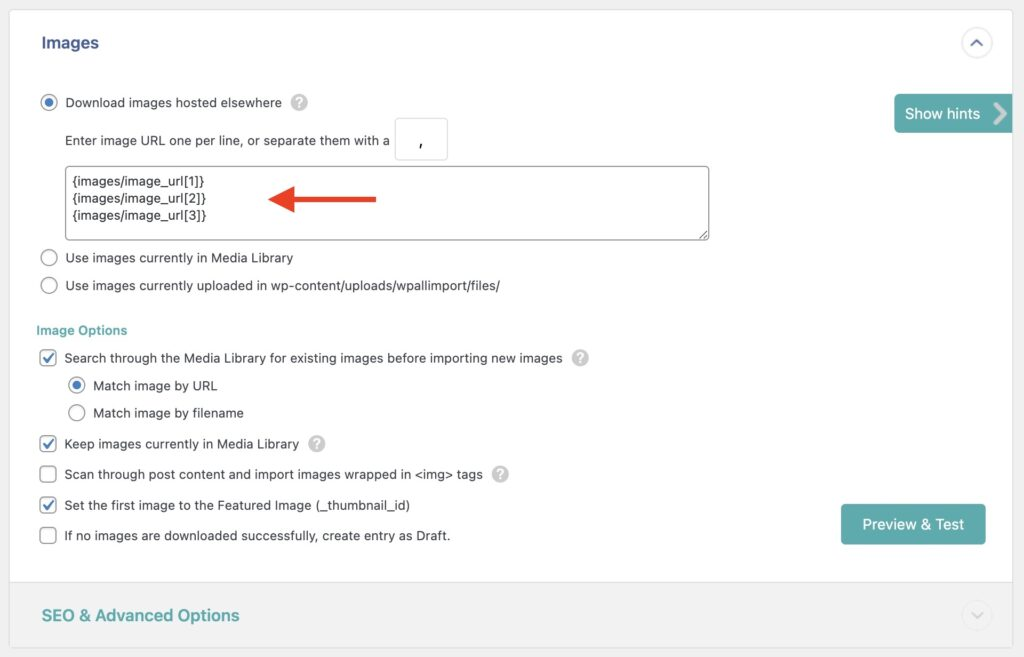
The other possibility is that one incoming data element contains multiple images that are separated by a character. In this case, you just drag that incoming data element into the edit box and specify the image separator in the …or separate them with a field, as follows:

In this example, all the images are stored in the image_url data element, and the separator character is a comma.
These same mechanisms apply to the Use images currently in Media Library and Use images currently uploaded in wp-content/uploads/wpallimport/files/ options.
By comparison, the Scan through post content and import images wrapped in <img> tags option does not require similar settings because, by default, it imports all the images it finds wrapped in the <img> tags and adds these to both the Media Library and the associated products.
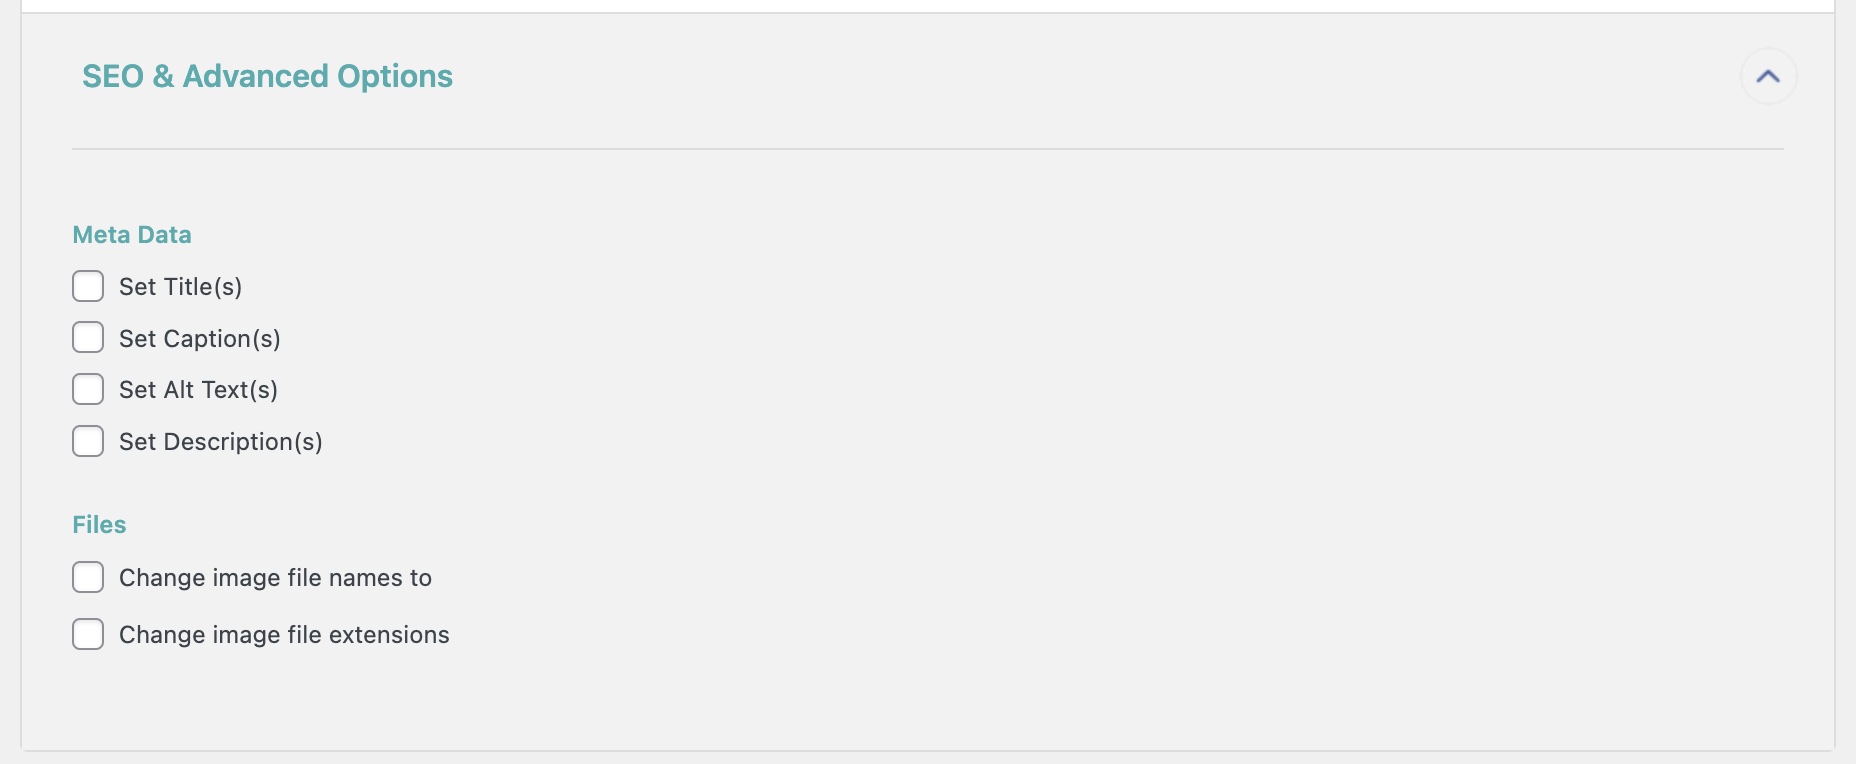
SEO & Advanced Options
Finally, note that the SEO & Advanced Options subsection of the Images section uses the exact same approach regarding multiple images per product:

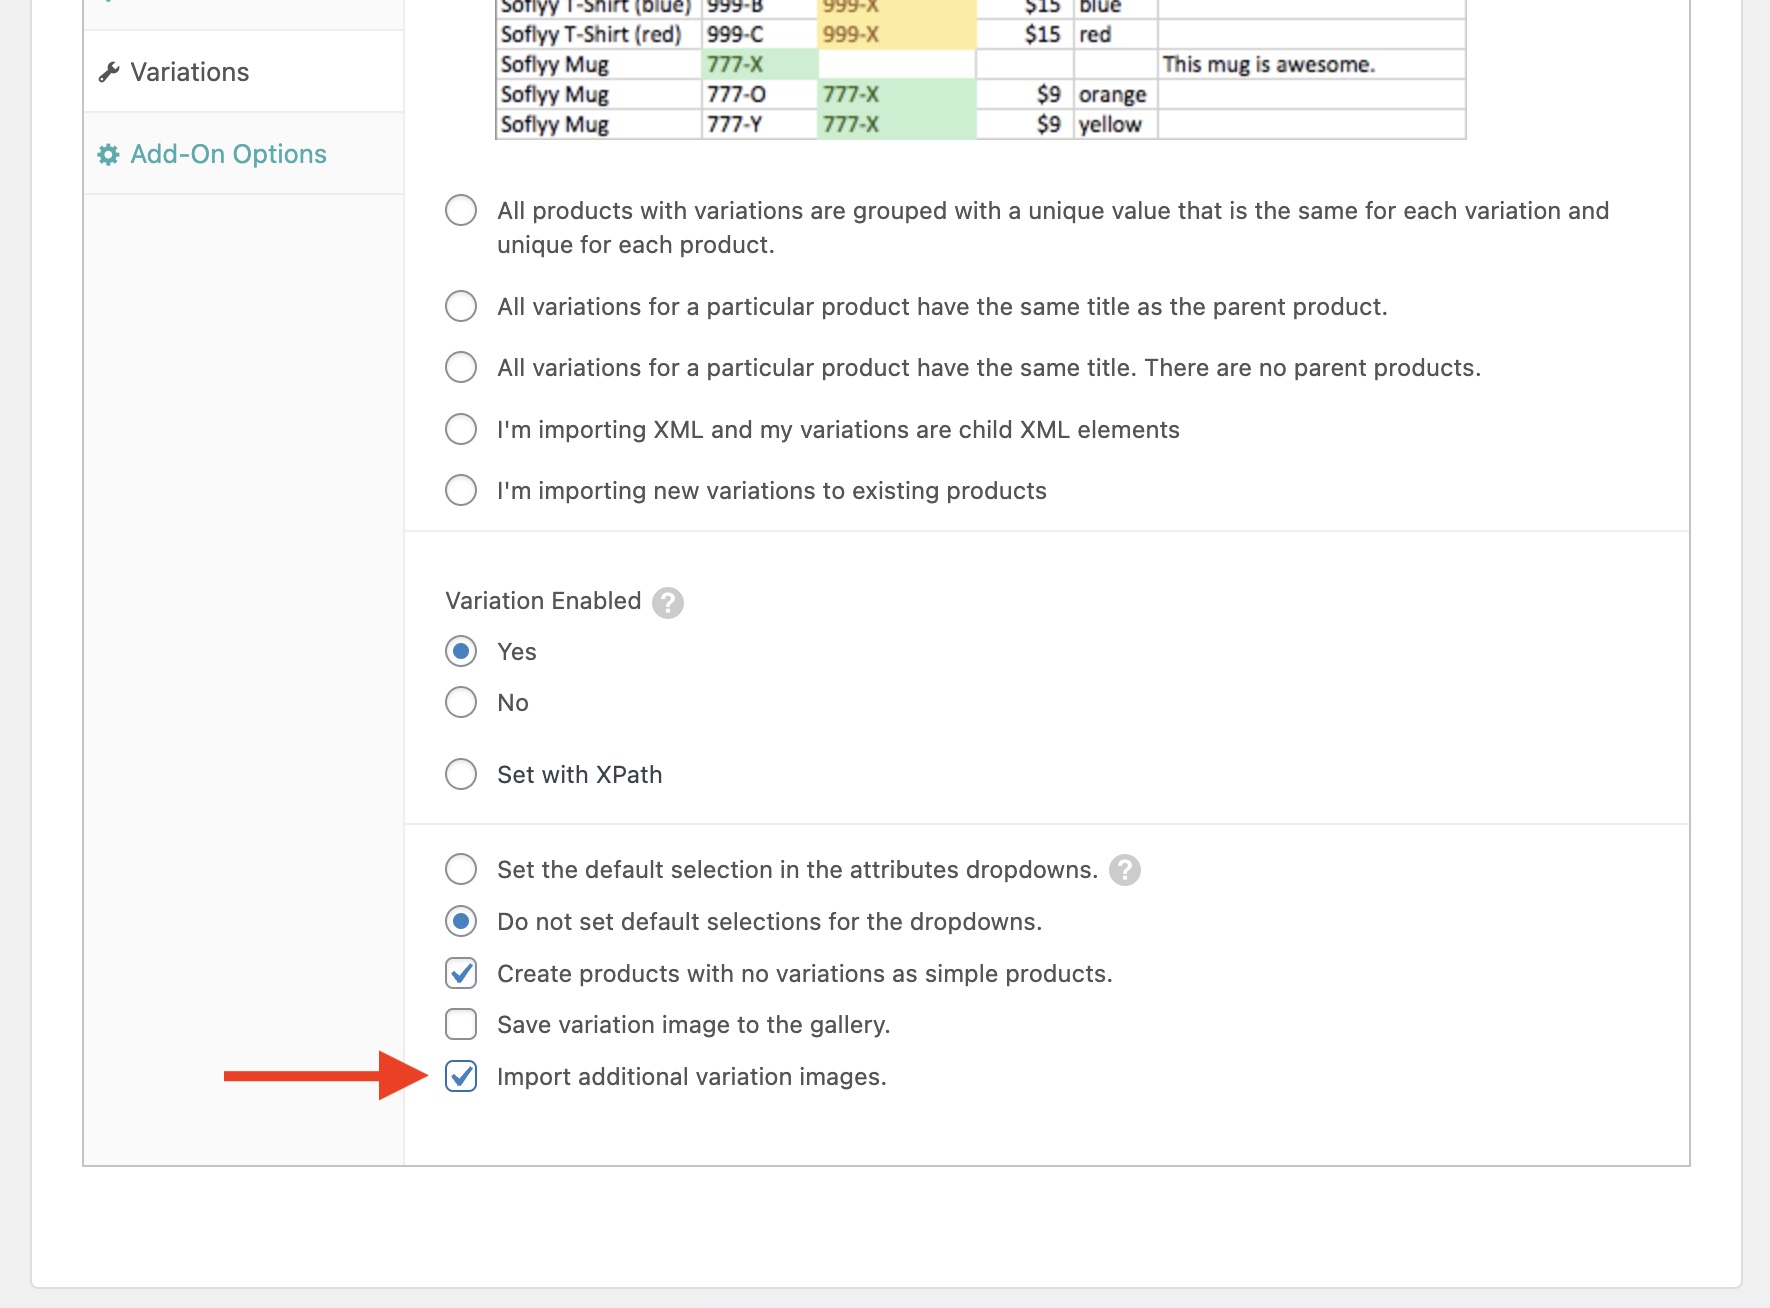
Importing Multiple Gallery Images to Product Variations
By default, variable products only allow one image per variation. However, these two plugins let you modify this behavior.
Once multiple images per variation are permitted, you can then import them by enabling the Import additional variation images option shown at the bottom of this page.
Completing Your Product Import
To complete your product import, click the Continue to Step 4 button at the bottom of the Drag & Drop interface (not shown).
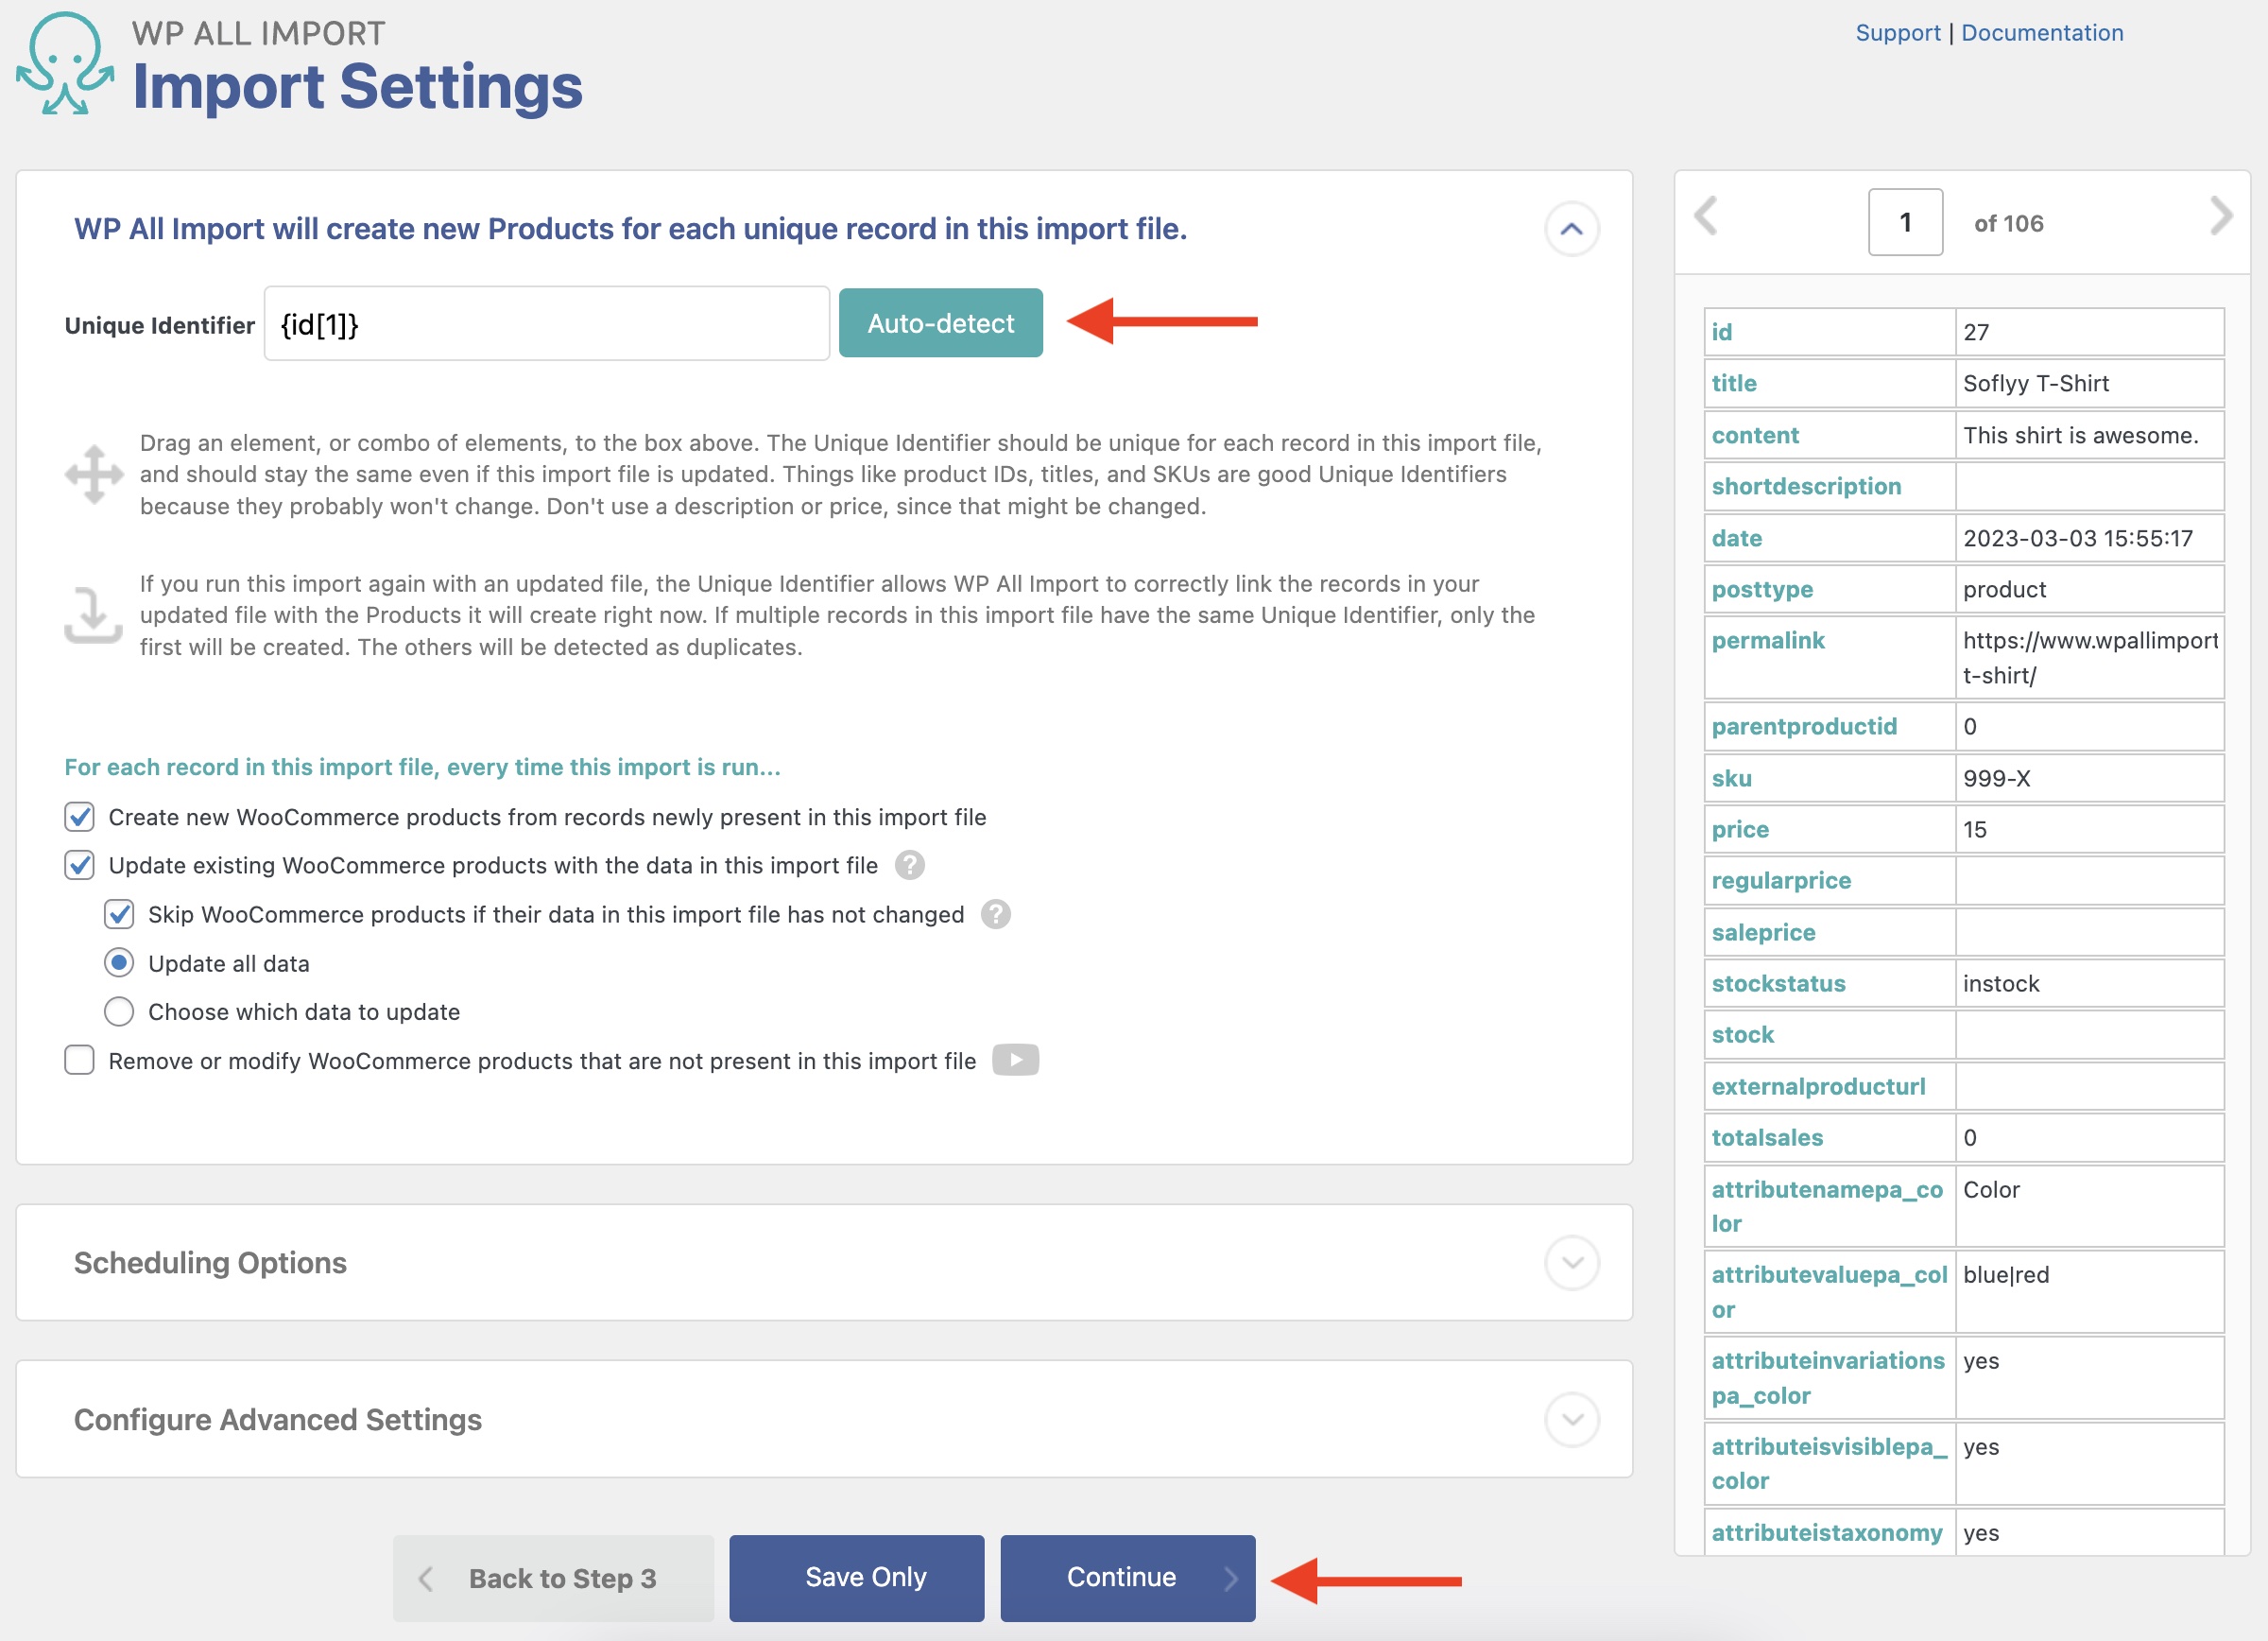
This will bring you to the Import Settings screen. There are many key settings on this page, but for this example, just click on the Auto-detect button to generate a unique identifier automatically, then click Continue at the bottom of the page.
In the Confirm & Run screen, just click Confirm & Run Import.

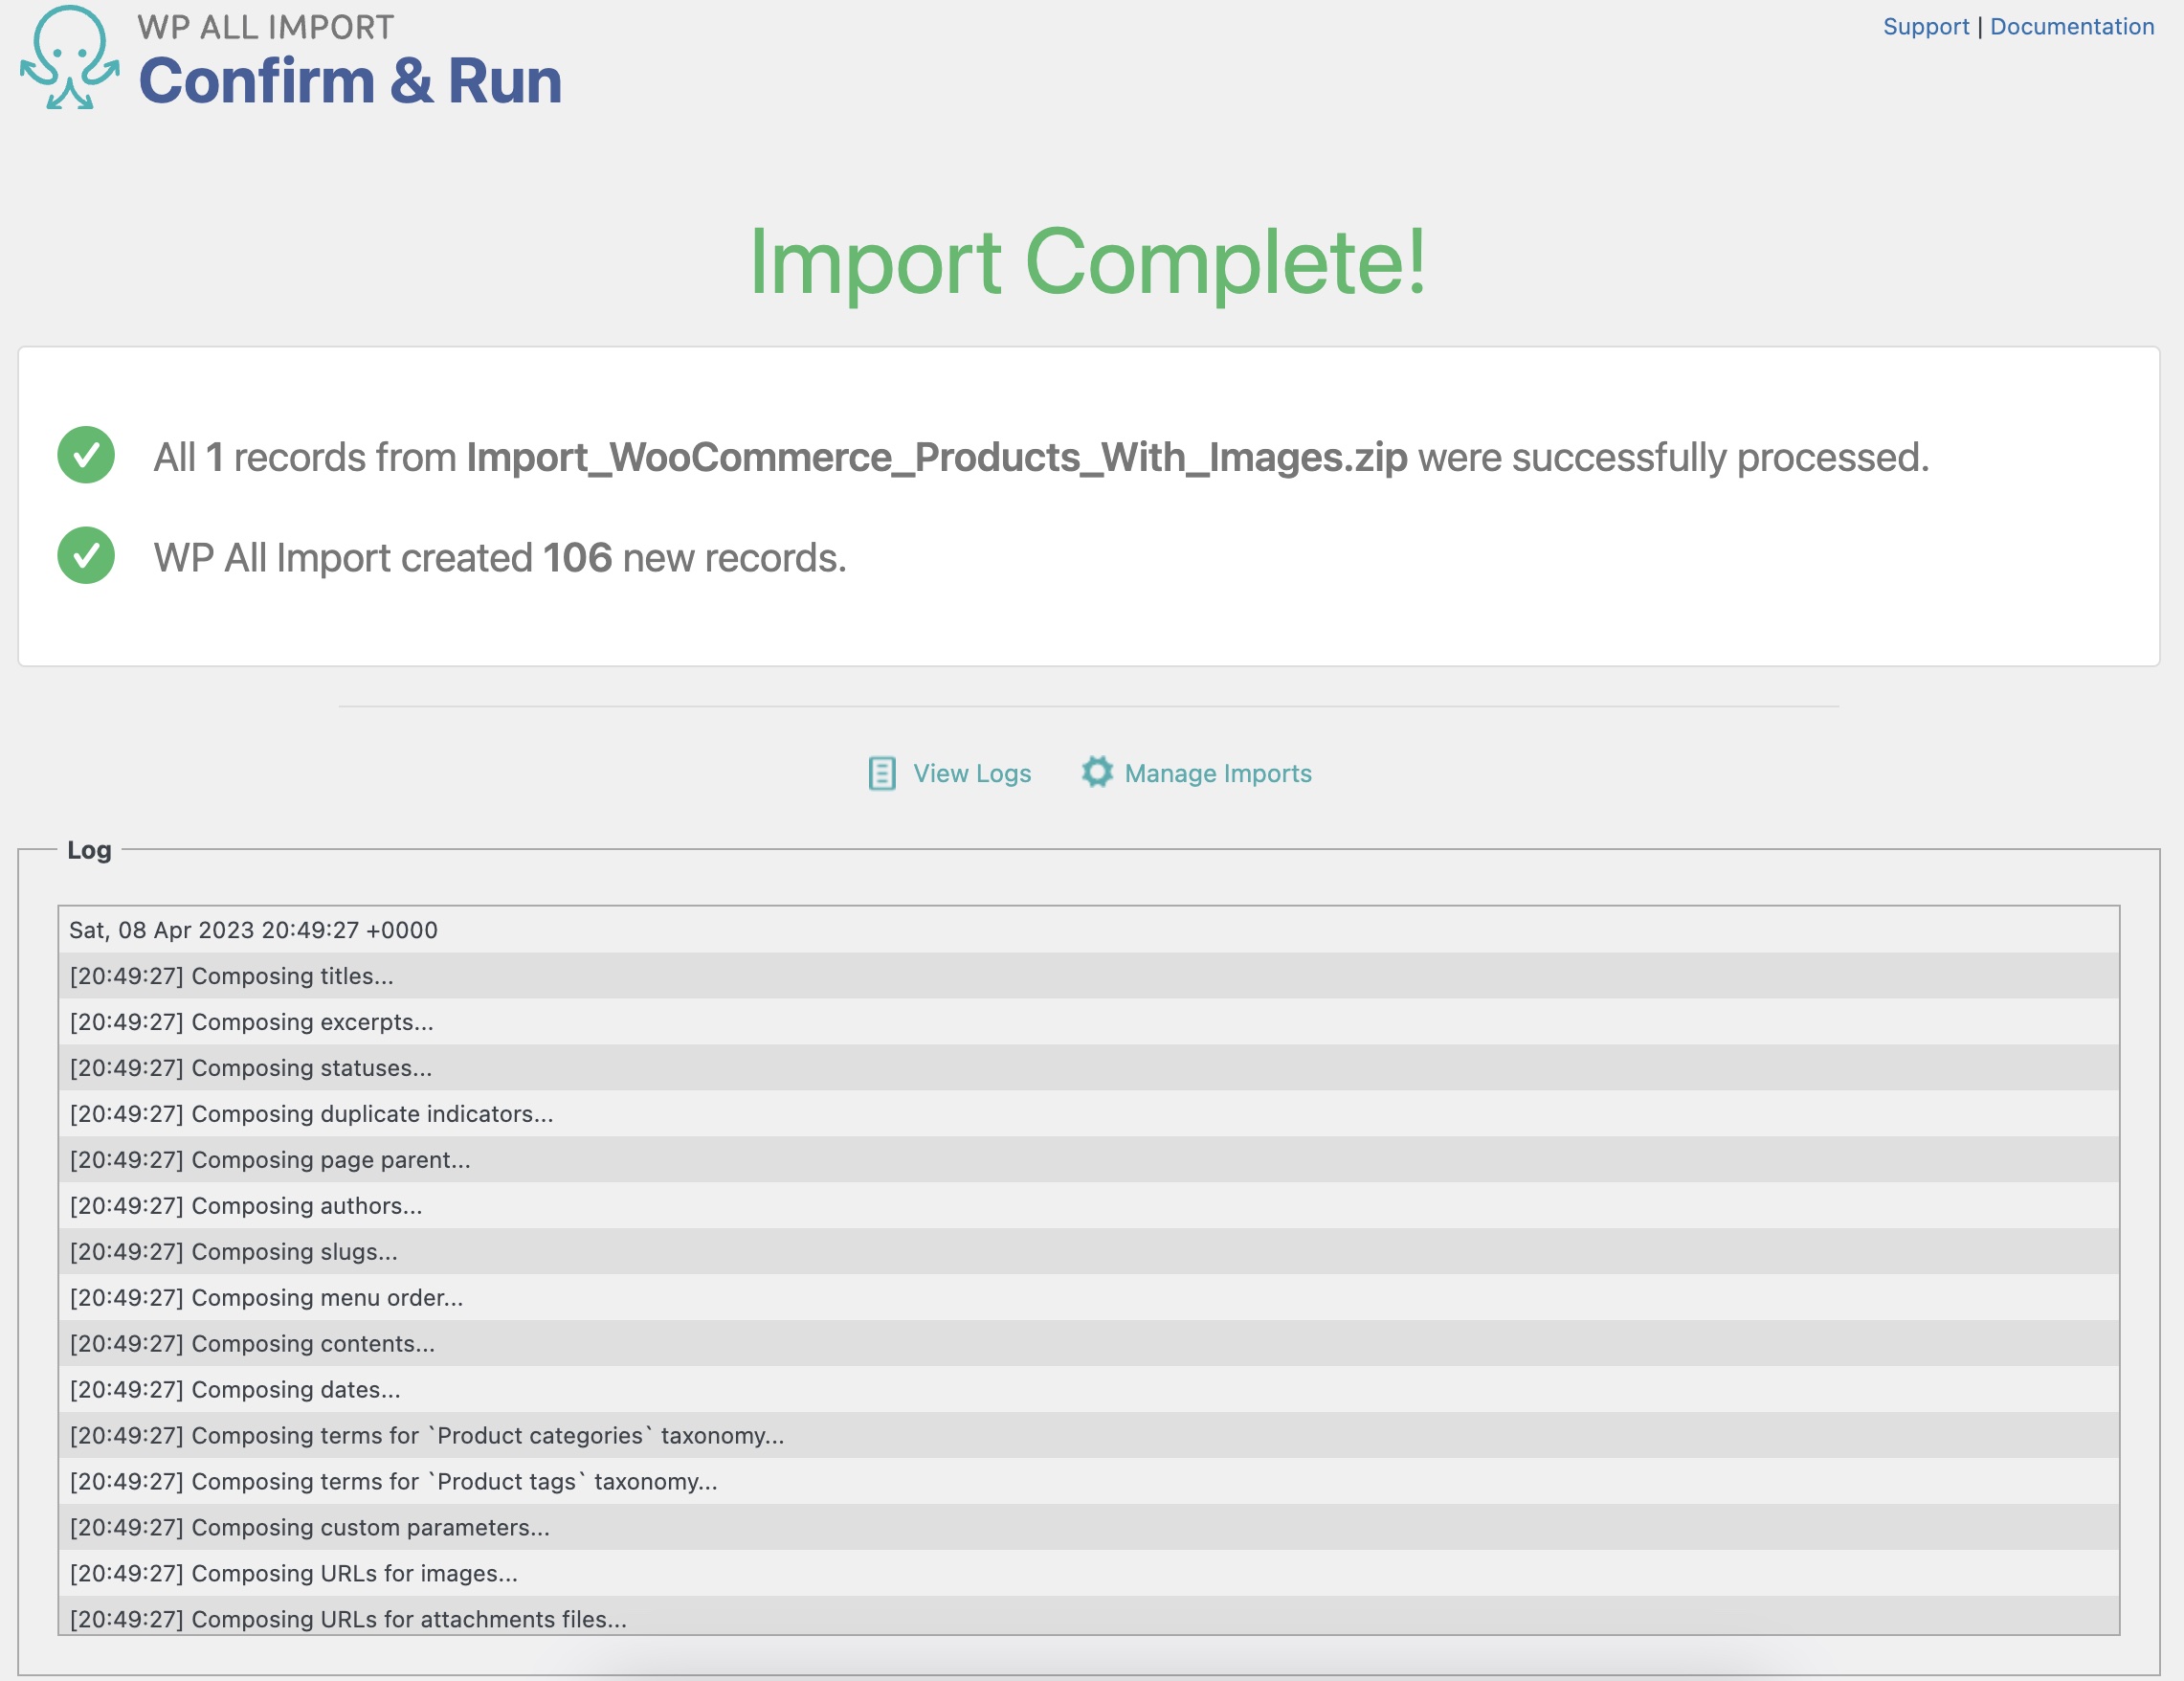
When the import completes, you should see a screen similar to this:
Finally, navigate to Products › All Products to verify that your import worked as expected, especially for the product gallery images!

Troubleshooting Product Gallery Imports
If your product gallery images didn’t import properly, do the following:
- Check the History Log to identify and then fix the error.
- Manually verify access to any image URLs that you are trying to import to ensure that they exist and can be automatically downloaded.
- If you want to avoid errors before they happen, make liberal use of the Preview & Test button in the Images section of the Drag & Drop screen, which allows you to see samples of your images based on the image options you’ve selected.
Importing a WooCommerce Product Gallery – Related Info
- Importing WooCommerce Products with Images
- Importing Images From URLs
- Importing Images From the Media Library
- Importing Images From Your Server
- Variable Number Of Images Per Post
- Image Metadata
- Image Options
Importing a WooCommerce Product Gallery – Related Videos