Importing WooCommerce Products with Images
Importing WooCommerce Products with images can be challenging because the images may be stored in different types of locations. For example, they may already be in your Media Library or at least on your server.
They may be hosted on another server or an FTP/SFTP site, or their location may be wrapped in <img> tags inside product descriptions or other product fields.
Regardless of their location, you may want to scan through the Media Library to see if you already have an image before importing it (to avoid duplicates). You can then decide whether to keep the existing image or replace it.
You may also want to set the metadata for your images or change their file names and extensions.
Finally, if you’re importing variable products and your store configuration lets you attach more than one image to each variation (the WooCommerce default), you’ll need a way to import those extra images.
To do all of this automatically requires a very capable WooCommerce product import plugin.
In this article, we’re going to walk you through importing WooCommerce products with images using WP All Import — the most popular import plugin in the WordPress/WooCommerce ecosystem.
To follow along, you can use this online Sandbox.
Table of Contents
- Step 1: Create a New Product Import
- Step 2: Review the Product Import File
- Step 3: Map the Incoming Data Elements to Product Fields
- Step 4: Configure the Product Import Settings
- Step 5: Run the Import
- Import Multiple Images to Product Variations
- Import Product Images From FTP or SFTP
- Offload Product Images From WordPress to Other Services
- Troubleshoot Product Image Imports
- Related Info
- Related Videos
Step 1: Create a New Product Import
Go to All Import › New Import in the main WordPress menu, upload or choose your import file, then select New Items › WooCommerce Products as the import type.
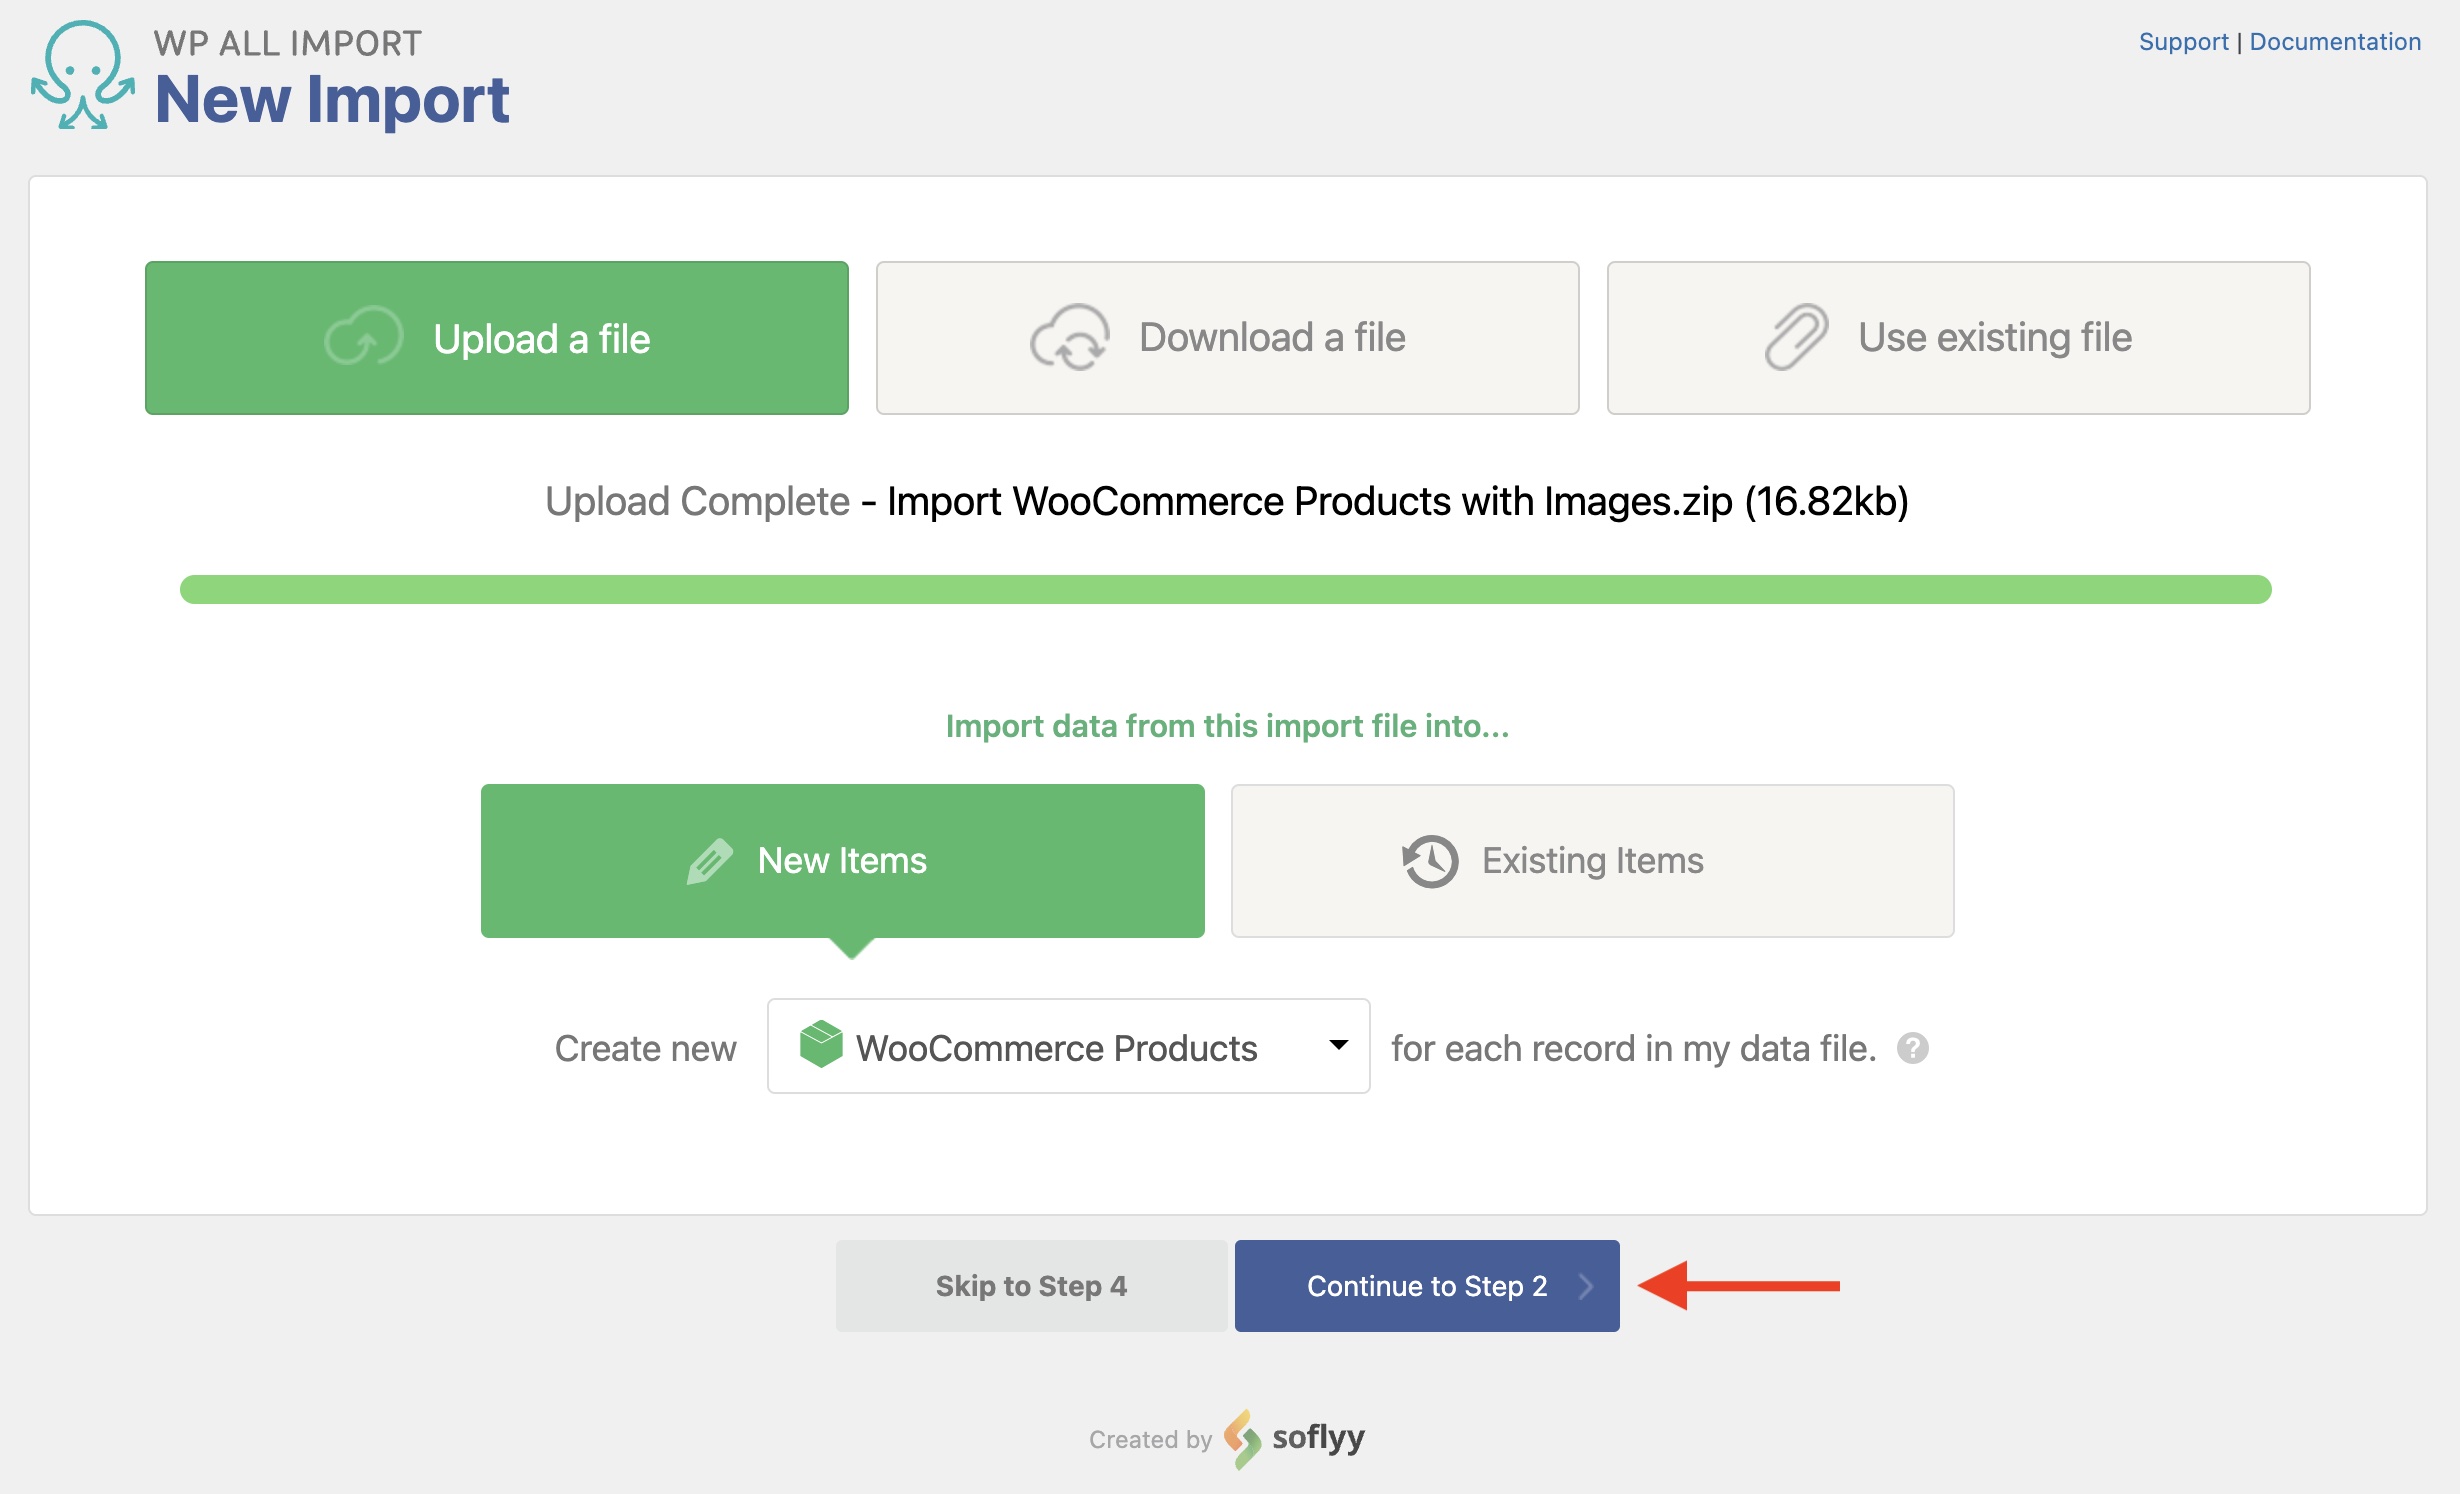
Click Continue to Step 2.
Step 2: Review the Product Import File
Next, you’ll see the product data you are about to import. Check this carefully to make sure that WP All Import has correctly interpreted your import file.
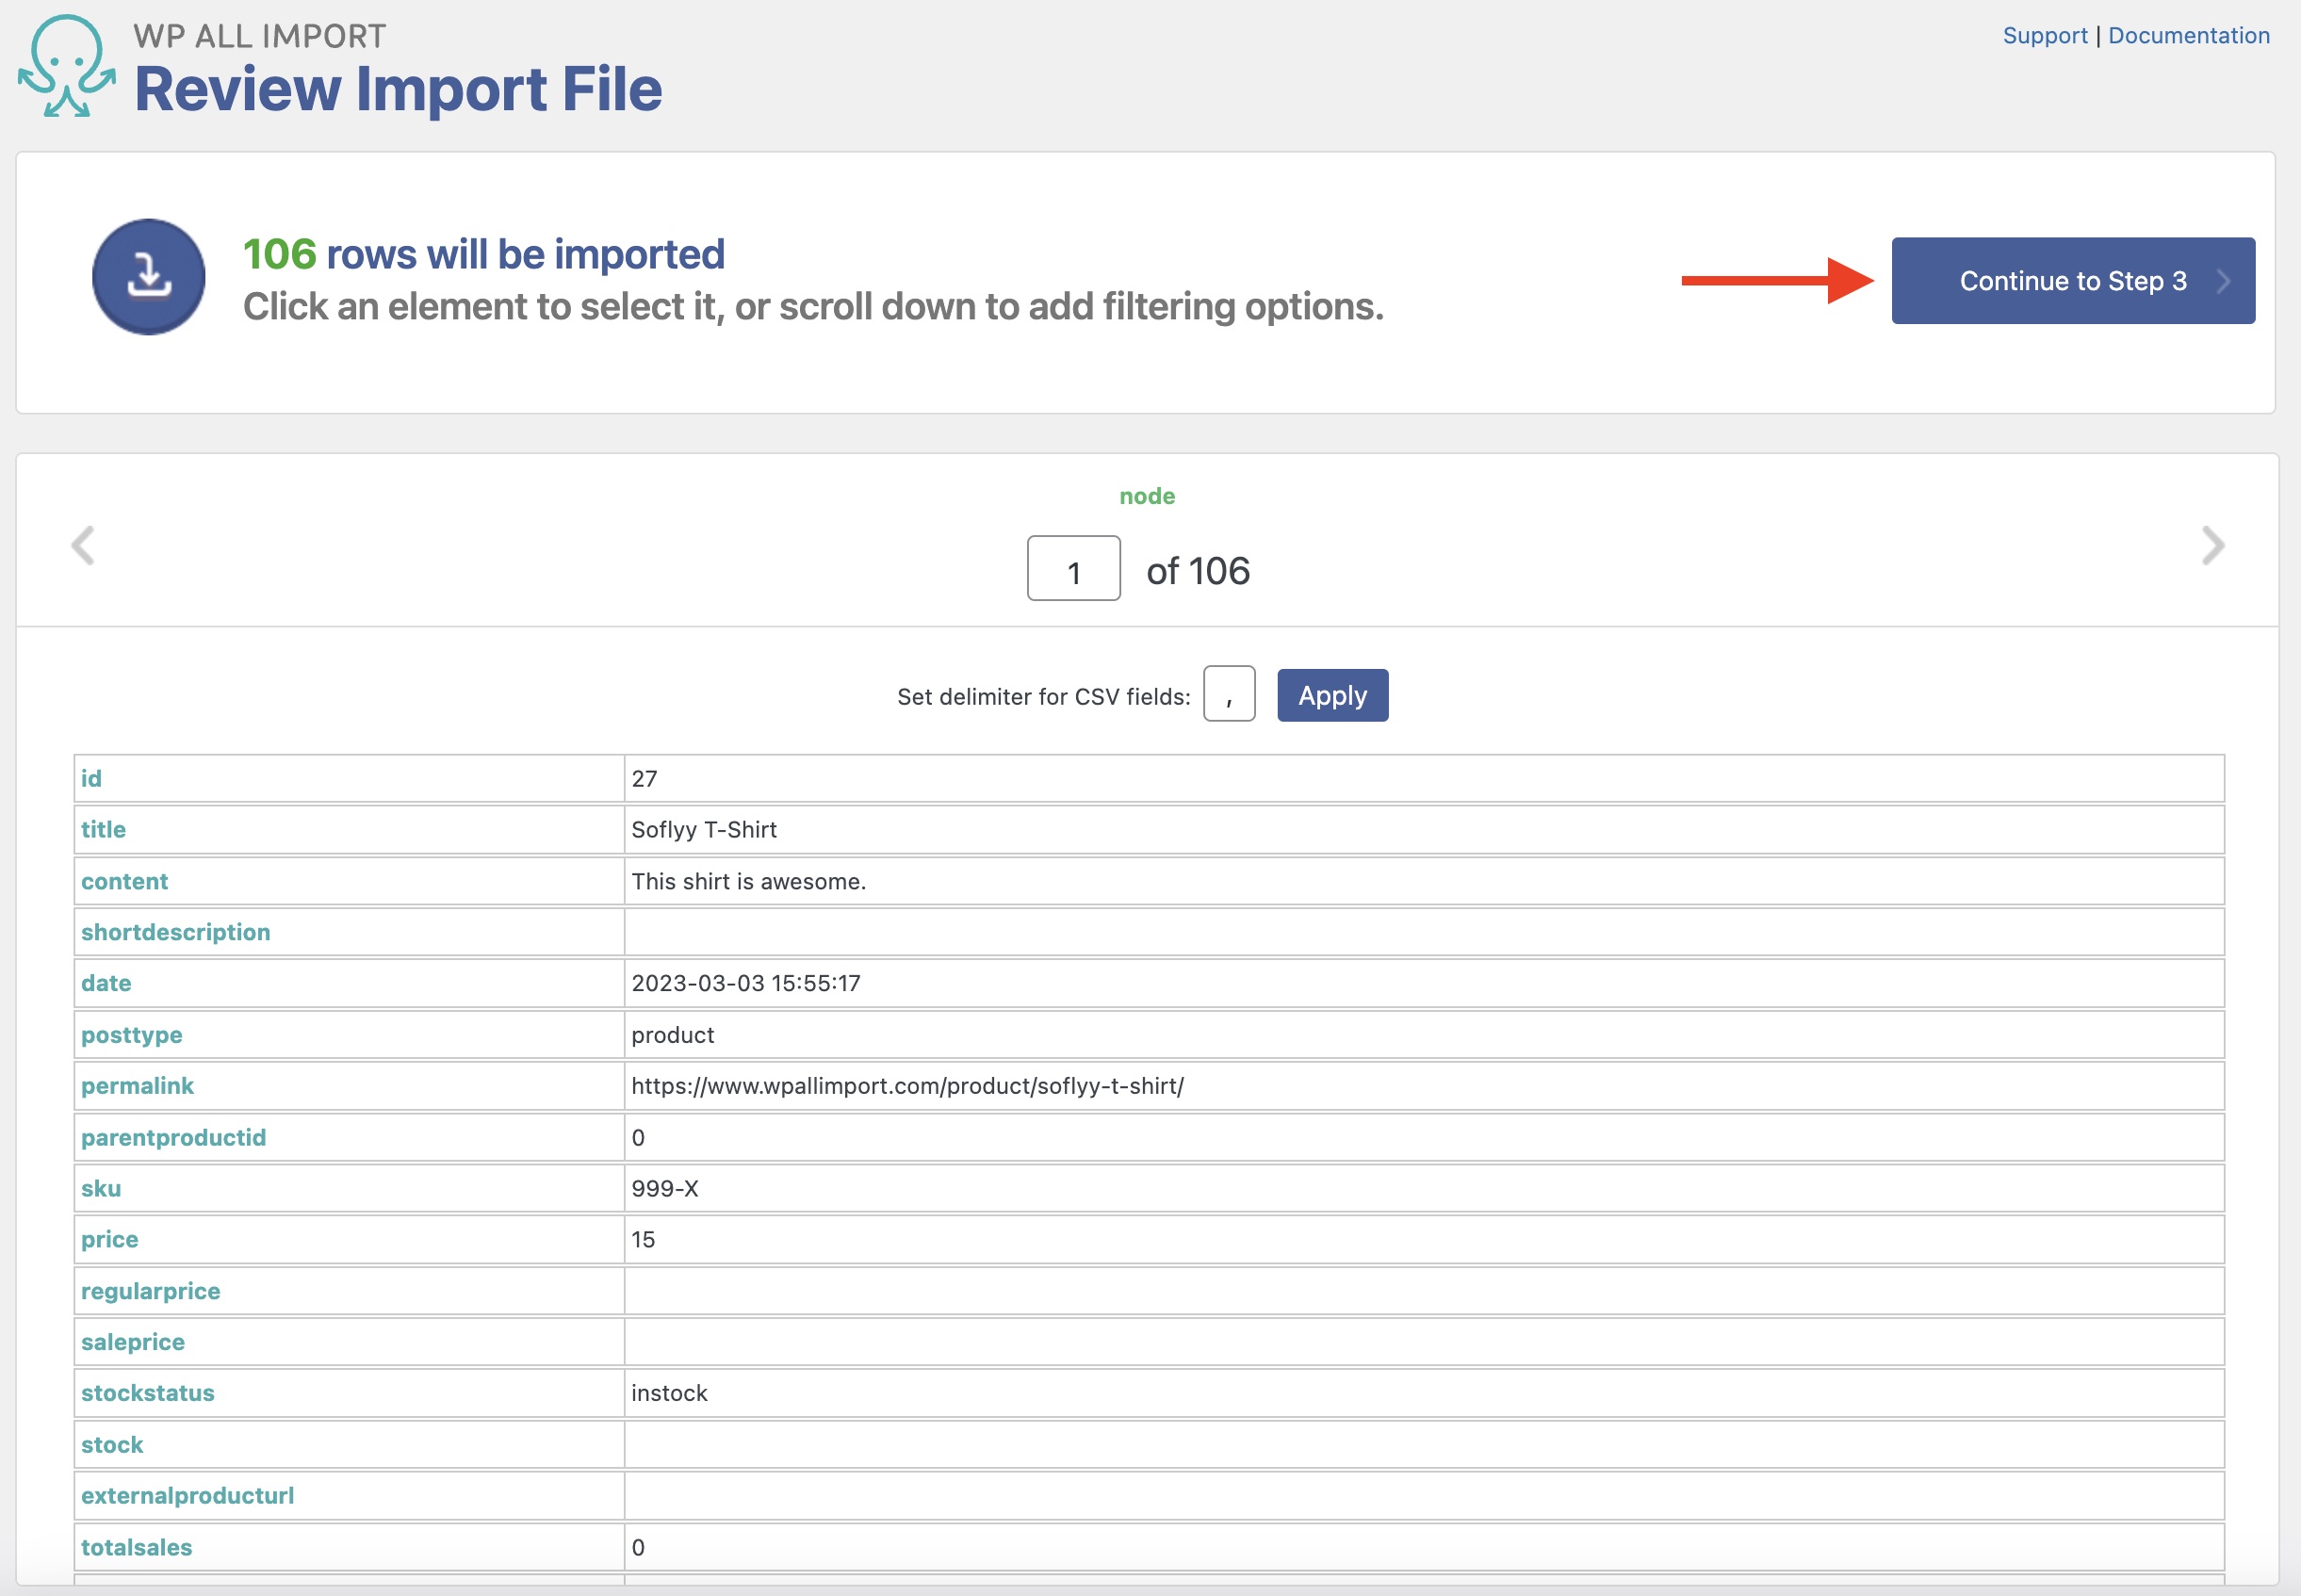
When you’re satisfied, click Continue to Step 3.
Step 3: Map the Incoming Data Elements to Product Fields
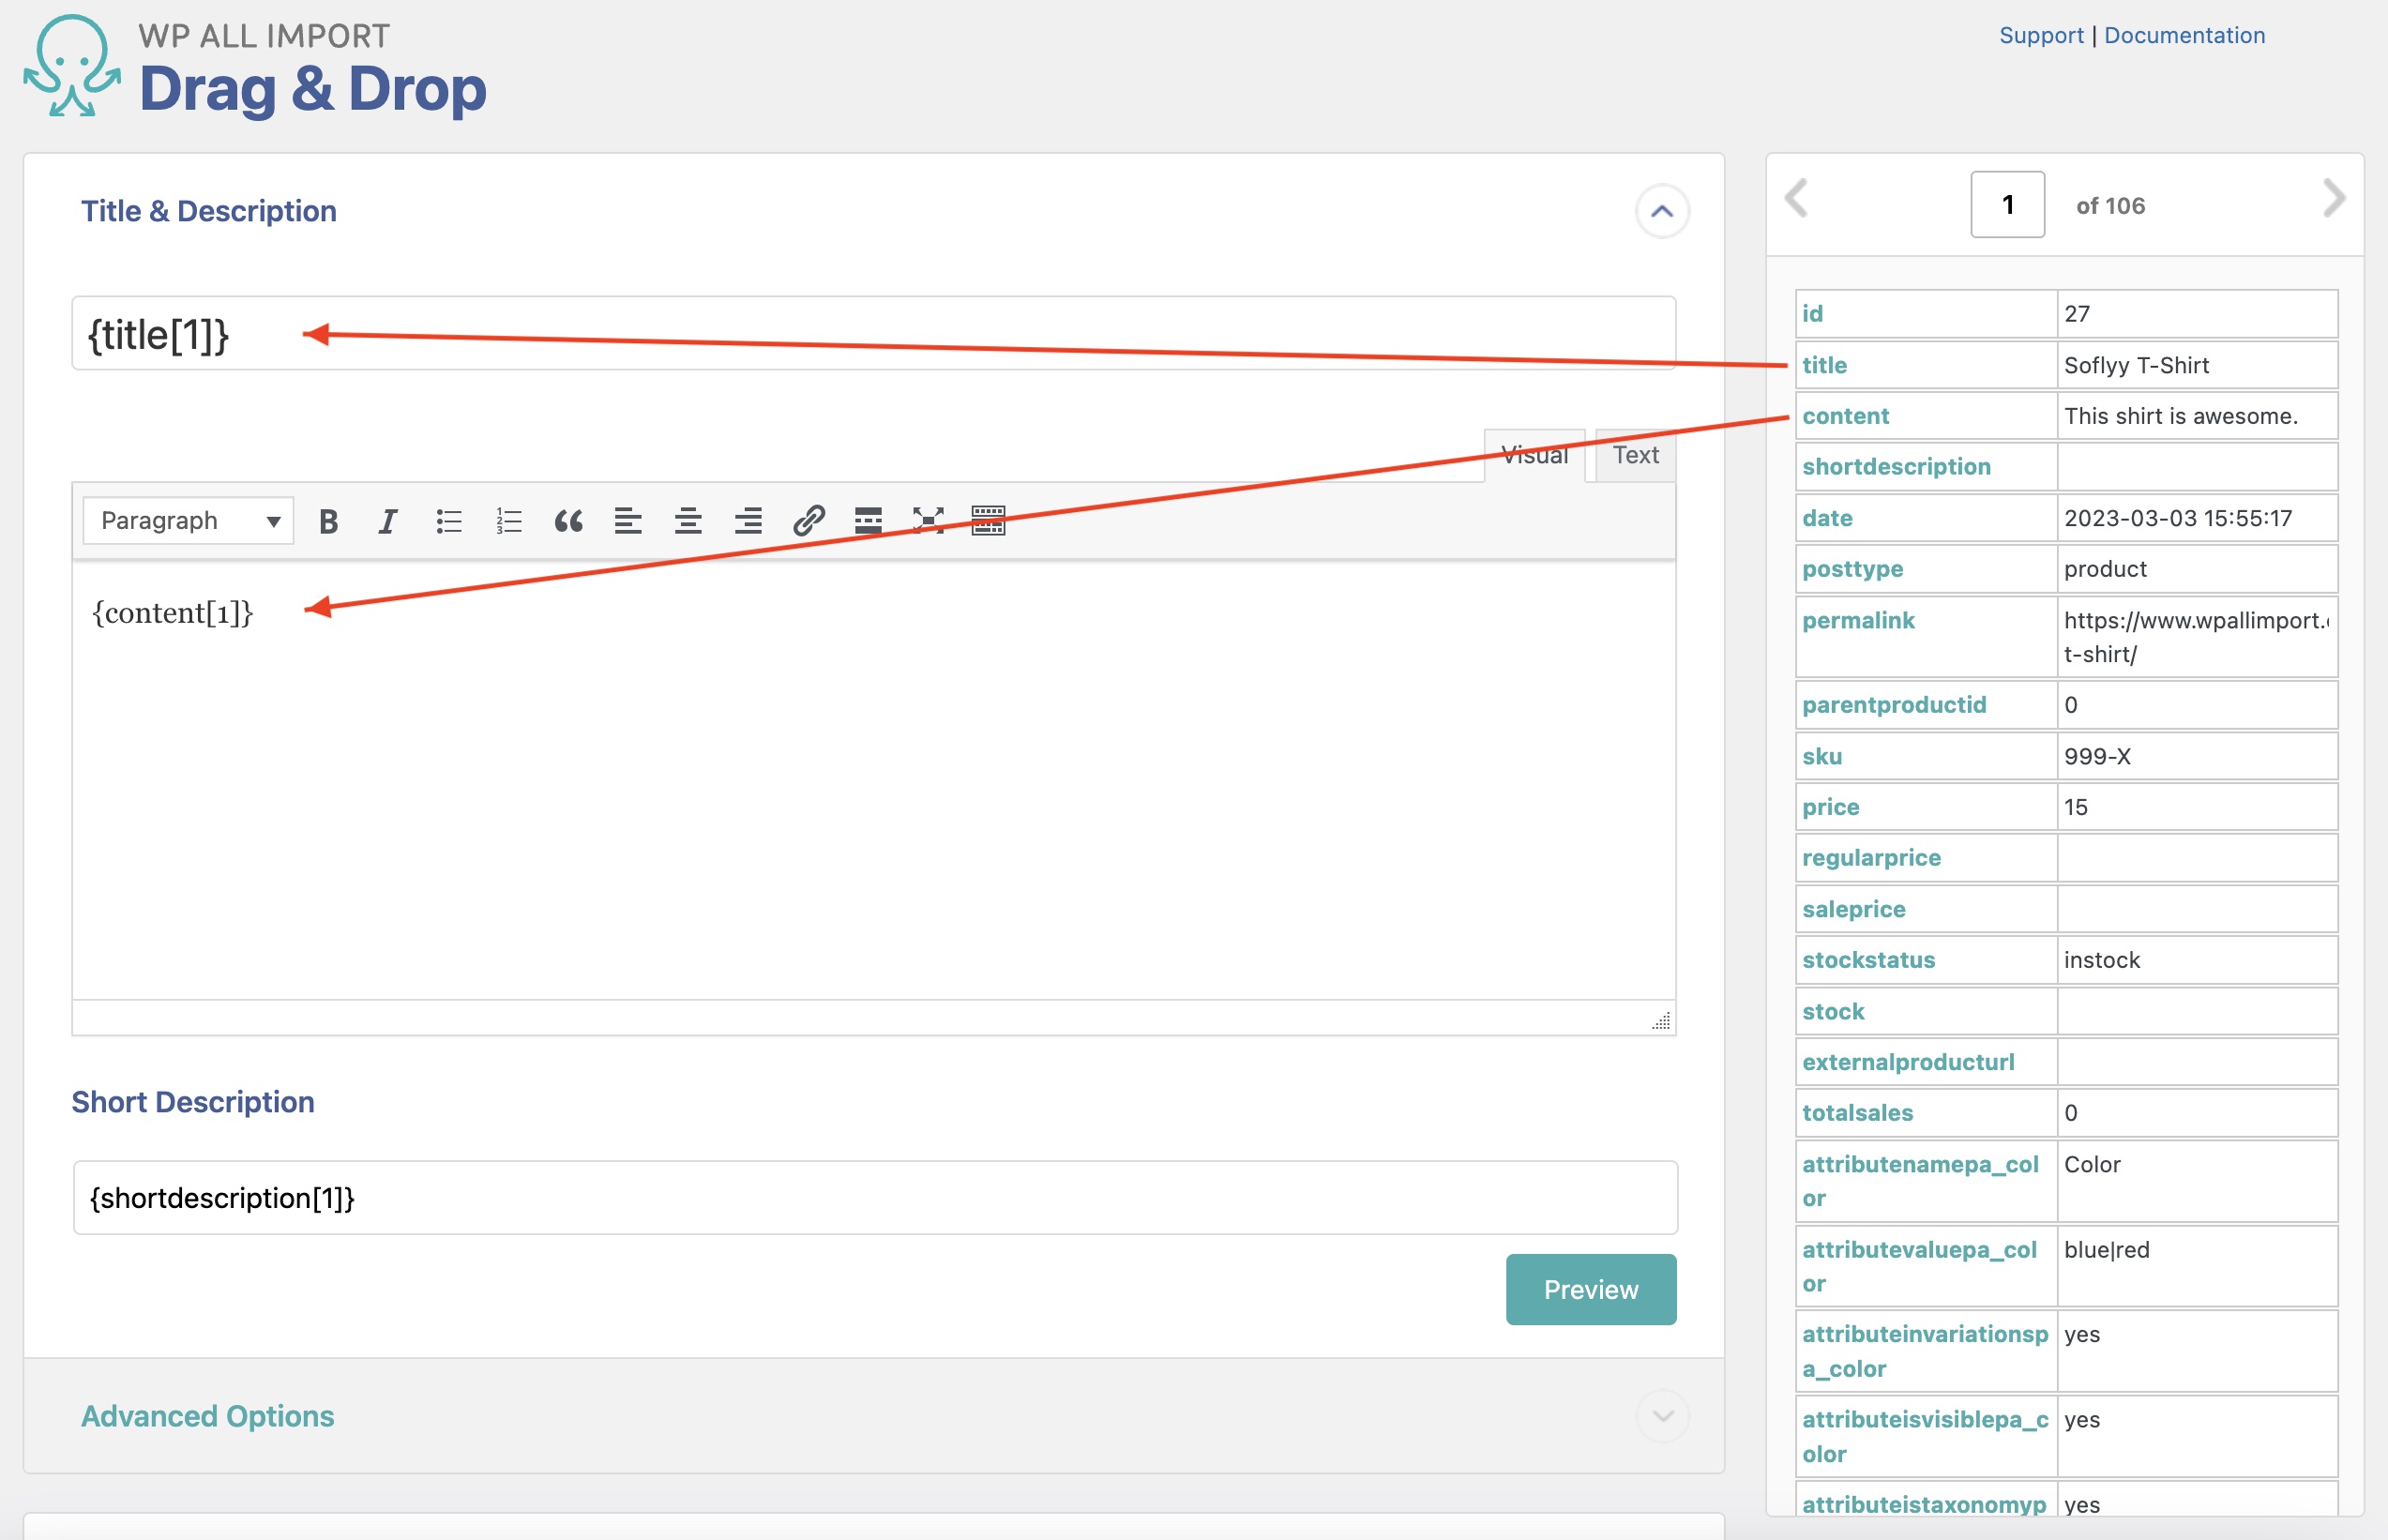
You’ll now see the Drag & Drop interface, where you can map the incoming data elements to WooCommerce fields using drag and drop.
The Title & Description and WooCommerce Add-On Sections
Start by mapping the title and description for your WooCommerce products in the Title & Description section.
Next, expand the WooCommerce Add-On section and map those fields. For more information on this topic, see WooCommerce Add-On Section.
In this article, we’re going to focus on the Images section.
Images Section
This is the section where you define how to import your product images:
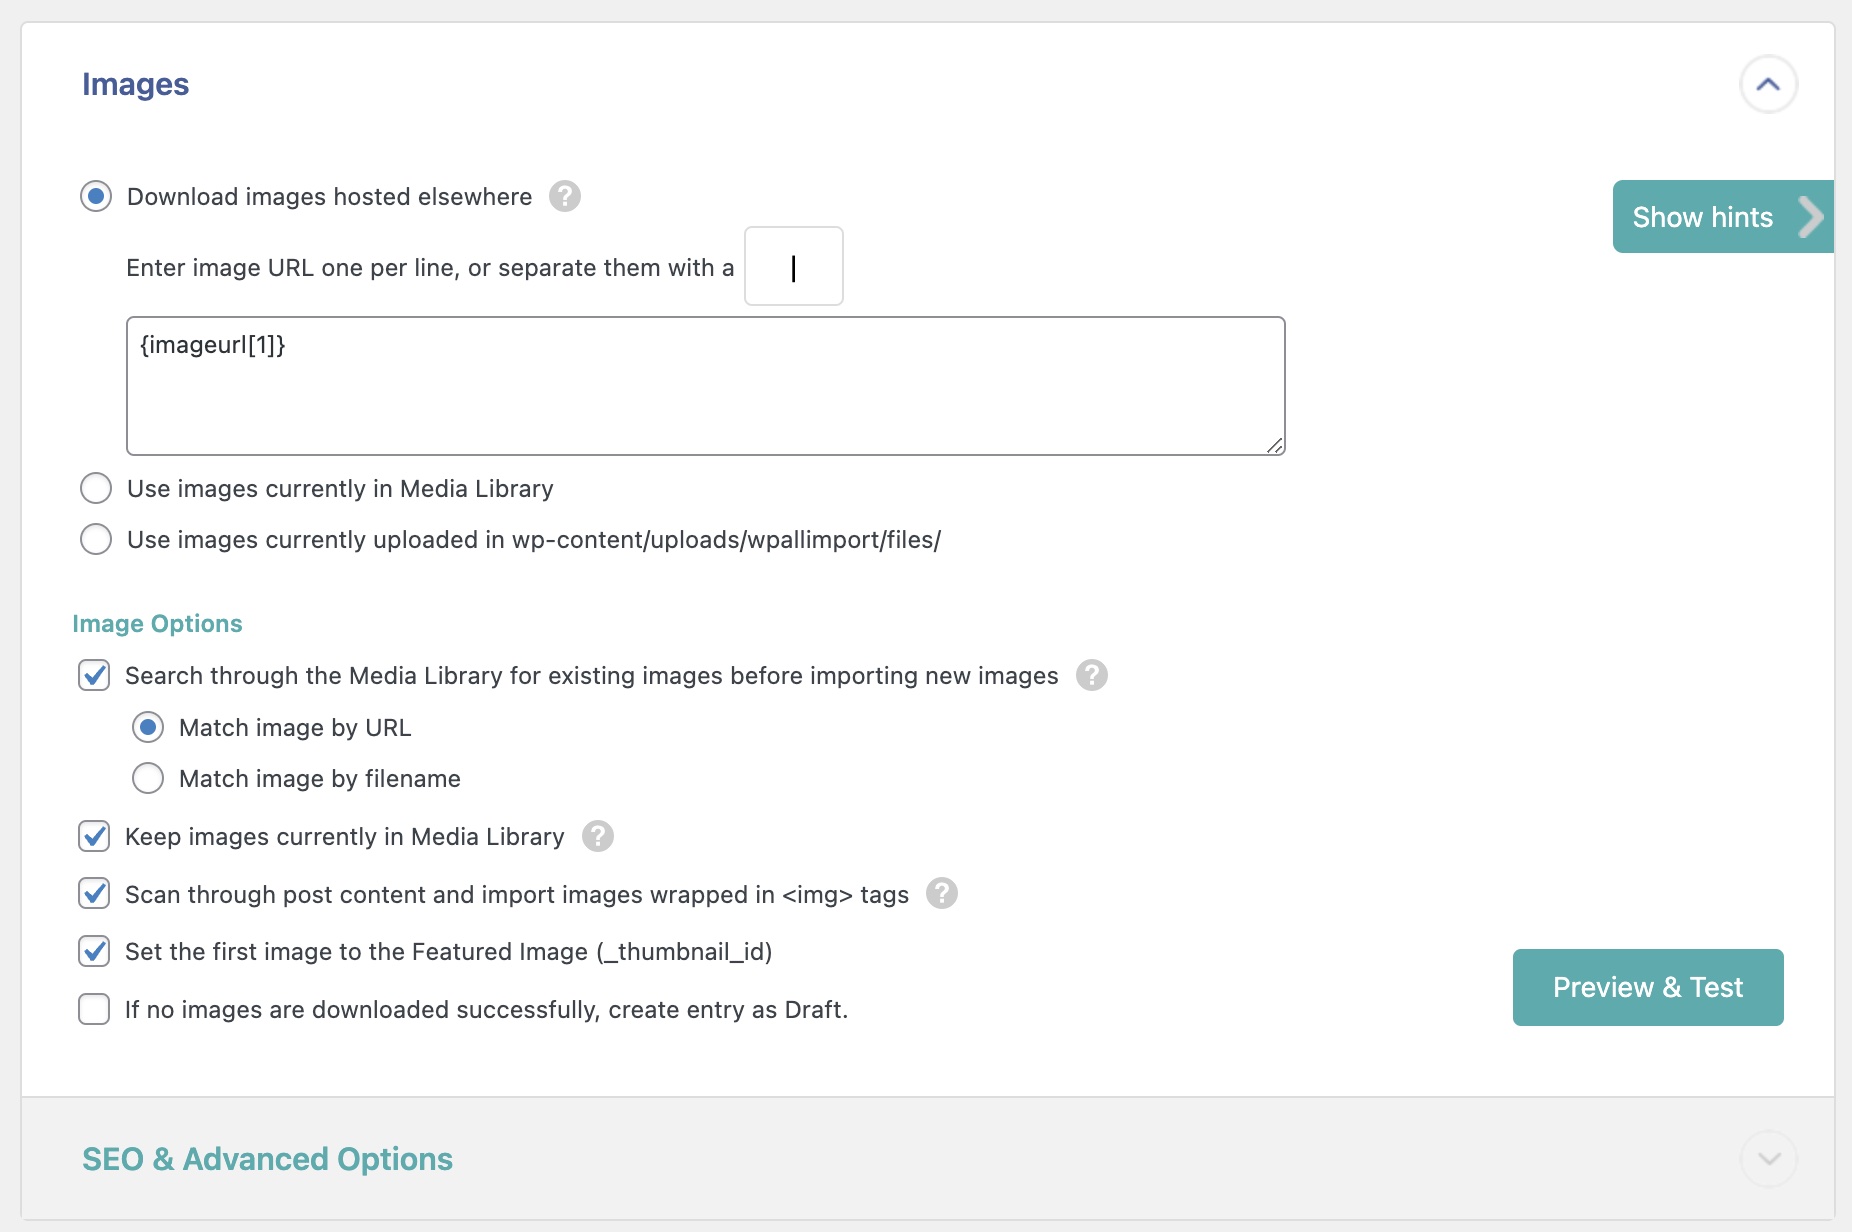
As you can see, there are a lot of options on this page. Let’s go through the three in the top section first.
Download images hosted elsewhere
This is the default option. It lets you specify an image URL using either the HTTP or HTTPS protocol to download an image. This image is then added to both your Media Library and your imported product. For multiple images for a product, you can add one URL per line or separate multiple URLs with commas.
In the above image, we’ve simply mapped the incoming imageurl data element to the edit box for this option. If that data element contains more than one image, WP All Import will parse the images based on the separator character specified in the …or separate them with a option.
Use images currently in the Media Library
This option lets you import image file names instead of URLs. Again, you can map an incoming data element to the associated edit box and specify a separator if the data element contains multiple file names.
The file names are then matched to the file names of images already in the Media Library, and it is these existing images that are assigned to the products.
Use images currently uploaded in wp-content/uploads/wpallimport/files/
This option assumes that you have already loaded your images into the /wp-content/uploads/wpallimport/files/ folder on your server. You can also use subfolders within this folder to keep your images organized.
Again, you can map an incoming data element to the edit box associated with this option and specify a separator if the data element contains multiple file names.
The import process then matches the file names in the data element to the file names in /wp-content/uploads/wpallimport/files/ or its subfolders. If a match is found, the corresponding image is loaded into the Media Library and assigned to the product.
Image Options
As you can see from the preceding image, this subsection is on the lower half of the Images section. It lets you specify the following:
- Whether to Search through the Media Library for existing images before importing new images and, if so, whether to Match image by URL or Match image by filename.
- Keep images currently in Media Library (versus replacing them)
- Scan through post content and import images wrapped in <img> tags
- Set the first image to the Featured Image (_thumbnail_id)
All of these are selected by default, with Match image by URL as the default method used to search the Media Library.
There is one final option that is not selected by default: If no images are downloaded successfully, create entry as Draft. This is self-explanatory.
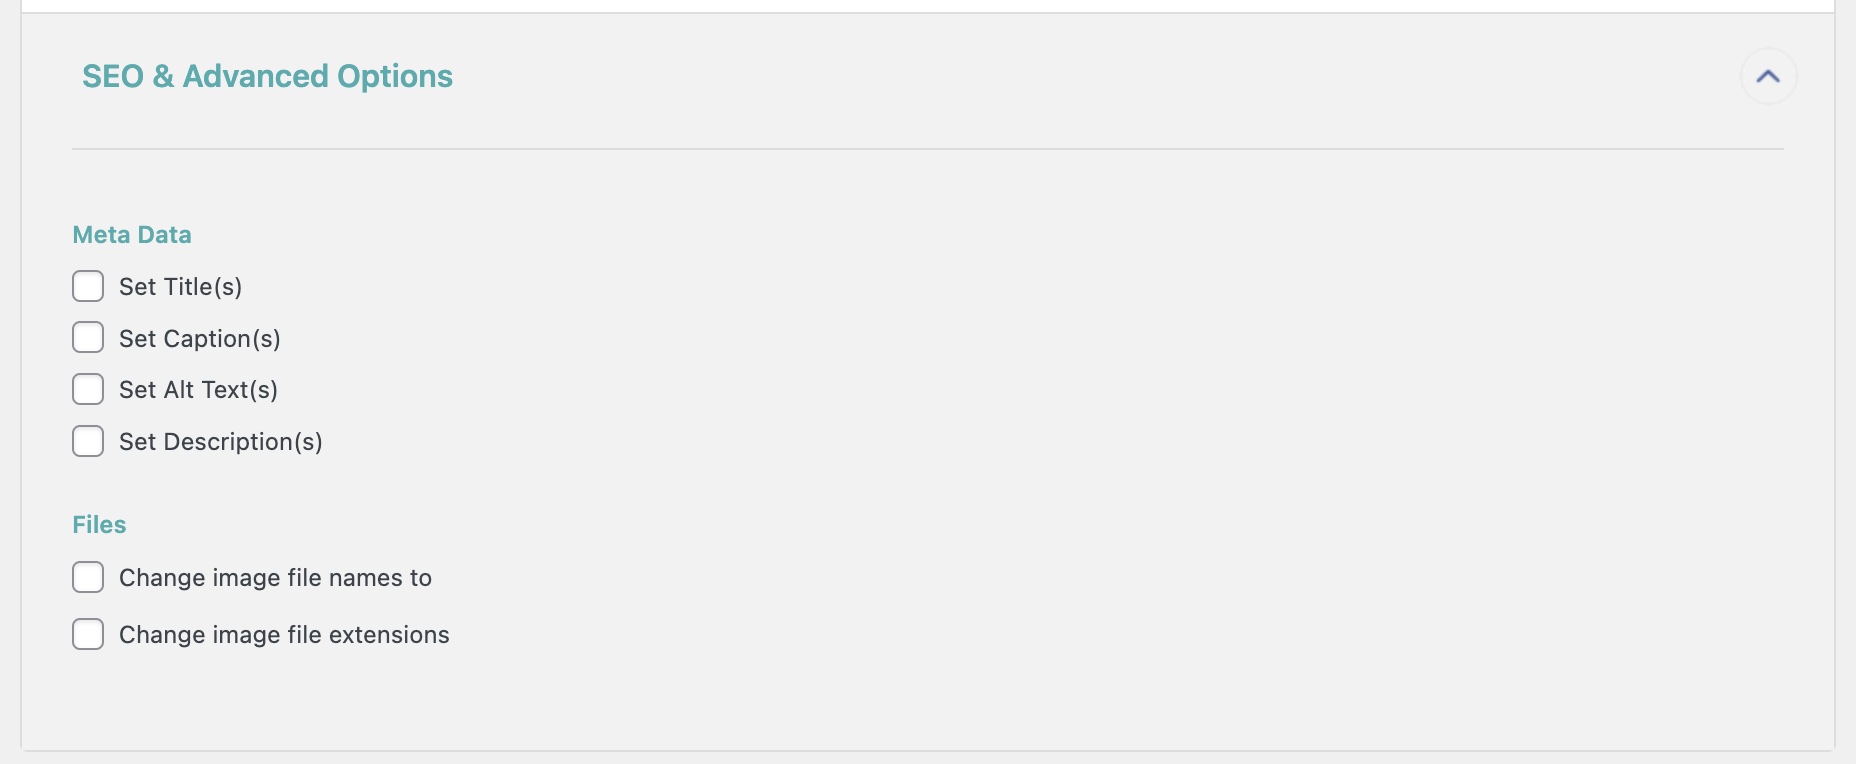
SEO & Advanced Options
This is a subsection found at the bottom of the Images section. It lets you define the metadata for the imported images and also change the image filenames and extensions:
There are numerous other sections below the Images section. To understand them, see How to Import WooCommerce Products from CSV and XML.
For now, click the Continue to Step 4 button (not shown) at the bottom of the Drag & Drop screen.
Step 4: Configure the Product Import Settings
Next up is the Import Settings screen, which allows you to control several important behaviors, such as how the import should behave if you run it again. You can also configure scheduling and other advanced options.
For now, just click on Auto-detect to generate a unique identifier automatically.
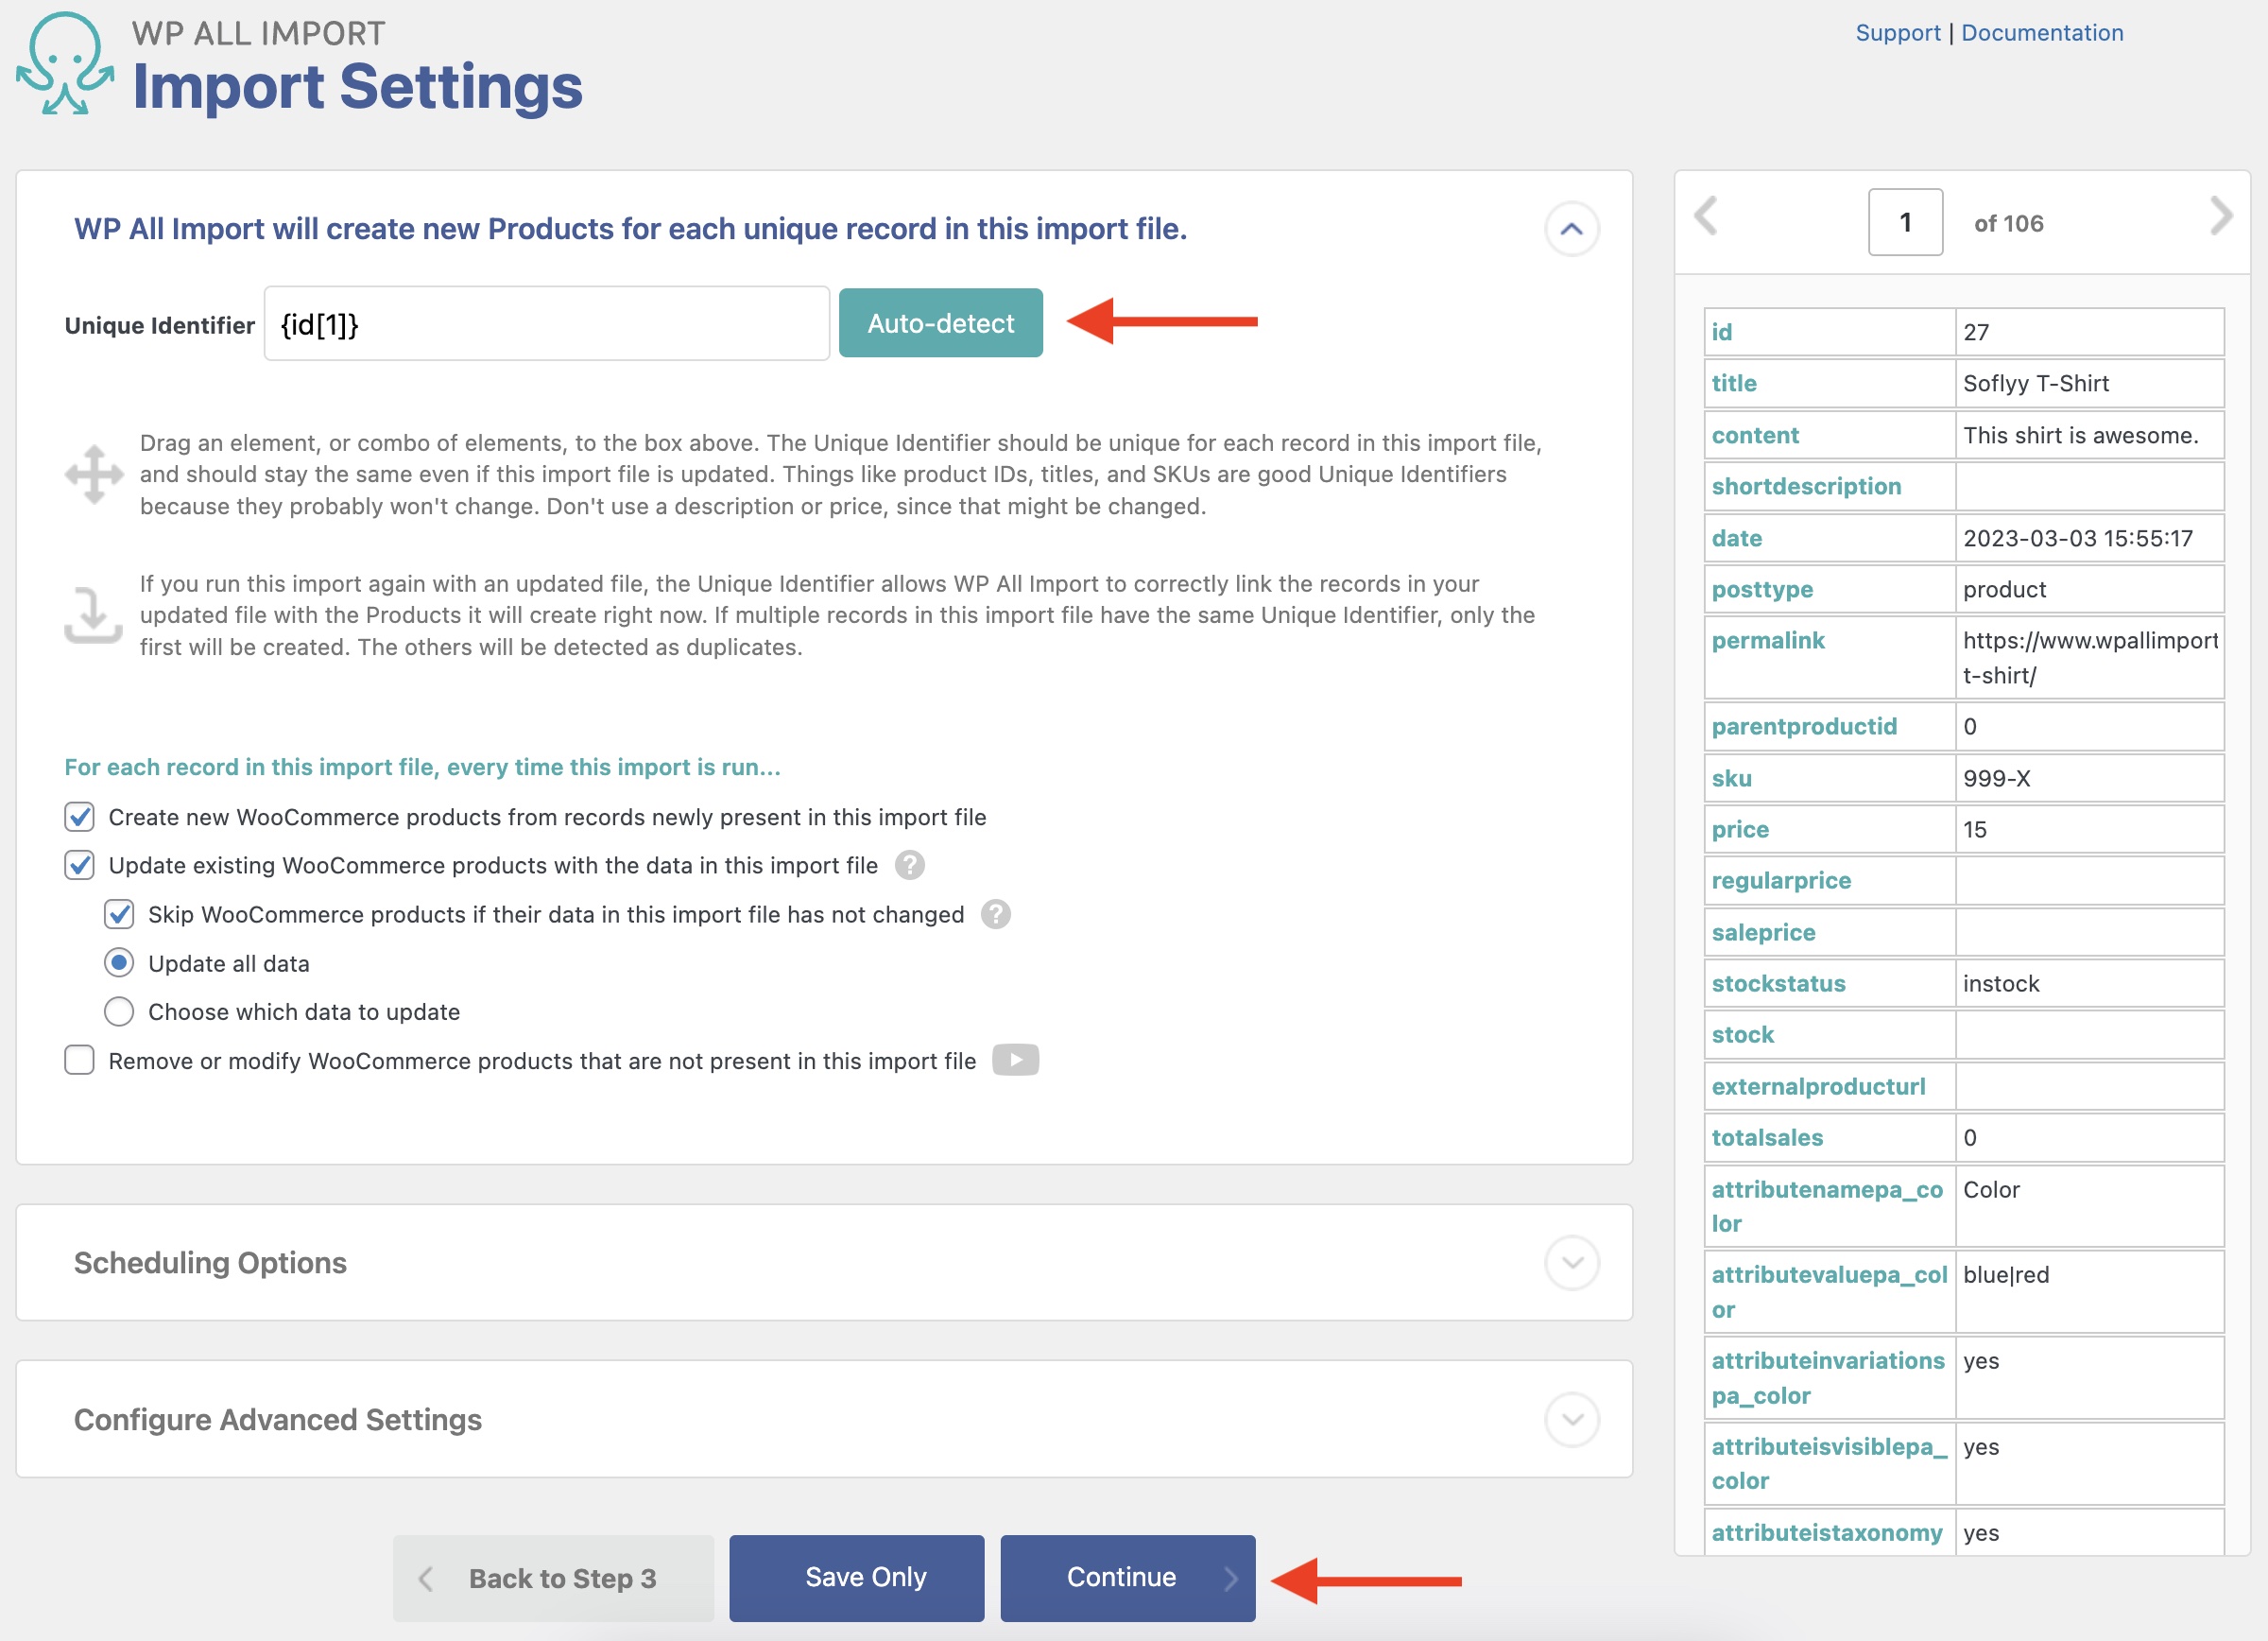
When this is done, click Continue at the bottom of the screen.
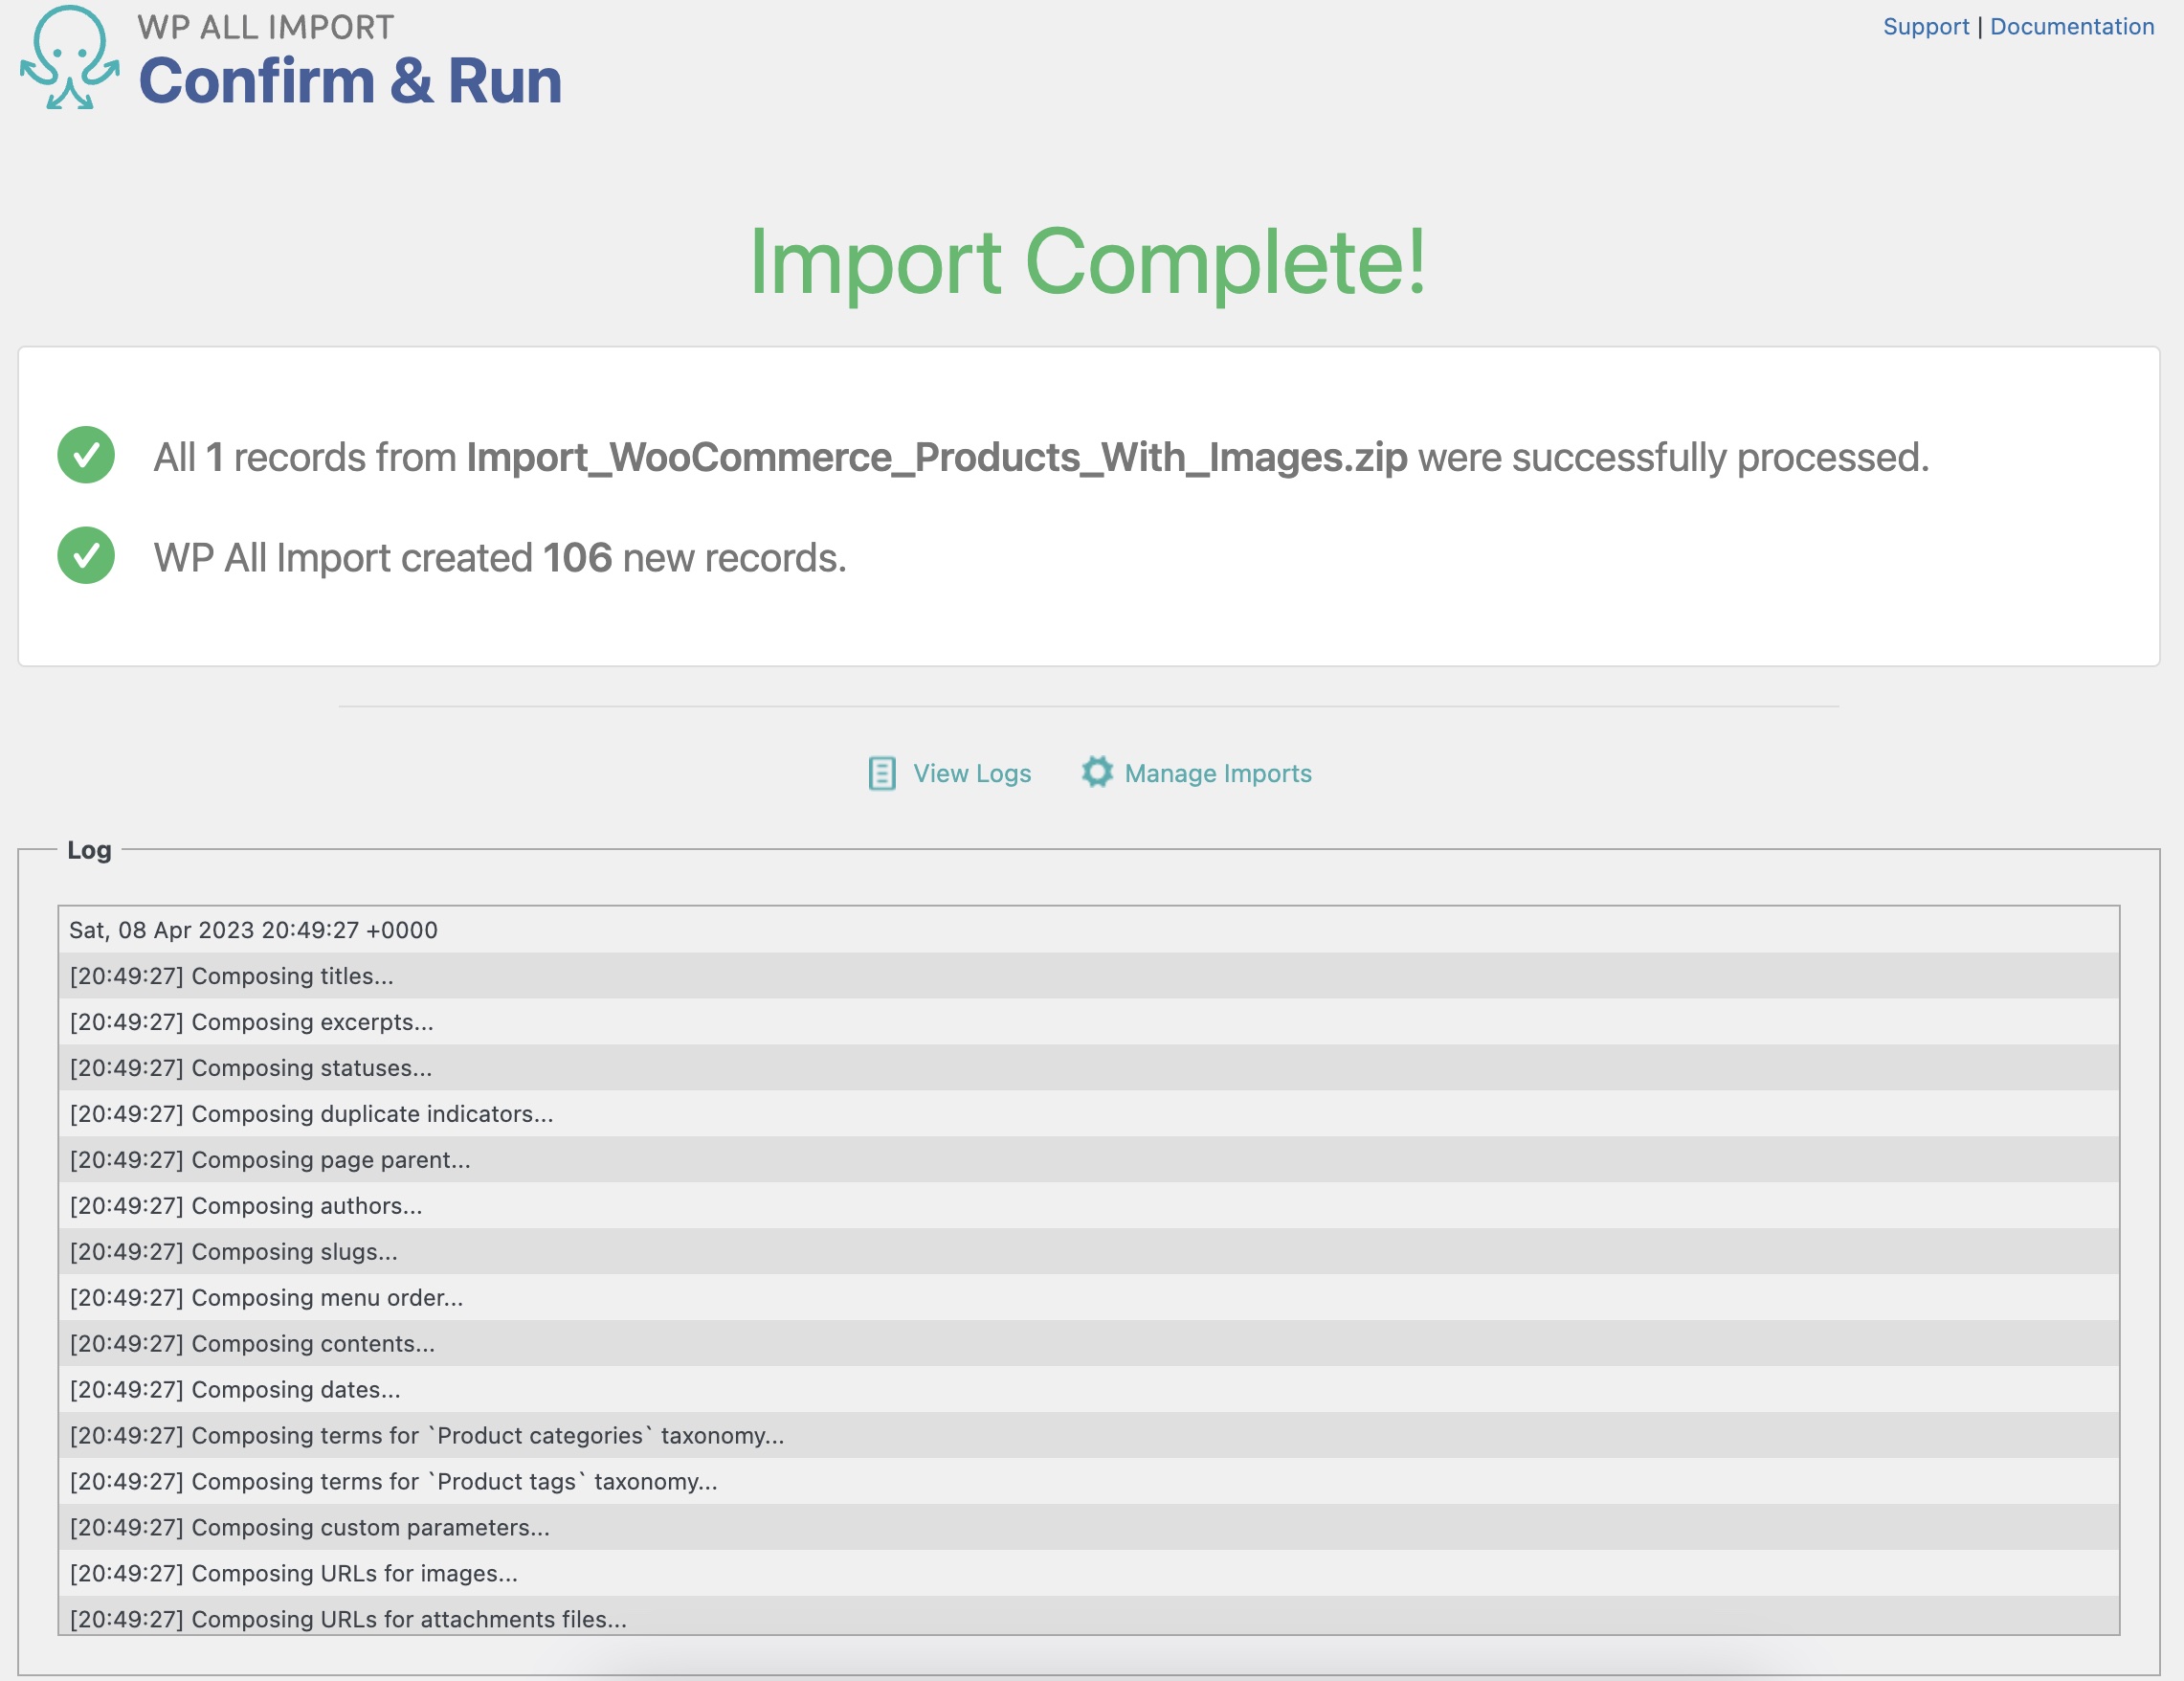
Step 5: Run the Import and Verify the Imported Data
This brings you to the Confirm & Run screen, which lets you review an import summary to make certain that the import is configured the way you want it.

After you confirm everything is okay, click Confirm & Run Import. When the import completes, you should see this screen:
Finally, you should navigate to Products › All Products to verify that your import worked as expected:

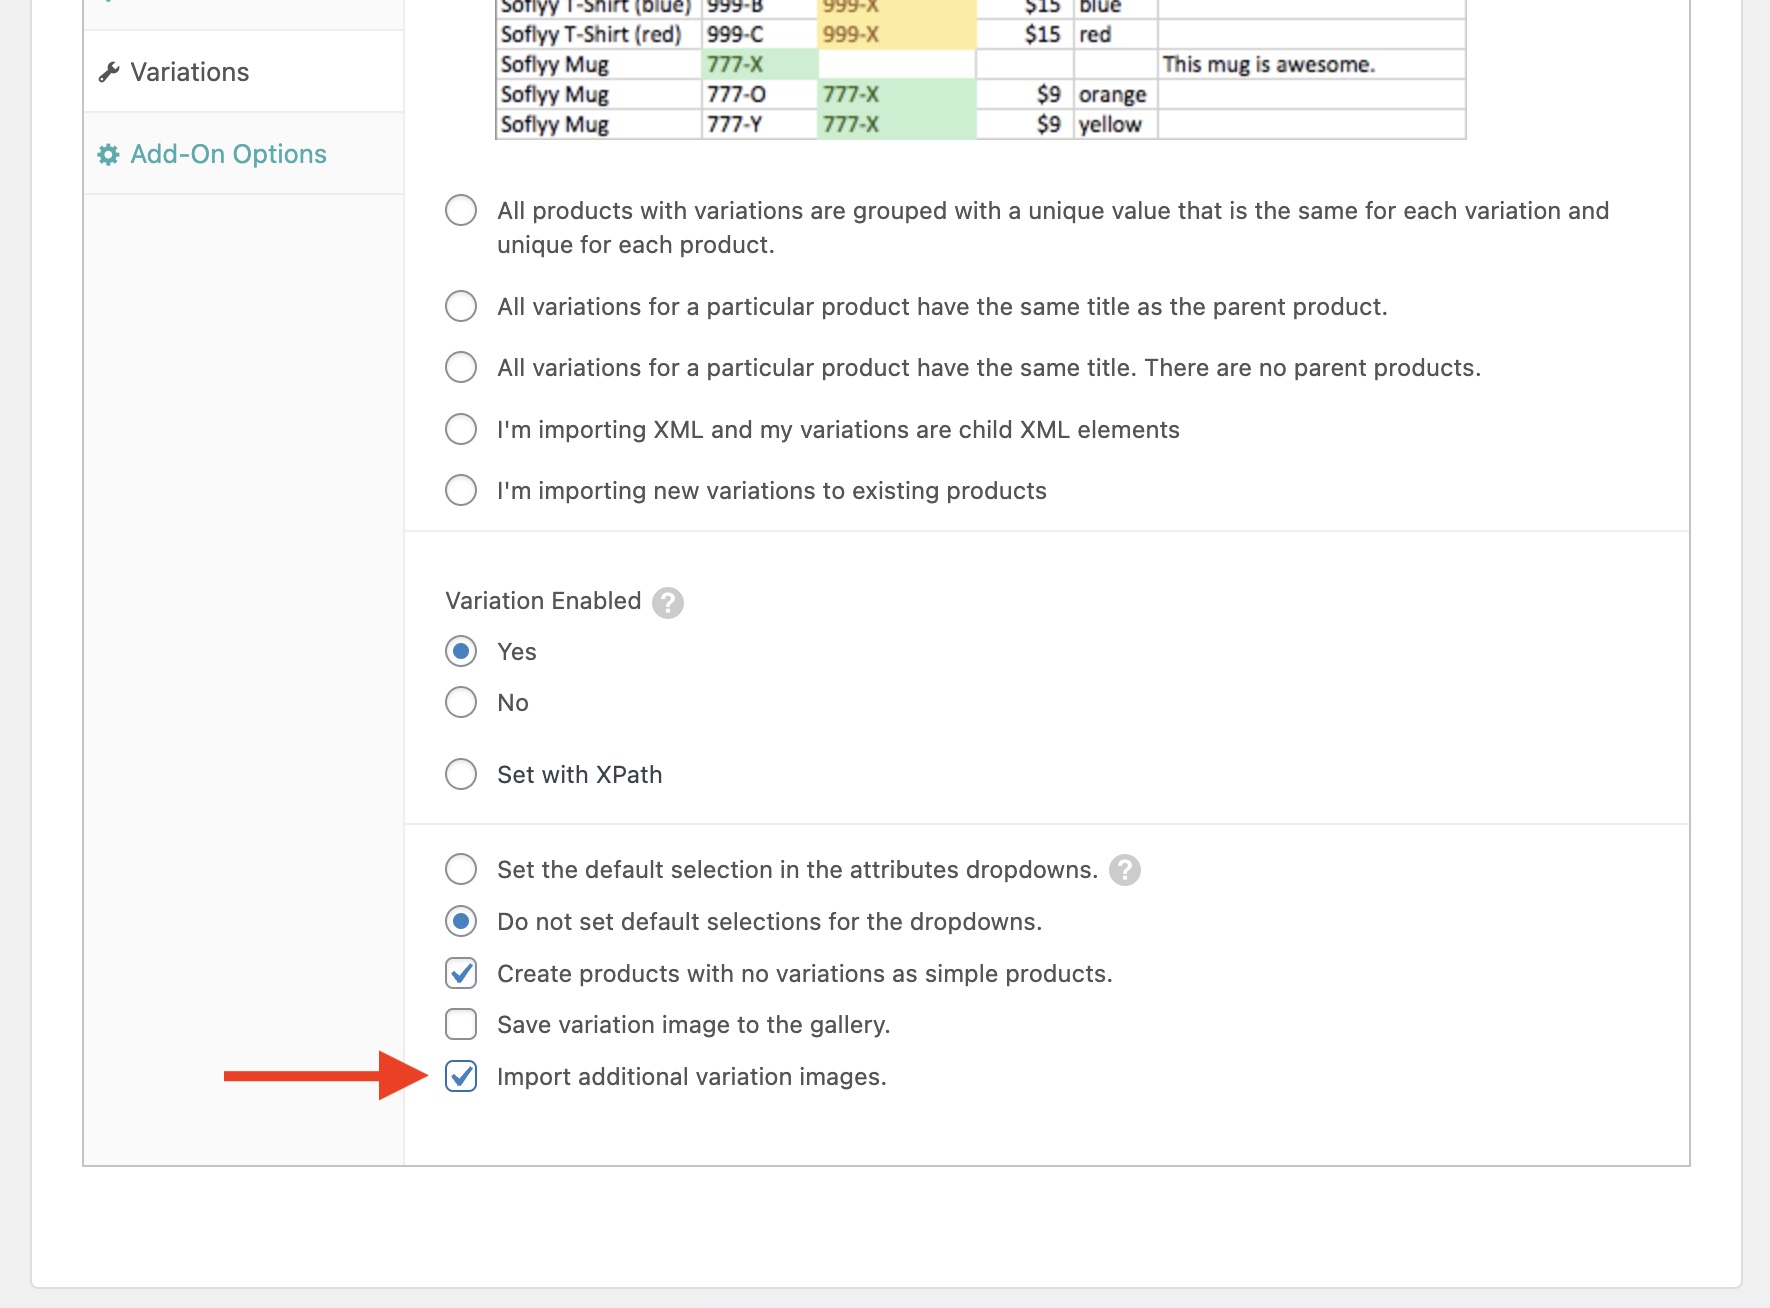
Import Multiple Images to Product Variations
As mentioned in the introduction of this article, variable products only allow one image per variation by default. However, there are plugins that modify this behavior, including:
When multiple images per variation are allowed, you can accommodate this situation by enabling the Import additional variation images option:
Import Product Images From FTP or SFTP
To import images stored on an FTP or SFTP site, you can use custom code to fetch the images. For example, you can use the code found in Workaround for Importing from FTP to fetch the images from your FTP source:
[custom_file_download("http://example.com/full/path/to/image-file.jpg","jpg")]This is used like this:

Offload Product Images From WordPress to Other Services
By default, all product images are automatically downloaded to WordPress. However, there are third-party plugins that will let you offload imported images to another service, such as an Amazon S3 bucket. In this scenario, the images get offloaded after they are imported.
Troubleshoot Product Image Imports
If your product images don’t import correctly, you should do the following:
- Check the History Log to identify the error and act accordingly.
- When importing an image from a URL, manually verify that the image exists and can be downloaded programmatically.
- If you look back at the Images section, you will see that there is a Preview & Test button that allows you to view a sample of the images you will import as a result of your selected options. You should make liberal use of this button to identify image import errors in advance.
Import WooCommerce Products With Images – Related Info
- Importing Images From URLs
- Importing Images From the Media Library
- Importing Images From Your Server
- Variable Number Of Images Per Post
- Image Metadata
- Image Options
Import WooCommerce Products With Images – Related Videos