Import Products from Shopify to WooCommerce: Easy Steps
Are you looking to import products from Shopify to WooCommerce but unsure where to start? Store owners who want to migrate their store from Shopify to WooCommerce might find it tricky, especially if they have a lot of products to move.
Shopify is a highly capable e-commerce solution, but WooCommerce has its own perks. If you want more control over your store and products, WooCommerce is the way to go. That’s why many store owners start their business with Shopify and later migrate the store to WooCommerce. Here are some of the common reasons for migrating your store from Shopify to WooCommerce:
- WooCommerce gives you full control over your store with more flexibility and customization options.
- The ongoing cost for WooCommerce is significantly cheaper than Shopify. WooCommerce is a free plugin, and you can get premium extensions starting from $39/year. Shopify, on the other hand, doesn’t have a free plan and starts at $29/month.
- WooCommerce doesn’t charge any fees for transactions, while Shopify has a fee if you add multiple currencies.
- WooCommerce users have access to thousands of free and premium plugins, thanks to WordPress.
- It’s really easy to modify the checkout process with WooCommerce, but Shopify is a bit restrictive.
- WooCommerce is better for search engine optimization. You can install plugins like Yoast SEO, RankMath, etc. to fully optimize your pages.
However, the migration comes with a big challenge. Importing thousands of products from Shopify to WooCommerce can be tricky, especially when you want to keep the product data error-free. We have the perfect solution for you. With WP All Import, you can import your Shopify products in minutes!
Best Method to Import Shopify Products to WooCommerce
There are multiple ways available to import Shopify products into WooCommerce. You can use the default WooCommerce importer or use a third-party plugin.
WooCommerce Native Importer
WooCommerce has a native importer that you can use to import products. For a few products, it’s just fine. However, we don’t recommend using it for store migrations.
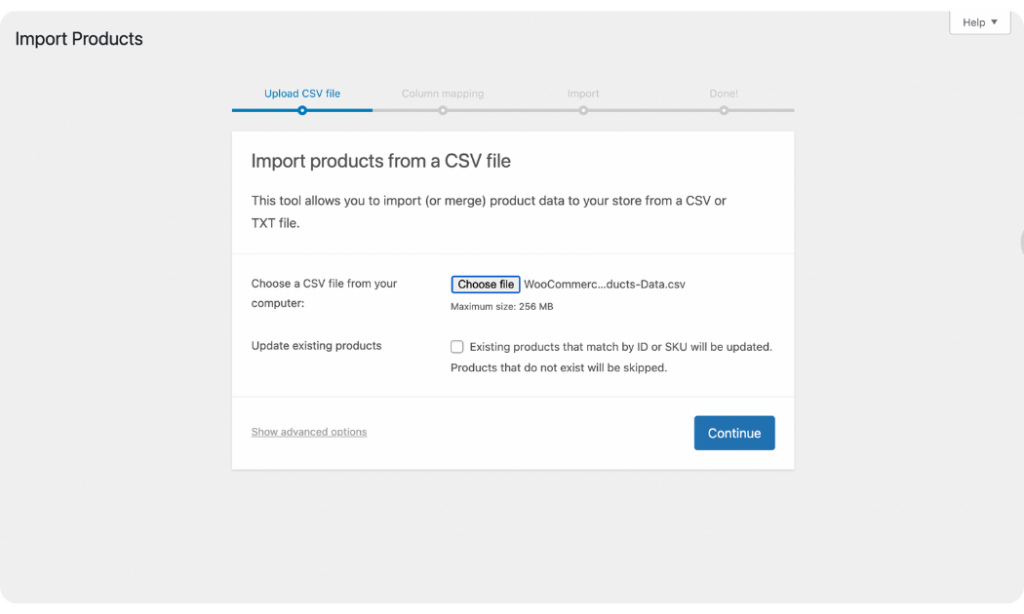
The default product importer in WooCommerce lacks some crucial features. For example, it only supports CSV files. That means, if you have an Excel (.XLSX or .XLS) file, you are out of luck.
It doesn’t support images from external sources either. It makes the process time-consuming, as you need to already have the images in the WordPress media library before you start importing your products.
WooCommerce’s import-export suite doesn’t work well with custom fields either. It does support variable products, but the process may seem confusing to many users.
This is why you need to choose the right plugin for importing your Shopify products to WooCommerce.
Introducing WP All Import – The Best WooCommerce Import Plugin
Choosing the right tool to migrate your products from Shopify to WooCommerce lets you do it in a seamless, error-free way. WP All Import is the best in the business when it comes to migrating thousands of products to WooCommerce.
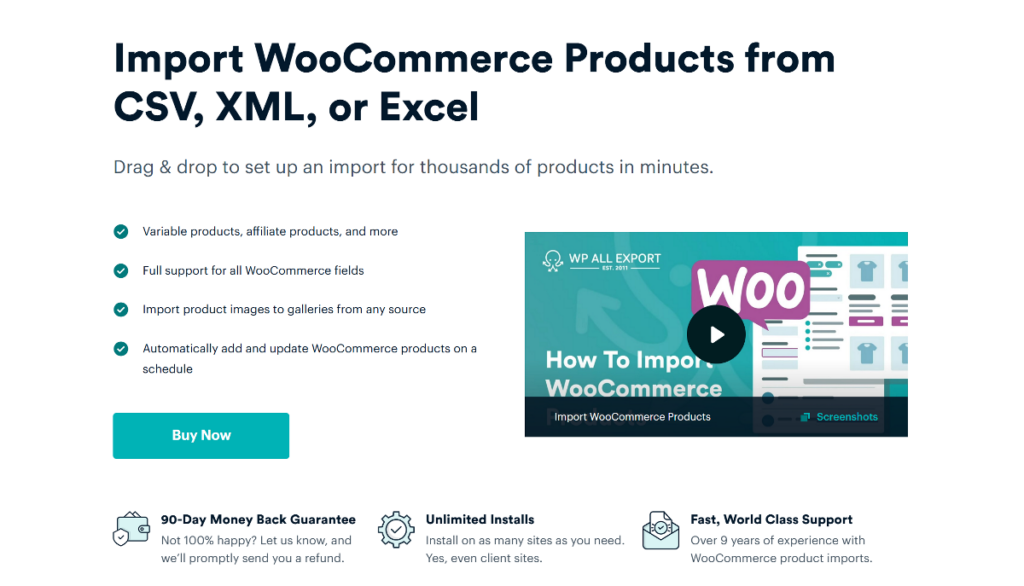
WP All Import is very well known for its ease of use and flexibility. You can import WooCommerce products through the plugin’s convenient drag-and-drop interface. You get a lot of flexibility in your migration, as you can customize the product data as per your liking.
Here are some of the key features of WP All Import:
- Supports importing product data from Excel, CSV, XML, and Google Sheets.
- Features a drag-and-drop interface to map WooCommerce product fields.
- Powerful filtering options to select which products you want to import.
- Can handle very large files, and any file structure.
- Fully compatible with custom plugins and theme fields.
- Capable of handling variable products with ease.
- Comes with powerful import scheduling options.
- Can manipulate product field data using PHP functions.
How to Export Your Product Data from Shopify Successfully
Before you migrate your products to WooCommerce, you need to export the products from your Shopify store first.
Here are the steps:
- From your Shopify admin, go to Products and click on Export.
- Choose the products that you want to export from the dialog box.
- Select the type of CSV file you want to export. Our recommendation is to choose a CSV file for Excel, Numbers, or another spreadsheet program.
- Click Export Products.
Point to be noted, you should keep your Shopify store live until the migration to WooCommerce is complete. It’s easy to import product images to WooCommerce via image URLs. If you disable your Shopify store before the migration, the Shopify image URLs won’t work.
How to Import Products from Shopify to WooCommerce
As now you have the exported file containing your Shopify product data, all you need to do is to import the products to WooCommerce to complete the migration process. We’ll explain the steps using the WP All Import, the most powerful WordPress import tool.
1. Install the WP All Import Plugin
To import products to your WooCommerce store, you first need to install WP All Import.
Start by purchasing the WP All Import Pro with the WooCommerce Import Add-On. The WooCommerce Import Add-On is important as it adds support for all standard WooCommerce fields.
After making your purchase, download the latest version of the plugin from WP All Import’s customer portal.
Once you have the zip files, it’s time to install the plugin to WordPress. Login to WordPress and go to Plugins › Add New. Select Upload Plugin and upload the Zip file you just downloaded. Then simply click on the Install Now button followed by the Activate Plugin button.
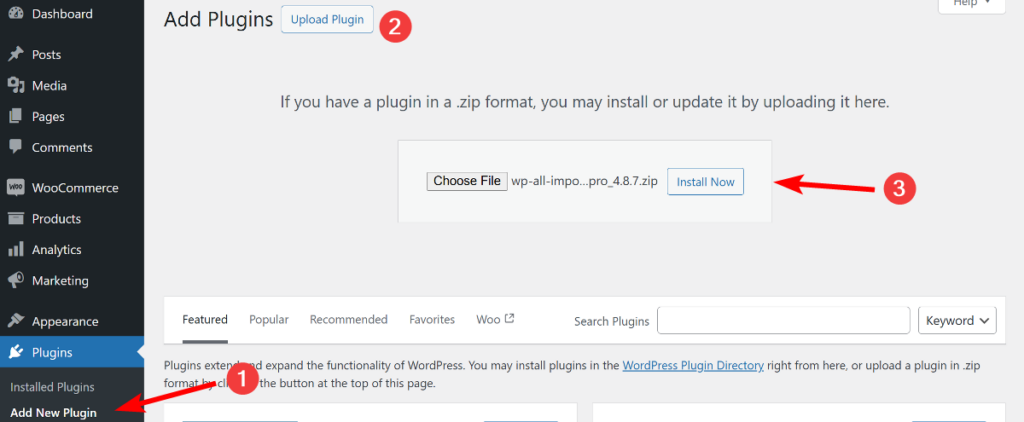
You can follow the same steps to install the WooCommerce Import Add-On as well.
2. Create a New Shopify to WooCommerce Product Import
To start the import process, you need to upload the file you exported from your Shopify store to WP All Import.
In the main WordPress menu, navigate to All Import › New Import.
You’ll see multiple options to import your WooCommerce product data. Select Upload a file.
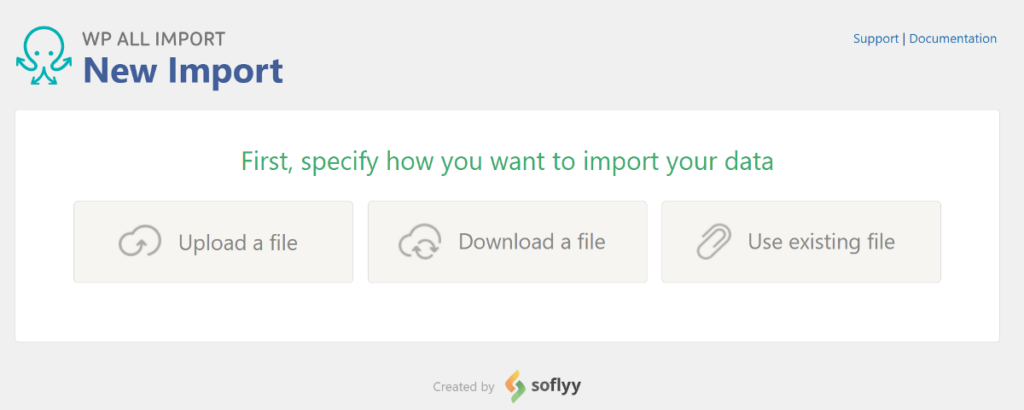
The other two options are Download a file and Use existing file. With the Download a file option, you can add a file from a URL or an FTP/sFTP server. Point to be noted, you can use this option to add Spreadsheet files from Google Sheets or Dropbox. The Use existing file option lets you use an existing file you previously uploaded to WP All Import.
Once you have uploaded your Shopify products CSV file, under New Items choose WooCommerce Products as the import type. WP All Import also supports Excel or XML files.
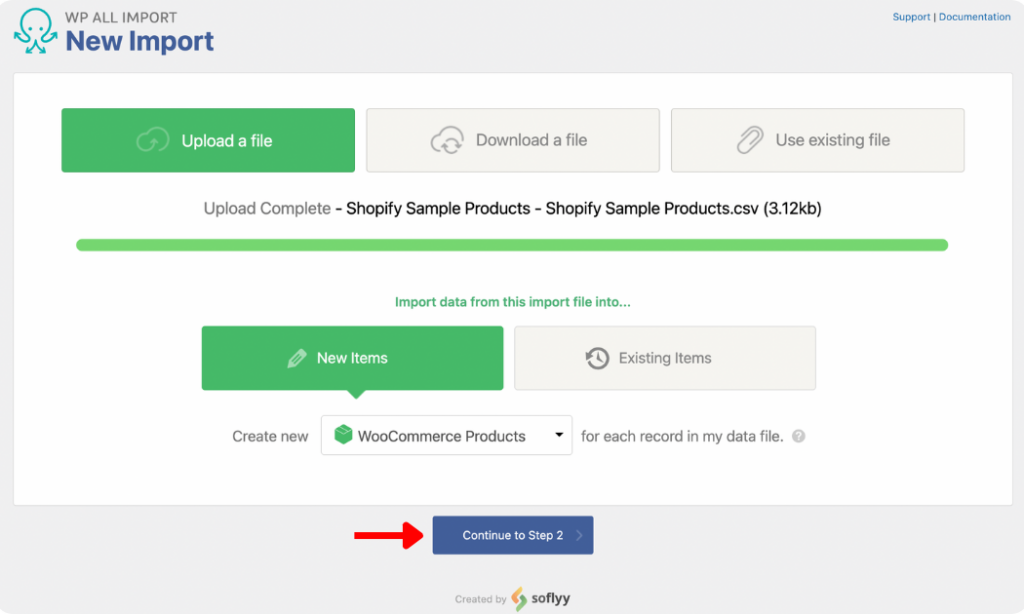
Next, Click Continue to Step 2 to move to the next step.
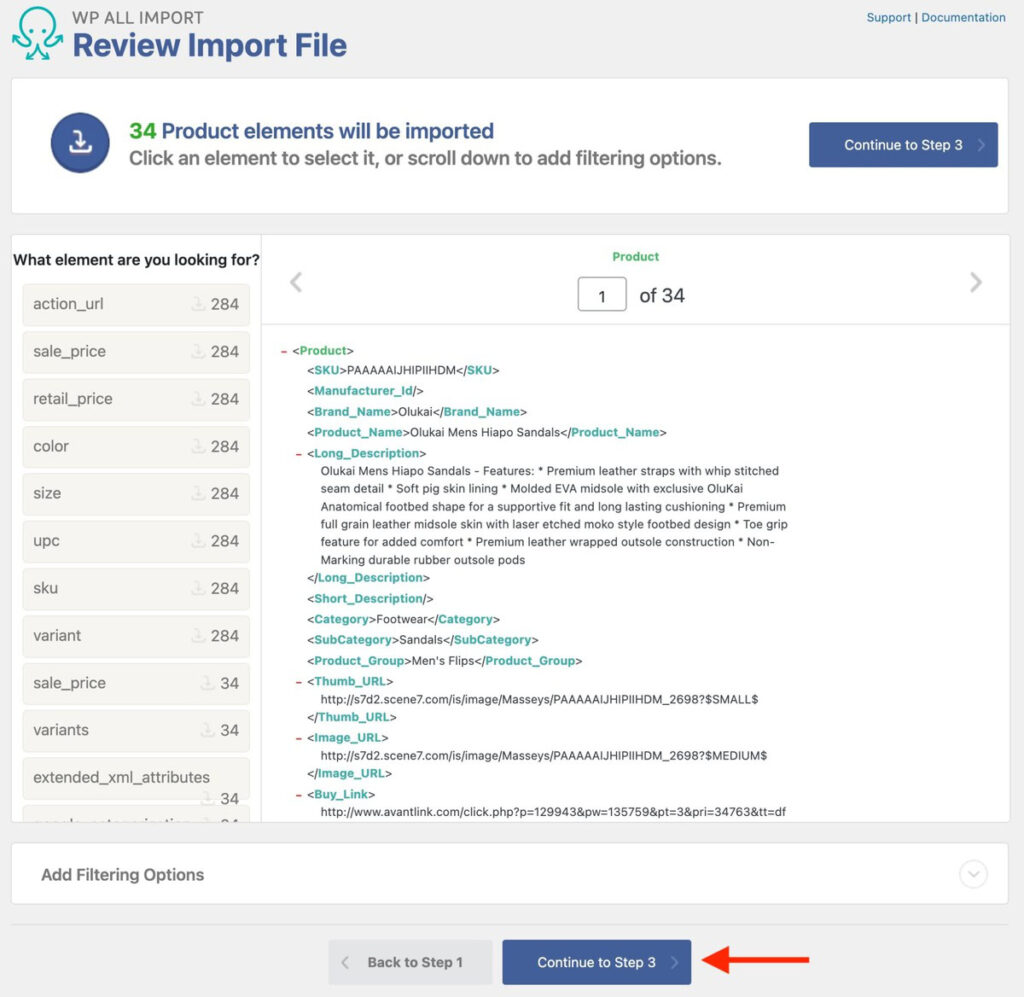
3. Review Uploaded Shopify Product Data and Apply Filters
You’ll now see the Review Import File Screen. It will show the number of products you are going to import and display the data in a table. This allows you to check if the data you uploaded is correct. You can navigate between different records using the arrows on both sides.
This step also allows you to filter the data to modify your import even further. You may not want to import every product from your Shopify store, and this is where WP All Import’s powerful filtering process comes in handy.
Let’s see how to apply filtering rules.
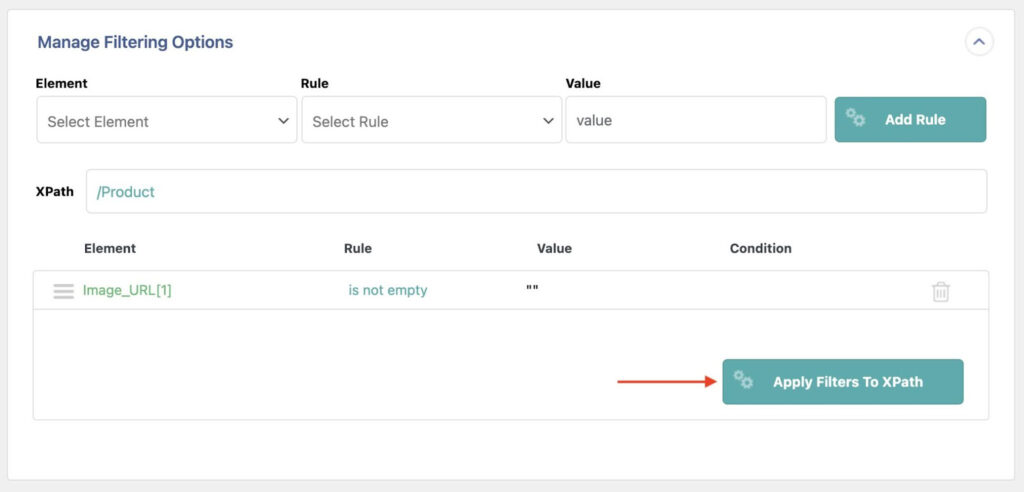
Step 1: Select an Import Element
The first step in applying the filter is to select the column based on which you want to filter the products. Let’s take the following example, where we want to import products with valid images.
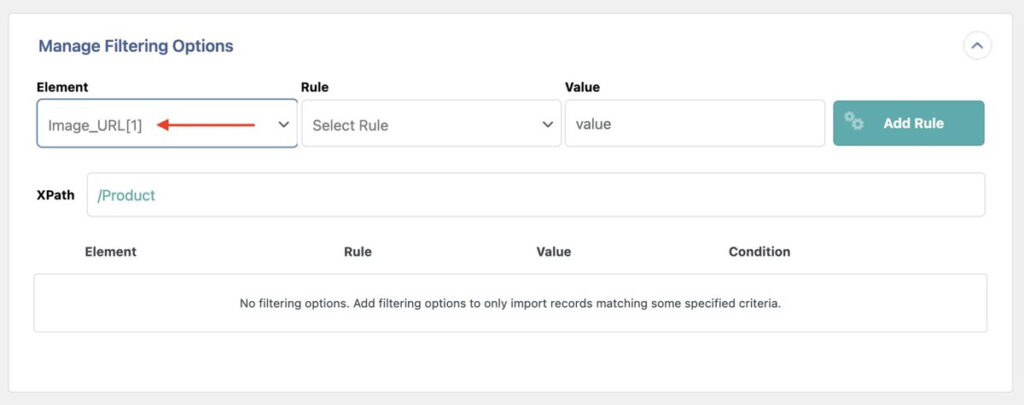
Step 2: Add a Filter Rule
The second step is to select the rule you want to apply. You can do this in the Rule selection box. For our example, we’ll select is not empty. This means that we’ll import products where the Image_URL element has data.
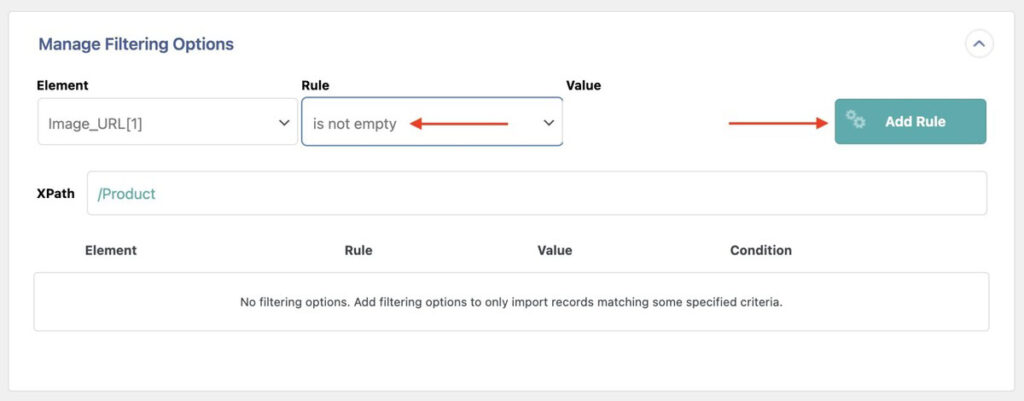
For most filters, you need to specify a Value. For example, if you want to filter products that cost more than $50, you need to choose greater than in the Rule selection box and put 50 in the Value field.
For our example, a Value is not needed.
Click the Add Rule button.
Step 3: Apply Filters to XPath
The filter you created will then appear in the lower section. Click Apply Filters to XPath to apply the filter.
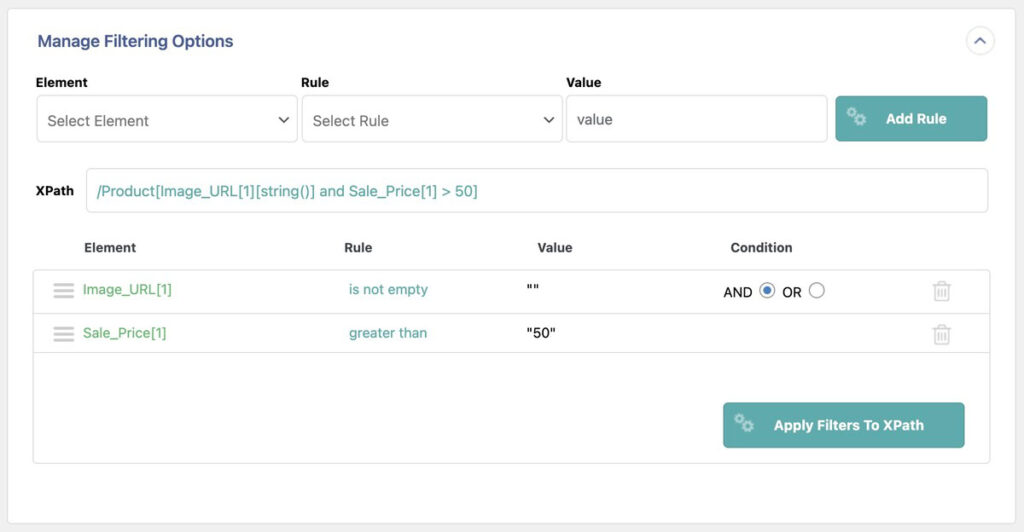
Your filter will then be applied to your import.
WP All Import allows you to add more than one filter rule. For multiple filter rules, you need to connect them using the logical operators AND(&&) and OR(||).
The AND(&&) operator filters out the products that satisfy both rules, and the OR(II) operator filters out the elements that satisfy either of the rules.
Here’s an example where we filtered products with images that cost more than 50.
Click Continue to Step 3 when you are done reviewing your import file and applying your filter rule/s.
4. Map Shopify Product Data to the Corresponding WooCommerce Fields
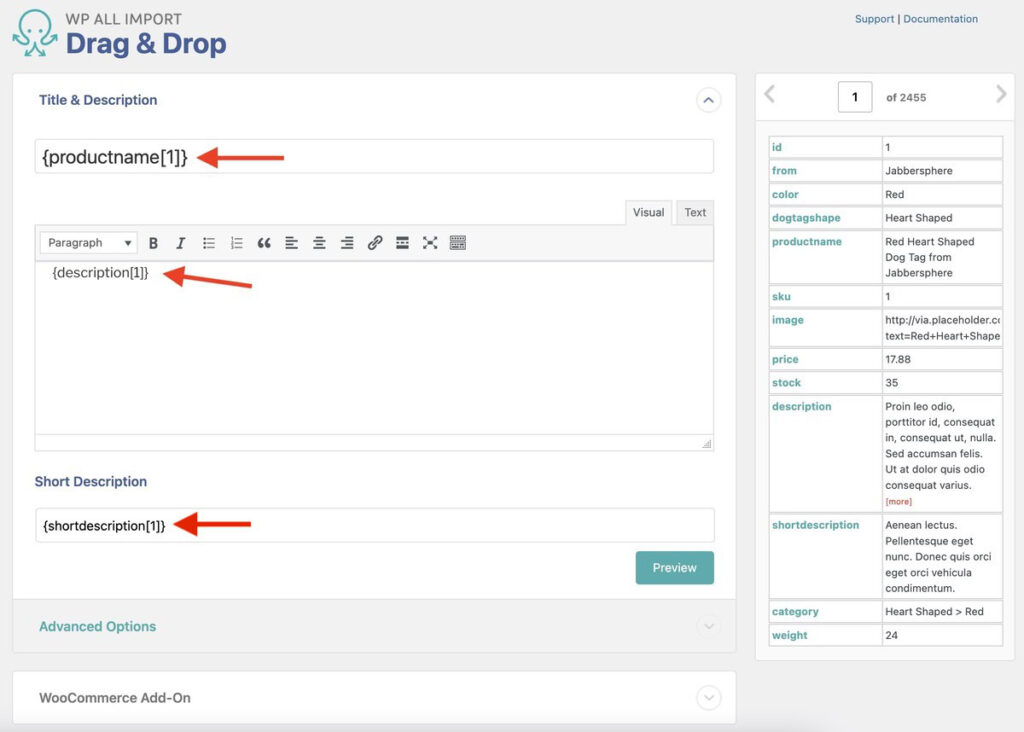
In the next step, you’ll find the Drag & Drop screen. Here, you can build and configure the import template. WP All Import makes it really easy to map product fields using the drag-and-drop interface.
WP All Import will list your Shopify product data in a table on the right, while the WooCommerce fields will be listed on the left.
Now we’ll look at some different panels to map WooCommerce product information.
Map Product Title and Description
The Title and Description section is pretty much self-explanatory. Here, we’ll drag and drop the product name, description, and short description element from the right panel to the relevant fields.
Then comes the most important part of the mapping process. Below the Title and Description section, you’ll find the WooCommerce Add-On section.
WooCommerce Add-On Section
Expand the WooCommerce Add-On section next.
This is the section where you need to define the Product Type. It’s set as Simple Product by default, but you can change it to different product types, including grouped, external, and variable products. You can even set your preferred product type with XPath.
Below Product Type, you’ll find several tabs to configure your import. We’ll describe some of the most frequently used tabs.
The General Tab is selected by default. It includes general product information such as SKU, sale price, regular price, tax status, and more.
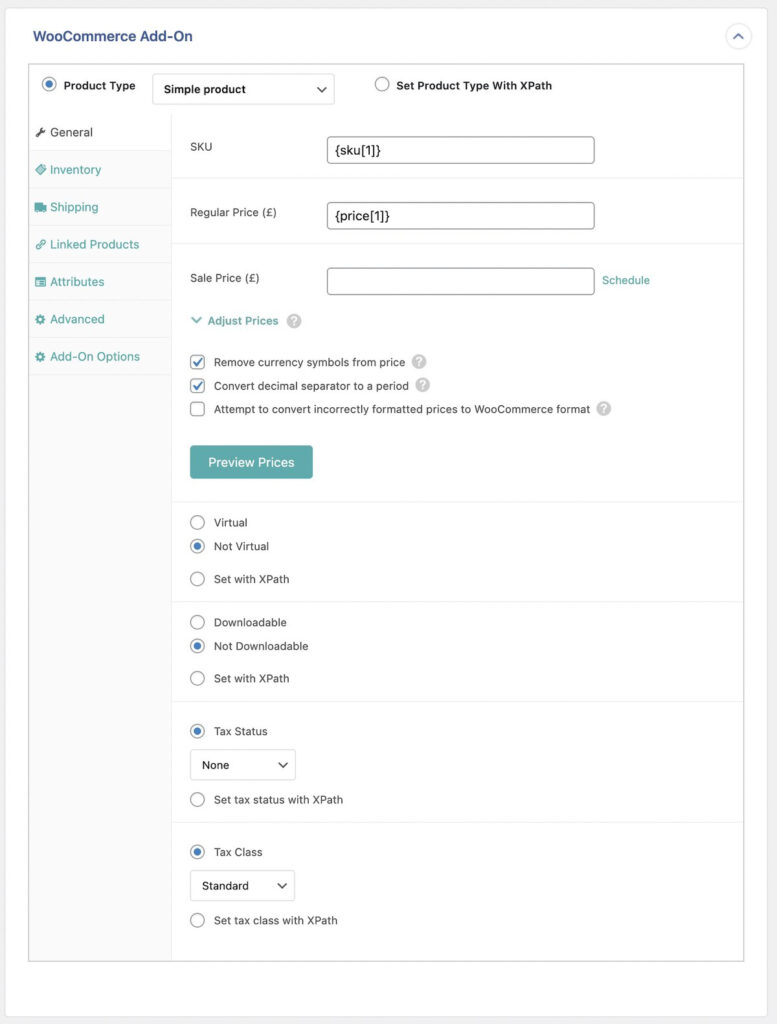
The Inventory tab includes the settings related to stock availability.
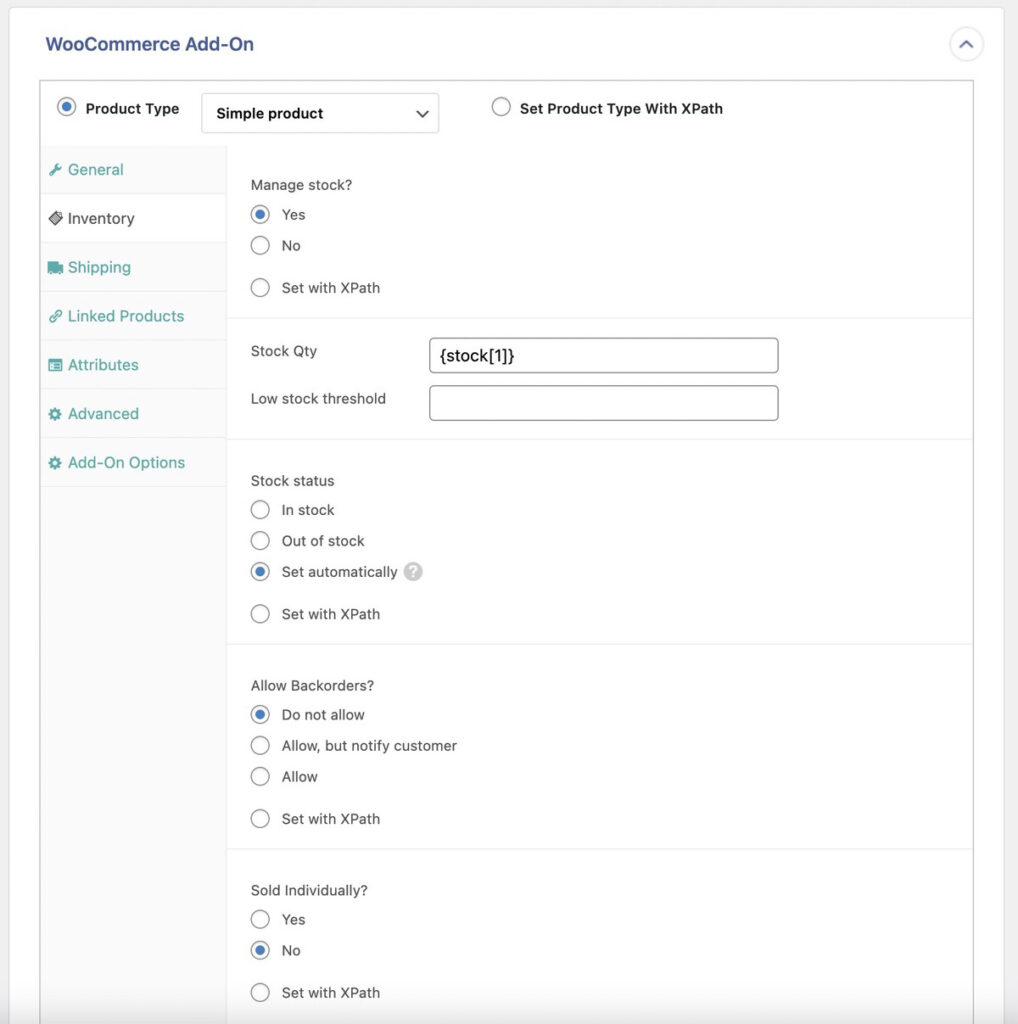
The Attributes tab lets you add different attributes like color, size, shape, etc.
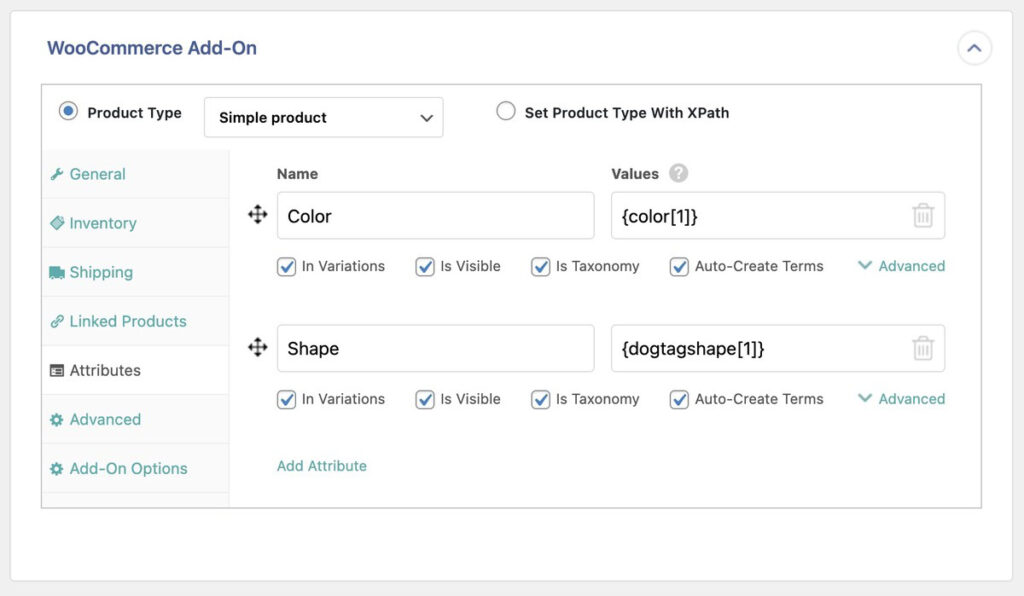
The other tabs let you configure shipping, linked products, and advanced settings.
If you want to learn how to configure the WooCommerce Add-On for variable products, you should read the documentation on importing variable products to WooCommerce from Shopify.
Map Shopify Images to WooCommerce
The Images panel lets you set up how you want to import the product images. You can import images from multiple sources — images hosted elsewhere, images currently in the Media Library, and images currently uploaded in wp-contents/uploads/wpallimport/files/.
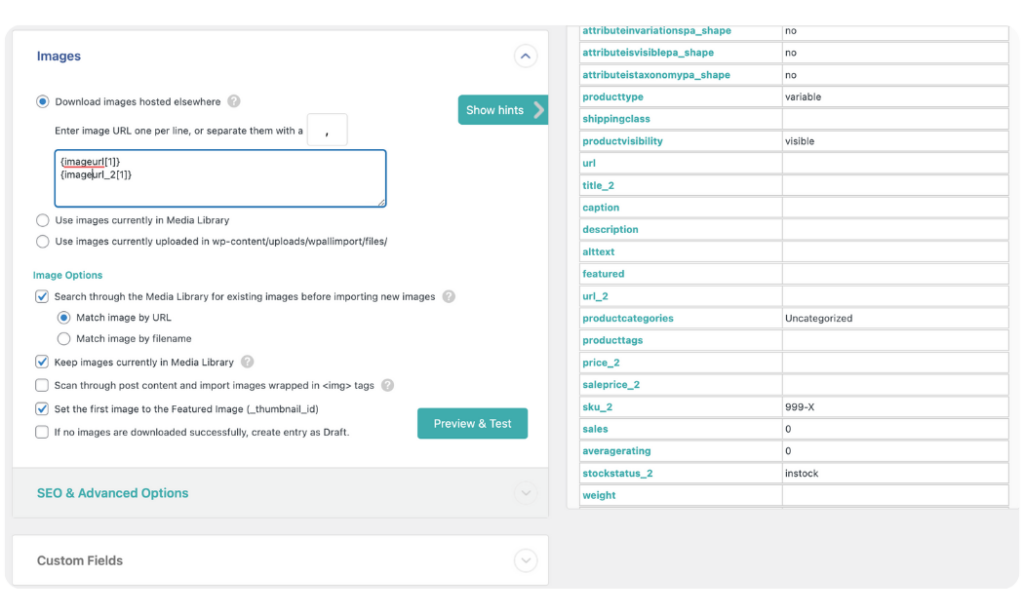
Among the other sections, Custom Fields is noteworthy. With WP All Import, you can import custom fields data to any theme or plugin, including WooCommerce.
Once you are done mapping all the WooCommerce fields, click Continue to Step 4.
5. Configure Additional WooCommerce Product Import Setting
At this step, you’ll see the Import Settings screen, which includes some additional settings to optimize your import further.
To begin with, you’ll need to first set a unique identifier for your import. A unique identifier is usually an element that’s unique for every product. For example, if every product in your Excel file has a unique SKU, then the SKU is a unique identifier. This is important as it allows you to prevent duplicate product entries in your store.
You can click the Auto-detect button to automatically select it or use the drag-and-drop interface to set it manually.
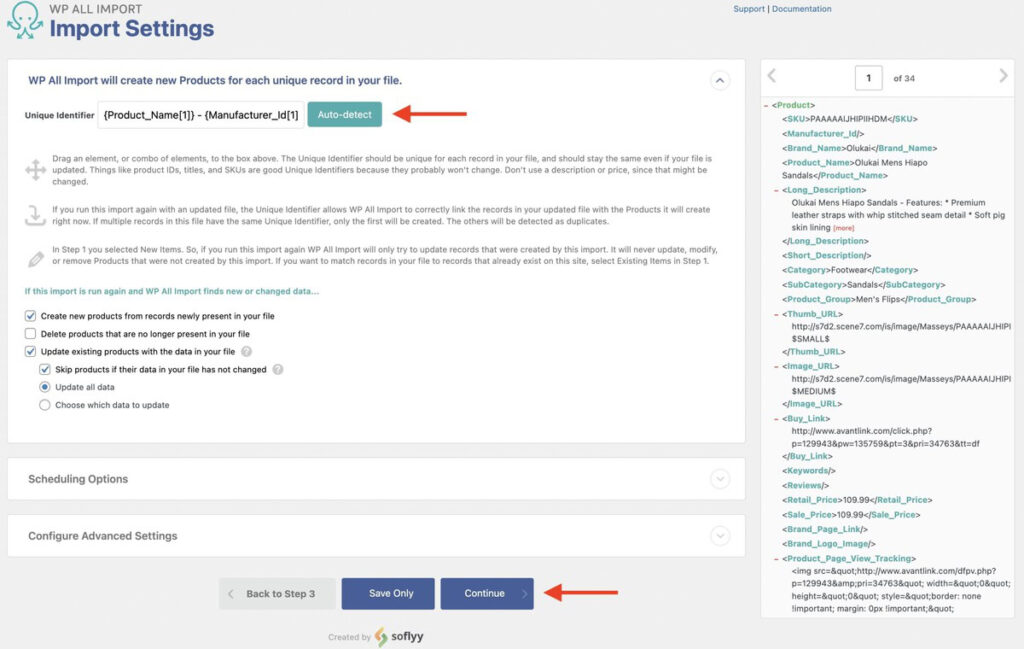
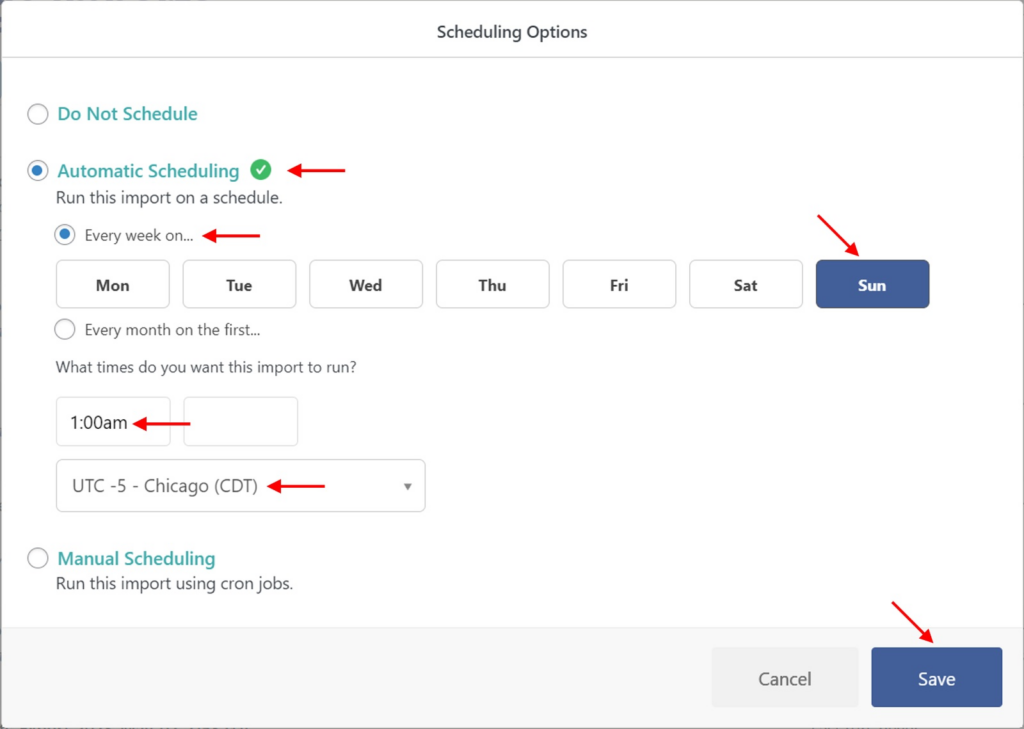
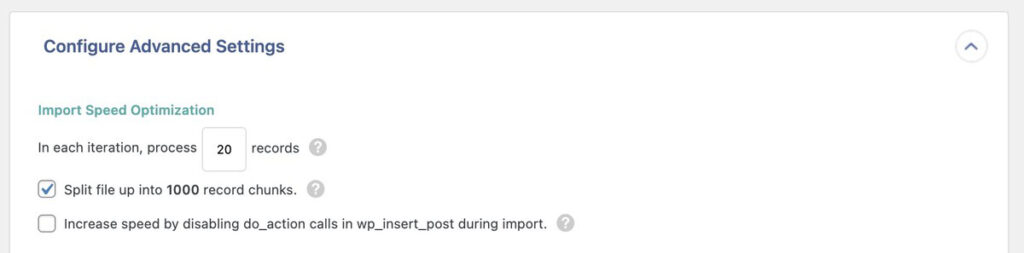
Below it, you’ll find two more panels – Scheduling Options and Configure Advanced Settings.
The Scheduling Options panel lets you automatically run your import on a daily, weekly, or monthly basis.
In Configure Advanced Settings, you can control how WP All Import splits your file into chunks and processes your import.
Once you have configured the advanced settings, click Continue to move to the final step.
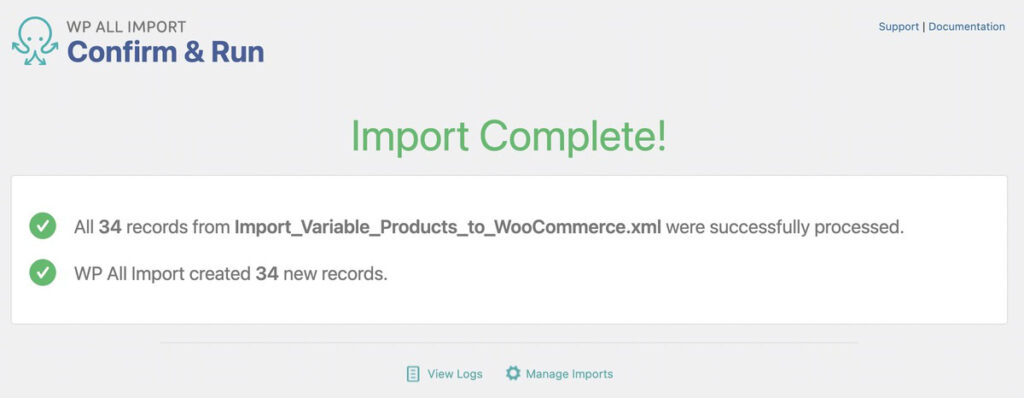
6. Import Products From Shopify to WooCommerce
The last step in the Shopify to WooCommerce product import process is the Confirm and Run screen. Here, WP All Import will display a summary of the import settings you are about to run.
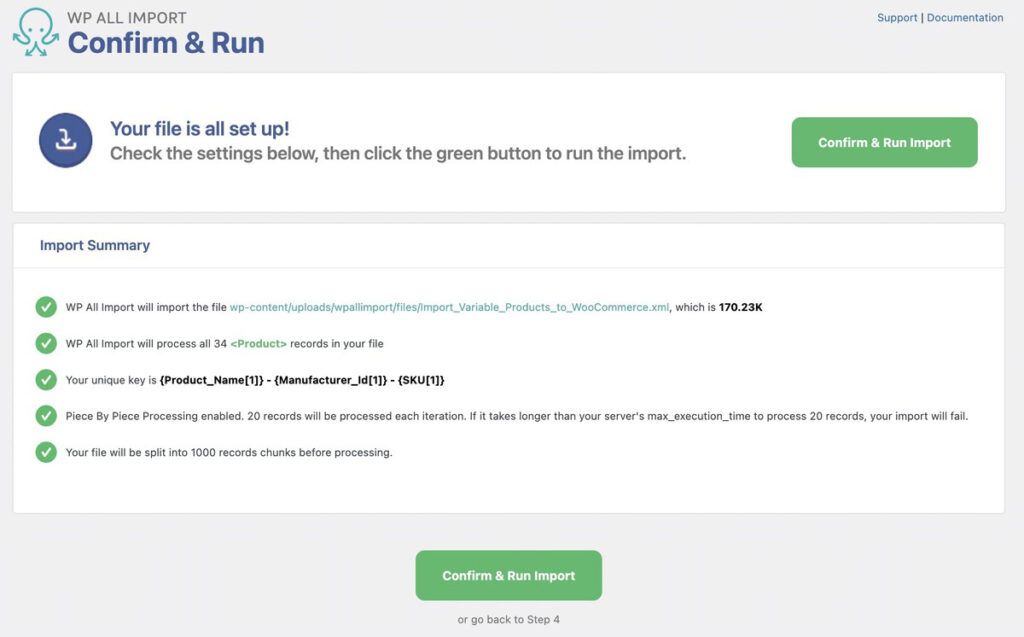
Click Confirm & Run Import to start the import. When the import is done, WP All Import will show you a summary of the new products that have been created, or if any of the existing products got updated. You’ll also be able to see the number of skipped products in case your import file has any missing information.
To review if your products were imported properly, go to Products › All Products in the WordPress menu. You should check the product data tab of some products at random to confirm the import.
There you go! Product migration from Shopify to WooCommerce is complete! Get the WP All Import plugin today to enjoy seamless product migration to WooCommerce and many other features.
Import Products from Shopify to WooCommerce- FAQs
Why Migrate From Shopify to WooCommerce?
One may want to migrate from Shopify to WooCommerce for the following reasons:
- More flexibility and control over the store.
- To have access to niche and lesser-known payment gateways.
- To save store maintenance costs.
- To have access to more plugins and free templates.
- For better SEO features.
For seamless Shopify to WooCommerce product import, we recommend using the WP All Import that supports all product types.
How Do I Import a CSV File From Shopify to WooCommerce?
You can easily import a CSV file from Shopify to WooCommerce using WP All Import. Here are the steps:
- Export your product data from Shopify in CSV format.
- Go to All Import › New Import, upload the CSV file and select WooCommerce Products in the dropdown below.
- Review the import file.
- Map the incoming product data elements to WooCommerce product fields.
- Run the Import and Verify the Imported Products.
How Do I Add Products to WooCommerce Easily?
There are multiple ways to add products to WooCommerce. If you want to add just one product to your WooCommerce store, you can manually do it using WooCommerce’s default product upload features. For bulk products, we recommend using WP All Import. These are the steps you should follow:
- Go to All Import › New Import and select/upload your product import file.
- Select WooCommerce Products as the Import Type.
- Map the Incoming product data elements to the WooCommerce product fields.
- Configure the Product Import Settings.
- Run the Import and Verify the Imported Products.
How Do I Import Shopify Orders Into WooCommerce?
With WP All Import, you can import Shopify orders into WooCommerce in minutes. Here are the steps:
- Export your order data from Shopify in CSV format.
- Go to All Import › New Import, upload the order data CSV file and select WooCommerce Orders as the import type.
- Map the Incoming order data elements to the WooCommerce order fields.
- Configure the Order Import Settings.
- Run the Import and Verify the Imported Orders.
Can I Bulk Upload Products to WooCommerce?
You can bulk upload products to WooCommerce in minutes using the WP All Import plugin. Here are the steps:
- Go to All Import › New Import and select/upload your product import file containing bulk product data.
- Select WooCommerce Products as the import type.
- Map the Incoming data elements to the WooCommerce product fields.
- Configure the Product Import Settings.
Run the Import and Verify the Imported Products.