How To Import External or Affiliate Products Into WooCommerce
Do you want to import affiliate products into your WooCommerce store and are searching for the best way to get it done?
Offering external or affiliate products on your online store is a great way to expand your offerings, keep customers engaged, and increase your earnings through commissions. If you do not want to handle inventory or work with product suppliers, you can run a WooCommerce store that is completely centered around selling external or affiliate products for passive income.
Adding affiliate products to your store manually can be time-consuming, especially when you have hundreds or thousands of them. This detailed guide will show you how to import affiliate products into WooCommerce easily, helping you save time and run your WooCommerce store more efficiently.
What Are WooCommerce External or Affiliate Products
External or affiliate products are a type of WooCommerce product hosted on your WooCommerce website but sold or fulfilled by a third-party merchant.
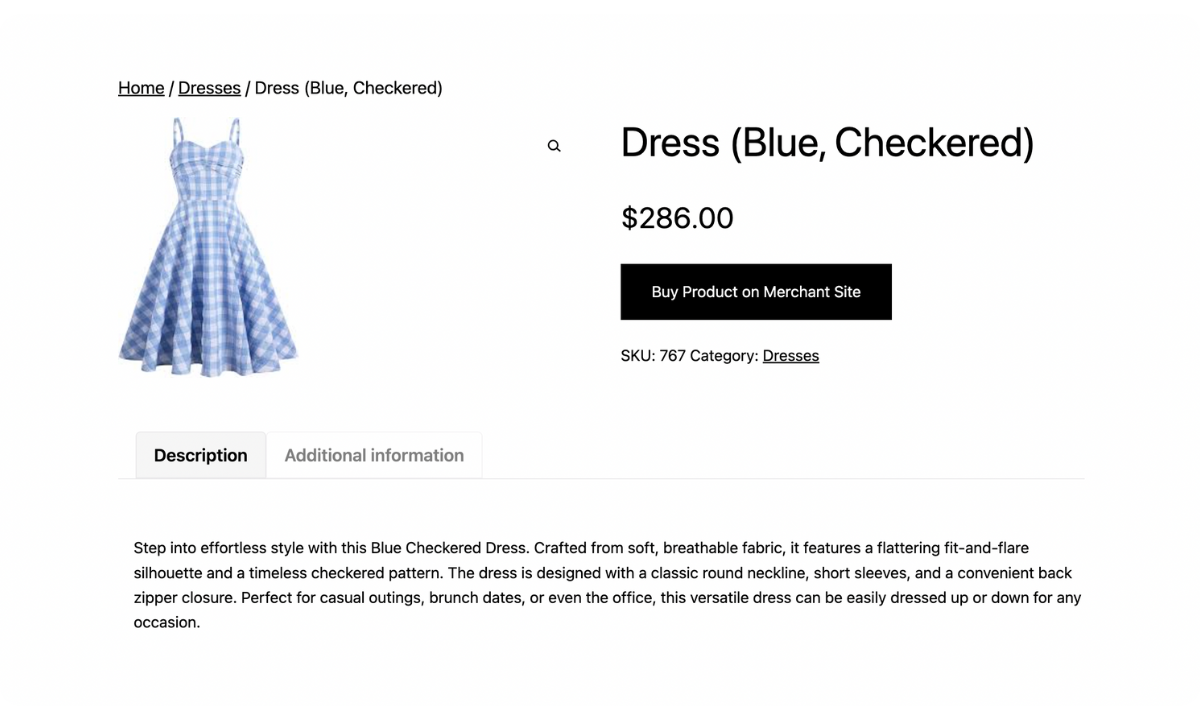
Unlike simple and variable products, which are set up to enable customers to pay for products directly on your site, affiliate products require inputting an affiliate link for each product during the product creation process. This ensures that when customers want to purchase affiliate products, they are redirected to the merchant’s store to place their order instead of checking out on your site. This earns you a commission percentage or fee without needing to do the extra work of fulfilling the order.
As we mentioned at the start of this article, manually adding these external products to your store is cumbersome, which leaves you prone to errors and data inconsistencies. It is always advisable to bulk-add affiliate products to your site by importing them.
While tons of WooCommerce product import plugins exist, many do not support importing all WooCommerce product types, such as external or affiliate products. Additionally, their import functionalities can be limited, skipping key features that grant you more control over your data and make the import process easier.
WP All Import is the only import plugin in the WordPress ecosystem that covers all the bases for WooCommerce product imports. For this reason, in this article, we will use it to import affiliate products into WooCommerce.
WP All Import – The Best WooCommerce Import Plugin
The WP All Import plugin is hands down the best plugin for importing WooCommerce products. It offers a user-friendly drag-and-drop interface, an intuitive 5-step import process, and features that grant you complete granular data control for the smoothest product imports.
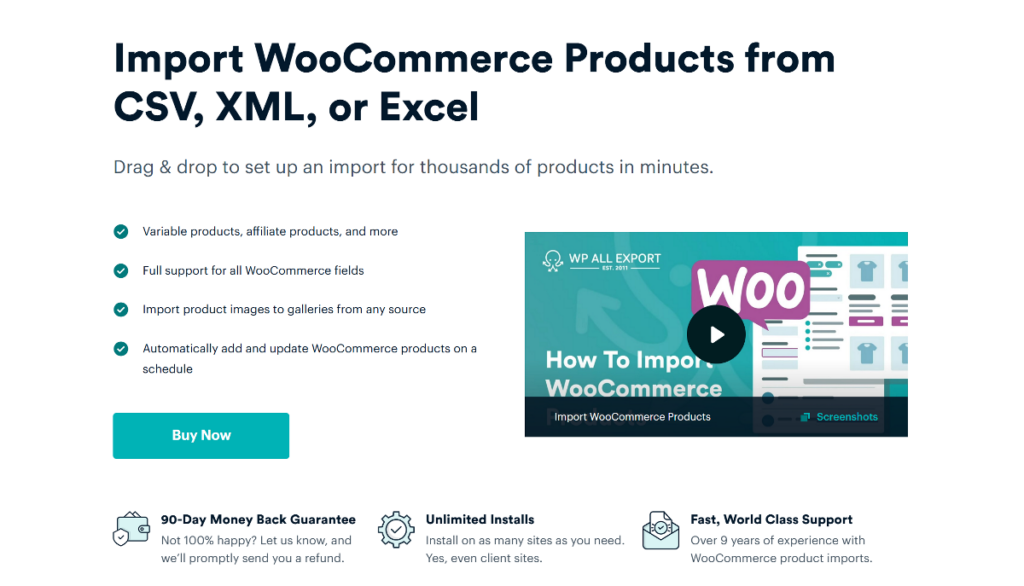
With the WP All Import plugin, you can set up an import of thousands of affiliate products from CSV, XML, Excel, or Google Sheets within minutes. It doesn’t matter the structure of your file or whether your products contain custom data – WP All Import will handle it all.
The plugin provides many great features that make importing affiliate products, amongst other data types, convenient. These include:
- Powerful filtering functionality to import only specific affiliate products to your WooCommerce store.
- Support for importing all affiliate product data, including custom fields.
- Scheduling feature to automate the import of affiliate products to your store on pre-defined days and times.
- Support for importing other WooCommerce product types, such as simple and variable products.
- On-the-fly import data modification capability using PHP functions.
- Support for importing other WooCommerce data types such as orders, customers, etc.
- Support for importing other WordPress post types such as pages, users, etc.
- Advanced import optimization settings for fast imports, and more.
The WP All Import plugin is so feature-rich that it’s the only import plugin you will ever need for your WooCommerce store. The outlined features make it obvious why this is our choice of plugin for importing affiliate products into WooCommerce.
How To Import Affiliate Products Into WooCommerce
In this section, we will show how to use the WP All Import plugin to import your affiliate products into WooCommerce quickly.
1. Install and Activate WP All Import
The first step in setting up an import of your affiliate products is to purchase and download the WP All Import plugin and its WooCommerce Import Add-On on your site. The WooCommerce Import Add-On is needed to enable importing all WooCommerce products and data types.
Once the plugin and add-on have been downloaded to your PC, head over to your WordPress admin dashboard. From the menu, go to Plugins › Add New Plugin.
On the screen that appears, start by installing the WP All Import plugin by clicking Upload Plugin › Choose file › Install Now. The installation process will start and complete within seconds. Next, click Activate Plugin and the plugin will be installed and activated on your site.
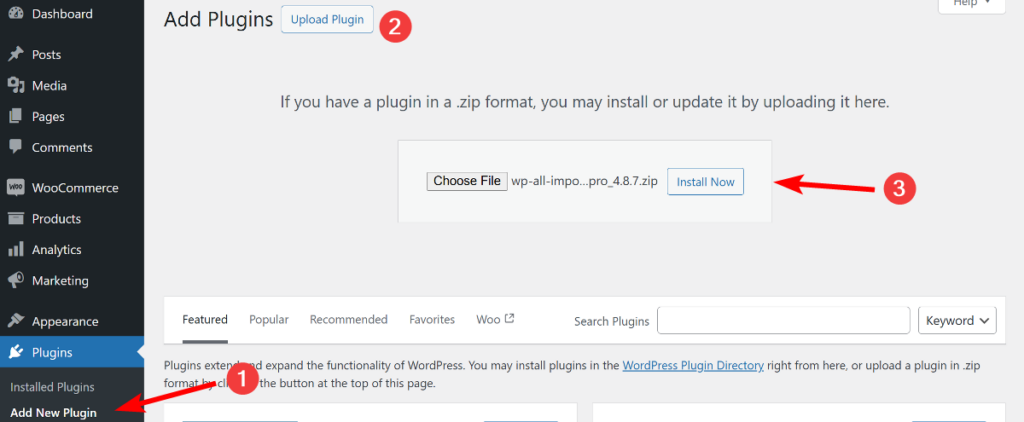
The same steps should be followed to install and activate the WooCommerce Import Add-On.
2. Start a New WooCommerce Affiliate Product Import
Now that the WP All Import plugin and its WooCommerce Import Add-On have been installed and activated on your site, it’s time to start a new WooCommerce affiliate product import.
Go to All Import › New Import from your WordPress dashboard menu to access the New Import screen.
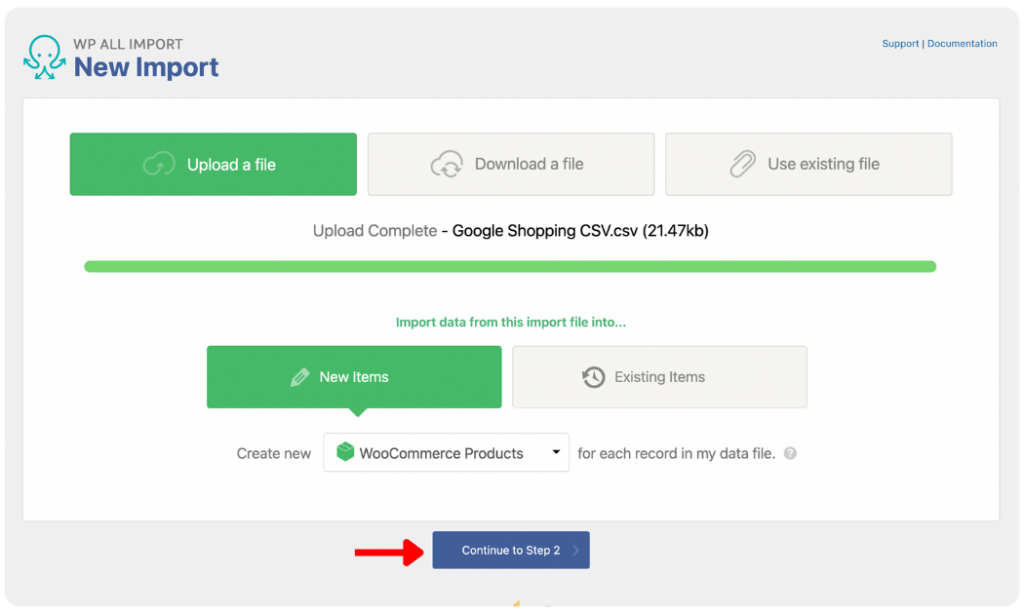
On this screen, you will see three options for importing your affiliate product data. You can Upload a file (from your PC), Download a file (from a URL or FTP/SFTP), or Use an existing file (if you have previously uploaded an import file).
Since this is your first import with the WP All Import plugin, you can select the option to either Upload a file or Download a file and then load your product import file.
Once your file is loaded, select WooCommerce Products as the import type under New Items. Next, click Continue to Step 2 to proceed.
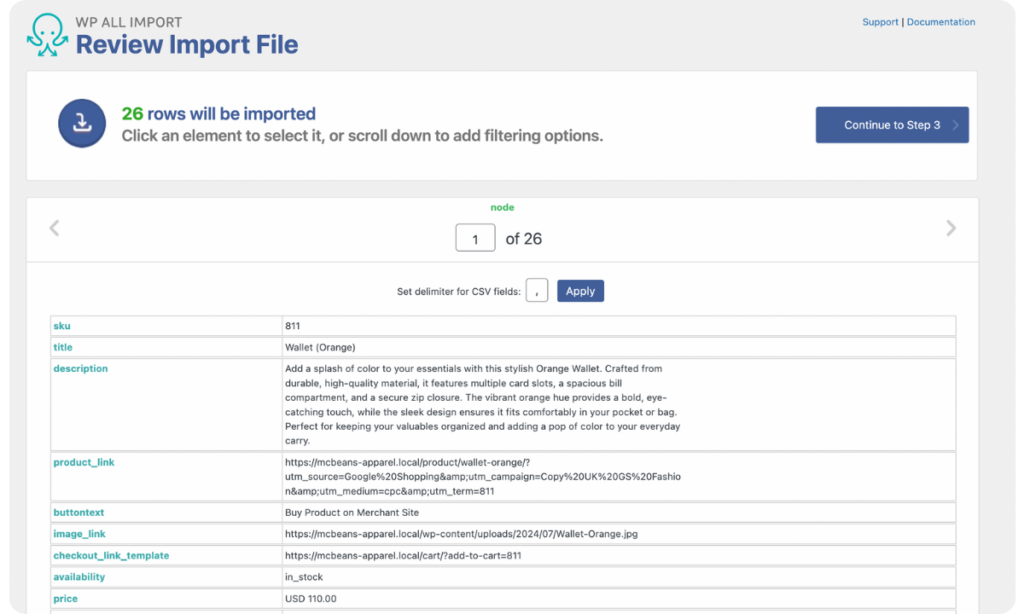
3. Review Loaded Affiliate Product Data
On the Review Import File screen, you can review your import file to ensure that WP All Import correctly detects all the records in the file. Use the gray arrows on the left and right of the screen to navigate between records and confirm that there are no data inconsistencies.
To add filters to your import, scroll down to see the Manage Filtering Options panel. This panel contains WP All Import’s powerful filtering settings that enable you to import only desired products to your WooCommerce store based on defined specifications.
To add a filter, select any Element from your import file, define a filter Rule, and enter a Value. Next, click Add Rule and then Apply Filter to XPath. Your filter will be created and applied to your import.
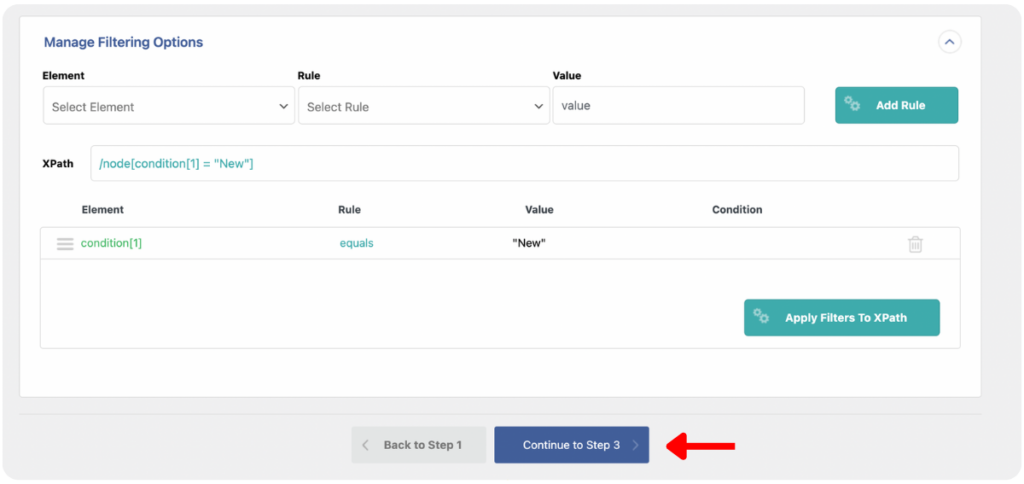
You can also create multiple filters if necessary and combine them using the AND and OR conditions.
After you are done on this screen, click Continue to Step 3.
4. Map Affiliate Product Data to WooCommerce Fields
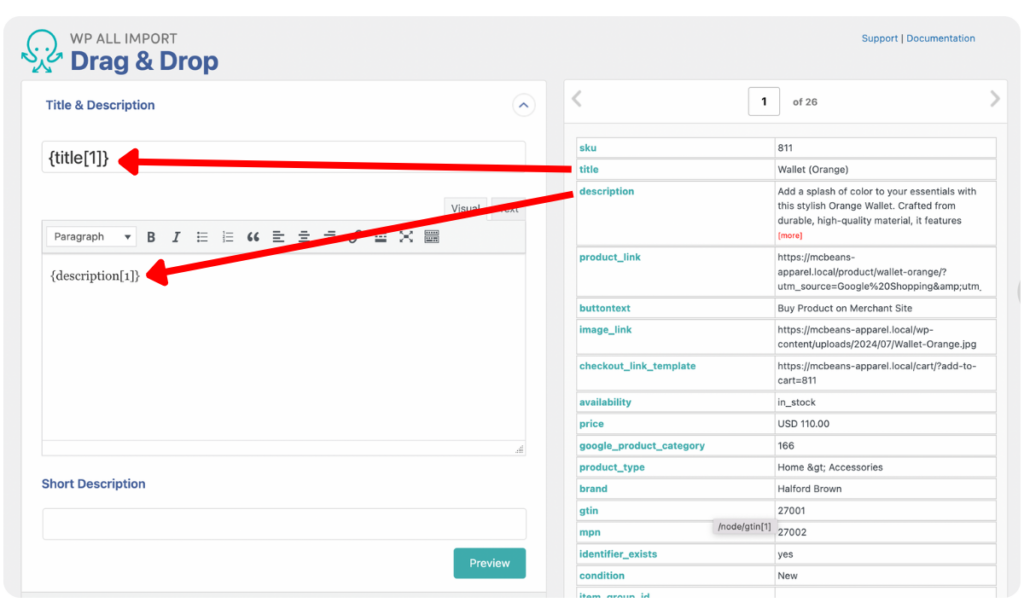
Data mapping, the most important step in the product import process, happens on the Drag & Drop screen.
WP All Import provides an easy-to-use drag-and-drop interface that makes mapping easy, even for beginners. The data from your import file is displayed in a table on the right side of the screen, while the product fields to be mapped are on the left.
Title & Description
The Title & Description panel provides fields to map your product title and description elements. Drag and drop the corresponding elements from your incoming data file into the fields to map them.
WooCommerce Add-On
From the WooCommerce Add-On panel, you can map all the standard WooCommerce product data fields for your affiliate products.
First, set the Product Type to External/Affiliate product. Doing this automatically changes the set of product tabs on the left that are available to be mapped.
The General tab is opened by default and provides input fields for mapping the SKU, Product URL, Button Text, Regular Price, and Sale Price. Map these fields with the elements from your incoming data file.
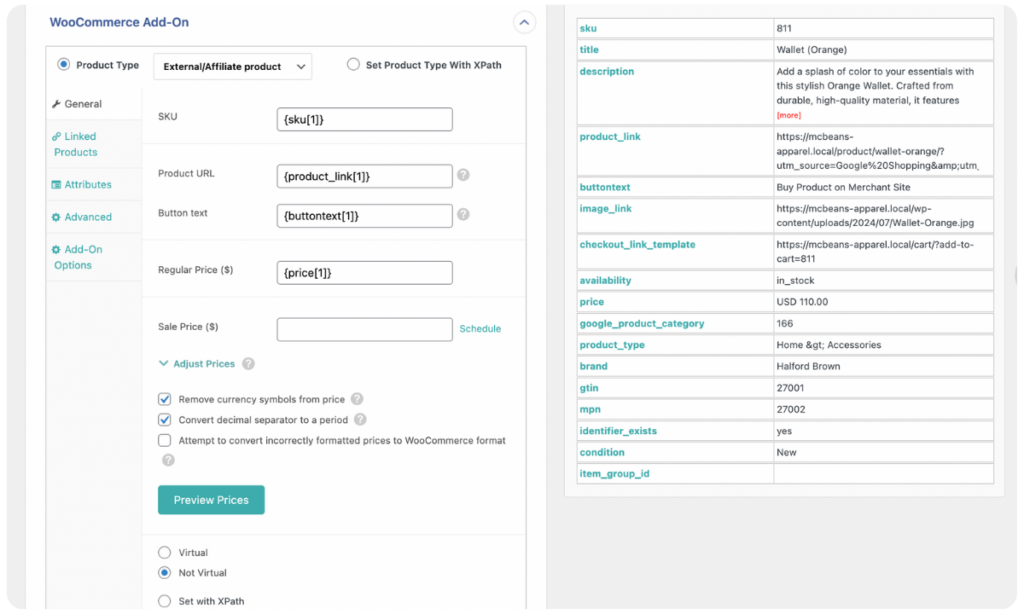
Below the fields, there are extra settings with default selections. The selections are ideal for most affiliate product imports. However, you can change them if necessary.
Open the Linked Products tab to map the Up-Sells and Cross-Sells for your affiliate products, if applicable.
From the Attributes tab, you can map the Name and Values of your product attributes. Advanced settings are provided to specify how WP All Import should handle the import of the product attributes. We recommend keeping the default settings.
Images
In the Images panel, you will see options to decide how you would like to import your affiliate product images. You can Download images hosted elsewhere, Upload images currently in Media Library, or Use images currently uploaded in wp-content/uploads/wpallimport/files/.
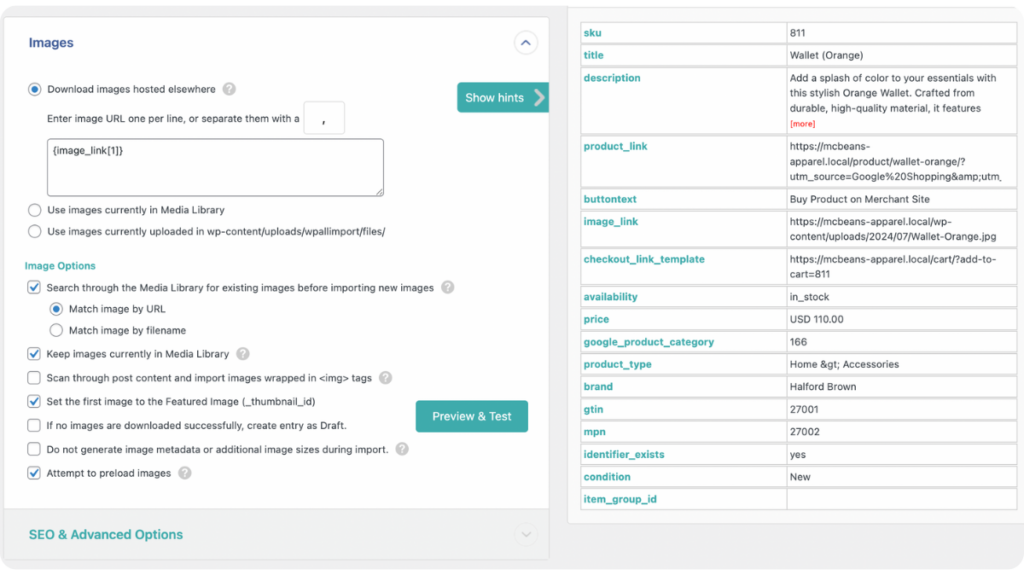
Since affiliate product images are often hosted on the merchant’s server, keep the default selection to Download images hosted elsewhere. Next, drag and drop the image URL element(s) from the incoming data into the provided field.
Below the mapping field, there are Image Options settings. Again, we recommend keeping the default selections since they work great for most imports.
Custom Fields
WP All Import also lets you map your affiliate products’ custom data in the Custom Fields panel.
If you already have products with custom fields in your WooCommerce store, WP All Import can auto-detect them. If any fields are detected, a notification and a See Detected Fields button are displayed at the top of the panel.
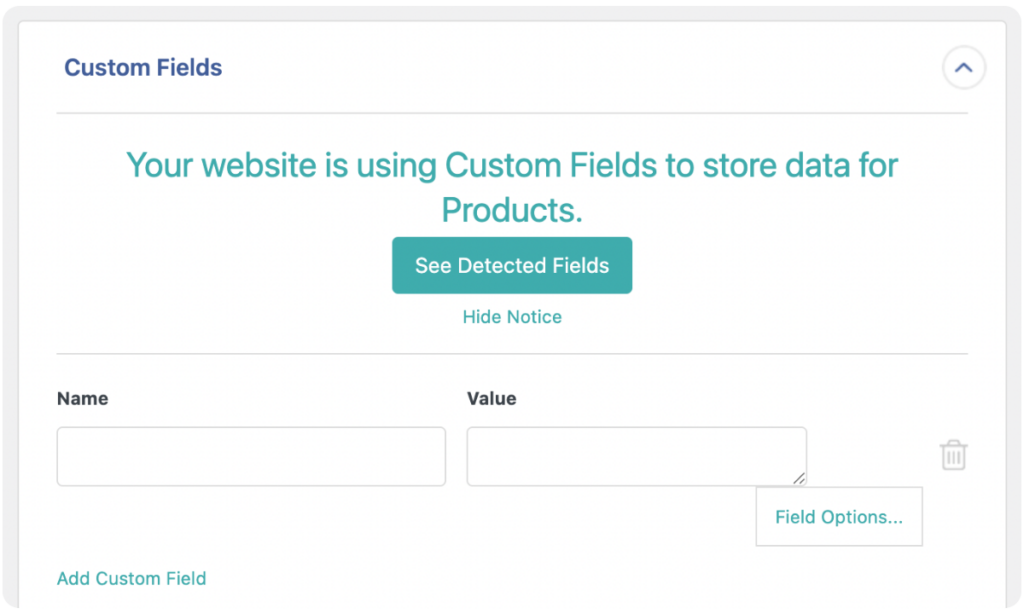
However, if you don’t have existing custom fields or would rather create them during the import, drag and drop the Name and Value elements for your products’ custom fields.
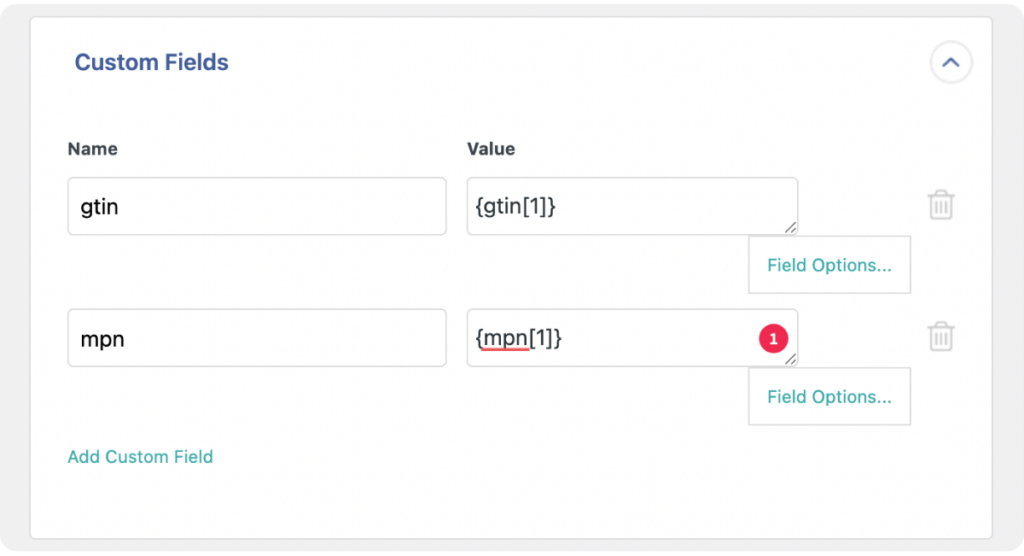
Use the Add Custom Field option to add as many as needed for your import.
WP All Import provides other panels to map additional data for your affiliate products and modify the import data. These include panels for Taxonomies, Categories, Tags, Function Editor, Other Product Options, and more. We won’t go into detail on those panels in this article.
Once you have fully mapped all the relevant fields, scroll to the bottom of the screen and click Continue to Step 4.
5. Apply Additional External Product Import Settings
On the Import Settings screen, you can configure additional settings to optimize how your import should run.
Start by setting a Unique Identifier for your import. To do this, you can drag and drop unique elements (such as IDs or SKUs) from your import file into the provided field, or click the Auto-detect button. The Unique Identifier helps WP All Import prevent product duplicates if you re-run the import in the future.

You will see some settings within the panel to dictate how WP All Import should handle records in the import file if the import is re-run. The default settings are fine for most imports.
The next panel is the Scheduling Options panel. This panel contains WP All Import’s powerful scheduling options that allow you to run your affiliate product imports automatically on specific days and times of the week or month. Check out the Run WordPress Import on a Schedule guide to learn more about the scheduling feature.
The panel to Configure Advanced Settings provides settings for optimizing the speed of your import. WP All Import selects the most optimal settings by default, so you can leave the selections as is. However, if you encounter issues while running the import, you can tweak the settings to better fit your import needs.
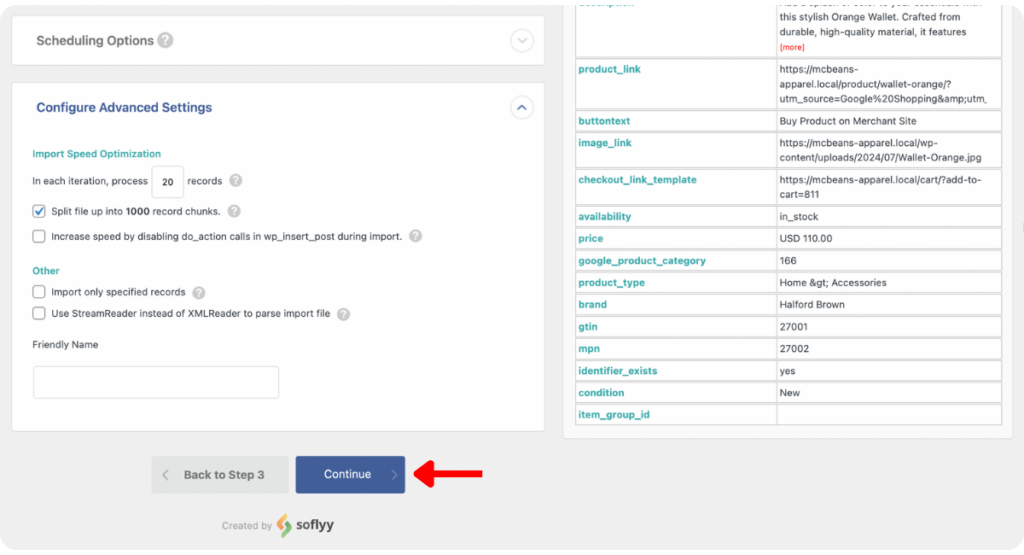
At the bottom of the screen, click Continue to move to the last step.
6. Run the WooCommerce Affiliate Product Import
The Confirm & Run screen is the final step of importing affiliate products into WooCommerce with WP All Import.
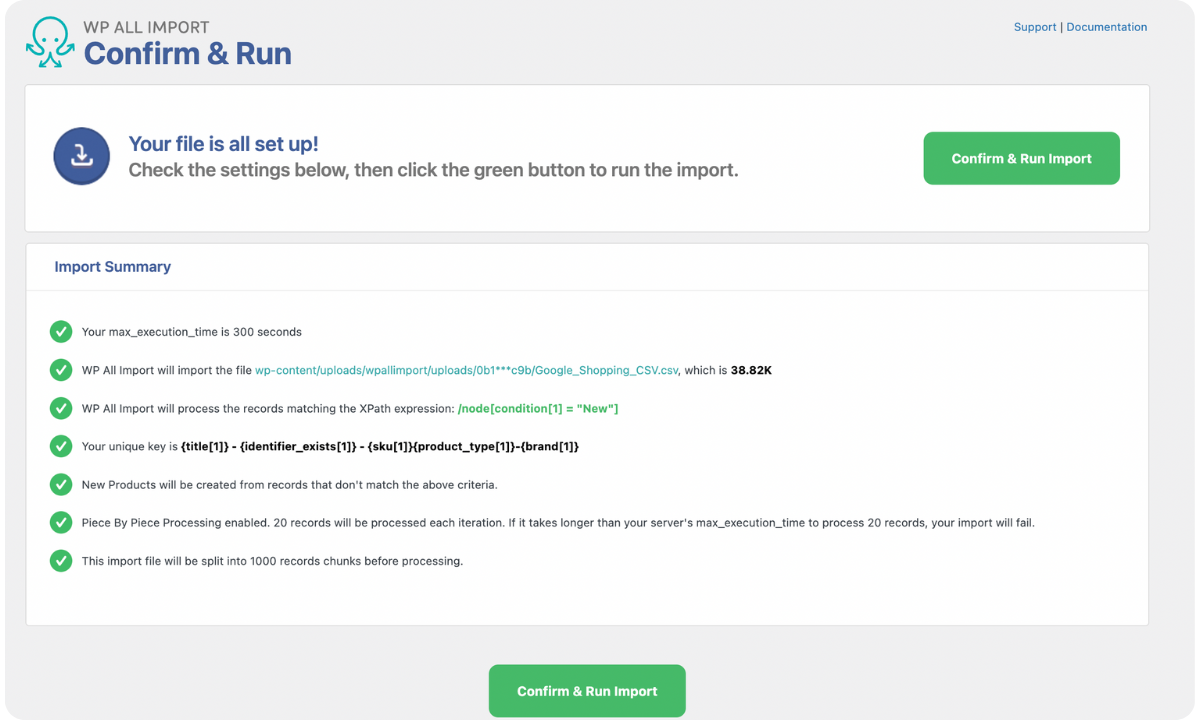
Here, you will see a summary of all the import settings you have applied. Review the settings to be sure your import will run without issues. If you notice any errors, you can go back and fix them before proceeding.
To run the import, click the Confirm & Run Import button.
Once the import is completed, you will see the Import Complete notification.
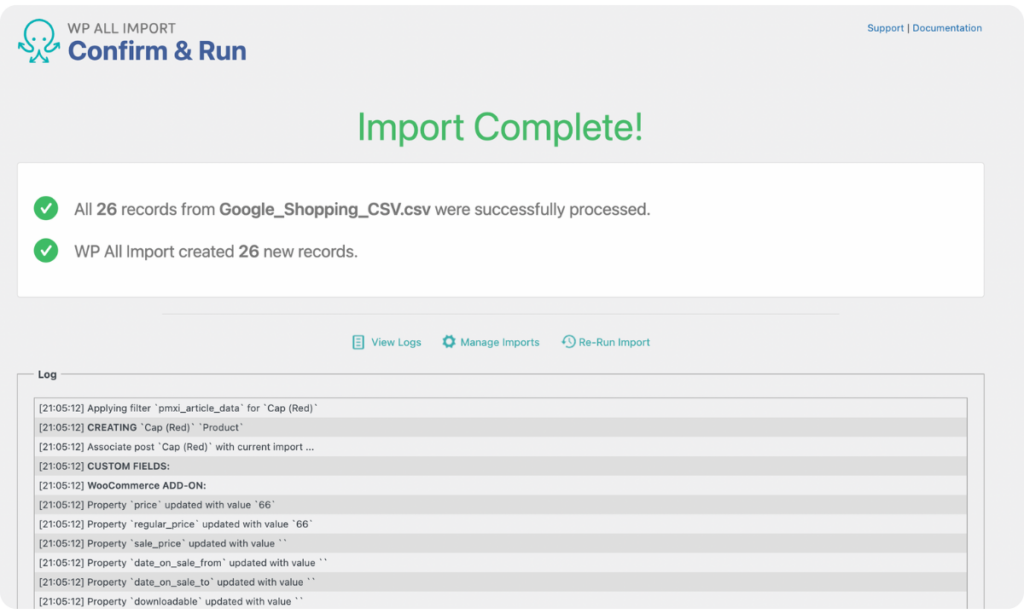
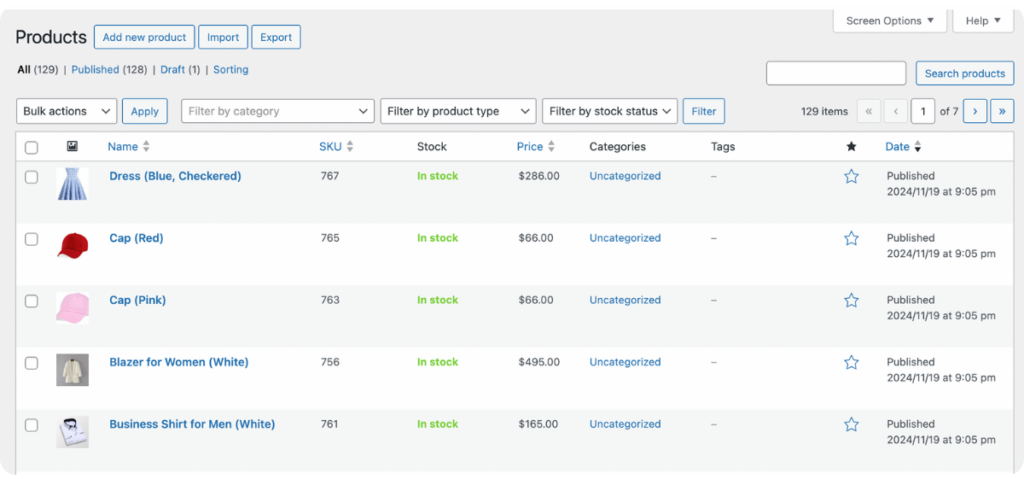
Navigate to Products › All Products to see the imported products. Open the product tabs for a few of them to cross-check that all the data was imported successfully.
Import Affiliate Products Into WooCommerce – FAQs
How Do I Add an External Product in WooCommerce?
To add an external product in WooCommerce, navigate to Products › Add New, from your WordPress dashboard menu. On the Add new product page, change the Product data to External/Affiliate product, then fill out the details for the product in the fields provided. Click the Publish button and your external product will be added to your store. If you need to add multiple external/affiliate products to your WooCommerce store, an import plugin, like WP All Import, will get the job done seamlessly. The plugin saves you time and prevents data entry errors.
How Can I Import Products From Any Website to My WooCommerce Website?
You can import products from any website to your WooCommerce website with the WP All Import plugin and its WooCommerce Import Add-On. Once you have installed both on your site:
- Navigate to All Import › New Import.
- Load the import file of the products you want to import. WP All Import supports importing product data from CSV, XML, Excel, and Google Sheets.
- Select WooCommerce Products as the import type.
- Map the incoming data elements to the product fields on the Drag & Drop screen.
- Run the import and the products will be added to your WooCommerce site.
How Do I Import Data Into WooCommerce?
To import data into WooCommerce, download and install the WP All Import plugin and its WooCommerce Import Add-On:
- Navigate to All Import › New Import.
- Upload your data import file.
- Under New Items, select the kind of WooCommerce data you want to import. WP All Import supports importing WooCommerce Orders, WooCommerce Coupons, WooCommerce Products, WooCommerce Reviews, and WooCommerce Customers.
- Map the incoming data elements to the provided fields on the Drag & Drop screen.
- Run the import and your WooCommerce data will be imported and added to your site.
How Do I Add Digital Products to WooCommerce?
To add digital products to WooCommerce, from your WordPress admin menu, go to Products › Add New. Next, check the Virtual and Downloadable boxes under the Product data section. Then populate all the product fields that appear, click Publish and your digital product will be added to your store. If you, however, need to import many digital products to your WooCommerce store to save time and effort, get the WP All Import plugin and its WooCommerce Import Add-On.