How to Export and Import Gravity Forms Entries
In this article, we’re going to describe everything you need to know about exporting and importing Gravity Forms entries. Here are the main topics:
Your Options to Export Gravity Forms Entries
How to Export Gravity Forms Entries
How to Change the Export File Type
How to Create an Export Filter
How to Modify Gravity Forms Entries While Exporting Them
How to Schedule Exports for Gravity Forms Entries
How to Integrate Your Exported Gravity Forms Entries with External Applications
Frequently Asked Questions About Exporting Gravity Forms Entries
Your Options to Import Gravity Forms Entries
How to Import Gravity Forms Entries
How to Handle Different Import File Types
How to Create an Import Filter
How to Modify Gravity Forms Entries While Importing Them
How to Schedule Imports of Gravity Forms Entries
Other Reliable Sources of Information Around the Web
Your Options to Export Gravity Forms Entries
You have three main options to export Gravity Forms entries. Below is a brief description of each of them.
Gravity Forms Built-in Export Feature
You can find this free option at Forms > Import/Export > Export Entities. It allows you to export fields, choose a date range, and apply simple filters. If all you want to do is dump all entries or a simple subset of entries for a form, this option should suffice. But if you need to do anything more sophisticated, you will quickly reach the limits of this tool.
For example, while you can stipulate that the entries must meet all of your filter conditions (equivalent to the AND operator) or any of your conditions (equivalent to the OR operator), you cannot mix these two operators to create a filter like “(Condition A and Condition B) OR Condition C” because there is no way to implement the parentheses. Also, you can only download a CSV version of your file.
GravityExport Plugin from GravityKit

It also won’t let you modify your export data on the fly without using advanced programming techniques. For these types of advanced features, you have to turn to WordPress’s import/export leader.
Gravity Forms Export Package from WP All Import

You can export your entries to CSV, Excel, or XML, download them from a URL, schedule them to run automatically, and even automatically integrate your export data with thousands of external apps through Zapier.
Finally, you also get much broader WordPress export capabilities (posts, pages, taxonomies, custom post types and fields, etc.) for free out of the box, and if you want to splurge another $50 for the lifetime Gravity Forms Pro Package, you get an equally powerful tool for importing Gravity Forms entries.
To avoid any limitations, we’re going to use this Pro Package to create examples for this article. If you don’t have access to this plugin, you can use this free online sandbox. Just choose the Gravity Forms Entries option and click Create Sandbox. Let’s begin with a simple walkthrough.
How to Export Gravity Forms Entries
Export Gravity Forms Entries Step 1: Create a New Export
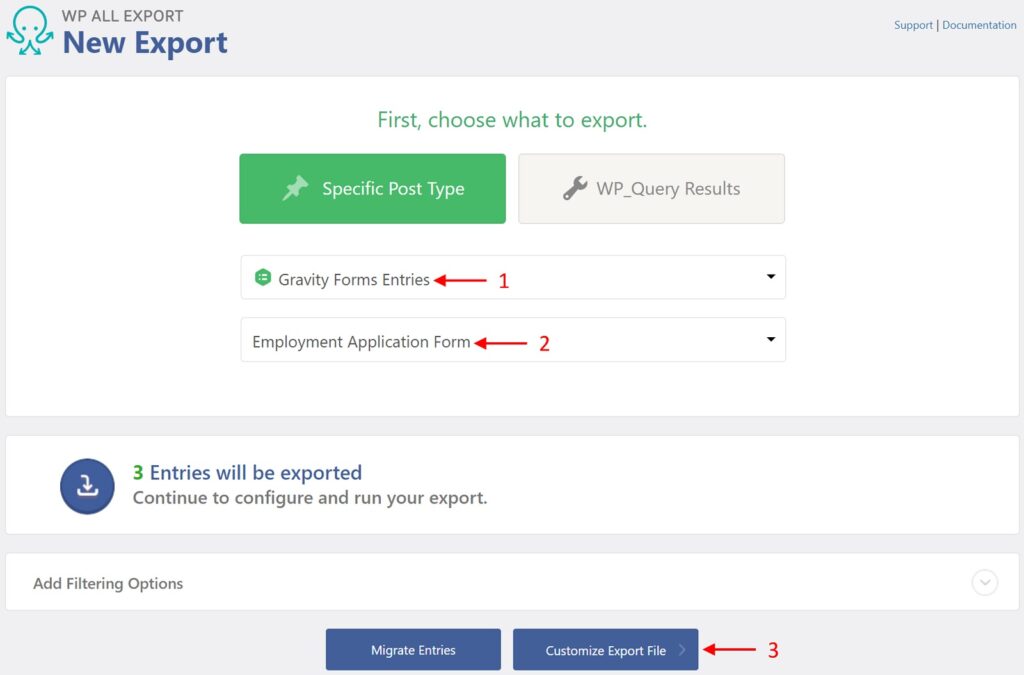
Go to All Export › New Export:
- Select Gravity Forms Entries as your export type.
- Choose the form for which you wish to export entries.
- Click the blue Customize Export File button at the bottom of the screen.
This will export all entries for the selected form. You can expand the Add Filtering Options section to filter your entries, but we’ll describe how to do this later in this article. After you click the Customize Export File button, you will arrive at the Drag & Drop interface.
Export Gravity Forms Entries Step 2: Select Export Columns
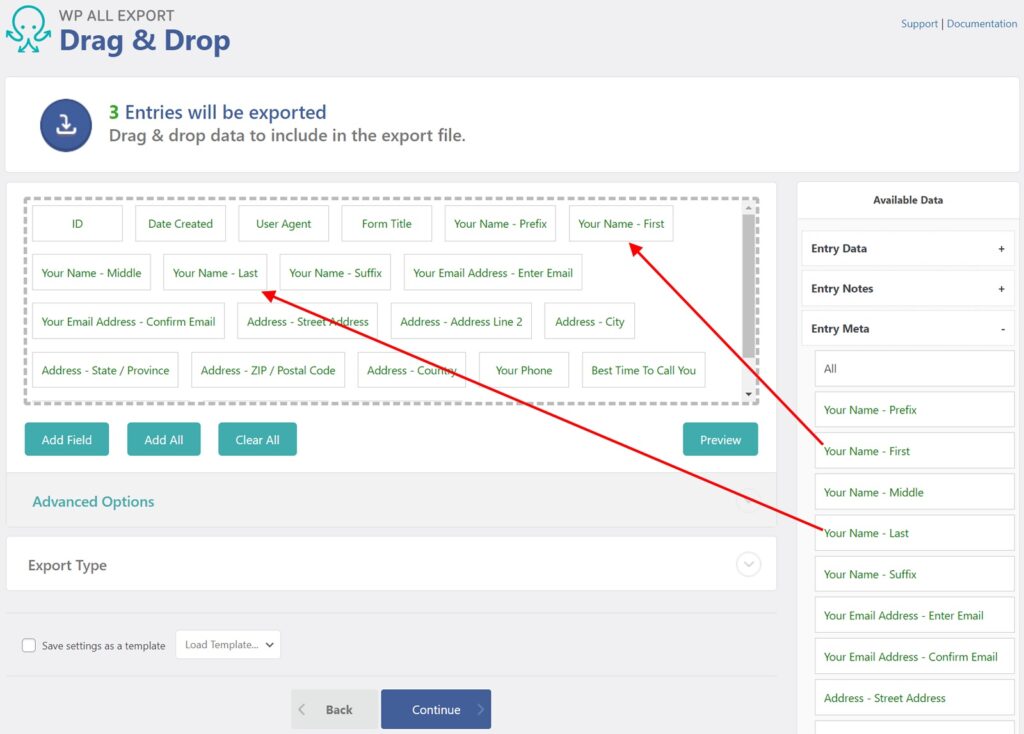
- Entry Data
- Entry Notes
- Entry Meta
These sections give you access to all the Gravity Forms entries data. In addition to selecting data fields for export, this interface offers far more advanced capabilities to create or modify export columns, which we’ll describe later. Click Continue to proceed to the Export Settings screen.
Export Gravity Forms Entries Step 3: Configure the Export Settings
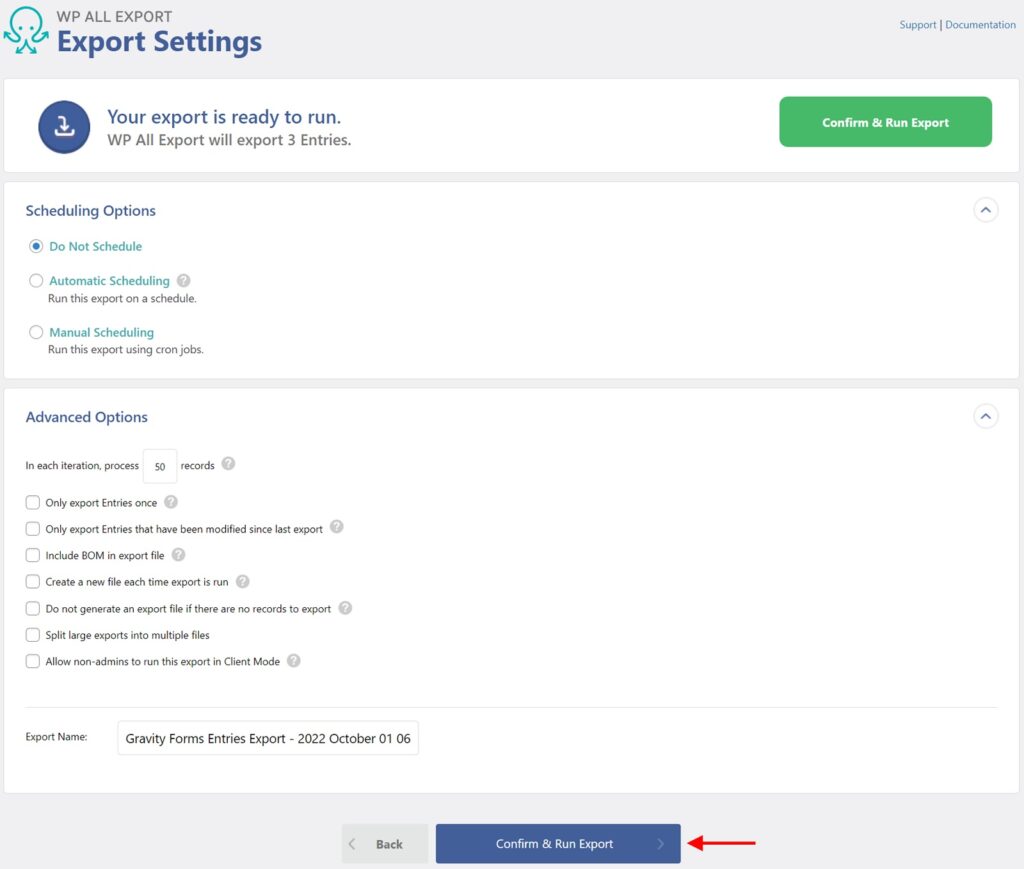
Export Gravity Forms Entries Step 4: Confirm and Run the Export
When the export completes, you will see this screen: 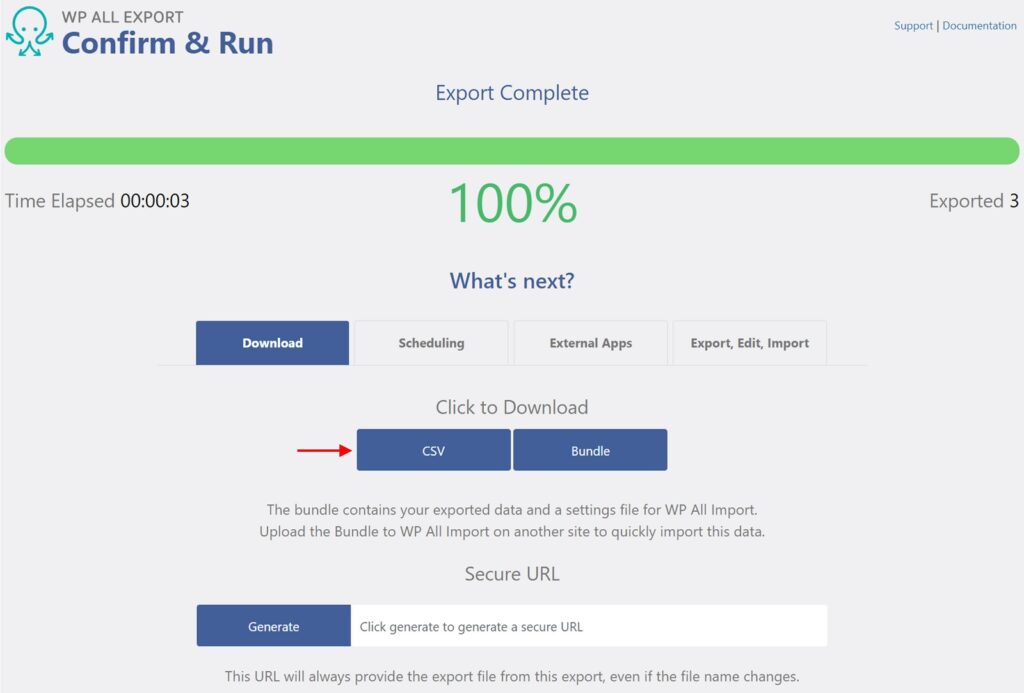
How to Change the File Type When Exporting Gravity Forms Entries
To change the export file type, do the following in the Drag & Drop interface:
- Expand the Export Type panel.
- Select Spreadsheet.
- Choose Excel File XLS or Excel File XLSX.
Alternatively, you can select Feed and then choose either Simple XML Feed or Custom XML Feed. 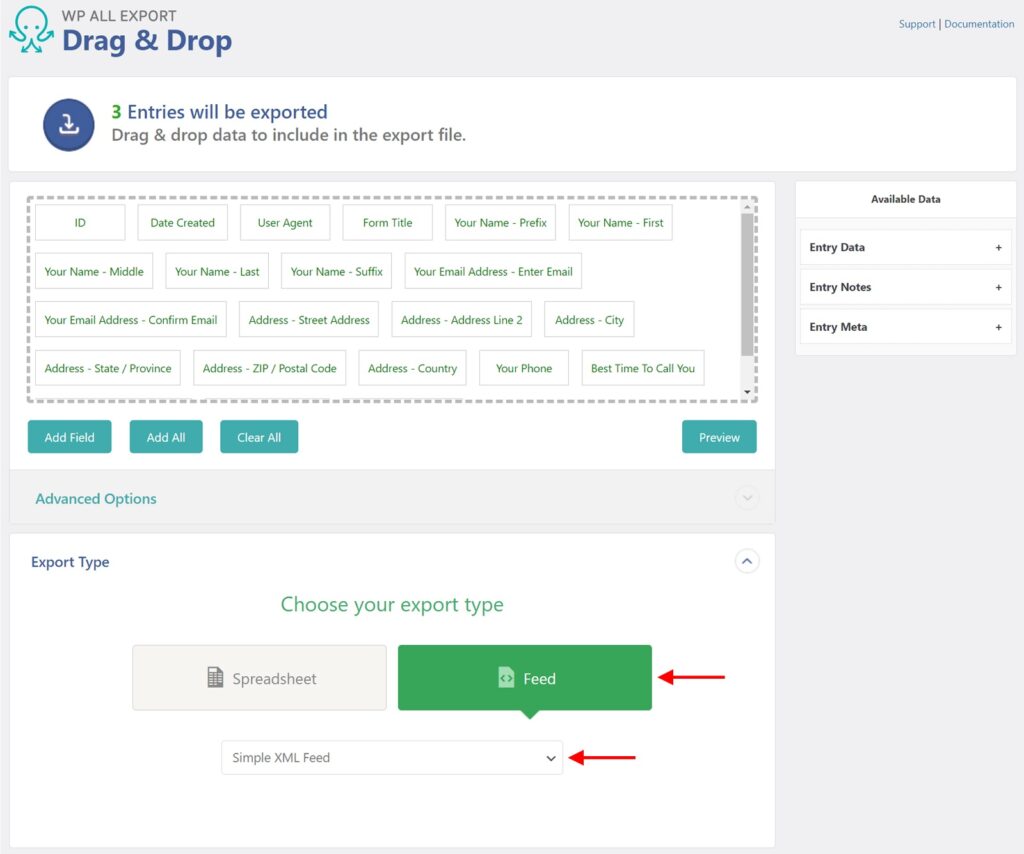
How to Create a Filter When Exporting Gravity Forms Entries
The ability to filter any export is essential. This is no different when exporting Gravity Forms entries. WP All Export’s filter tool is accessible in the New Export screen: 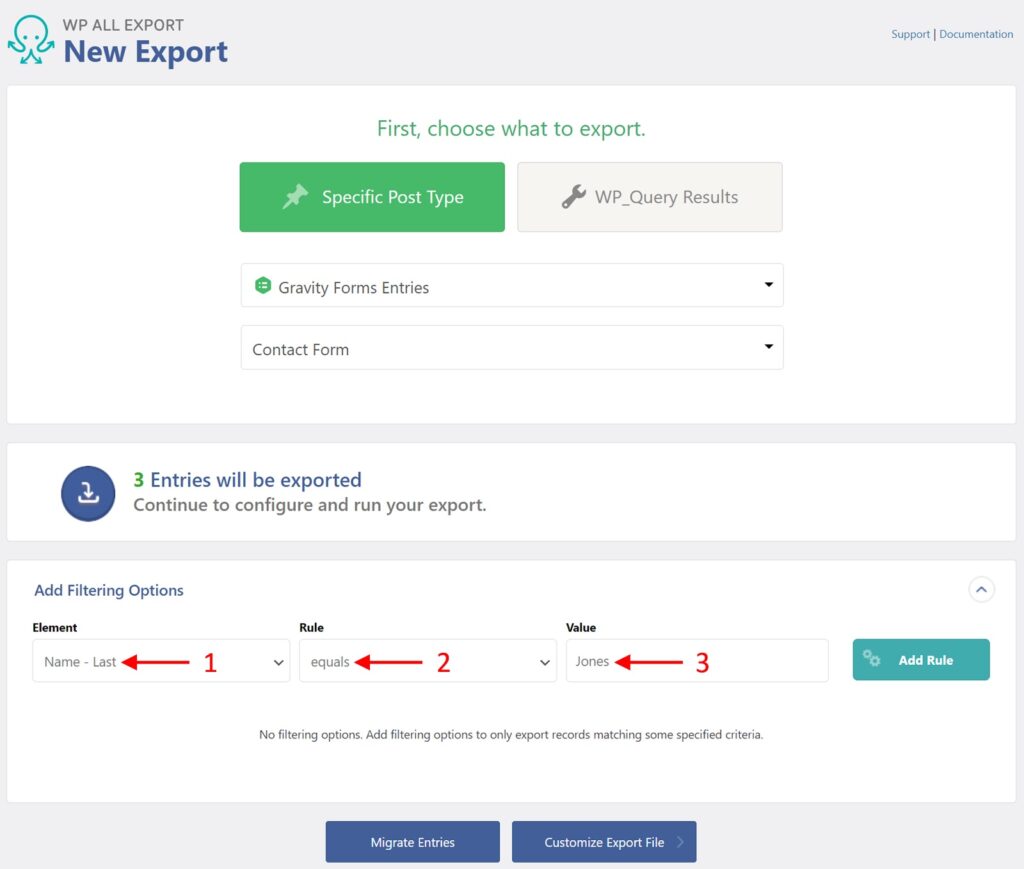
- An Element, in this case, the Name – Last field.
- A Rule, in this case, equals.
- A Value, in this case, Jones.
In plain English, this simply means to export all Contact Form entries with the last name of “Jones”. When you’ve provided all three rule components, click the Add Rule button.
What if you want a slightly more complex filter, such as exporting all the Contract Form entries with the last name of either “Jones” or “Wilkes”? Just add another rule. But as you do so, make sure that you select the OR operator: 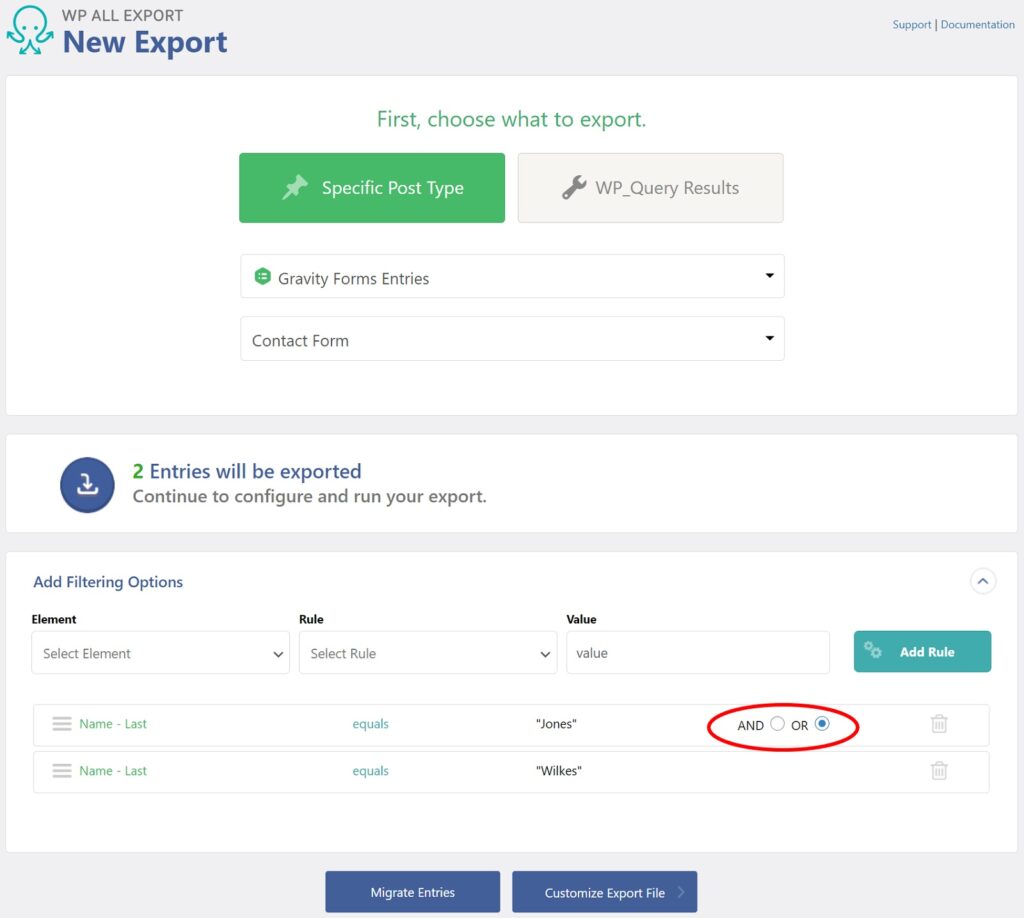
What if you were looking for two specific individuals? This is where this plugin begins to truly separate itself from its competitors. All you do is add two sets of conditions and indent the second set like this: 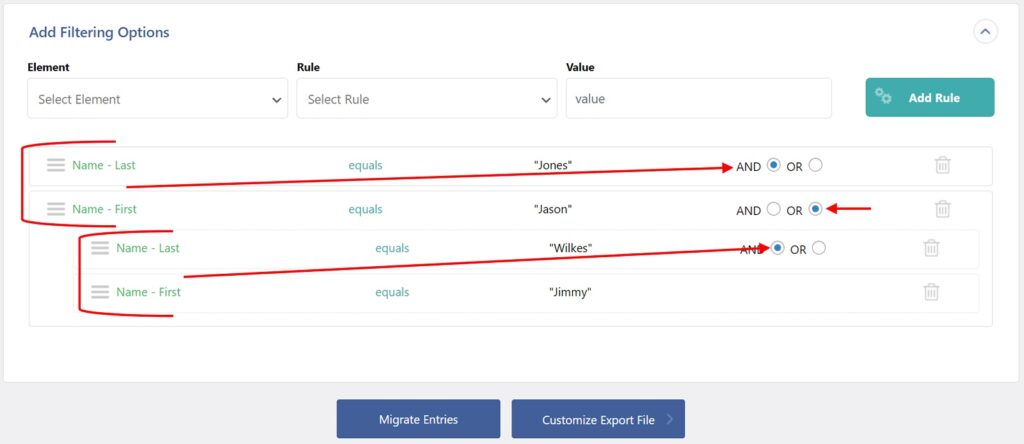
The same situation exists for the second set of rules that filters for “Jimmy Wilkes”. But since you are looking for either person, the two sets of filters must be joined with an OR operator. Indentation is equivalent to the use of parentheses, so this query could actually be written as: (Name – Last = “Jones” AND Name – First = “Jason”) OR (Name – Last = “Wilkes” AND Name – First = “Jimmy”). You may not need this kind of powerful filtering capability often, but when you do, you’ll be glad you have it.
How to Modify Gravity Forms Entries While Exporting Them
When exporting data from WordPress, you will sometimes need to alter it. This is often the case when you are exporting data to synchronize it with an external system.
WP All Export lets you modify export data in multiple ways in the Drag & Drop screen. First, you can just double-click a column in the column selection area and rename it. In this example, we have renamed the Name – Last field to become Last Name: 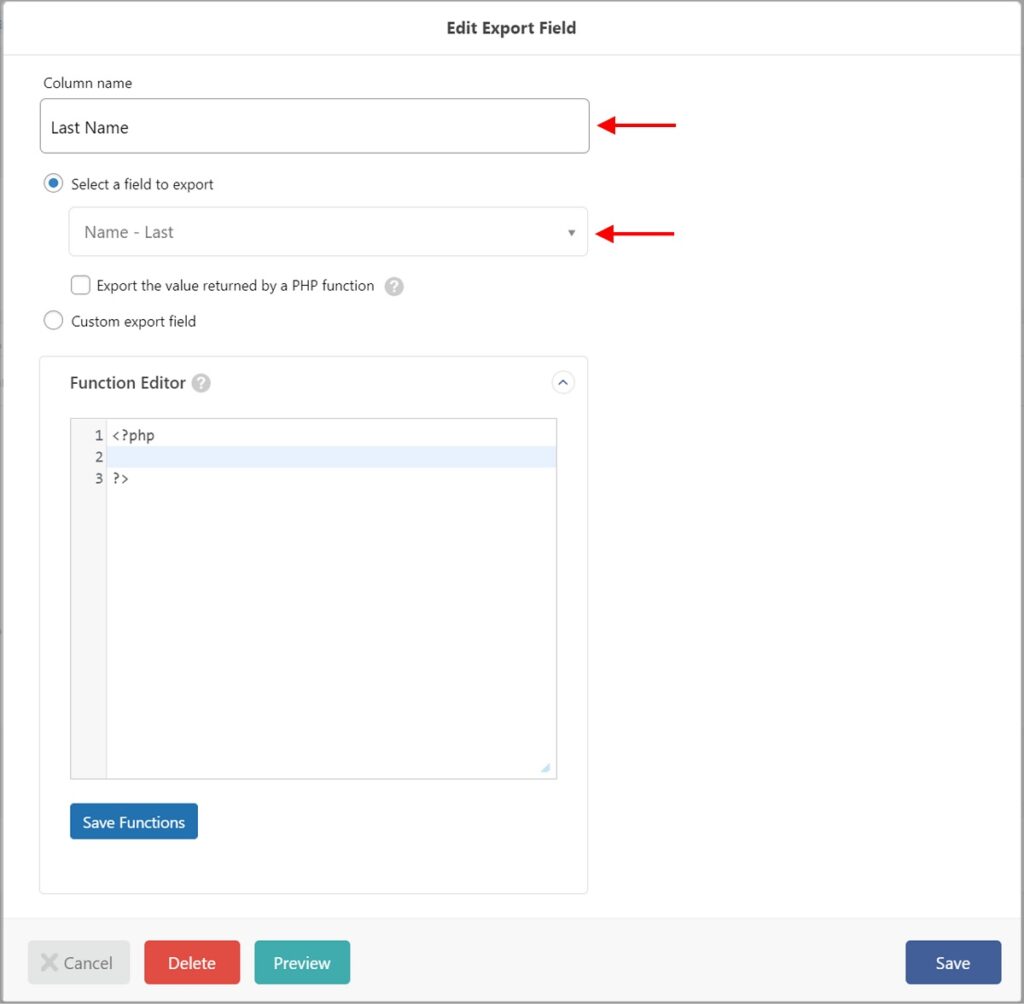
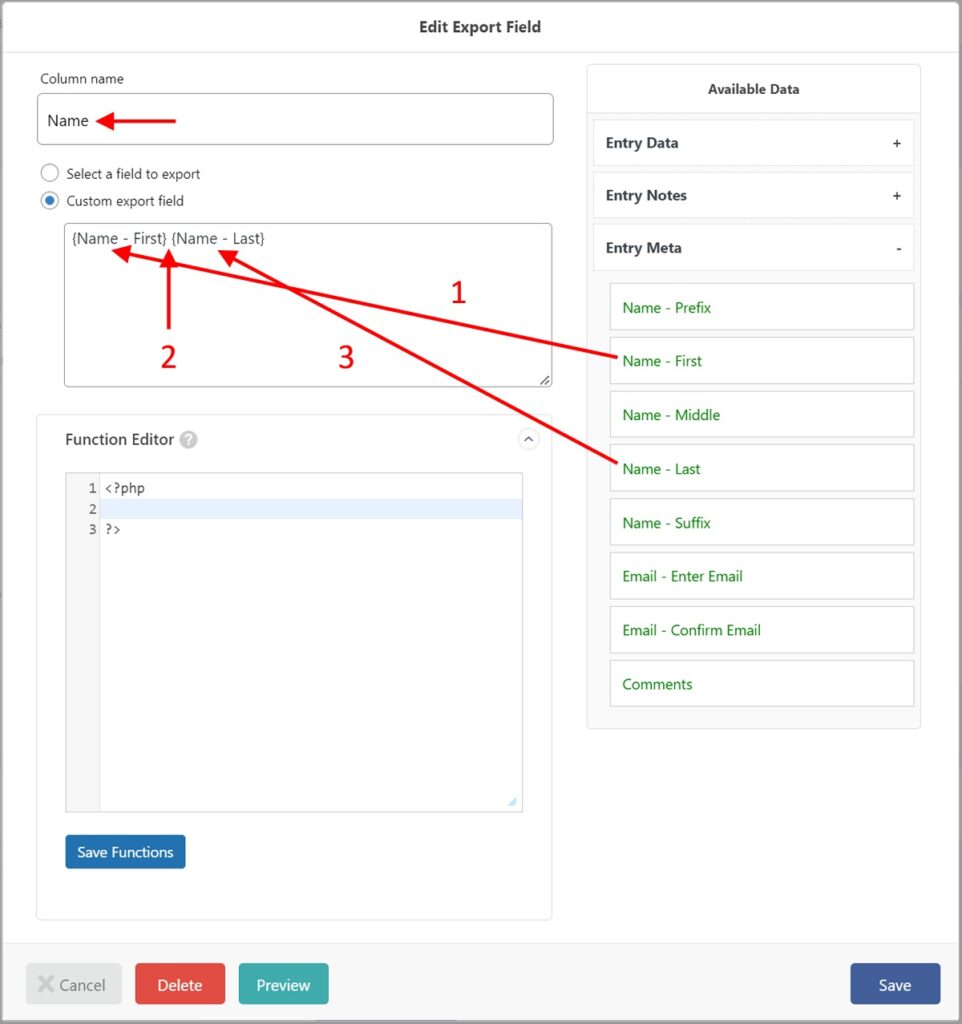
- The Name – First field.
- A space.
- The Name – Last field.
Finally, you can incorporate programming logic into custom fields by using the Function Editor in the lower section of the screen. A full description of this is beyond the scope of this article, but the main point is that you can create fields of arbitrary complexity, including conditional logic (i.e., if this, then A, else B). This makes it possible to always achieve the output you want, no matter how difficult or challenging. For a complete understanding of this capability, see How to Pass Exported WordPress Data Through PHP Functions.
How to Schedule Exports for Gravity Forms Entries
WP All Export offers two scheduling options:
- manual scheduling by setting up cron jobs on your server
- automatic scheduling by signing up for an Automatic Scheduling service and setting your schedule through the plugin’s interface
We’re going to focus on automatic scheduling, which you can access in the Export Settings screen: 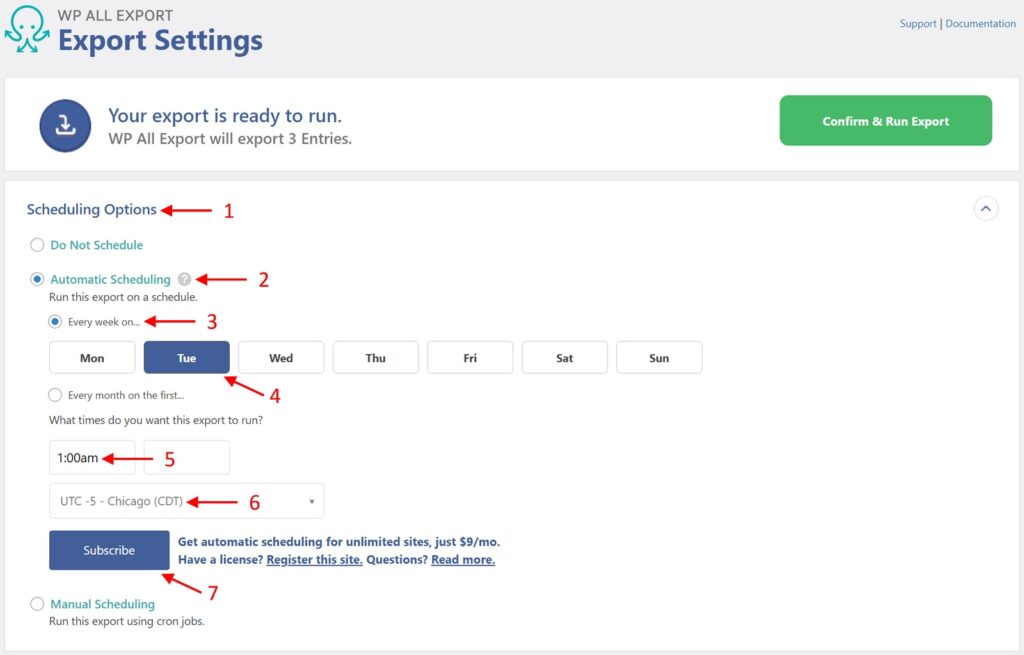
- Expand the Scheduling Options panel.
- Select Automatic Scheduling.
- Choose the Every week on… option.
- Select the day of the week on which you want the export to run.
- Choose the time(s) when you want the report to run.
- Select the applicable time zone.
- Make sure you subscribe to the Automatic Scheduling service, which is required to make this type of scheduling work.
As you can see, this type of scheduling process is quite intuitive. To schedule exports using cron jobs on your server, please see Scheduling WordPress Exports Using Cron Jobs.
How to Integrate Your Exported Gravity Forms Entries with External Applications
One of the main reasons that users schedule exports is to regularly update external systems, such as updating marketing platforms with users who have filled out a Gravity Form. The scheduled export will generate the necessary export file.
The question is, how do you get that file to the external system? Enter Zapier — a leading integration platform that acts as a middleman between WP All Export and thousands of external applications. We’re not going to cover the details of using Zapier because there are articles dedicated solely to that, which we’ll share. But we do want to give you an overview of the required process, as follows:
- Set up a scheduled export of Gravity Forms entries.
- Create a Zapier Zap. A Zap is basically a configuration involving a trigger and one or more actions.
- In the Zap, identify WP All Export as the trigger app, and then select New Export File as the trigger event. You can set filters to make sure that the Zap only runs for a specific type of export.
- Create an action, such as copying the export file to a designated Google Drive or Dropbox location.
- Create a process on the external system to retrieve the export file and process it. If the external system is compatible with Zapier, you can use Zapier to handle that part of the process, too.
As you can see, this is a very powerful tool. For additional information, see How to Send Exported WordPress Data to Zapier.
Frequently Asked Questions About Exporting Gravity Forms Entries
How Do I Export Gravity Forms Entries to Excel?
You can export Gravity Forms entries to Excel simply by changing the Export Type to either Excel (XLS) or Excel (XLSX), depending of the version of Excel that you desire. When the export is complete, make sure you download the specific file type option and not the Bundle file.
Where are Gravity Forms entries stored?
Gravity Forms entries are stored in custom tables in your WordPress database. For detailed information on these tables, please see the official database structure.
How to Export Gravity Forms entries to another website?
You can export Gravity Forms entries to another site by performing what we call a migration. This involves exporting the Gravity Forms entries from the source site, downloading the Bundle file from this export, then uploading the Bundle file on the destination site. Because the Bundle file contains an import template, WP All Import will automatically configure the import portion of the process.
Your Options to Import Gravity Forms Entries
The three main options for importing entries are the same ones used for exports. They also have similar strengths and weaknesses, namely:
- Gravity Forms built-in import capabilities: good for quick, simple import tasks using CSV files only.
- GravityImport plugin from Gravitykit: a $99-a-year solution that offers some improvements over the built-in tool, such as the ability to create a new form during import or to set up an email notification for each imported entry. It is also limited to CSV import files.
- WP All Import’s Gravity Forms Import Package, which sells for $149 lifetime (or $199 if you want both import and export capabilities). As with its export counterpart, this plugin lets you do pretty much anything you want when importing entries, along with a much broader toolset for importing WordPress posts, pages, taxonomies, custom post types and fields, etc.
Again, we’ll use the WP All Import option for our walkthrough, as it allows us to perform all required tasks. To create an import file, just perform an export of all Gravity Forms entries for the Contact Form.
How to Import Gravity Forms Entries
Import Entries Step 1: Create a New Import
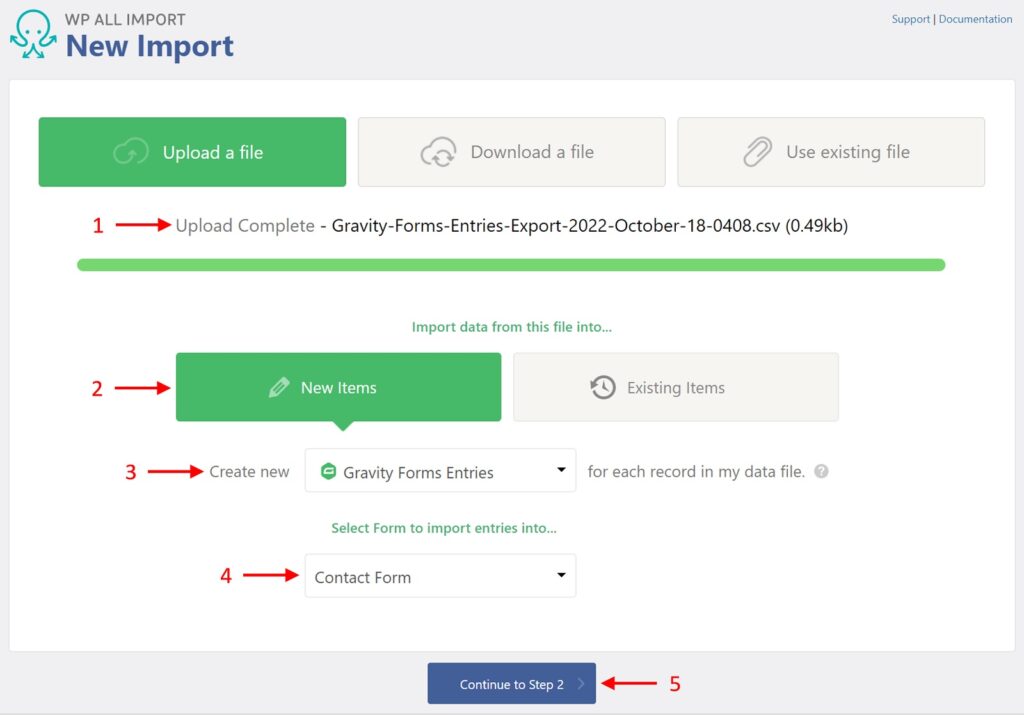
Go to All Import > New Import:
- Select your data loading method. In this case, we have chosen to upload a file, and then we specified that file. You can also import data from a URL or use a file that has already been uploaded to your server.Choose New Items.Select Gravity Forms Entries as your Create new type.Choose Contact Form as the import target form.Click Continue to Step 2.
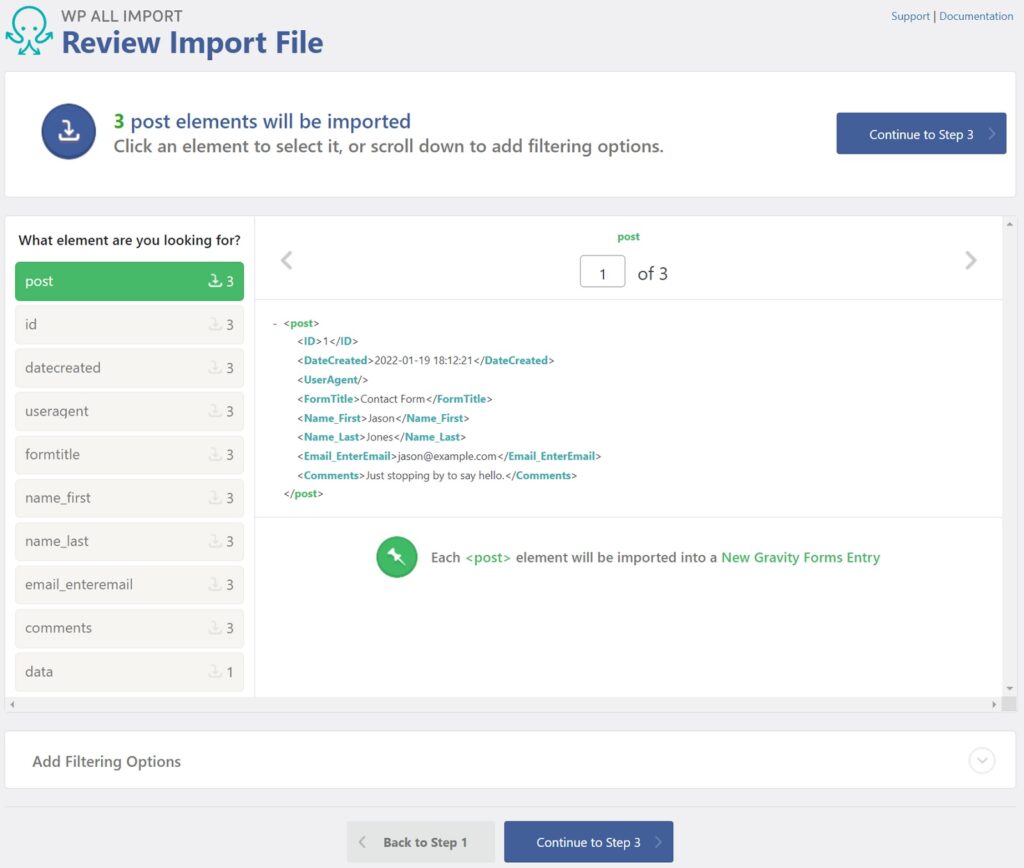
Import Entries Step 2: Review the Import File
The Review Import Data screen will appear: 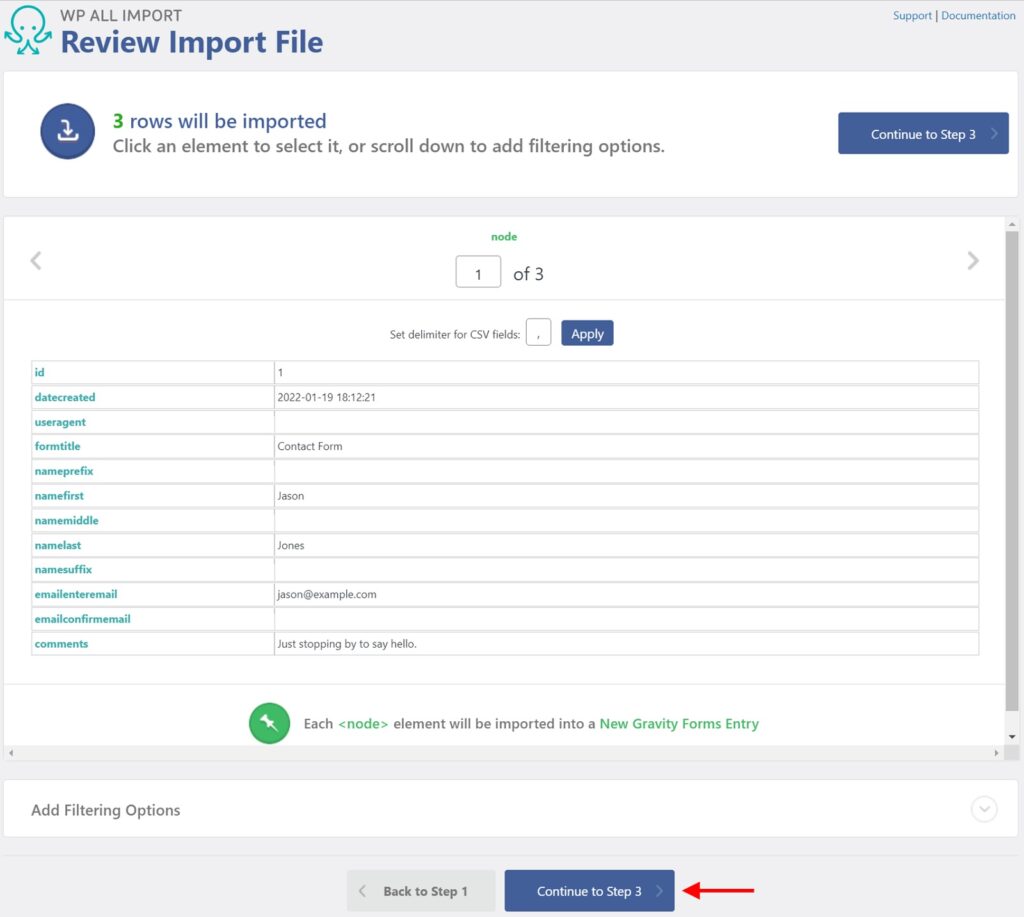
You can also filter your import in this screen by expanding the Add Filtering Options section. This gives you access to the same tool used in the export filter example, which means you have complete flexibility to filter out any entries that you don’t want to import. When you’ve completed your review, click Continue to Step 3.
Import Entries Step 3: Map Incoming Data Elements to Their Target Form Fields
The Drag & Drop screen lets you map incoming data elements to their target form fields: 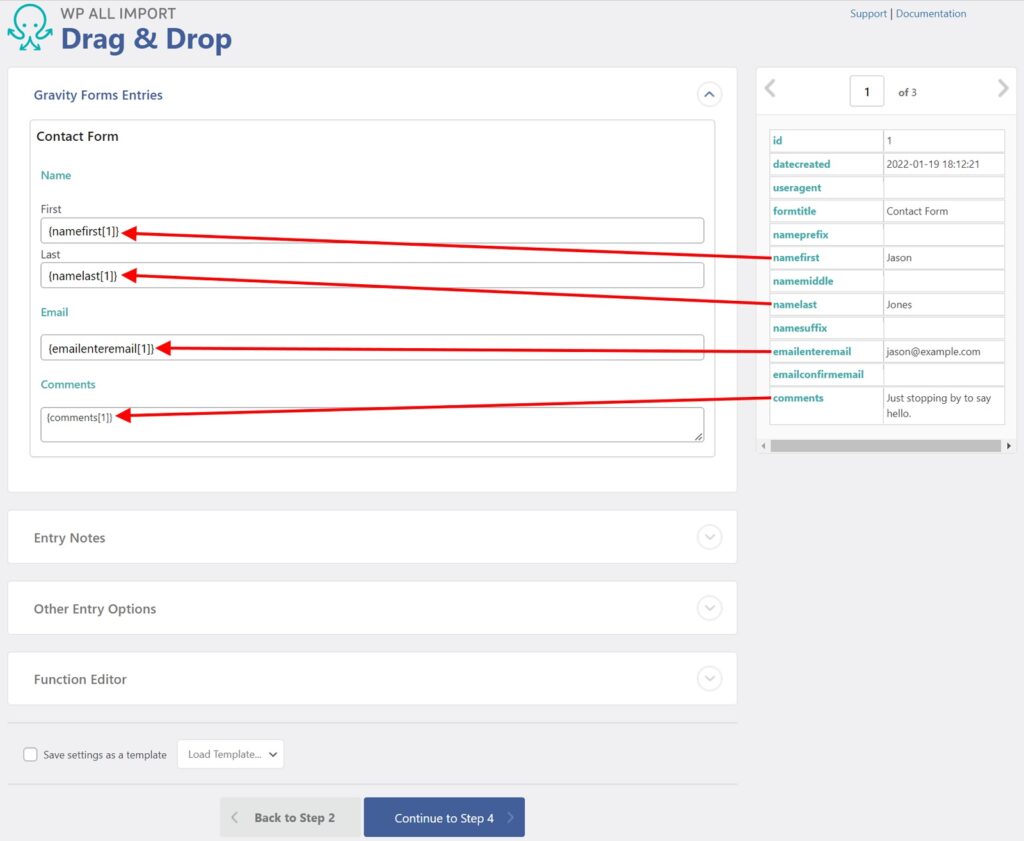
A form’s main fields are contained in the Gravity Forms Entries section at the top. However, there are other fields that you can target. These are contained in the Entry Notes and Other Entry Options sections, which you can expand and populate as needed. Click Continue to Step 4.
Import Entries Step 4: Import Settings
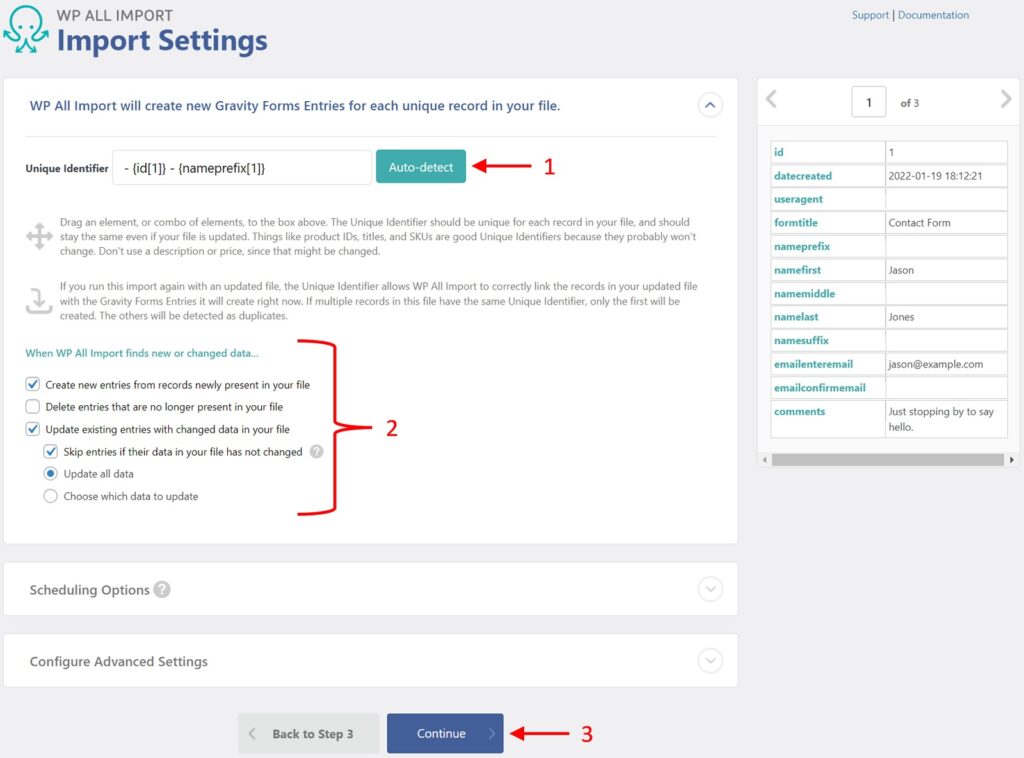
The Import Settings screen allows you to control important settings:
- Click the Auto-detect button. This identifies the field or combination of fields that makes each incoming record unique. This is especially important for checking whether existing records already have the same unique identifier, which allows the plugin to determine whether it is dealing with a new entry or an update to an existing entry.This group of options helps WP All Import decide how to handle new or missing records, as well as how to update existing records. The options should be self-explanatory.Click Continue.
Import Entries Step 5: Confirm & Run
The Confirm & Run screen allows you to review your import prior to running it: 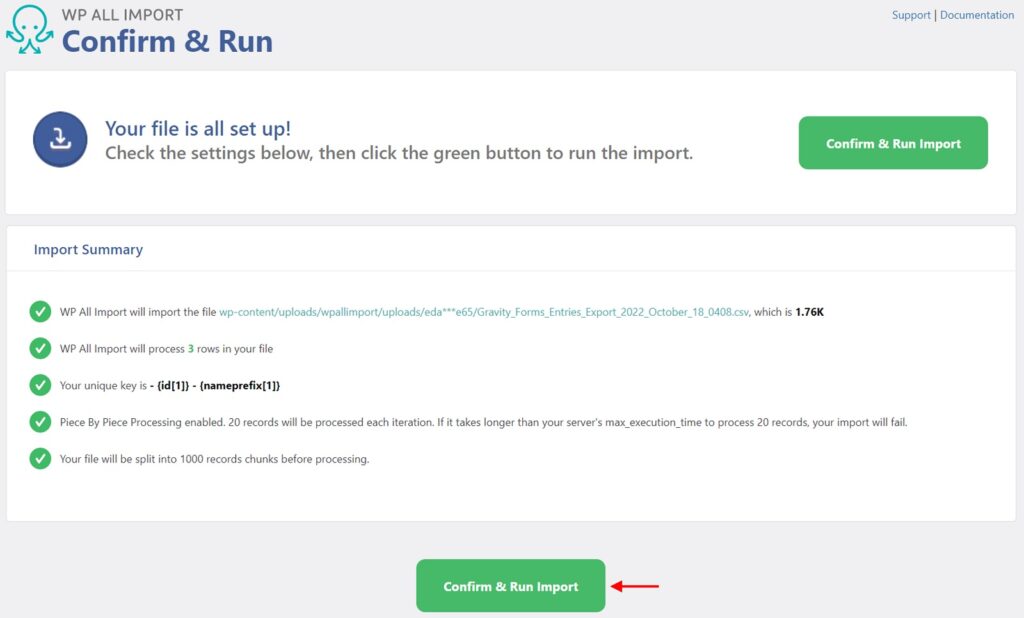
If something does need to be changed, you can click the Go Back to Step 4 link (not shown) below the Confirm & Run Import button at the bottom. If everything is okay, click that button. WP All Import will now process your import. When the import is complete, you will see this type of confirmation screen: 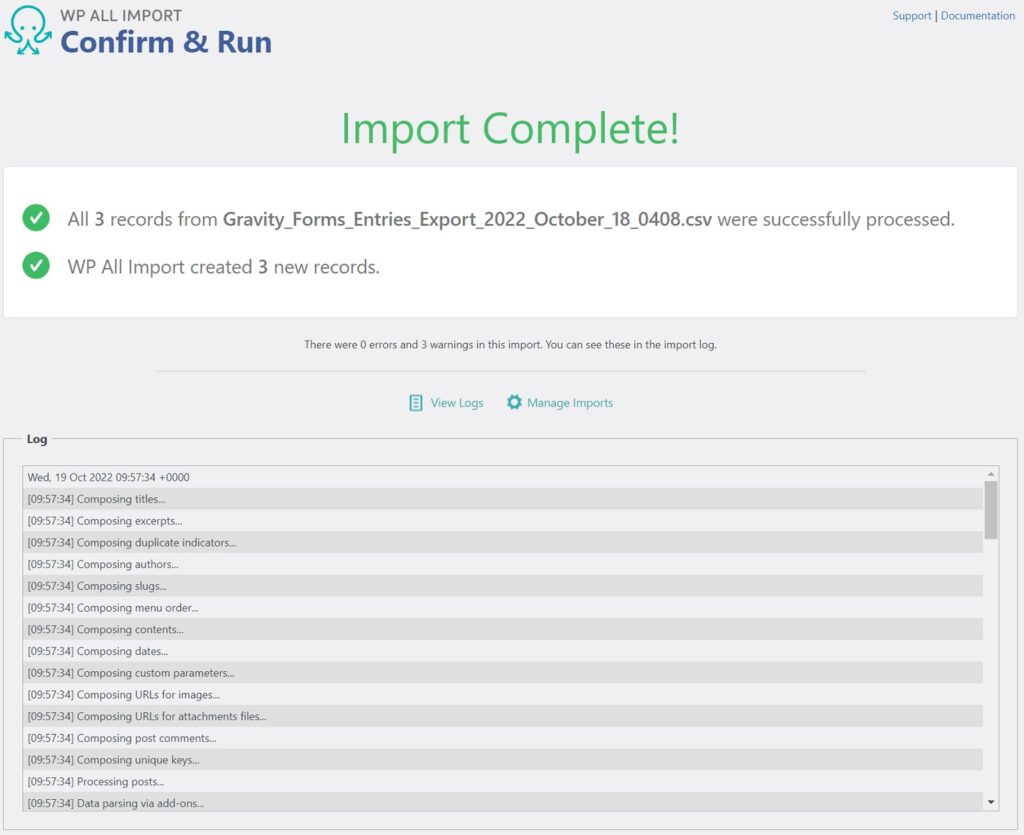
How to Handle Different Import File Types
As with the export process, you can import data using different file types. To do this, simply load the data in question, in this case, an XML file: 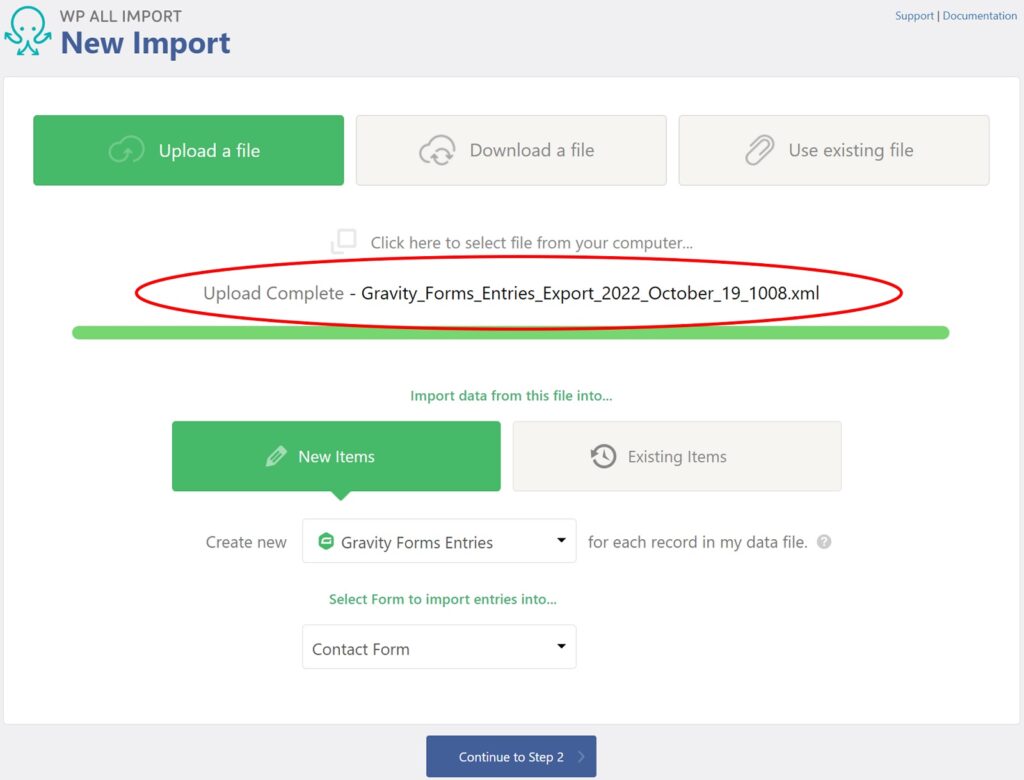

How to Create an Import Filter
The basic mechanics of the import filter are the same as for the export filter, so we won’t repeat those here. For a refresher, see How to Create an Export Filter.
One difference is that the Add Filtering Options section is in the lower half of the Review Import File screen, not the New Import screen.
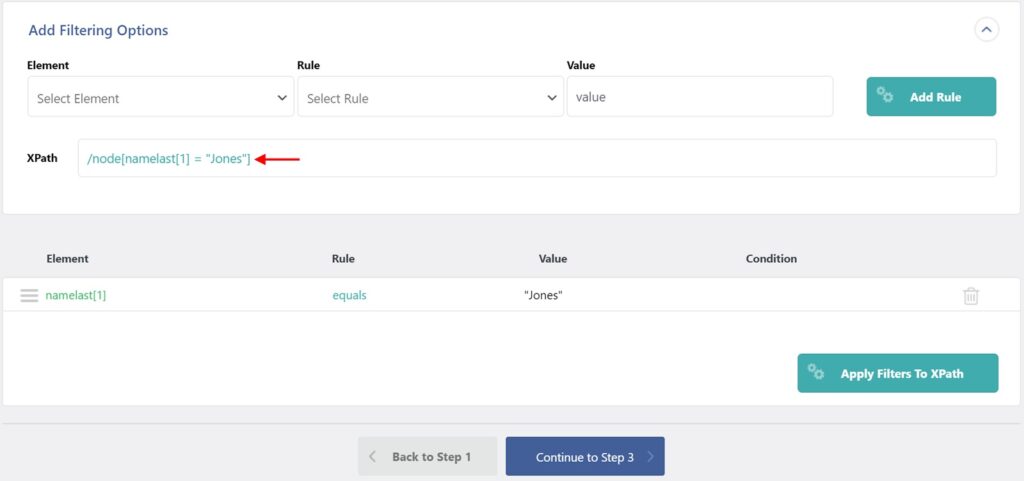
Another, more important difference is that the import filter has to be applied to data outside the WP database. To do this, it uses XPath, which is a language used to address parts of an XML document. As part of this process, the filter rules you create go into a temporary XPath holding area before being applied to the incoming data: 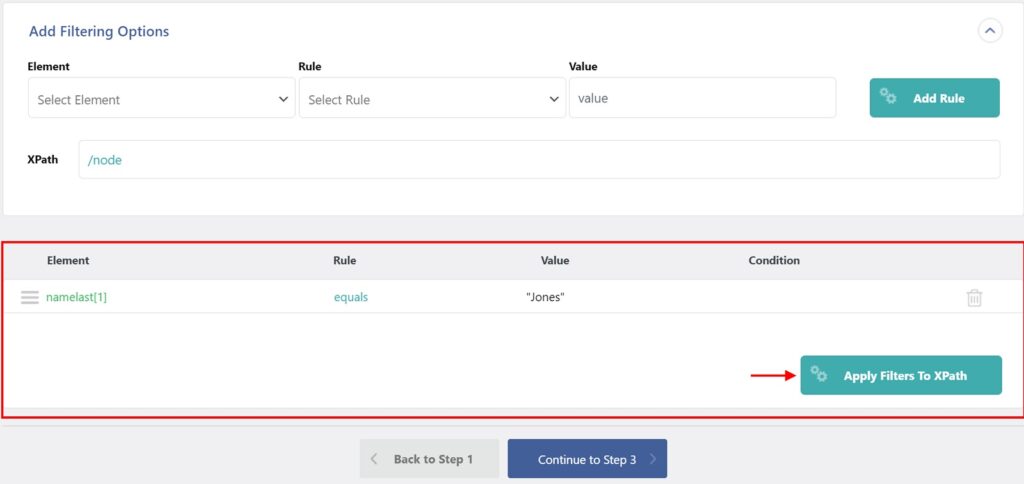
How to Modify Gravity Forms Entries While Importing Them
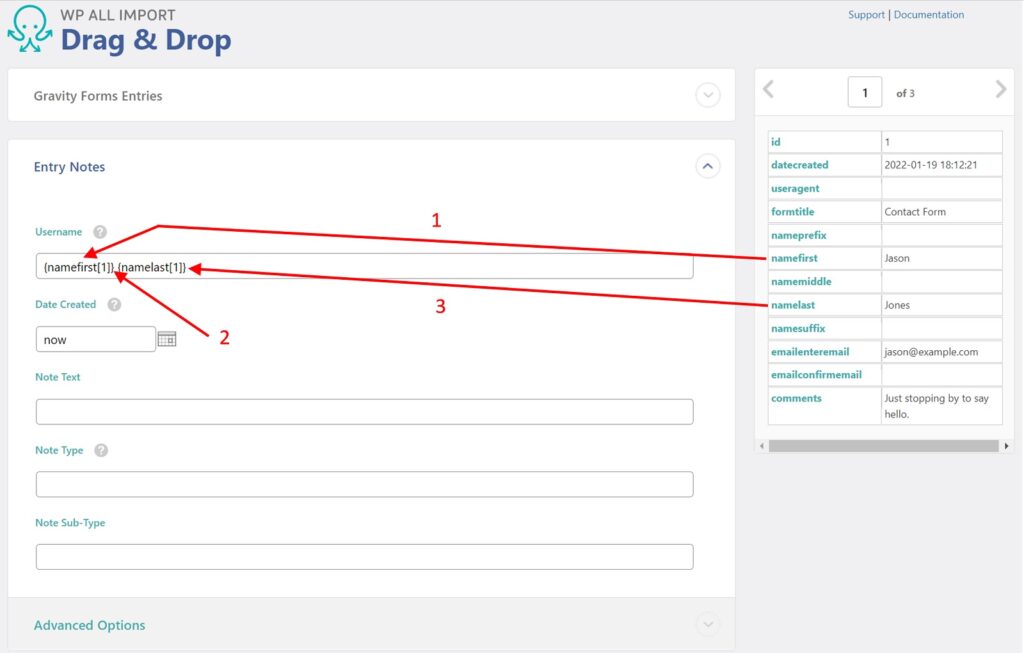
The basic principles of modifying entries during an import are the same as during an export (see How to Modify Gravity Forms Entries While Exporting Them). The mechanisms are just slightly less formal. For example, say that you wanted to combine the incoming first and last names into a single name field for some reason. To do this, you don’t have to click any options to open up additional edit fields. Instead, just drag the incoming elements where you want them:
- Drag the namefirst data element into the Username field.
- Enter a space.
- Drag the namelast data element into the Username field.
Put another way, every form field can be treated like a custom import field.
The same is true for incorporating PHP functions. First, you can use any native PHP function directly in a form field. For example, say your incoming data includes honorific prefixes in the namefirst field, and you want to strip these out. You could use a function like this… [str_replace(array(‘Mr.’, ‘Ms.’), “”, {namefirst[1]})] …in the target field: 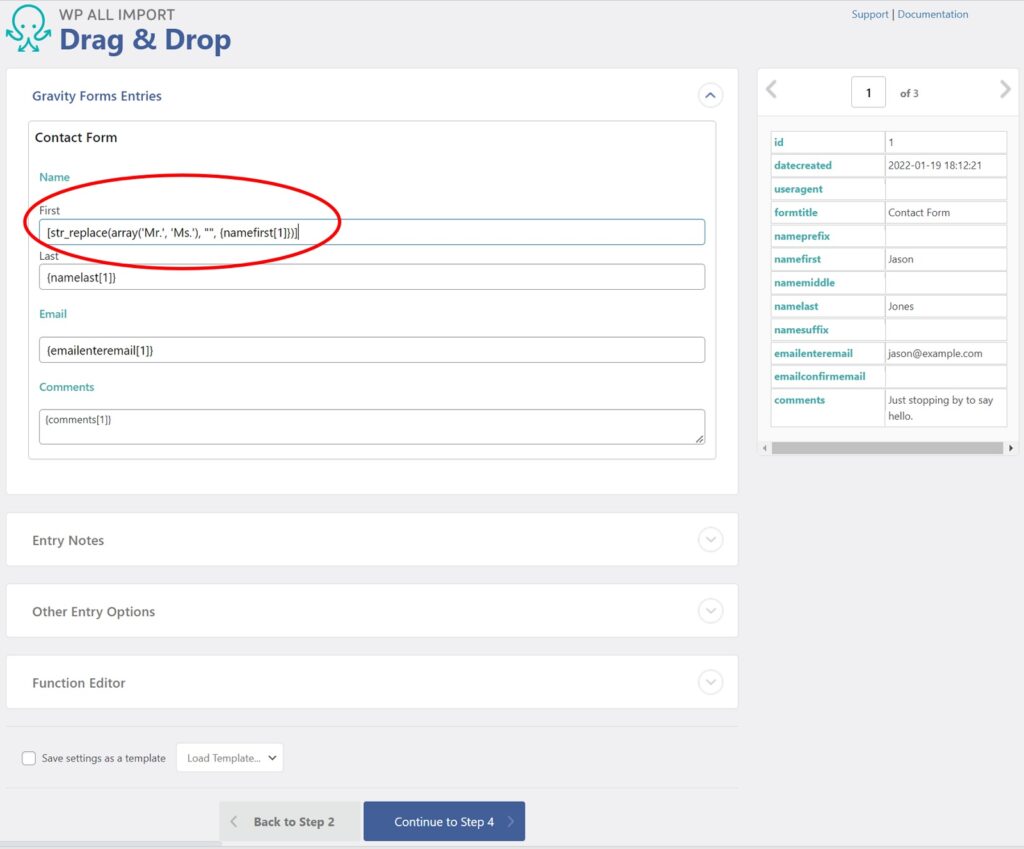
How to Schedule Imports of Gravity Forms Entries
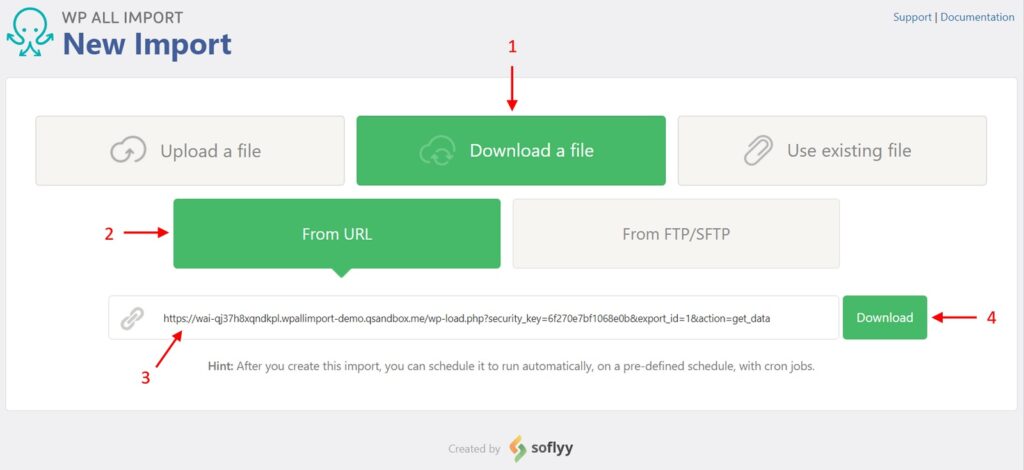
In order to schedule an import, you must choose the Download a File > From URL or the Existing File option in the New Import screen. For example, here is a new import using the From URL option:
- Select Download a File.
- Choose From URL.
- Provide the URL that supplies the data.
- Click the Download button.
Other than this requirement, the scheduling process for importing entries is exactly the same as described in How to Schedule Exports for Gravity Forms Entries, with one additional exception. In order for a scheduled import to achieve the desired result, you need to ensure that the data export feeding it (presumably from an external system) completes before your import starts.
Related Information
Export Gravity Forms Entries – Plugin Description
Import Gravity Forms Entries – Plugin Description
Official Documentation: How to Export Gravity Forms EntriesOfficial Documentation: How to Import Gravity Forms Entries
Official Documentation: How to Migrate Gravity Forms Entries

